manuals.online logo
Brands
  1. Home
  2. •
  3. Brands
  4. •
  5. Welbilt
  6. •
  7. Grinder
  8. •
  9. Welbilt 139276 User manual

Welbilt 139276 User manual

1/4in. AIR ANGLE DIE GRINDER
USER'S MANUAL
WARNING:
Read carefully andunderstand all INSTRUCTIONSbefore operating. Failureto follow
the safety rulesand other basic safety precautions mayresult in serious personalinjury.
Item# 139276
6 of 6
WARNING
Some dust createdby power sanding,sawing, grinding, drilling,and other construction
activities contains chemicalsknown to theState of Californiato cause cancer, birth
defects or otherreproductive harm. Someexamples of thesechemicals are:
lead from lead-basedpaints,
crystalline silica frombricks and cementand other masonryproducts, and
arsenic and chromiumfrom chemically treatedlumber.
Yourrisk from theseexposures varies, dependingon how oftenyou do thistype of work.
Toreduce your exposureto these chemicals:work in awell-ventilated area, andwork with
approved safety equipment,such as thosedust masks thatare specially designedto filter
out microscopic particles.
Distributed by
Northern Tool +Equipment Co.,Inc.
2800 SouthcrossDrive West
Burnsville, MN5337-0499
Made inChina.
4 of 6
7.With afirm grip onthe Die Grinder, lightly applythe Grinding drumto the workpiece,
slowly and steadilymoving the grindingdrum to theright and leftuntil you haveachieved
the desired appearance(finish) on theworkpiece.
8.Once thework is completed,release hand pressureon the trigger, the safetywill
automatically return toits locked positionto prevent thetrigger from accidentallybeing
activated.
9.Turnoff theair compressor.Trip thesafety with yourfinger, andslowly squeeze the
trigger to releaseany remaining airpressure from thedie grinder.Then disconnectthe air
hose from thetool.
10.Remove thegrinding drum fromthe Die Grinder. Thenstore the toolin a clean,dry
location out ofreach of childrenand untrained operators.
INSPECTION, MAINTENANCEAND CLEANING
1.Always makesure the triggeris in its"OFF" position, anddisconnect the DieGrinder
from its compressedair supply beforeperforming any inspection,adjustments,
maintenance, or cleaning.
2.Before eachuse, inspect thegeneral condition ofthe Die Grinder. Check forloose
screws, misalignment orbinding of movingparts, cracked orbroken parts, damagedair
hose, and anyother condition thatmay affectits safe operation.If abnormal noiseor
vibration occurs, havethe problem correctedbefore further use.Do not usedamaged
equipment.
3.Daily: Witha clean cloth,remove all dirt,oil, and greasefrom the DieGrinder. If
necessary,you may usea mild detergent.Do not usesolvents, as damagedto the Die
Grinder may occur. Do notimmerse the DieGrinder in anyliquids.
PARTSLIST
Description
Part#
1
2
3
4
5
6
7
8
9
10
11
12
13
14
15
1
1
1
1
1
1
1
1
1
1
Qty.
1
1
Air Inlet
Muffle Cover
Housing
Valve Plug
O-ring
O-ring
Air Regulator
Spring
O-ring
Valve Stem
O-ring
Steel Ball
Valve Busing
Pin
Trigger
1
1
1
Description
Part# Qty.
19
20
21
1
23
22
24
25
26
27
28
29
30
1
1
1
4
1
1
16
17
18
1
2
Bearing
End Plate
Pin
Rotor Blade
Rotor
Cylinder
Front Plate
Bearing
Washer
Collet Holder
Retainer
Housing Cap
Collet
Cap
Wrench
1
1
1
1
1
2
1 of 6
For technical questionsand replacement parts,please call1-800-222-5381.
Thank you verymuch for choosinga Wel-Bilt , Product! Forfuture reference, please
complete the owner'srecord below:
Model: _______________ PurchaseDate: _______________
Save the receipt,warranty and theseinstructions. It isimportant that youread the entire
manual to becomefamiliar with thisproduct before usingit.
This machine isdesigned for certainapplications only. Thedistributor strongly
recommends that thismachine is notmodified and/or usedfor any applicationother than
that for whichit was designed.If you haveany questions relativeto a particular
application, DO NOTuse the machineuntil you havefirst contacted NorthernTool +
Equipment to determineif it canor should beperformed on theproduct.
Before using thisproduct, please readthe following instructionscarefully.
TECHNICAL SPECIFICATIONS
SAVETHIS MANUAL
Youwill need thismanual for thesafety warnings andprecautions, assembly, operating,
inspection, maintenance andcleaning procedures, partslist and assemblydiagram. Keep
this manual andinvoice in asafe and dryplace for futurereference.
GENERAL SAFETYRULES
Read and understandall instructions.
Failure to followall instructions listedin the followingpages may resultin electric shock,
fire, and/or seriousinjury.
WORK AREA
1.Keep yourwork area cleanand well lit.Cluttered benches anddark areas invite
accidents.
2.Do notoperate pneumatic toolsin explosive atmospheres,such as inthe
presence of flammableliquids, gases, ordust. Pneumatic tools createsparks which
may ignite flammables.
3.Keep bystanders,children and petsaway while operatinga pneumatic tool.
Distractions can causeyou to losecontrol. Protect othersin the workarea from debris
such as metalfilings and sparks.Provide barriers orshields as needed.
Item Description DescriptionItem
Collet Capacity
Rated Speed
Max. Air Pressure
Air Consumption
Air Inlet Diameter
Min. Hose Size
Accessories
1/4in.
22,000 RPM
90 PSI Recommended
5 CFM
1/4in.- 18NPT
3/8in.
Collet nut wrenches (2pcs.)
TM
5 of 6
DIAGRAM
3 of 6
4.Always disconnectthe Die Grinderfrom its compressedair supply source,and squeeze
the trigger torelease all compressedair in thetool before performingany maintenance or
service.
5.The warnings,precautions, and instructionsdiscussed in thismanual cannot coverall
possible conditions andsituations that mayoccur.The operator mustunderstand that
common sense andcaution are factorswhich cannot bebuilt into thisproduct, but must
be supplied bythe operator.
ASSEMBLYAND OPERATING INSTRUCTIONS
TO ATTACHA QUICKCONNECTOR
WARNING!Prior to performingany assembly and/oradjustment procedures,
make sure theair supply hose(not included) isdisconnected from theDie Grinder.
1.Prior touse, the DieGrinder requires theattachment of aquick-connector into itsair
inlet. To do so,wrap approximately 3in.of pipe threadsealer tape (notincluded) around
the male threadsof a quick-connector. Then,firmly tighten thequick-connector into the
air inlet.
TO OPERATE ASA1/4IN. DIEGRINDER:
1.Always wearANSI-approved safetyglasses, a fullface shield, andhearing
protection when operatingthe tool.
2.Use thetwo wrenches providedto loosen thecollet nut.
3.Insert the1/4in. diameter shankof a grindingdrum (not included)fully into thecollet.
Then, firmly re-tightenthe collet nutto lock boththe collet andgrinding drum inplace.
4.Connect theair supply hoseto the quick-connectoron the DieGrinder.Turn onthe air
compressor, andset its regulatorto the recommended90 PSI forthe Die Grinder.
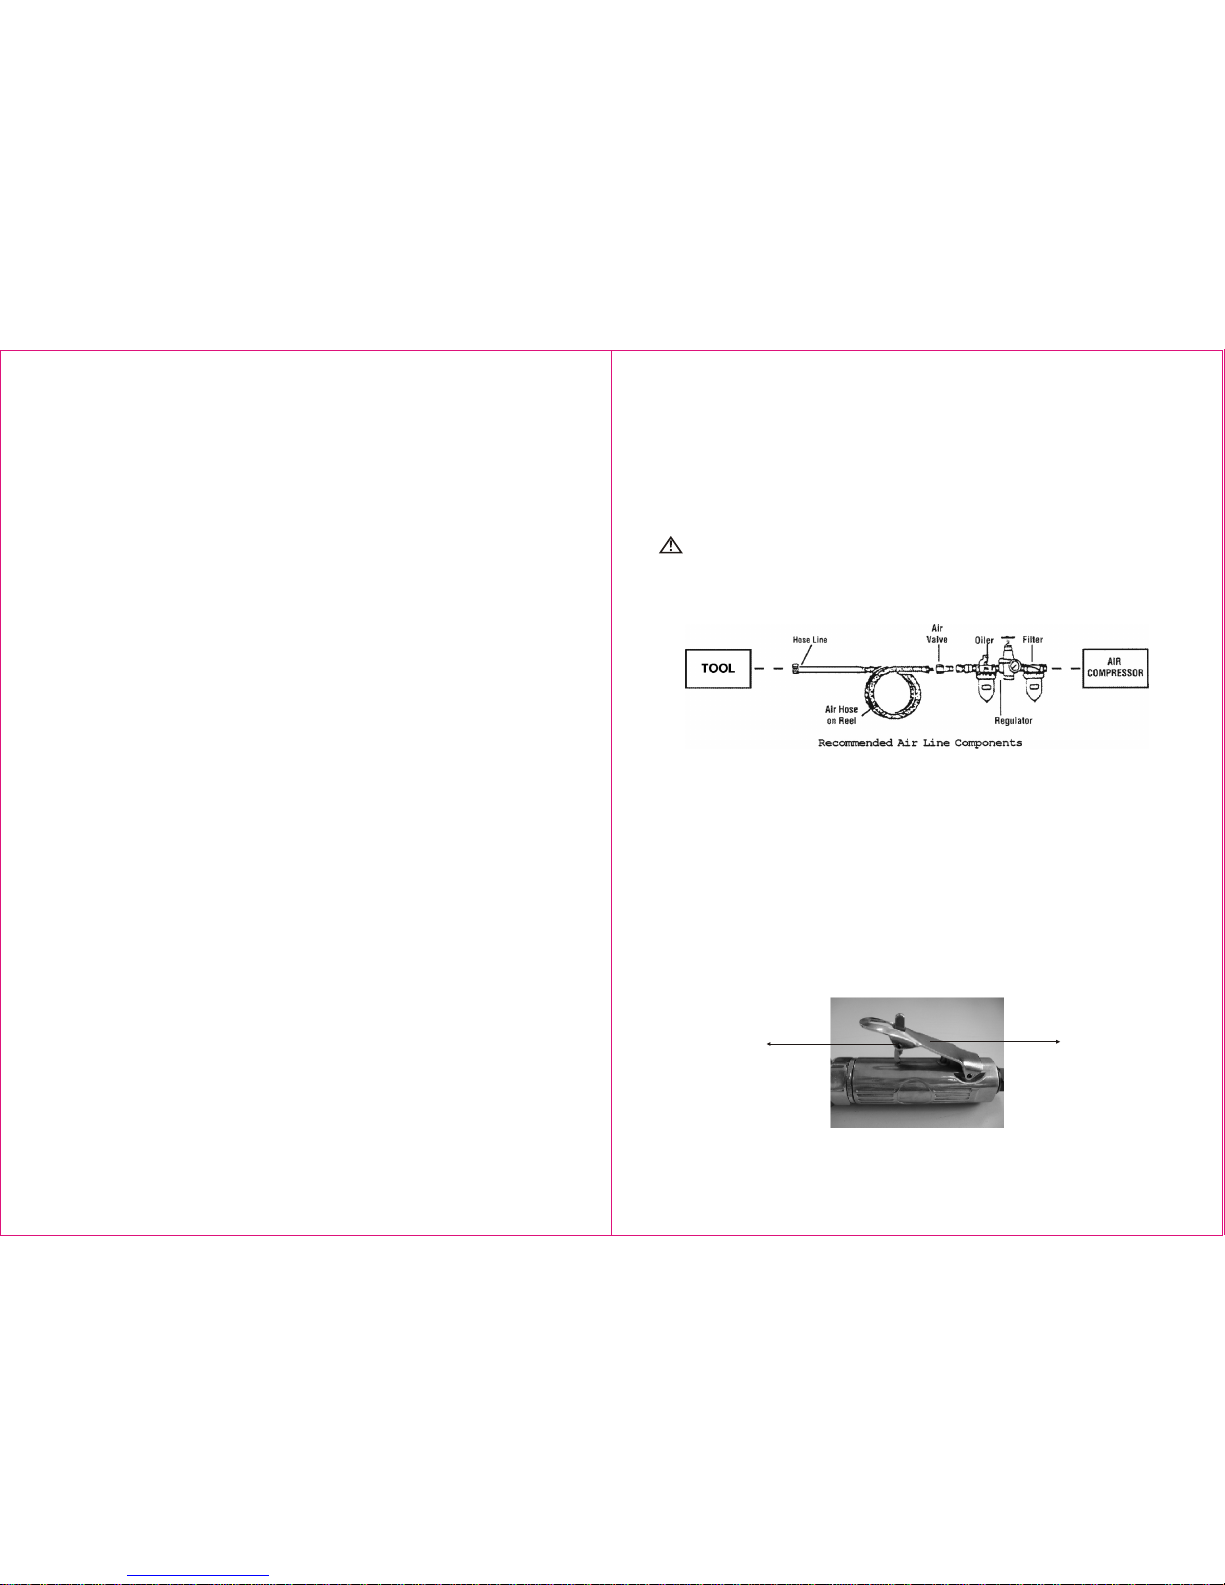
5.IMPORTANT! Grip the appliancefirmly with BOTHhands.
6.Tripthe safety withyour finger.Then slowlyapply hand pressureto the triggeruntil the
desired speed isobtained. NOTE: The toolalways turns theGrinding Drum/Drill
Chuck clockwise. (Seefig. 2)
Fig. 1
Fig. 2
SAFETY TRIGGER
2 of 6
PERSONAL SAFETY
1.Stay alert.Watch whatyou are doing,and use commonsense when operatinga
pneumatic tool. Donot use apneumatic tool whiletired or underthe influence ofdrugs,
alcohol, or medication.Amoment of inattentionwhile operating pneumatictools may
result in seriouspersonal injury.
2.Dress properly. Do not wearloose clothing orjewelry.Keep your hair, clothing, and
gloves away frommoving parts. Looseclothes, jewelry, or longhair can becaught in
moving parts.
3.Avoidaccidental starting.Be sure thetrigger is off before connectingto the airsupply.
Carrying pneumatic toolswith your fingeron the trigger, or connectingpneumatic tools to
the air supplywith the triggeron, invites accidents.
4.Remove adjustingkeys or wrenchesbefore turning onthe tool.Awrench or akey
that is leftattached to arotating part ofthe tool mayresult in personalinjury.
5.Do notoverreach. Keep proper footingand balance atall times. Properfooting and
balance enables bettercontrol of thetool in unexpectedsituations.
6.Use safetyequipment. Always wearANSI-approved safetyglasses underneath afull
face shield, andhearing protection.
USE ANDCARE
1.Use clampsor other practicalways to secureand support theworkpiece to astable
platform. Holding thework by handis unstable andmay lead toloss of control.Only work
on a workpiecethat is properlysecured.
2.Do notforce the tool.Use the correcttool for yourapplication. Thecorrect tool willdo
the job betterand safer atthe rate forwhich it isdesigned.
3.Do notuse the powertool if thetrigger does notturn it onor off.Any toolthat cannot be
controlled with thetrigger is dangerousand must bereplaced.
4.Disconnect theair hose fromthe tool beforemaking any adjustments,changing
accessories, or storingthe tool. Suchpreventive safety measuresreduce the riskof
starting the toolaccidentally.
5.Store idletools out ofreach of childrenand other untrainedpersons. Tools are
dangerous in thehands of untrainedusers.
6.Maintain toolswith care. Donot use adamaged tool.Tagdamaged tools "Donot use"
until repaired.
7.Check formisalignment or bindingof moving parts,breakages of parts,damaged air
hose (not included),and any othercondition that mayaffect thetool's operation. If
damaged, have thetool serviced beforeusing. Many accidentsare caused bypoorly
maintained tools.
8.Use onlyaccessories that arerecommended by themanufacturer for yourmodel.
Accessories that maybe suitable forone tool maybecome hazardous whenused on
another tool.
SERVICE
1.Tool service mustbe performed onlyby qualified repairpersonnel. Service or
maintenance performed byunqualified personnel couldresult in arisk of injury.
2.When servicinga tool, useonly identical replacementparts. Follow instructionsin the
"Inspection, Maintenance andCleaning" section ofthis manual. Useof unauthorized
parts or failureto follow maintenanceinstructions may createa risk ofinjury.
SPECIFIC SAFETYRULES
1.To avoid accidentalinjury,always wearANSI-approved safety glasses,a full faceshield,
and hearing protectionwhen operating theDie Grinder.
2.Use clean,dry,regulated compressed airat 90 PSI.Do not exceedthe recommended
90 PSI. Neveruse oxygen, carbondioxide, combustible gases,or any otherbottled gas
as a powersource for thistool.
3.When connectingto the airsupply: Prior toeach use, ifan automatic oileris not used,
add two dropsof air tooloil (not included)into the airinlet fitting ofthe Die Grinder.

Other Welbilt Grinder manuals

Welbilt 1433781 User manual

Welbilt

Welbilt 1433781 User manual

Welbilt 151604 User manual

Welbilt

Welbilt 151604 User manual

Welbilt 21403 User manual

Welbilt

Welbilt 21403 User manual

Welbilt 22481 User manual

Welbilt

Welbilt 22481 User manual

Welbilt 24288 User manual

Welbilt

Welbilt 24288 User manual

Welbilt CREM Pulse 65 User manual

Welbilt

Welbilt CREM Pulse 65 User manual

Welbilt 22481 User manual

Welbilt

Welbilt 22481 User manual

Popular Grinder manuals by other brands

Guild PGA230G1 instruction manual

Guild

Guild PGA230G1 instruction manual

Bosch GWS 14,4 V PROFESSIONAL operating instructions

Bosch

Bosch GWS 14,4 V PROFESSIONAL operating instructions

Yamato 99454 instruction manual

Yamato

Yamato 99454 instruction manual

Makita 9005B instruction manual

Makita

Makita 9005B instruction manual

Makita 9564PC instruction manual

Makita

Makita 9564PC instruction manual

VERTO 51G427 manual

VERTO

VERTO 51G427 manual

Eastwood 31659 instructions

Eastwood

Eastwood 31659 instructions

Superabrasive LAVINA ELITE Series user manual

Superabrasive

Superabrasive LAVINA ELITE Series user manual

Hilti DEG 500-D operating instructions

Hilti

Hilti DEG 500-D operating instructions

Truper TPN-875-2 manual

Truper

Truper TPN-875-2 manual

EINHELL bavaria 44.303.21 operating instructions

EINHELL

EINHELL bavaria 44.303.21 operating instructions

Makita 9561CR instruction manual

Makita

Makita 9561CR instruction manual

Ryobi P420 Operator's manual

Ryobi

Ryobi P420 Operator's manual

EINHELL AXXIO 18/125 Original operating instructions

EINHELL

EINHELL AXXIO 18/125 Original operating instructions

Skil 1045 instructions

Skil

Skil 1045 instructions

Neilsen CT2279 Original instructions

Neilsen

Neilsen CT2279 Original instructions

Blastrac BHG-1800 operating manual

Blastrac

Blastrac BHG-1800 operating manual

Bosch GWS 11-125 CIH operating instructions

Bosch

Bosch GWS 11-125 CIH operating instructions

manuals.online logo
manuals.online logoBrands
  • About & Mission
  • Contact us
  • Privacy Policy
  • Terms and Conditions

Copyright 2025 Manuals.Online. All Rights Reserved.