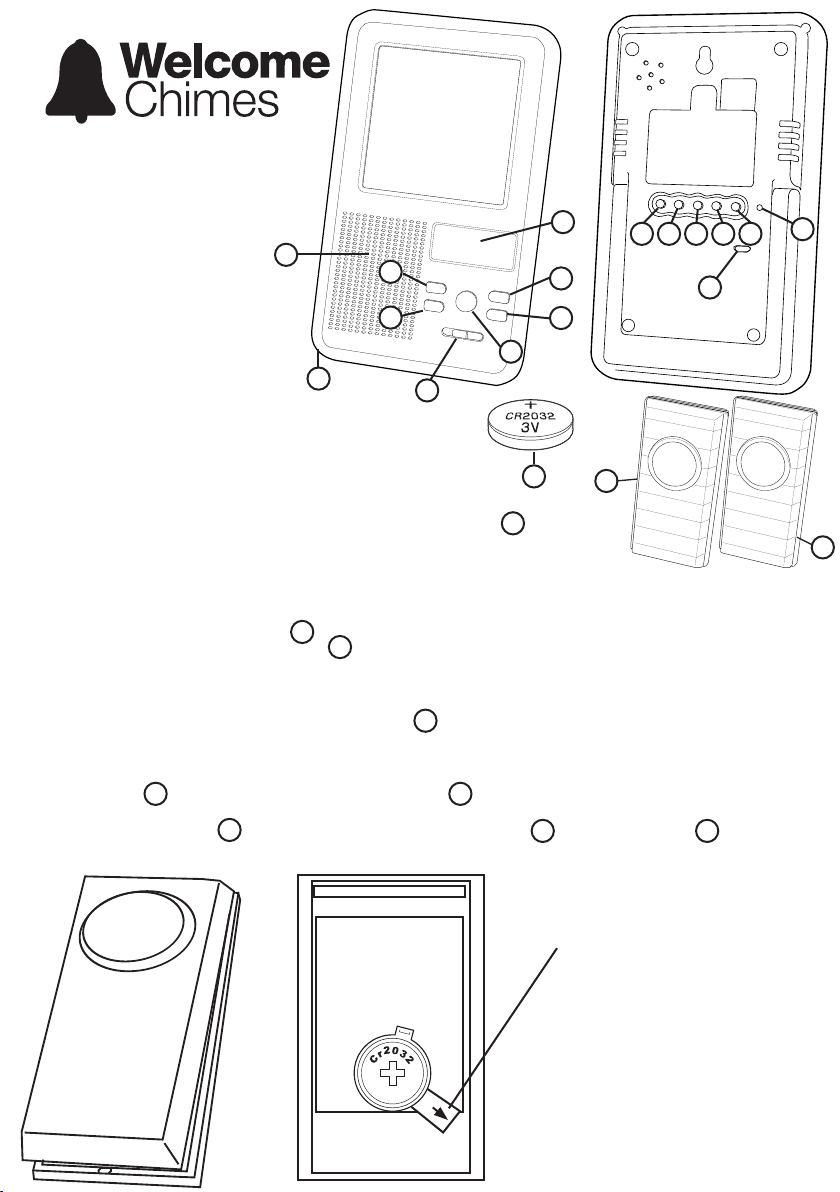
Changing Batteries:
Push Button:
1: Insert a small flat screwdriver into the slot on the base of the
push button.
2: Gently twist the screwdriver to separate the front and back
parts of the push button casing.
3: Remove the old battery from the holder.
4: Replace with a new CR2032 cell battery in the appropriate
slot.
5: Push the front and back parts of the push button casing
together. Ensuring that the O-ring is positioned correctly.
6: Test the operation of the chime kit.
Troubleshooting:
In case of the door chime does not sound, please check the
following:
1: Ensure that new batteries are used in both the push button
and door chime and that they are inserted correctly.
2: Check that the push button is in range of the door chime by
moving the push button and door chime close to each other.
Melody Selection:
The WC9955 Chime Receiver has 23 musical tones to select from. To select a tone, press the “Melody” button on the front
of the door chime. The chime will play the selected tone. Continue pressing the “Melody” button until the desired tone is
selected.
Alarm Sound Selection:
The WC9955 Chime Receiver has 9 Alarm sounds to select from. To select a alarm sound, press the “Sound” button on the
front of the door chime. The chime will play the selected sound. Continue pressing the “Sound” button until the desired tone
is selected.
Volume Control Setting:
To select the Chime Volume level, press the appropriate “Volume” button or on the front of the door chime for the door bell
or alarm function. The chime will play the selected tone or sounds at the selected volume. Continue pressing the “Volume” button
or until the desired volume level is selected.
Setting the Clock:
To set the clock and date, hold the SET button 15 on the back of the chime unit 4until it beeps. First choose between 12
hour or 24 hour clock by pressing UP button. Once selection is made press SET button to cycle through the Seconds, Hours,
Minutes, Year, Month, and Day using the UP and DOWN buttons 16 and 17 to adjust each setting. Once time and date are set.
Press SET button 15 to display Clock or date.
Setting the Timer:
To set the timer, press the TIMER button on the rear of the chime receiver. The countdown timer will appear. Make sure the timer
symbol is not flashing . Press the SET button. The hours should flash. Press the UP or DOWN button to adjust the hours. Press
SET button to cycle through minutes, seconds, and alarm tone using the UP and DOWN buttons to adjust each setting. To finish
setting timer press SET. Once you have chosen your alarm time, press TIMER button to start count down timer. Timer symbol
will flash when timer is active.
Setting the Alarm:
To set the alarm, press MODE button on the rear of the receiver. The alarm time will appear with the Alarm symbol displayed .
Press UP or DOWN button 16 and 17 to adjust the hours, then press SET button 15 to cycle through minutes, duration of
snooze button, and alarm tone using the UP and DOWN buttons 16 and 17 to adjust each setting. Lastly press SET buttonto
finish setting up the alarm.
Alarm Button:
The alarm button will activate the alarm sound on the receiver. To turn off the alarm press any button on the front of the chime
unit.
Pairing Button:
To pair the chime or alarm buttons, hold down the SIGNAL 9button for 3 seconds and then press the push button until chime
rings.
Light/Sound Switch :
The Light/Sound switch 12 controls the behaviour of the chime when the push button is pressed. In light mode, the chime will
not make a sound, only the light will flash. In sound mode, the chime will ring, however the light will not illuminate. Light/Sound
mode combines both of the these features.
Exclusively distributed by
Chime Unit:
1: Remove the battery cover of the door chime (located on
the rear of the unit).
2: Remove the old batteries from the holder.
3: Insert 3 x ‘AAA’ Batteries, ensuring that the positive and
negative markings on the battery are correctly aligned with
the positive and negative markings on the door chime.
Note that only alkaline batteries are recommended for use
with this chime.
4: Replace the battery cover.
5: Test the operation of the chime kit.
Technical Parameters:
1. Rated Voltage: Receiver: 4.5V
Transmitter: 3V
2. Volume: 50 ~ 80 dB
3. Working Frequency: 433 MHz
4. Maximum Range: Up To 80 Metres
(note that range may be affected by environmental factors and
nearby interference sources)
Made in China www.welcomechimes.com.au
2
7
7
10
10
15
8
8
11
11