Well Straler 3003EU User manual

User Guide
3003EU
info@wellstraler.be

2
Index
1.Introduction ..............................................................................................................................................3
1.1. Welcome ..............................................................................................Error! Bookmark not defined.
1.2. Warranty ..............................................................................................Error! Bookmark not defined.
1.3. Security................................................................................................................................................3
1.3.1. Built-in safeties in the control system ..........................................................................................3
1.3.2. Thermo safety - transmitter .........................................................................................................3
1.3.3. Communication safety - transmitter ............................................................................................4
1.3.4. Thermo safety - receiver...............................................................................................................4
1.3.5. Child protection (CP).....................................................................................................................4
1.4. Appliances with ventilator ..................................................................................................................4
2.Commands of your appliance ...................................................................................................................5
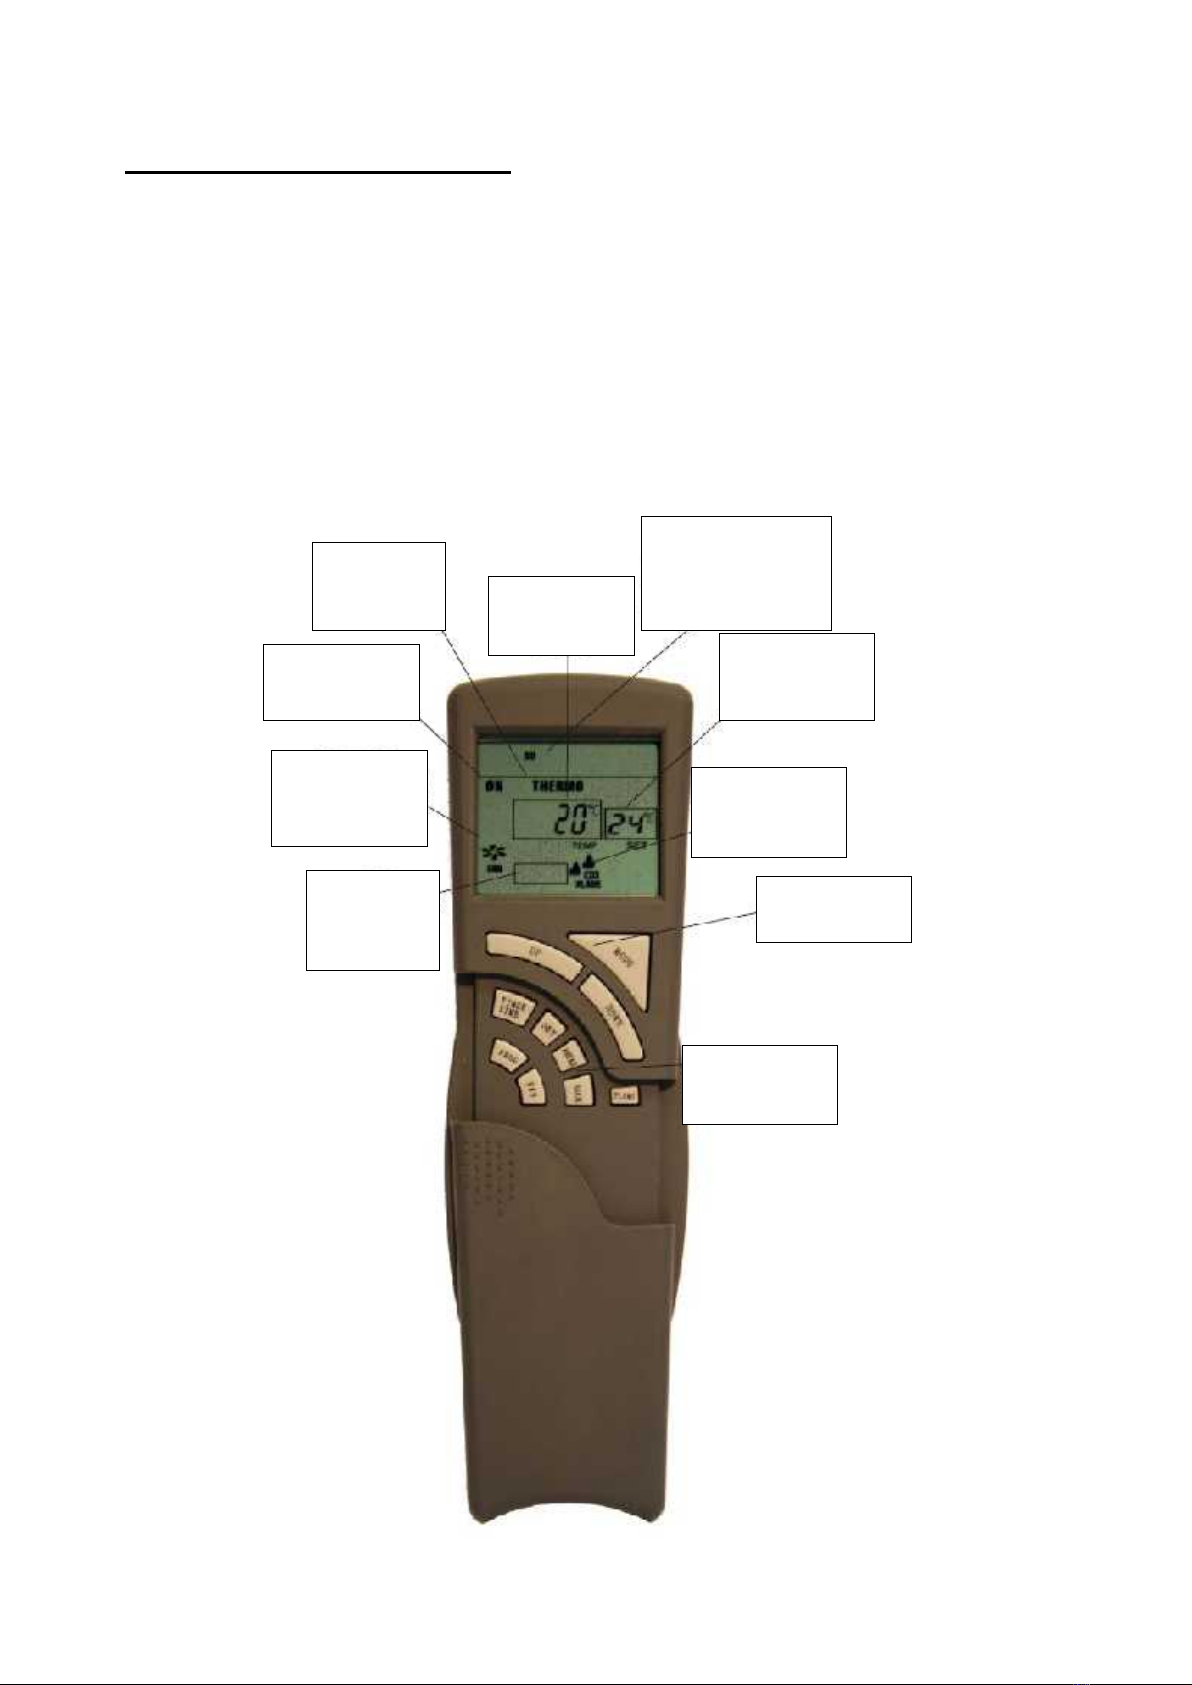
2.1. Transmitter..........................................................................................................................................6
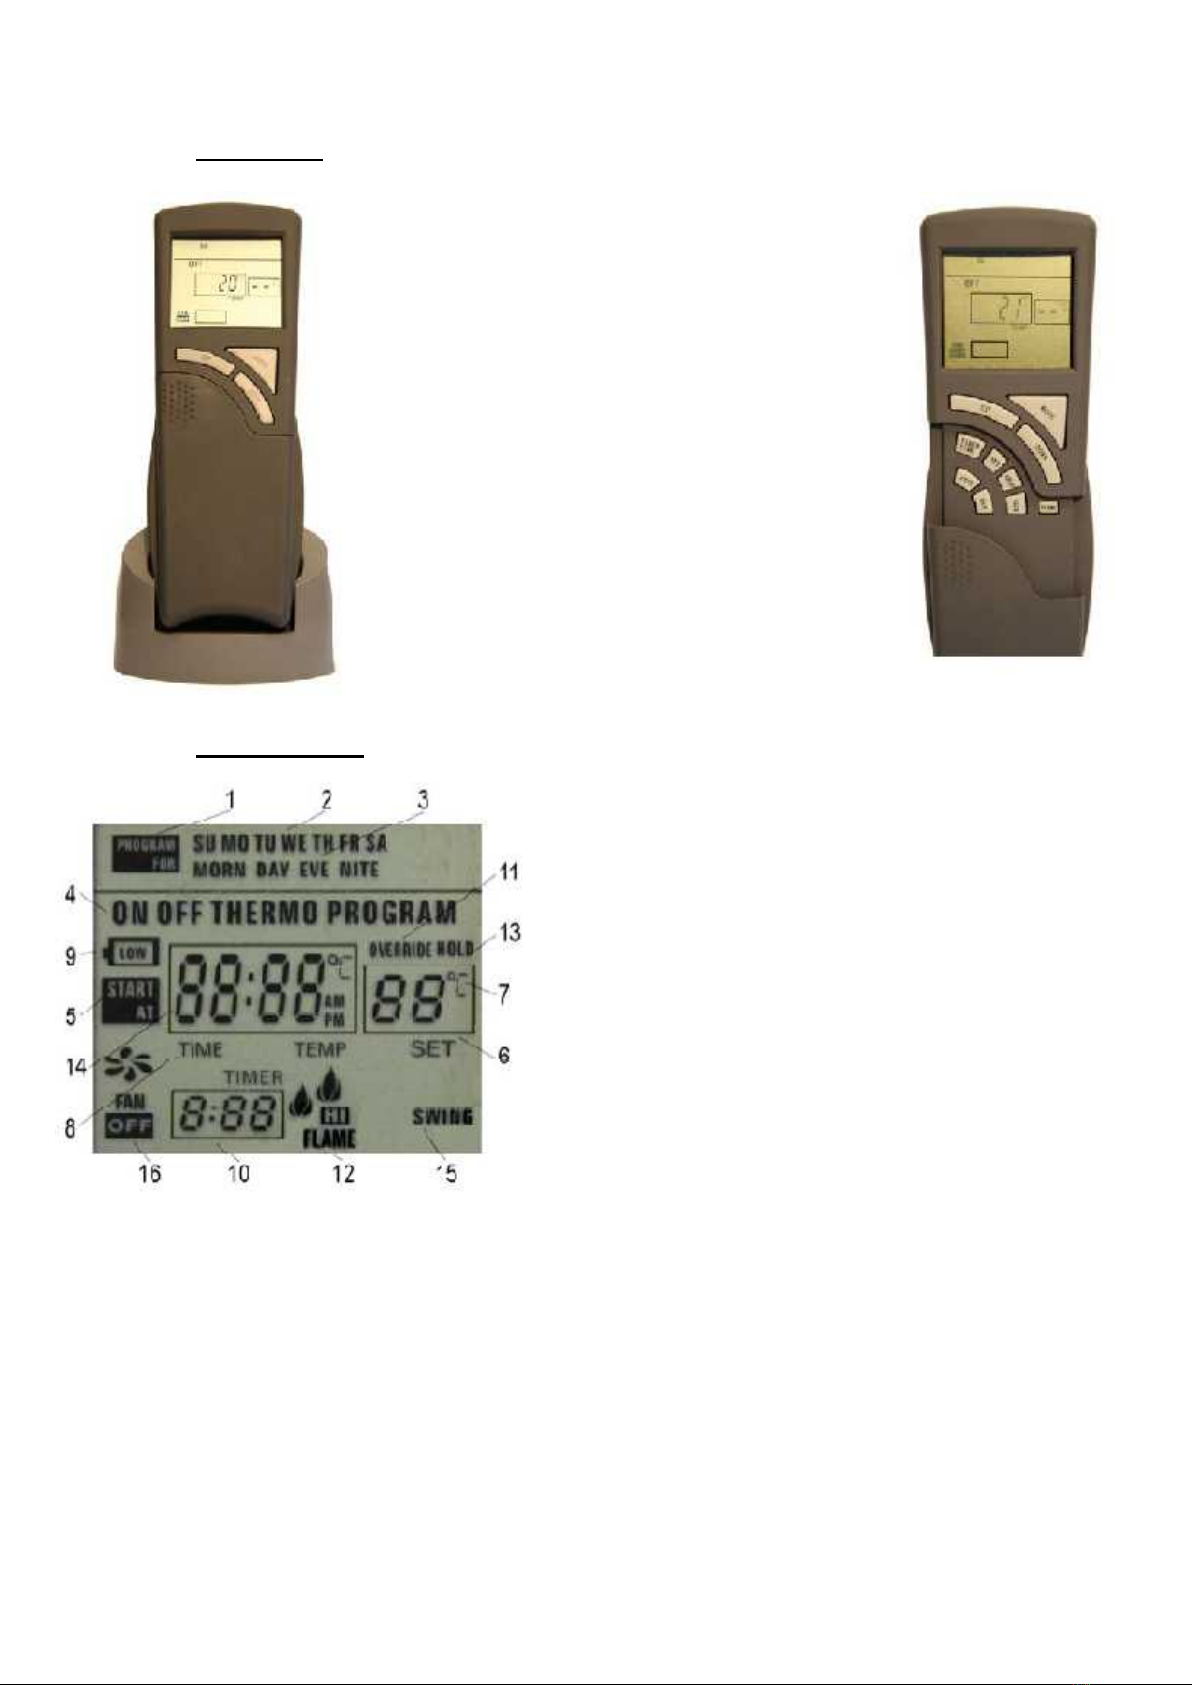
2.2. The LCD display ...................................................................................................................................6
2.3. Initial set-up programming of transmitter..........................................................................................7
2.3.1. Changing temperature scale (°C - °F)............................................................................................7
2.3.2. Setting the current day of the week.............................................................................................7
2.3.3. Setting the current hour and minutes..........................................................................................7
2.4. Additional program options: SWING (temperature differential)........................................................8
2.4.1. Manual control of the pre-programmed SWING-temperature ...................................................8
2.4.2. Changing the pre-programmed SWING: ......................................................................................8
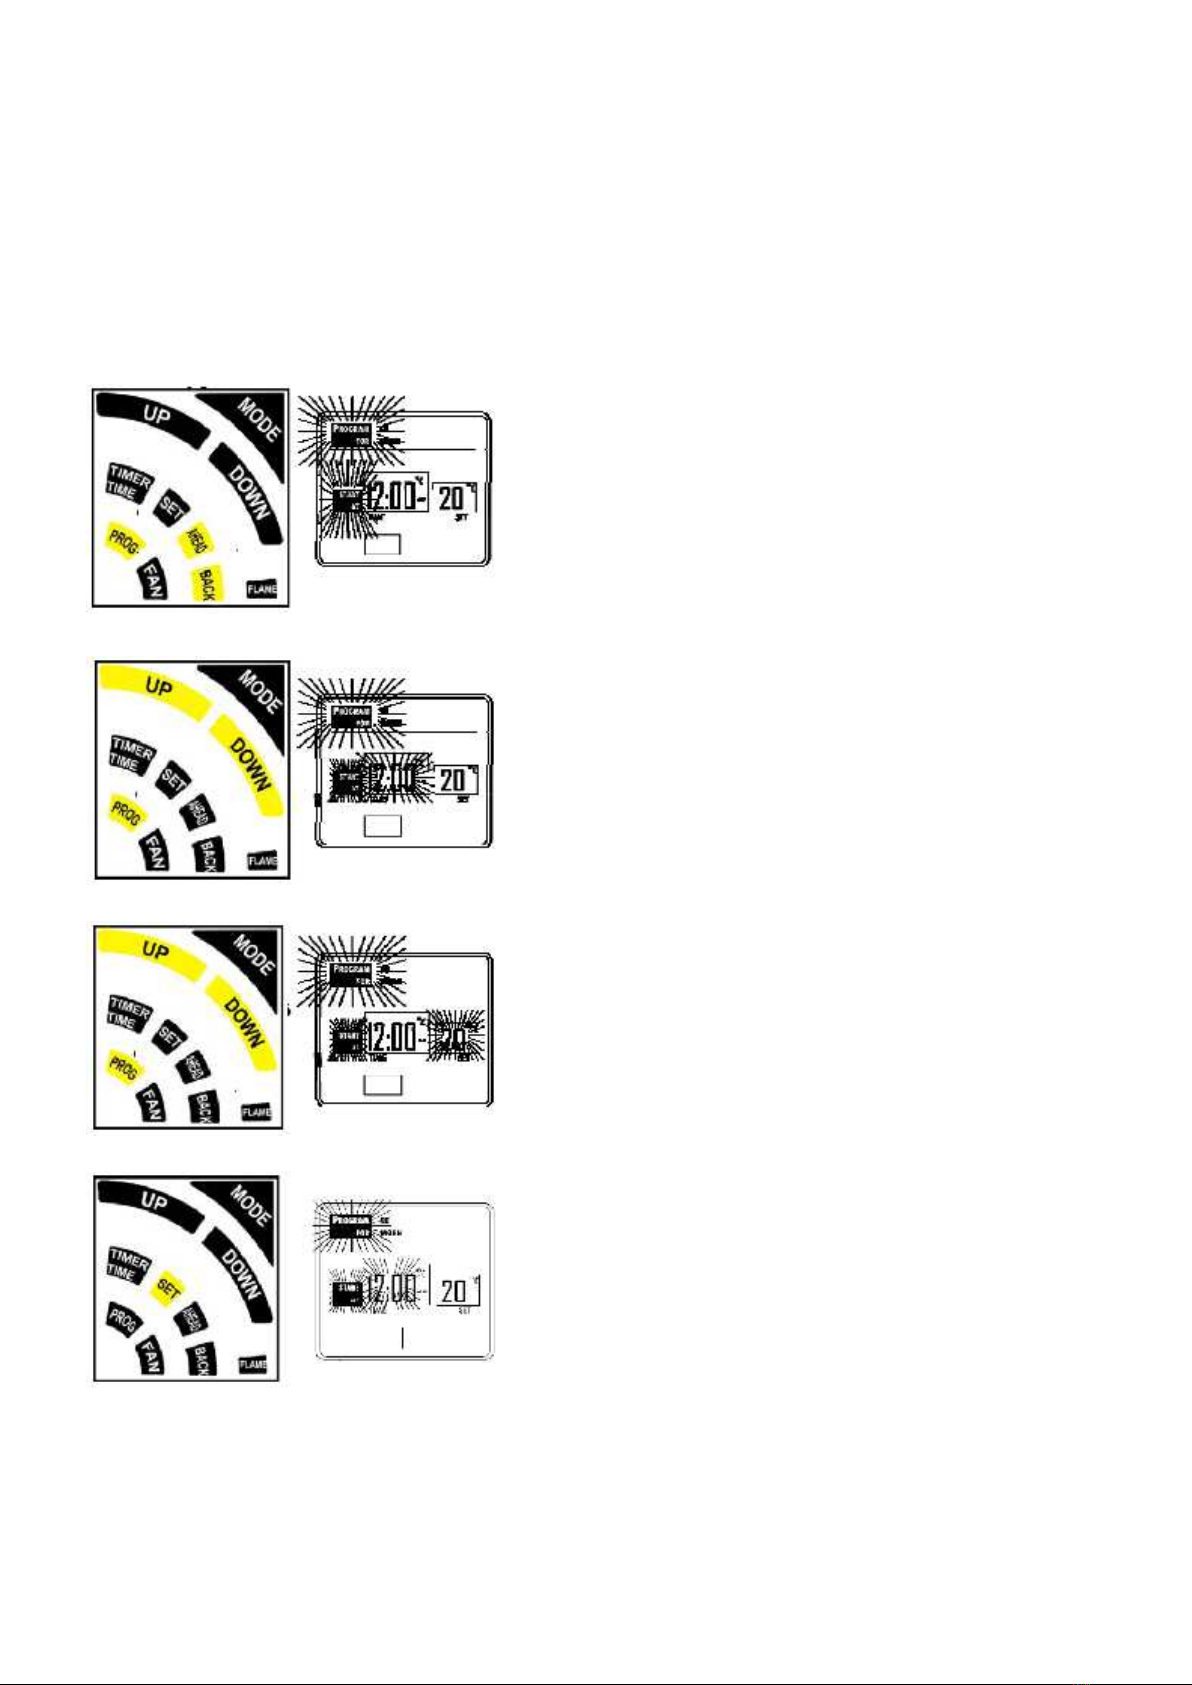
2.5. Week programming ............................................................................................................................8
2.5.1. Programming day/period of day/temperature ............................................................................8
2.5.2. Program overview ......................................................................................................................10
2.5.3. Program cancellation – return to factory settings .....................................................................10
2.6. Operating your appliance..................................................................................................................10
2.7.1. Manual (ON/OFF) .......................................................................................................................10
2.7.2. Thermo operation (ON/OFF BASED ON SET TEMP SETTING).....................................................11
2.7.3. Automatic (PROGRAM)...............................................................................................................11
2.7.4. Adjusting the FLAME HEIGHT .....................................................................................................11
2.7.5. Adjusting ventilator speed..........................................................................................................12
2.7.6. Temporaly temperature OVERRIDE (operates only in PROGRAM mode)..................................12
2.7.7. Time of day display .....................................................................................................................12
2.7.8. Setting the countdown timer .....................................................................................................13
2.7.9. Low battery indicator .................................................................................................................13
2.7.10. Place of the remote control system ...........................................................................................13
2.7. Receiver.............................................................................................................................................14
2.7.1. Matching security codes (LEARN)...............................................................................................14
2.8. Problem solver ..................................................................................................................................15

3
1. Introduction
1.1. Welcome
Thank you for buying your Well Straler gas heater.
We are glad to have you as a customer. With this quality product you will enjoy the cosy warmth and unique flame dance
for many years.
Before using the heater, please read the instructions carefully and keep them in a safe place.
Installation must be carried out by a suitably qualified gas technician in accordance with the gas safety regulations that are
currently in effect. Make sure that you get informed by your technician about how to use, operate and maintain your
appliance. Every appliance has been tested, carefully adjusted and sealed in the factory in accordance with I2H or I3B/P
category. The warranty will only be valid if the service has been completed by a competent person (according the gas safety
regulations in force). Failure to install the fire correctly could lead to prosecution.
The appliance is covered with a heat-resistant surface coating. During the first few hours of use, it is absolutely normal that
a harmless temporary odor is produced. This disappears after a short period. We advise you to let the appliance work for a
few hours in a well ventilated room.
1.2. Warranty
This product has a 2 year warranty counting from the date of installation, and this for manufacturing defects only. The
warranty is limited to a simple exchange of parts that are recognized as defective by our technical department, and not
giving cause by any means to further liability. Shipping costs and labor are not part of the warranty and have to be paid by
the user. Warranty will be invalidated if the appliance has been poorly maintained, used in a wrong way, has been damaged
in an accident or catastrophe of which the origin has no connection with the appliance itself, or if service has been done by
an unauthorized person. Delicate parts in contact with fire like glass etc. are not covered by warranty. Complaints are only
accepted when made through a recognized dealer.
1.3. Security
1.3.1. Built-in safeties in the control system
The system operates on radio frequency signals that are sent by the transmitter (remote) to the receiver in the appliance.
We recommend that the transmitter always be located within the operating range (± 6 m).
To avoid unpleasant situations, the system has several built-in safety measures that alert the user when action is needed.
1.3.2. Thermo safety - transmitter
The transmitter has a thermo-safety function built into its software. It provides an extra margin of safety when the
appliance is in the THERMO or PROGRAM mode.
The thermo-safety is activated when the transmitter is moved beyond the maximum recommended operating range, which
is ± 6 m. It is also activated when batteries become weak or are removed from the transmitter. The thermo-safety operates
in the following manner (only in THERMO or PROGRAM mode):
The room temperature is measured every 2 minutes by the transmitter and compared against the SET temperature. In
addition to check these temperatures, the transmitter sends an RF signal to the receiver, signaling that the transmitter is still
in the operating range. Should the receiver NOT receive a transmitter signal every 2 minutes, the IC software in the receiver
will begin a one hour countdown timing function (thermo-safety function).
If the receiver does not receive a signal from the transmitter during this 45 minutes period, the system will shut down the
appliance. The receiver will produce a series of rapid beeps for a period of 10 seconds, followed by a single beep every
4 seconds until a transmitter signal is again received and the system is RESET.
To RESET the receiver: press the MODE button until OFF appears on the LCD-screen. It is now possible to operate the
appliance to the preferred working mode.

4
1.3.3. Communication safety - transmitter
The communication-safety operates in all operation modes (ON-THERMO-PROGRAM):
At all times and in all operating modes, the transmitter sends an RF-signal every 15 minutes to the receiver, signaling that
the transmitter is within the normal operating range of ± 6 m. Should the receiver not receive a transmitter signal, the
IC-software in the receiver will begin a 1 hour countdown timing function. If the receiver does not receive a signal from the
transmitter during this 1 hour period, the system will shut down the appliance. The receiver will produce a series of rapid
beeps for a period of 10 seconds, followed by a single beep every 4 seconds until a transmitter signal is again received and
the system is RESET.
To RESET the receiver: press the MODE button until OFF appears on the LCD-screen. It is now possible to operate the
appliance to the preferred working mode.
1.3.4. Thermo safety - receiver
The system has a thermo-safety feature that is built into the receiver. This feature is temperature-activated and it provides
an extra margin of safety in case the receiver should be placed where ambient temperatures exceed 65°C. At 65°C the
thermistor will automatically shut down the fireplace and the receiver will begin emitting a series of 4 beeps every 2
seconds. When the ambient temperature near the receiver drops under 50°C, you can reactivate the appliance by pushing
MODE on the transmitter.
1.3.5. Child protection (CP)
The system includes a child-proof ‘lock-out’ feature that allows the user to ”lock-out’operation of the appliance from the
transmitter.
REMARK: If the appliance is already operating in ON, THERMO or PROGRAM modes, engaging the ”lock-out” will not cancel
the operating mode. It only prevents the manual operation of the transmitter. If the appliance is operating in AUTO mode
(thermo and/or program operation) it will continue working normally. To totally ”lock-out” the operation of the transmitter’s
operating signals, the transmitter’s mode must be set to OFF.
1. To activate the ”LOCK-OUT‘, press and hold the
TIME/TIMER- and UP- buttons together for at least
5 seconds. The letters CP will appear in the TEMP frame on
the LCD-screen.
2. To disengage the ”LOCK OUT,‘ press and hold the
TIME/TIMER and UP buttons together for at least
5 seconds.
1.4.Appliances with ventilator
To prevent cold air to flow out of the cooled-down appliance, the ventilator begins working after the appliance has warmed
up (± 5 minutes warming up at the maximum rate). After extinction of the burner the ventilator keeps working for 15
minutes, in order to use the residual warmth.

5
2. Commands of your appliance
Some advantages of the new generation of Well Straler.
Automatic ignition without steady pilot;
Precise digital temperature control in a range of ± 6 m from the heater;
Wireless RF remote control of all the functions of your heater in a range of ± 6m;
Four different operation modes: (ON/OFF – THERMOSTAT – WEEKLY PROGRAM – COUNTDOWN TIMER);
Full automatic pre-programmed weekly program with 4 independent temperature ranges each day, seven days a week.
IMPORTANT
For the device to work correctly, the emitter and receiver must be well tuned to each other (cfr. LEARN, p.14). If the range
is lower than 6 m, the antenna of the receiver (black wire on the side) must be moved.
9 hour –
countdown
timer
adjustable
intensity ventilator:
HIGH / LOW
manual control:
ON / OFF
appliance is
controlled by
thermostat
room temperature
in °C of F
full automatic control
week program
4 periods a day /
7 days a week
adjustable
flame height
HI / LOW
shielded
control buttons
adjustable
desired
temperature
control button

6
2.1. Transmitter
The transmitter operates on 2 AAA-size 1,5V
batteries. We recommend the use of ALKALINE
BATTERIES for maximum operation performance.
Insert batteries into the battery compartment on the
back of the transmitter, positioning the (+) and (-)
ends of the batteries as indicated. Once batteries are
inserted, the temperature will display. Should this not
be the case, please check that batteries are properly
inserted (mind the polarity).
2.2. The LCD display
1. PROGRAM FOR: appears when programming days of week
(Su/Mo/Tu/We/Th/Fr/Sa) and period of day (morning/
daytime/ evening/night).
2. DAY: current day of week
3. PERIOD: current period of day
4. MODE: indicates operation mode of system:
ON (indicates system is on, either manually or
thermostatically)
OFF (system is turned off)
THERMO (indicates the system will automatically cycle,
depending on programmed SET temperature)
PROGRAM (indicates the system is operating with
programmed settings)
5. START AT: Appears when programming time to turn system
on.
6. SET: Indicates desired SET room temperature, when in
THERMO or PROGRAM mode.
7. F°/C°: Temperature, in Fahrenheit or Celcius.
8. TIME/TEMP: Displays CURRENT room temp. In same frame, the current time will display in AM or PM. Press
TIME/TIMER to display current time.
9. LOW: Battery power is LOW. Replace batteries within 2 weeks.
10. TIMER: appears when countdown timer is in operation.
11. OVERRIDE: Displays when SET temperature is overridden.
12. FLAME: Single or double flame symbol indicates burner is operational in LOW/HI mode.
13. HOLD: appears when the SET temperature is overridden, and you wish to keep this temperature until you cancel this
function again.
14. CP: Displays when CHILD PROOF—LOCK OUT“ is engaged. Pressing TIME/TIMER and FAN buttons together for more
than 5 seconds, engages or disengages CP.
15. SWING: Displays in SET frame when setting temperature differential.
16. FAN: indicates whether the ventilator is working at high speed (FAN) or low speed (OFF).

7
2.3. Initial set-up programming of transmitter
Follow the procedure below before first use
Temperature setting (°C of °F) - preset for °F
Setting current day of the week
Setting current time
Batteries must be inserted in order to be able to do the initial set up. Now press the small SET
button on the top left in the battery compartment. Now you can program your transmitter.
2.3.1. Changing temperature scale (°C - °F)
1. Press button on back of transmitter ONCE. °C
symbol will begin flashing on the LCD-screen.
2. To change °C to °F, press the UP or DOWN
button on the front of the transmitter.
3. After setting/confirming the preferred
temperature scale, press SET/RETURN.
REMARK: If you choose to keep the set temperature
(°C), push SET/RETURN after step 1.
2.3.2. Setting the current day of the week
4. Following step 3 above, the SU symbol will begin
flashing on the LCD-screen.
5. To change to the CURRENT DAY of the week,
press the AHEAD or BACK button.
6. After setting/confirming the current DAY of the
week, press SET/RETURN
2.3.3. Setting the current hour and minutes
7. Following step 6 above, the HOUR digits will
begin flashing in the TIME frame.
8. To set the current HOUR, press UP or DOWN,
setting the HOUR for the corresponding
AM/PM-period.
9. After setting the current HOUR, press
SET/RETURN and the MINUTE digits will begin
flashing.
10. To set the MINUTES, press UP/DOWN, setting
the correct MINUTES.
11. After setting HOURS and MINUTES press
SET/RETURN. HI FLAME will start to flash.
12. Press SET/RETURN to confirm your settings.
THE INITIAL SET-UP/PROGRAMMING OF THE TRANSMITTER IS NOW COMPLETE. BE SURE THE SLIDE-ON BATTERY COVER
IS REINSTALLED. THE LCD-SCREEN IS NOW IN ITS NORMAL STATE.
YOU NOW ONLY HAVE TO SET THE ‘SWING’ TO YOUR PERSONAL PREFERENCES.

8
2.4. Additional program options: SWING (temperature differential)
The thermostatic function starts your appliance as soon as the room temperature drops beneath a certain amount of
degrees under the SET temperature. This variatiin is called ‘SWING’ or temperature differential. A small SWING switches on
your appliance quicker and keeps the room temperature more stable. A bigger SWING reduces the number of times that
your appliance gets switched on, but entails bigger temperature changes.
The SWING is pre-programmed on 1°C .
2.4.1. Manual control of the pre-programmed SWING-temperature:
The SWING can be controlled manually by making changes in the SET-temperature. Normally the system reacts every two
minutes to a change in temperature.If however changes are made manually, the system reacts within a lapse of 10 seconds.
With a preset SWING of 1°C your appliance (in THERMO-mode) will start if you set the SET-temperature with 1°C over the
room temperature, or stop if you lower the SET- temperature with 1°C below the room temperature. If this only happens
after 2°C, it means that the SWING is set on 2°C.
2.4.2. Changing the pre-programmed SWING:
1. Simultaneously push the AHEAD- en BACK-
buttons. The currently set SWING appears in the
SET TEMP-window, together with the word
SWING on the LCD-display.
2. Push UP/DOWN to change the SWING.
3. Push SET/RETURN to confirm the change.
2.5. Week programming
The transmitter has a factory program built-in standard program. Each day has been broken into four periods and each
period has its own starting time and temperature. A chart of the built-in programs is pictured below:
You may change any of the factory settings by following the procedures below. Should you wish to return to the factory
program, follow the procedure under heading 2.5.3 Program cancellation.
2.5.1. Programming day/period of day/temperature
Custom program:
DAY
Morning
Daytime
Evening
Night
Hour
Temp
Hour
Temp
Hour
Temp
Hour
Temp
Sunday (SU)
Monday (MO)
Tuesday (TU)
Wednesday (WE)
Thursday (TH)
Friday (FR)
Saturday (SAT)
DAY
PERIOD
hour / temperature
Every day of the week
MORN
6:00 am
21°C
DAY
8:30 am
16°C
EVE
3:00 pm
21°C
NIGHT
11:00 pm
18°C

9
You may change the built-in time and temperature programs to suit your personal schedule. Each day is divided into four
periods: MORNING, DAY, EVENING and NIGHT. A blank programming chart is provided above to record your customized
time and temperature settings If desired, you may change a single day or all seven days that have the built-in factory
program. To change one or all seven days, complete the following steps.
NOTE: If the initial SET-UP and settings were not previously completed and you go into programming mode, the LCD-
screen will display SU, MORN, TIME and SET temperature digits. You must go back and perform the initial set-up
procedure or the remote will not operate properly in the PROGRAM MODE.
To make changes in the standard program:
1. Press PROGRAM/REVIEW for 4 sec. The shaded
boxes on the LCD-screen with the words PROGRAM
FOR and START AT will begin to flash. The current
day, period, time and set temperature of the built-in
factory program will also be displayed.
2. To program the DAY and PERIOD of DAY, press
AHEAD or BACK to display the DAY and PERIOD you
wish to program.
3. Press PROGRAM/REVIEW. to confirm, and TIME will
flash on the LCD-screen.
4. Press UP or DOWN to program the START TIME.
Programmed start time settings are in 15
min.-segments. The new start time will display on the
LCD-screen.
5. Press PROGRAM/REVIEW to confirm: SET TEMP will
flash on the LCD-screen.
6. Press UP or DOWN to program the SET temperature.
7. When the desired SET TEMP displays, press
PROGRAM/REVIEW to confirm.
8. After pressing the PROGRAM/REVIEW button in step
7, the next PERIOD of the same DAY or next DAY will
display on the LCD-screen.
9. To program the next period, follow steps 3, 4, 5, 6
and 7.
10. Continue to follow steps 3, 4, 5, 6 and 7 until all
7 days and the 4 time periods in each day are
programmed.
11. Once all the programming has been completed, press
SET/RETURN. The programming data that has been
entered will now over-ride the factory built-in
program and operate your remote control system.
NOTE: Once you are in the programming process and you want to advance the programming procedure, you may bypass
some of the DAYS or PERIODS OF DAY, by pushing the AHEAD or BACK buttons. This allows you to eliminate the need to
enter the TIME and TEMP for each DAY/PERIOD, speeding up the programming process by skipping some of the ‘software
prompts‘. Once the DAY/PERIOD you want to reprogram is displayed by the LCD-screen, press PROGRAM/REVIEW and
follow the programming steps outlined above.

10
2.5.2. Program overview
If you want to review the settings for either
the factory program and/or your customized
program, you may do so by pressing the
PROGRAM/REVIEW button for 1 second. By
pushing this button repeatedly you can
review the complete program.
If you press the PROGRAM/REVIEW button
for 4 seconds you enter the programming
process.
Press the SET/RETURN button should you
hold the PROGRAM/REVIEW button too
long.
2.5.3. Program cancellation – return to factory settings
To cancel the customized program that you have entered and to return to the factory settings:
Press SET/RETURN to make sure the LCD-screen is in its normal state. Press and hold PROGRAM/REVIEW and at the same
time, press SET/RETURN for a period of ± 10 sec. The customized program will be cancelled when the display icons/numbers
flash with some icons disappearing. The LCD-screen will begin flashing PROGRAM FOR,START AT, together with the digits in
the TIME and SET frames. This confirms that the CUSTOMIZED program has been cancelled. Press SET/RETURN to return the
LCD-screen to normal state, or wait approximately 10 seconds and the LCD-screen will return to its normal state
automatically.
2.6. Operating your appliance
2.6.1. Manual (ON/OFF)
Press MODE until the LCD-screen displays ON. Together with ON the LCD-screen will display FLAME and 1 flame symbol. At
this point the spark electrode will begin sparking to ignite the pilot for a period of approx. 60 seconds. As soon as a flame is
detected the sparking will stop, and after a few seconds the main burner will ignite. The flame height at this stage will be LO.
The appliance will burn as long as it is not turned off manually, regardless of the room temperature.
REMARK: In case of a new installation, it is possible that the pilot does not ignite after 60 seconds, due to air in the gas
pipes. In this case the appliance will shut down and turn to secure mode. Before you can use the appliance again it has to be
reset. To reset the appliance press MODE till LCD-screen displays OFF. To ignite again: press MODE until LCD-screen displays
ON. Repeat this procedure until there is no more air in the gas pipes that lead to the appliance and the pilot ignites.
Once the pilot is on and the main burner is burning low, it is possible to change the flame height and the speed of the fan
with the FLAME and FANtoggle keys.
To switch off the device, push MODE until OFF appears. The pilot as well as the main burner will be quenched.
After this, the fan will still turn for about 15 minutes, until the remaining heat is fully utilized.
There is an additional safety imbedded in this mode of operation that will put the fire automatically to OFF after a period of
9 hours.
*only for devices equipped with a fan

11
2.6.2. Thermo operation (ON/OFF BASED ON SET TEMP SETTING)
The system can control your appliance thermostatically when operating in THERMO mode.
1. Press MODE until LCD-screen displays THERMO.
2. Press UP/DOWN to set the desired room
temperature. The highest SET temperature is 32°C
(99°F), the lowest SET temperature is 6°C (45°F).
The transmitter will measure the room temperature
every 80 seconds automatically turning the
appliance ON or OFF thermostatically.
3. Press FLAME to modify the FLAME HEIGHT (see
chapter Adjusting FLAME Height).
4. Press FAN (only for appliances equipped with a fan)
to modify the FAN speed (see chapter 2.7.5.
Changing FAN speed).
REMARK:
To prevent your appliance from switching on/off too often, the temperature is only measured every 2 minutes.
However, the temperature differential between switching on and off also depends on the set SWING (cfr. Chapter 2.4.
SWING).
2.6.3. Automatic (PROGRAM)
Press MODE until PROGRAM displays on the LCD-screen. Together with PROGRAM the following is displayed on the LCD-
screen:
Current period of the day (morn/day/eve/nite), depending on the program;
ON/OFF to mark if the appliance is turned on or not;
Room temperature (TEMP). Desired temperature for this period (SET);
FLAME/FLAME HI to indicate whether the appliance functions or will function with normal/high flames;
FAN LOW/HI to indicate whether the fan operates or will operate in LOW or HI speed.
The gas appliance will operate fully automatically depending on the pre-programmed weekly program and changes in
temperature.
2.6.4. Adjusting the FLAME HEIGHT
The flame height can be adjusted only in the following
modes: ON – THERMO – PROGRAM. Press FLAME on the
transmitter to change flame height from LO to HI. You
will note the word HI and a 2nd FLAME icon will appear
on the LCD-screen. Press again to change from HI to LO.
The transmitter always remembers the last setting of the flame height, and this for the entire mode of operation (ON -
THERMO and PROGRAM mode). Only when you change mode the setting will return to its standard setting (LO).

12
2.6.5. Adjusting ventilator speed
The speed of the FAN can be adjusted only in the following modes: ON -THERMO –PROGRAM.
Press FAN to select the speed of the ventilator:
LOW – HI.
The transmitter always remembers the last setting of the FAN speed, and this for the entire mode of operation (ON -
THERMO and PROGRAM mode). Only when you change mode the setting will return to its standard setting (FAN LOW).
Remark: only for appliances equipped with a fan.
2.6.6. Temporaly temperature OVERRIDE (operates only in PROGRAM mode)
You can change the current SET temperature without changing the programs stored in the transmitter‘s memory. The
OVERRIDE feature will be automatically cancelled at the start of the next PROGRAM PERIOD.
1. Press UP/DOWN to change the SET temperature.
Setting will be cancelled automatically when next
program period begins). The word OVERRIDE will
appear over the SET frame on the LCD-screen.
2. To cancel temperature OVERRIDE, press
SET/RETURN.
2.6.7. Time of day display
1. To check the current TIME of day, press
TIME/TIMER on the transmitter for less then
1 second. The current TIME of day will appear in the
TIME/TEMP frame replacing the temperature
reading.
2. The temperature will reappear automatically in 15
seconds, or you can press SET/RETURN to cancel
the display of TIME immediately.

13
2.6.8. Setting the countdown timer
This system can operate with a built-in COUNTDOWN timer when the transmitter is in the ON or THERMO mode (THERMO
or ON must be displayed on the LCD-screen).
When the set time period has elapsed, the device will automatically switch off.
1. Press TIME/TIMER on the transmitter for more than
5 seconds. The word TIMER and 0:15 flash on the
LCD-screen.
2. Press UP/DOWN to begin advancing through each
of the countdown time options. Available
countdown times are 15 min./ 30 min. / 45 min./
1 hr / 1hr30 / 2 hr / 2hr30 /… up to 9hrs.
3. To set the TIMER press SET/RETURN. If the system
is ON, it will remain on until the ”timer time” has
expired. If the system is in the THERMO mode, it
will cycle ON and OFF as the room temperature
requires
4. To cancel the TIMER operation, press the
TIME/TIMER button for more than 5 seconds until
the ‘timer time‘ disappears.
2.6.9. Low battery indicator
The word LOW outlined by a battery on the left side of the LCD-
screen will appear when battery power has dropped significantly.
At this time, approximately two weeks of battery power remains
until the transmitter may experience partial or complete loss of
functions.
(REMARK: Wrong placement of the batteries will also result in
the appearance of LOW on the screen.)
Here’s how to replace the batteries:
1. Push the MODE-button until OFF appears on the screen;
2. Remove the batteries one by one;
3. Place new batteries, minding their polarity.
Replacing the batteries in an operational mode (ON – THERMO – PROGRAM) can damage the microprocessor.
2.6.10. Place of the remote control system
As the transmitter is also the thermostat of your appliance, it is preferable to locate the bracket on an inside wall,
sufficiently far away from direct sources of heat such as a fireplace, incandescent lighting or sunlight, in order for it to
detect actual ambient room temperatures, and not a single heat source. Before fixing the bracket to the wall, check if the
transmitter is not outside the operating range of the receiver! Normal operating range is ± 6 m, but can vary.
The system operates on RF-signals. The place of the antenna (black thread on the side of the receiver) determines the
operating range of the system. In order to get the system to function as good as it may, the antenna must be free in the
appliance.
Be careful: Transmitter and receiver must be placed at at least 1 meter from electromagnetic fields (such as TV, radio, PC,
microwave oven,…). Repeated exposure to magnetic fields reduces the operating capacity of the appliances.

14
Access to the LEARN-button
2.7. Receiver
The receiver is built-in in your appliance and has a 3-position slide button:
LEFT: OFF (the system is OFF)
MIDDLE:REMOTE (the system only operates if the receiver receives commands from the transmitter)
RIGHT:ON (the system remains ON in low flame until the slide switch is placed in the OFF or REMOTE
position)
We advise you to put the slide switch in the OFF position if you will be away from your home for an extended period of time
or during summer. Placing the slide switch in the OFF position also functions as a safety ”LOCK-OUT” by both turning the
system off and rendering the TRANSMITTER inoperative.
2.7.1. Matching security codes (LEARN)
Each transmitter can use one of the 1.048.576 security codes. It may be
necessary to program the remote receiver to LEARN the security code of
the transmitter, upon initial use, if batteries are replaced or if a
replacement transmitter is purchased. When matching security codes, be
sure the slide button on the RECEIVER is in the REMOTE position: the code
will not LEARN if the slide switch is in the ON or OFF position. Program the
remote RECEIVER to LEARN a new security code by pushing in the LEARN-
button on the top of the remote RECEIVER until a beep is heard and then
simultaneously pressing MODE on the TRANSMITTER. The RECEIVER will
emit a series of rapid beeps indicating the transmitter‘s code has been
programmed into the receiver. When an existing receiver is matched to a
new transmitter, the new security code will overwrite the old one
REMARK: The microprocessor that controls the security code matching procedure is controlled by a timer function. If you
are unsuccessful in matching the security code on the first attempt, wait 1-2 minutes before trying again: this delay
allows the microprocessor to reset its timer circuitry.

15
2.8. Problem solver
PROBLEM
CAUSE
SOLUTION
The appliance does not
react when the MODE-
button is pressed.
The receiver is in ‘OFF’
position
Place the receiver button in ‘REMOTE’ position
The receiver does not match
to the transmitter.
Execute the ‘LEARN’ procedure.
The transmitter does not
react after the ‘LEARN’-
procedure.
The transmitter is too far
from the receiver.
Move the antenna to a free space (the outside
of the appliance is the maximum range area)
so that the operating range is wider.
The receiver emits a beep
The transmitter is positioned
out of range of the receiver
for more than 1 hour.
Place the transmitter closer to the receiver, or
move the antenna of the receiver.
The receiver beeps
repeatedly in quick tempo
and the transmitter is
within the receiver’s
operating range
The receiver got overheated
The receiver has to cool down, as it will only
operate again when the temperature inside
the receiver drops beneath 50°C.
The receiver beeps in slow
tempo and the transmitter
is within the receiver’s
operating range
The transmitter is positioned
on a radio-wave reflecting
surface
Place transmitter on a soft, non-reflecting
surface.
The transmitter is broken
Replace transmitter.
Table of contents