Well PTI-840 User manual

Contents
I. Panel Description – 4 Ports.................................................................................................... 1
II. Panel Description – 1 Port......................................................................................................3
III. Connecting 4/1 Port ADSLRouter........................................................................................ 5
IV. Set Up TCP/IP In Windows.................................................................................................... 9
Option-A : Windows ME/98............................................................................................... 9
Option-B : Windows 2000 .................................................................................................. 10
Option-C : Windows XP..................................................................................................... 11
V. Set Up 4/1 Port ADSL Router................................................................................................ 12
4/1 Port ADSL Router 0

I. Panel Description – 4 Ports
1.1 Back Panel :
The back panel of the 4 Port ADSL Router contains ADSL/LAN, Reset, Power Adaptor
connection and Power ON/OFF Switch.
ADSL Port for connecting the 4 Port ADSL Router to the ADSL Service
Provider.
RESET Restore the 4 Port ADSL Router’s factory default setting.
Ports 1-4 Four 10/100Mbps Fast Ethernet Switch Port for connecting the 4 Port
ADSL Router to the network devices.
AC Jack 9VAC/1A Power adapter connector.
ON/OFF Power Switch to ON/OFF the 4 Port ADSL Router.
!
All the Ethernet port of the 4 Ports ADSL Router supports auto crossover
capability.
4/1 Port ADSL Router 1

4/1 Port ADSL Router 2
1.2 Front Panel :
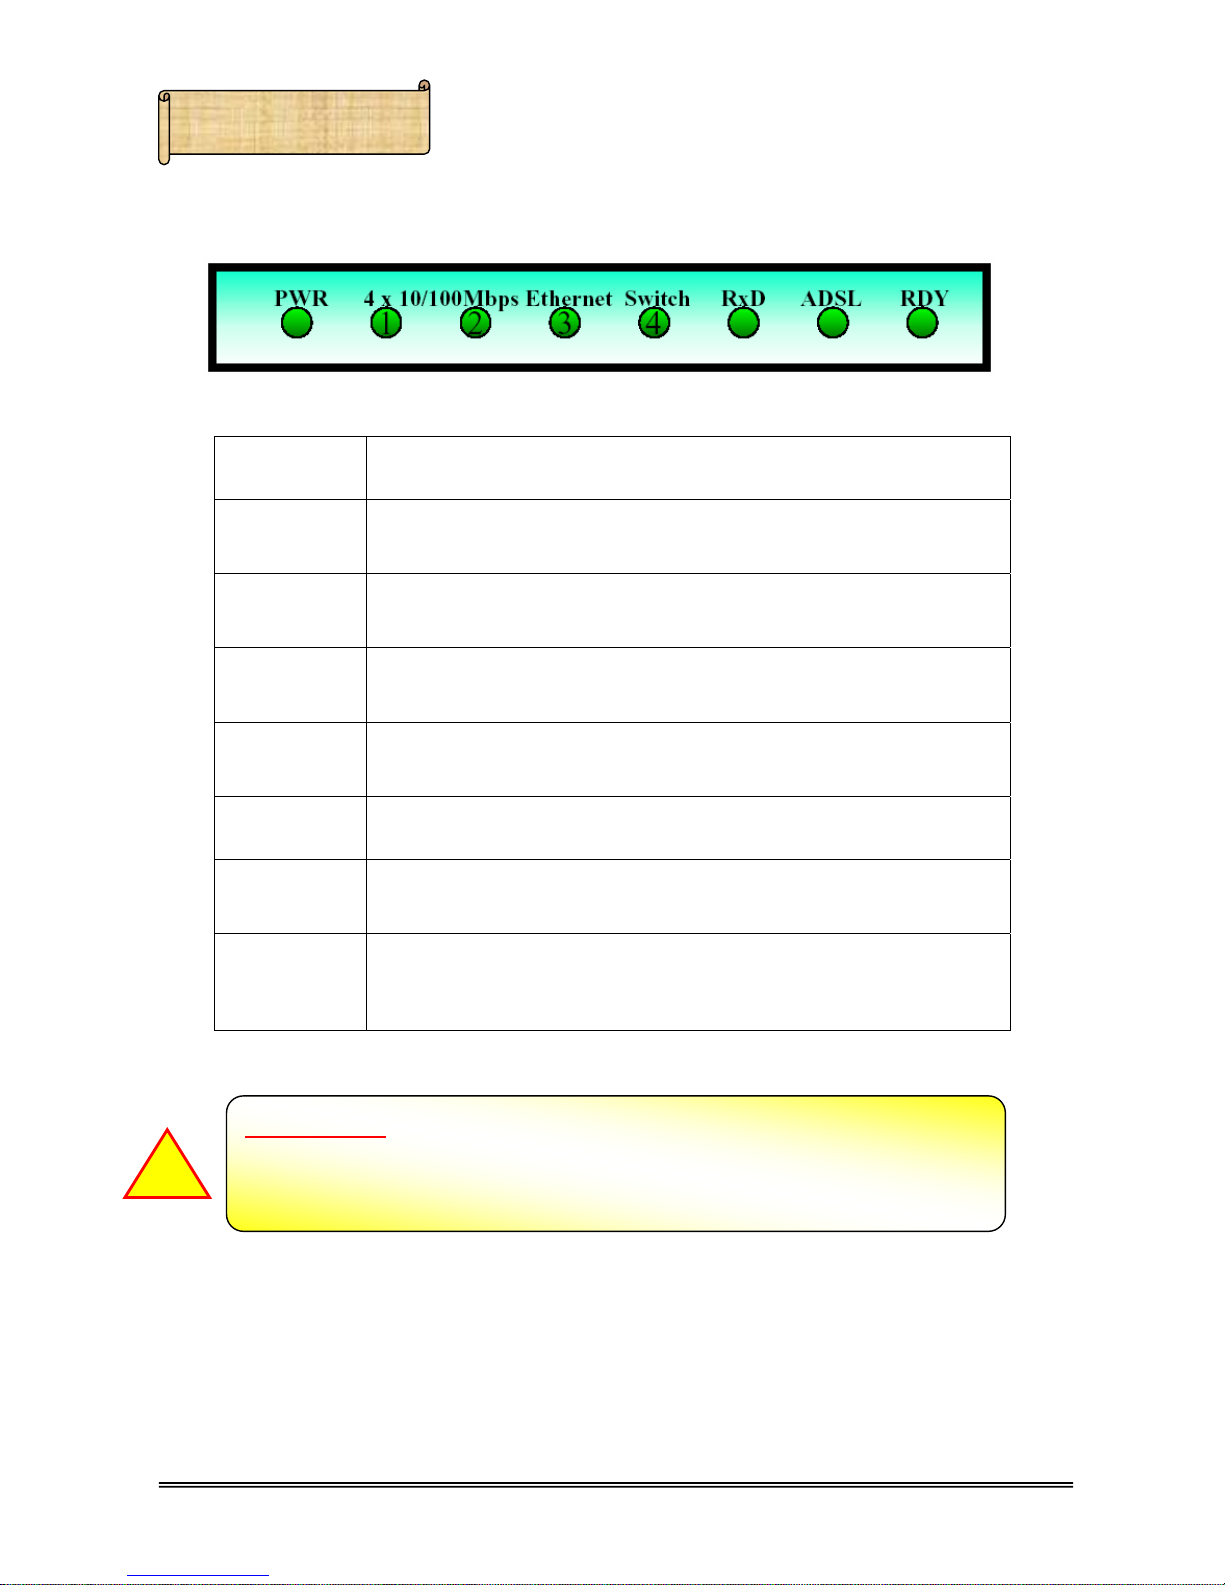
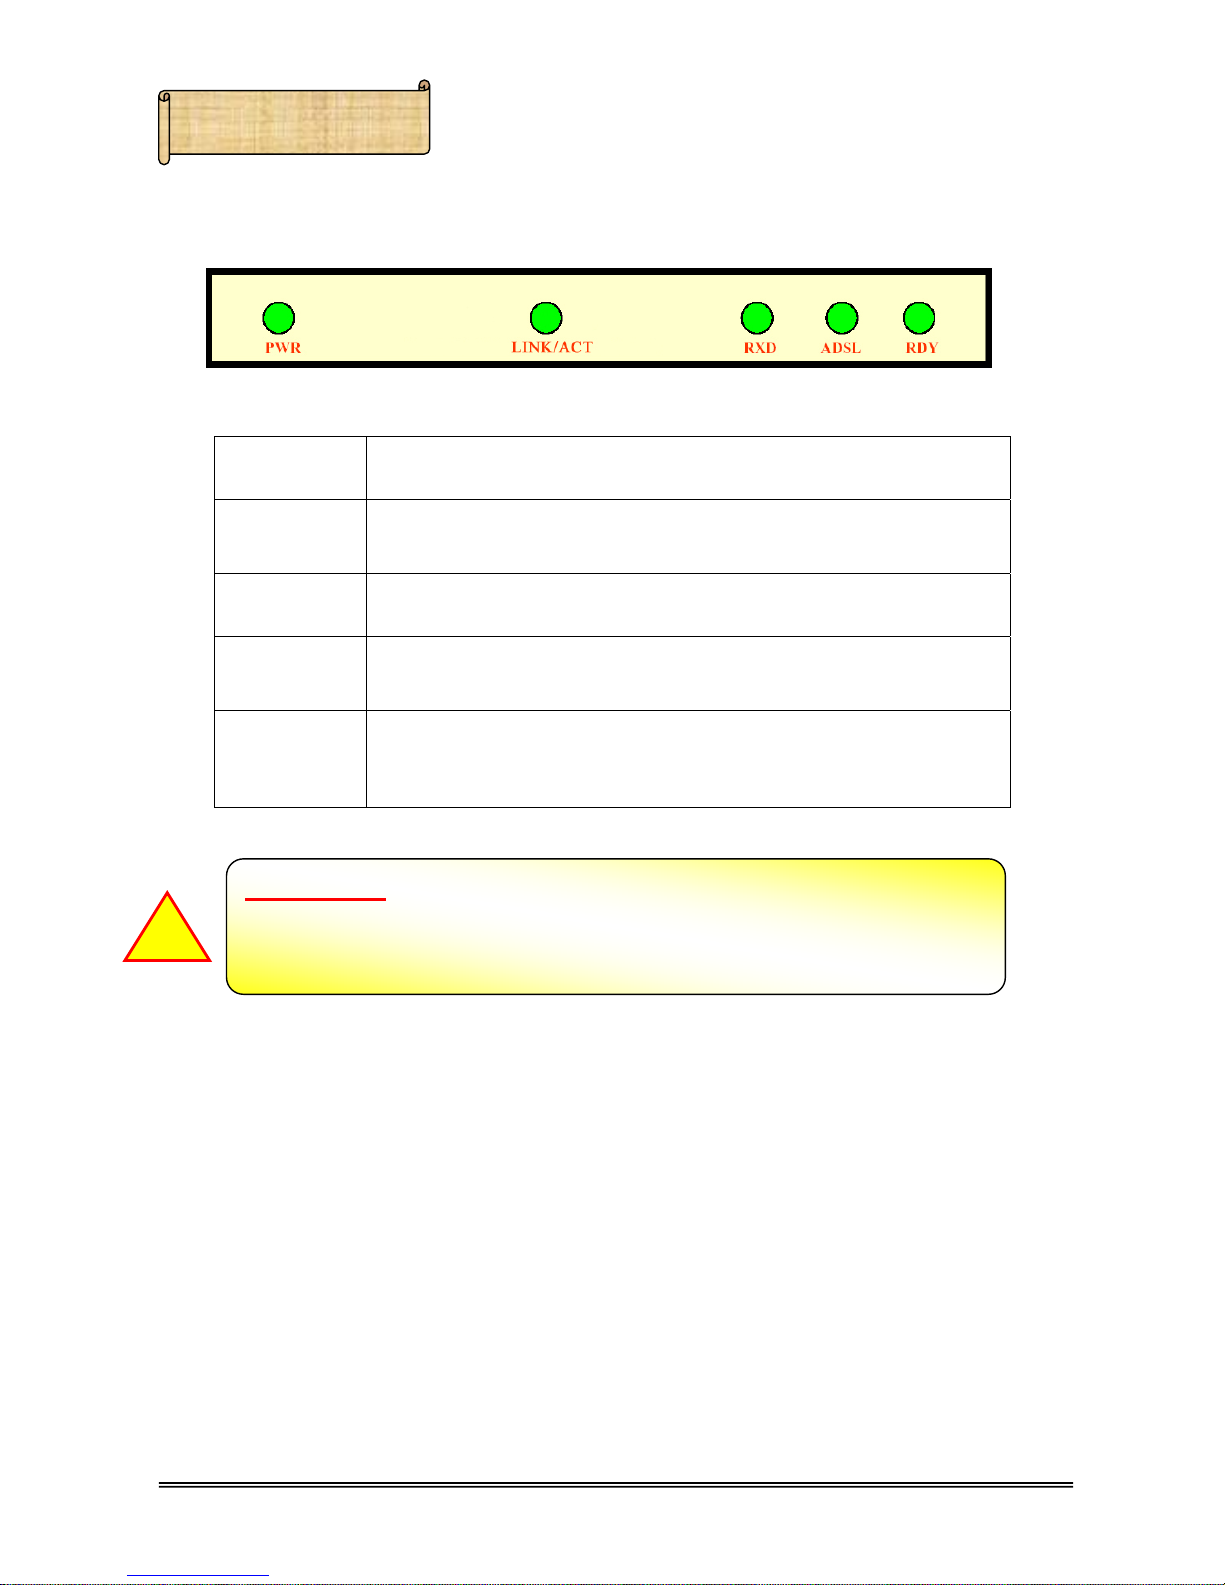
The 4 Port ADSL Router’s LEDs indicators display information about the device’s status.
PWR Steady green light indicates the 4 PortADSL Router is powered on.
1 : LINK/ACT Steady green light indicates a valid Ethernet connection. Blinking
green light indicates active Ethernet session.
2 : LINK/ACT Steady green light indicates a valid Ethernet connection. Blinking
green light indicates active Ethernet session.
3 : LINK/ACT Steady green light indicates a valid Ethernet connection. Blinking
green light indicates active Ethernet session.
4 : LINK/ACT Steady green light indicates a valid Ethernet connection. Blinking
green light indicates active Ethernet session.
RXD Blinking green light indicates an active ADSL session.
ADSL 4 Port ADSL Router system status indicator. When blinking indicates
ADSL system is alive.
RDY Blinking green light indicates a valid ADSL connection. This will
light after the ADSL negotiation process has been settled.
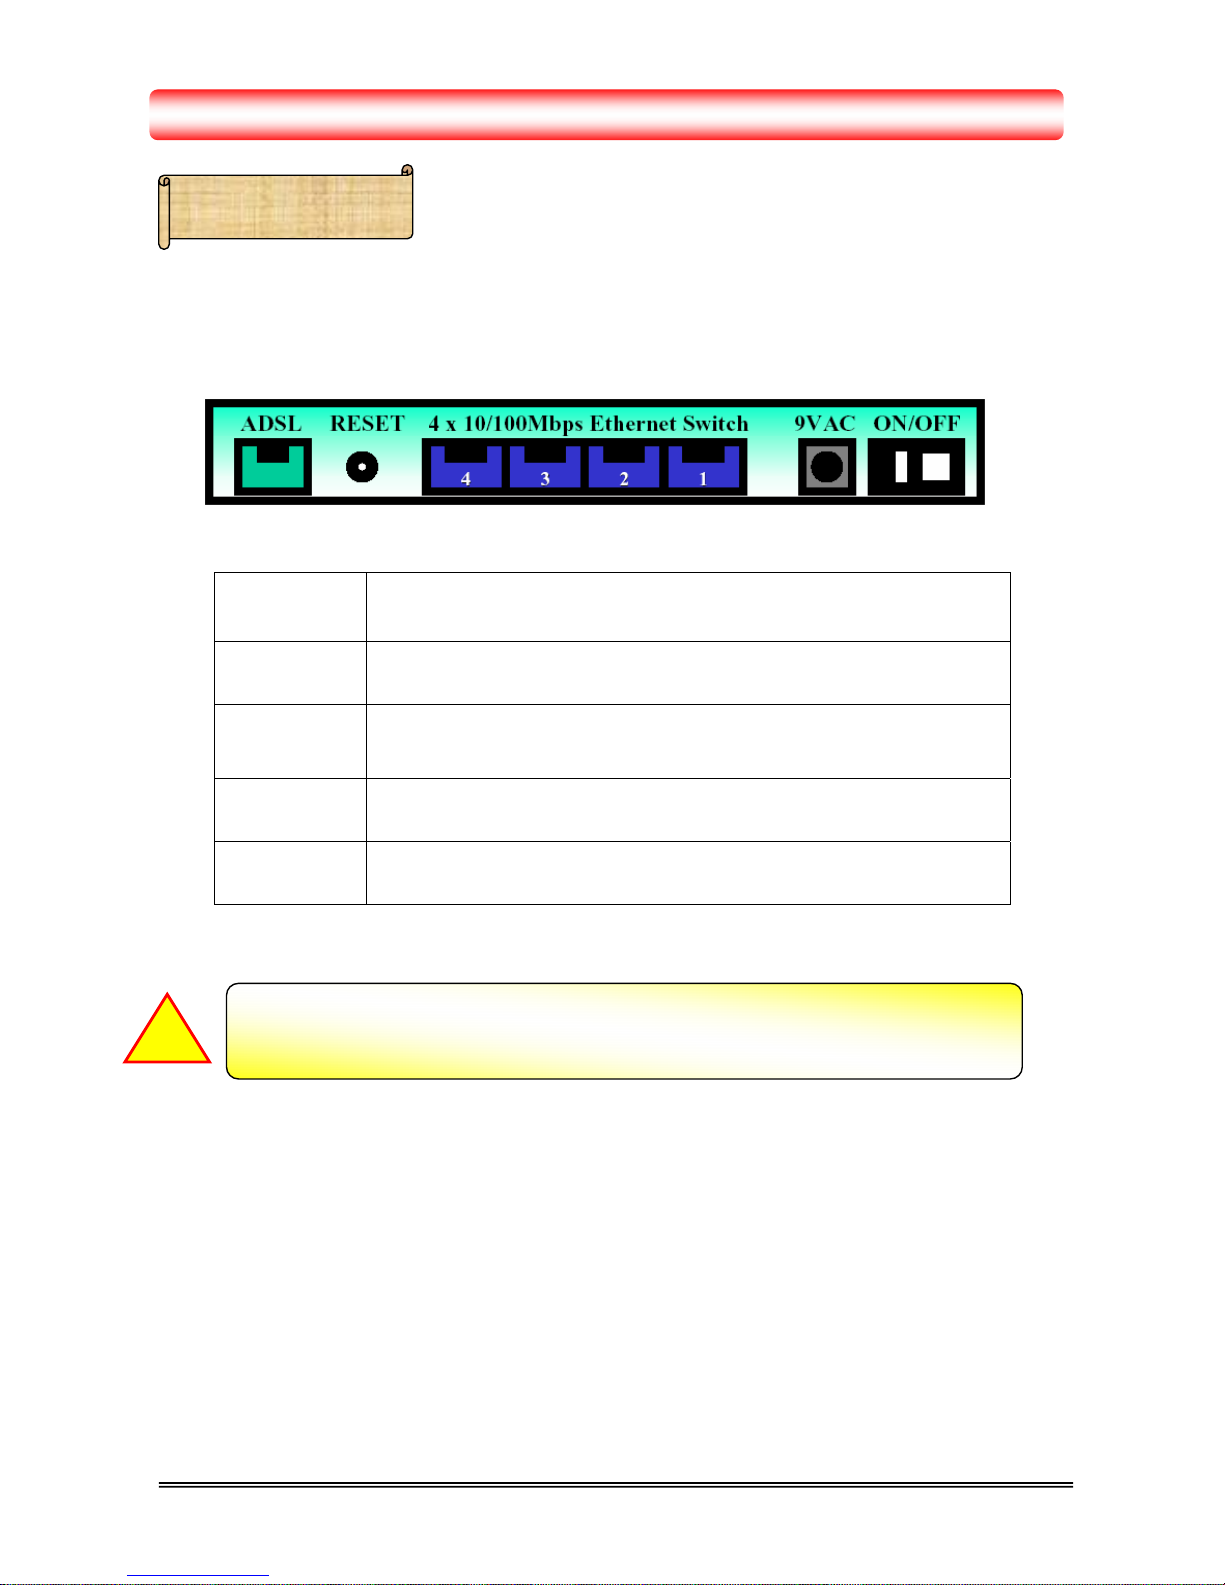
Reboot & Restore the 4 Port ADSL Router’s factory defaults and clear all the
setting.
RESET Button :
!

II. Panel Description – 1 Ports
4/1 Port ADSL Router 3
2.1 Back Panel :
The back panel of the 1 Port ADSL Router contains ADSL/LAN, Reset, Power Adaptor
connection and Power ON/OFF Switch.
ADSL Port for connecting the 1 Port ADSL Router to the ADSL Service
Provider.
RESET Restore the 1 Port ADSL Router’s factory default setting.
LAN One 10/100Mbps Fast Ethernet Switch Port for connecting the 1 Port
ADSL Router to the network devices.
AC Jack 9VAC/1A Power adapter connector.
ON/OFF Power Switch to ON/OFF the 1 Port ADSL Router.
!
All the Ethernet port of the 1 Port ADSL Router supports auto crossover
capability.

4/1 Port ADSL Router 4
2.2 Front Panel :
The 1 Port ADSL Router’s LEDs indicators display information about the device’s status.
PWR Steady green light indicates the 1 PortADSL Router is powered on.
LINK/ACT Steady green light indicates a valid Ethernet connection. Blinking
green light indicates active Ethernet session.
RXD Blinking green light indicates an active ADSL session.
ADSL 1 Port ADSL Router system status indicator. When blinking indicates
ADSL system is alive.
RDY Blinking green light indicates a valid ADSL connection. This will
light after the ADSL negotiation process has been settled.
Reboot & Restore the 1 Port ADSL Router’s factory defaults and clear all the
setting.
RESET Button :
!

III. Connecting 4/1 PortADSLRouter
3.1 Connection Mechanism (4 Ports):
This section describes the hardware connection mechanism of your 4 PortADSL Router on
your Local Area Network ( LAN ) connect to the Internet, how to configure 4 Port ADSL Router for
Internet access or how to manually configure your Internet connection.
You need to prepare the following items before you can establish an Internet connection
through your 4 Port ADSL Router :
1. A computer which must have an installed Ethernet Adaptor and an Ethernet Cable.
2. An ADSL service account and configuration information provided by your Internet
Service Provider ( ISP ). You will need one or more of the following configuration
parameters to connect your 4 Port ADSL Router to the Internet :
a. VPI/VCI parameters
b. Multiplexing Method
c. Host and Domain Names
d. ISP Login Name and Password
e. ISP Domain Name Server ( DNS ) Address
f. Fixed or Static IPAddress
4/1 Port ADSL Router 5

4/1 Port ADSL Router
3.2 Connecting Steps (4 Ports):
Follow the following steps or instructions for connecting your 4 PortADSL Router :
1. Turn off your computer.
2. Connect the ADSL port of your 4 Port ADSL Router to the wall jack of the ADSL
Line with a RJ-11 cable.
3. Connect the Ethernet cable ( RJ-45 ) from your 4 Port ADSL Router to the Ethernet
Adaptor in your computer.
4. Connect the Power adaptor to the 4 Port ADSL Router and plug the other end into a
Power outlet.
5. Turn on your 4 Port ADSL Router.
6
Auto and self diagnostic process will turn the LED indicators ON and OFF
during the process.
The Power light will lit after turning on the 4 Port ADSL Router.
!
6. Turn on your computer.
7. Refer to the next chapter to setup or configure your Network Adaptor.

4/1 Port ADSL Router
3.3 Connection Mechanism (1 Port):
This section describes the hardware connection mechanism of your 1 PortADSL Router on
your Local Area Network ( LAN ) connect to the Internet, how to configure 1 Port ADSL Router for
Internet access or how to manually configure your Internet connection.
You need to prepare the following items before you can establish an Internet connection
through your 1 Port ADSL Router :
1. A computer which must have an installed Ethernet Adaptor and an Ethernet Cable.
2. An ADSL service account and configuration information provided by your Internet
Service Provider ( ISP ). You will need one or more of the following configuration
parameters to connect your 1 Port ADSL Router to the Internet :
a. VPI/VCI parameters
b. Multiplexing Method
c. Host and Domain Names
d. ISP Login Name and Password
e. ISP Domain Name Server ( DNS ) Address
f. Fixed or Static IPAddress
7

4/1 Port ADSL Router 8
3.4 Connecting Steps (1 Port):
Follow the following steps or instructions for connecting your 1 PortADSL Router :
1. Turn off your computer.
2. Connect the ADSL port of your 1 Port ADSL Router to the wall jack of the ADSL
Line with a RJ-11 cable.
3. Connect the Ethernet cable ( RJ-45 ) from your 1 Port ADSL Router to the Ethernet
Adaptor in your computer.
4. Connect the Power adaptor to the 1 Port ADSL Router and plug the other end into a
Power outlet.
5. Turn on your 1 Port ADSL Router.
!
The Power light will lit after turning on the 1 Port ADSL Router.
Auto and self diagnostic process will turn the LED indicators ON and OFF
during the process.
6. Turn on your computer.
7. Refer to the next chapter to setup or configure your Network Adaptor.

IV. Set Up TCP/IP In Windows
Option-A Windows ME / 98
Step 5: Erase all the previous setting.
Step 3: Select the network adapter installed
and click on Properties.
2
1
Step 2: Double-click the Network icon.
Step 1: Click Start →Settings
→Control Panel.
Step 4: Select Obtain an IP address
automatically.
1
2
Step 6: Select Disable DNS then click OK.
4/1 Port ADSL Router 9

Option-B Windows 2000
4/1 Port ADSL Router 10
Step 2: Double-click the Network and Dial-up
Connections icon.
Step 1: Click Start →Settings
→Control Panel.
Step 3: Right Click on the Local Area
Connection and select Properties.
Step 4: Select Internet Protocol(TCP/IP)
and click Properties.
1
2
3
Step5: Select Obtain an IPaddress
automatically and Obtain DNS
server address automatically.
Then Click OK.

Option-C Windows XP
4/1 Port ADSL Router 11
Click Switch to Classic View.
Step 2: Double-click the Network
Step 1: Click Start →Click Control Panel. Connections icon.
Step 3: Right Click on the Local Area
Connection and select Properties.
Step 4: Select Internet Protocol(TCP/IP)
and click Properties.
1
Step5: Select Obtain an IPaddress
automatically and Obtain DNS server
address automatically. Then click OK.
2
3

V. Set Up 4/1 Port ADSL Router
1.
Launch your web browser, and enter the 4/1 Port ADSL Router’s IPAddress :
“10.0.0.2”
in the
address field then press the Enter key to login.
2. Enter the default User Name “admin” and Password “epicrouter”. Then press “OK” to
login.
4/1 Port ADSL Router 12
3. Click “EZ SETUP -- Automatic Setup” and follow the following steps to help you
install the 4/1 Port ADSL Router quickly and easily.

STEP 1. Select the presetting country form the list then click “Next”.
4/1 Port ADSL Router 13
A. The following setup widow wizard with the following “Encapsulation” type will
pop up :
;PPPoAVC-Mux
;PPPoA LLC
;PPPoE LLC
Manually enter your “Service Name”,“User Name” and “Password” which
will be provided by your ISP. Check your ISP for the setting/configuration details.

B. The following setup widow wizard with the following “Encapsulation” type will
pop up :
;1483 Bridged IP LLC
Bridge Mode : Click “Disabled” or “Enable” for the device’s connection
mode. Check your ISP for the connection/setting details.
4/1 Port ADSL Router 14
IP Mode : Click “Dynamic IP” or “Static IP” for the connection mode.
Check your ISP for the connection/setting details.
;If “Static IP” mode is chosen, more terms need to be filled
before any Internet access is available. Check your ISP for the
setting/configuration details
Click and select “EZ SETUP-- Manual Setup” if you can’t find any
available parameters from the country list.
Check your ISP immediately for the setting/configuration details.
!

STEP 2. Click“SAVE” after your choice.
The 4/1 Port ADSL Router system will reboot and activate your setting. Click
“Return To Home” after the system reboot process. Connection to the Internet is
available after the above procedures.
4/1 Port ADSL Router 15
Table of contents
Other Well Network Router manuals