Wellink Wel+8010S User manual

Wel+8010S ADSL Modem
Installation Guide

FCC Statement
FCC WARNING
This equipment generates or uses radio frequency energy. Changes or modifications to this
equipment may cause harmful interference unless the modifications are expressly approved in the
instruction manual. The user could lose the authority to operate this equipment if an unauthorized
change or modification is made.
INFORMATION TO THE USER
This equipment has been tested and found to comply with the limits for a Class B digital device,
pursuant to Part 15 of the FCC Rules.
These limits are designed to provide reasonable protection against harmful interference in a
residential installation.
This equipment generates, uses and can generate radio frequency energy and, if not installed and
used in accordance with the instructions, may cause harmful interference to radio
communications. However, there is no guarantee that the interference will not occur in a particular
installation. If this equipment does cause harmful interference to radio or television reception,
which can be determined by turning the equipment off and on, the user is encouraged to try to
correct the interference by one or more of the following measures:
· Reorient or relocate the receiving antenna.
· Increase the separation between the equipment and receiver.
· Connect the equipment to an outlet on a circuit different from that to which the receiver is
connected.
· Consult the dealer for technical assistance.

Contents
Ⅰ. Installation of Wel+8010S
1.1 Basic Knowledge
1.1.1 What's the ADSL?
1.1.2 Wel+8010S ADSL Modem Specification
1.2 Wel+8010S ADSL Modem Installation
1.2.1 Confirmation of PC Installation
1.2.2 Ready for Cables
1.2.3 Connecting PC and Cable
1.2.4 Connecting LINE
1.2.5 Connecting Power
1.2.6 Connecting Console
1.2.7 Confirming Connection Status
II. Showing status of Wel+8010S
2.1 Physical status
2.2 Current configuration of Wel+8010S
2.3 System Infomation
III. Configuration of Wel+8010S
3.1 Changing Wel+8010S ADSL Mode
3.2 Establishing of HI-NET 1120 Protocol
3.2.1 RFC1483 Bridged Mode
3.2.2 RFC1483 Routed Mode (dhcpserver+NAT)
3.2.3 PPPoA Routed Mode(RFC2364/dhcpclient)
3.2.4 PPPoA Bridged Mode(RFC2364)
3.2.5 PPPoE Routed Mode(RFC2516/No using PPP client S/W)
3.2.6 IPoA Routed Mode(RFC1577/dhcpserver+NAT)
3.2.7 DHCP server
3.2.8 PPTP Tunneling
Ⅳ. Troubleshooting
4.1 Common malfunction items
4.2 About power problem
4.3 Network connection problem
Appendix A : Command words
Appendix B : Webconsole Errors

I. Installation of Wel+8010S
1.1 Basic Knowledge
1.1.1 What's the ADSL?
Asymmetric Digital Subscriber Line is a technology for transmitting digital information
at a high bandwidth on existing phone lines to homes and business. Unlike regular
dialup phone service, ADSL provides continuously available for telephone and internet
lines at the same time. ADSL is generally offered at downstream data rates from 512
kbps to about 6Mbps.
1.1.2 Wel+8010S ADSL Modem Specification
ITEM Specification
Power input power :110/220Vac to 5Vdc
frequency : 50/60Hz
Operation
Environment O.S Win95/98(first,second)/2K/NT
/ME/Linux/Unix/Machintoch
Interface IEEE 802.3 10BaseT
Rate(DN/UP) max 8Mbps/1Mbps
Standard
ANSI T1.413 issue2
/ITU-T G.992.1(G.dmt)
G.992.2(G.lite),G.994.1(G.hs)
Splitter Internal
H/W
LED LAN(LINK,ACK)/ADSL(Sync,Rx,Tx)
Power&ALARM
Modulation DMT
Error Detect Reed-Soloman
S/W
Signaling PVC
Board specification size(171mmX131mmX40mm)
ADSL Line -RJ11
POTS-RJ11
Ethernet-RJ45
Wel+8010
(ADSL
External
Modem)
Interface
DC power -PC mounted DIN connector

1.2 Wel+8010S ADSL Modem Installation
1.2.1 Confirmation of PC Installation
Before connect the Wel+8010S ADSL Modem to PC, confirm that LAN card has to
installed on the PC. LAN card is available in the PC shop.
1.2.2 Ready for Cables
Telephone Line Port(LINE/TEL) -RJ-11 (telephone cable 1 each)
Ethernet port(LAN) -RJ-45 UTP Ethernet cable (cross cable for connection to PC
directly )
CONSOLE Port -RS232-C cable
1.2.3 Connecting PC and Cable
Hook up one side of the RJ-45 UTP Ethernet cable to the Wel+8010S ADSL Modem
Ethernet port(LAN), then connect the other jack to the LAN card on the PC
1.2.4 Connecting LINE
Connect the telephone line to the LINE port of the Wel+8010S ADSL Modem
1.2.5 Connecting Power
Connect the Power Adaptor to the power input port of the Wel+8010S ADSL Modem,
then hookup the power cable to the consent
1.2.6 Connecting Console Cable (For protocol setup and monitoring)
Connect HI-NET 1120 ADSL Modem's CONSOLE Port and the Serial port of the PC
by the RS232-C cable then it can perform by using your favorite VT100 terminal
emulation program or webconsole offered on your CD-ROM
▶ Speed -- 9600bps
▶ no parity
▶ 8 bit data
▶ 1 bit stop
▶ no flow control
If you are using the Webconsole, we need not to set above items.
Now you can see several lines on the screen of the terminal when you turn on the HI-
NET 1120's power. This screen can be used for terminal.
Also you can monitor and configure your modem Wel+8010S with webconsole offered
on your CD-ROM.
Webconsole is installed by “webconsole.exe”file in offered CD-ROM with Wel+8010S.
You can start the installed program by double-clicking on Wel+8010S icon in the
screen.

Click on the "Serial Config” at the starting menu to set the PC COM port connected
with Serial Cable.
Also The Modem can be accessed with Telnet. IP is set at 192.168.1.1 by default,
which can be changed. Type "password" for password.
1.2.7 Confirming Connection Status
Each ports of the Wel+8010S ADSL Modem can be confirmed its connection status by
the following methods;
Confirm the ADSL Line Connecting Status
After Wel+8010S ADSL has been connected, normally ADSL sync. LED should be
blanking within some seconds.
It is indicates that ADSL Line is in the status of LINK
Confirm the PC connecting Status
If LINK LED between the LAN card of the PC and Wel+8010S ADSL Modem's lights
are on,
it means that modem has been connected properly.
Confirm the Telephone Connecting Status
It is proper operation if you can hear normal telephone signal sound and no
interruption sound when you pick up the phone,
it means that the operation has been operating successfully.

※If the PWR/ALARM LED shows RED light, ADSL Modem is not in the status of
LINK or the Ethernet connecting status with PC has not been connected in properly.
II. Showing status of Wel+8010S
2.1 Physical Layer status
You can check the connecting status of the modem such asPhysical Link Rate, Error
count, DMT-tone by CLI(Command Line Interface)
Ø
bsp sysinfo
In using Webconsole, you can check the link status by selecting STATUS/Physical at
the stating menu.
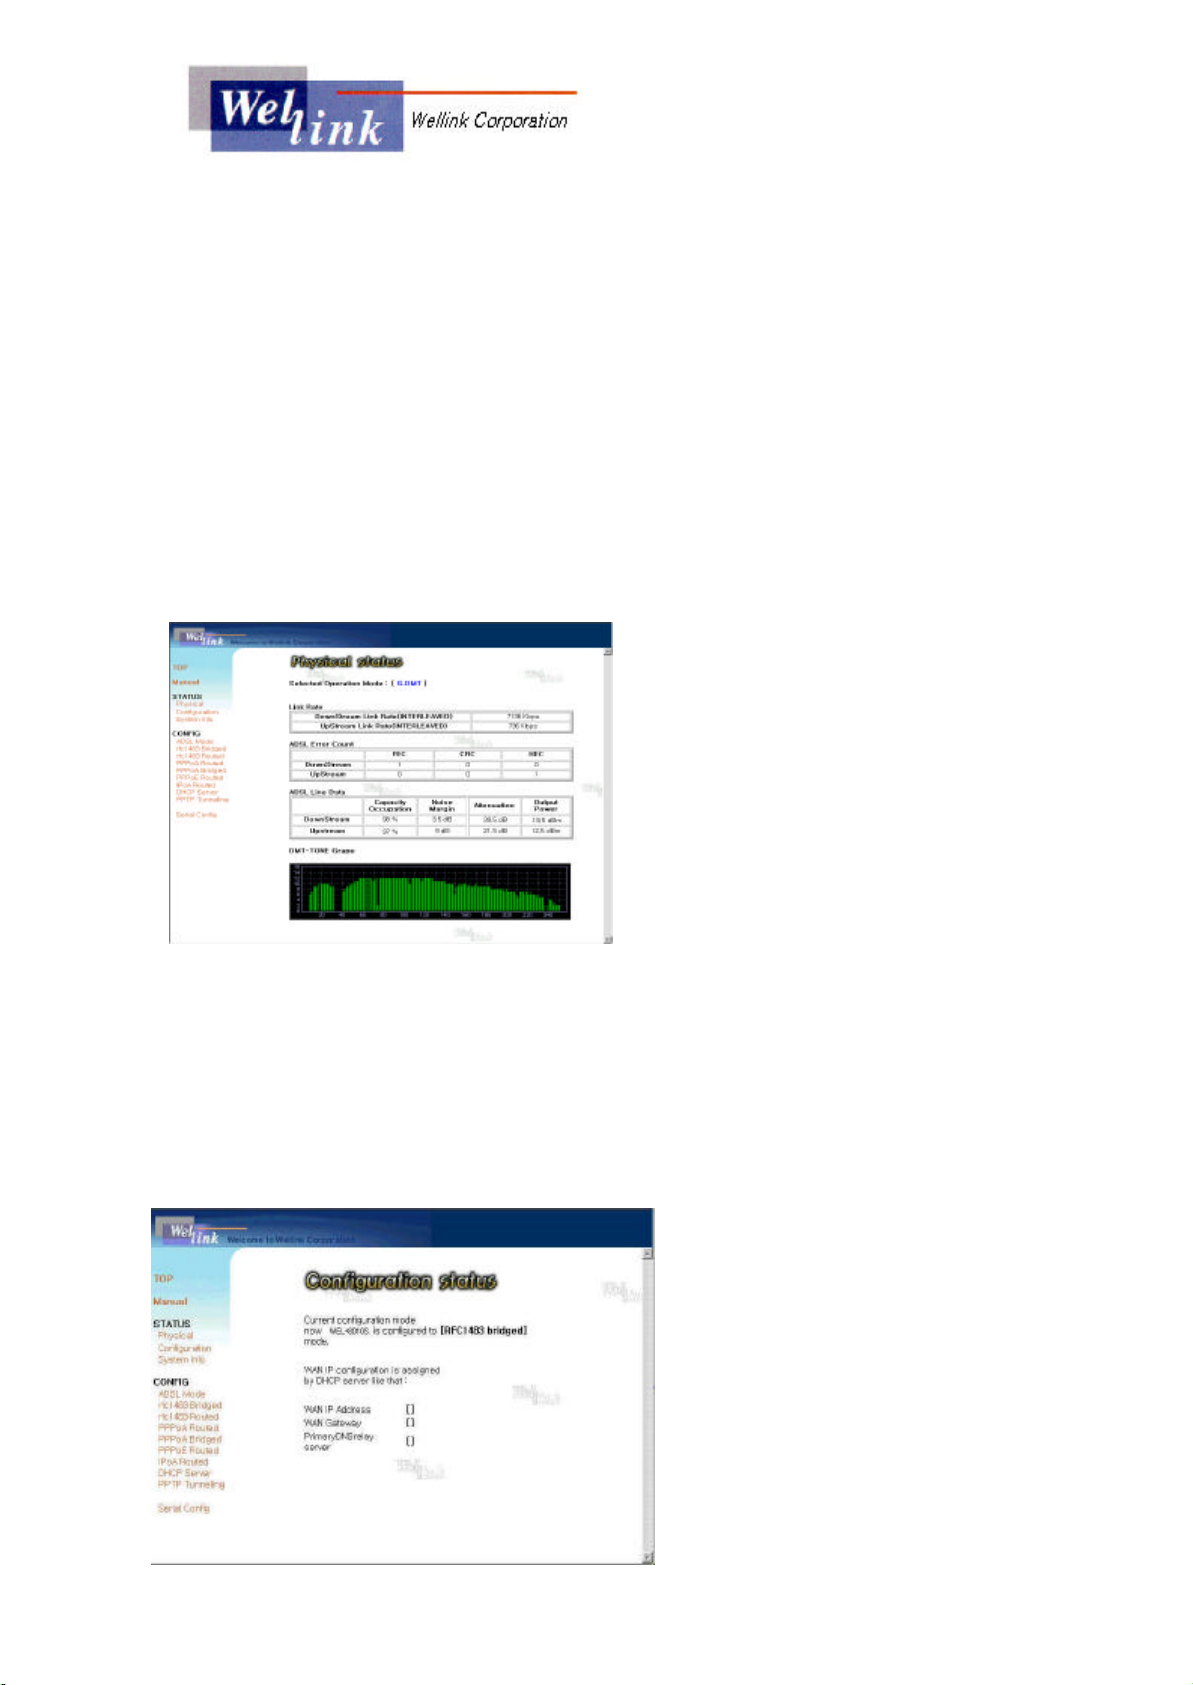
In the Physical Statusscreen,
Selected Operation Mode shows the
current setting mode from CO like
DSLAM and displays Physical Link
Rate and Error Count of the modem
which is linked to CO.
DMT-tone at the bottom part,
displays each Carrier load (bits/tone)
for 256 sub-channels (0~31 for
upstream, 40~255 for downstream) in graphics.
2.2 Current configuration of Wel+8010S
Using Webconsole, if you click on STATUS/Configuration you can see the current
protocol setting status of the modem and IP configuration on the WAN assigned from
DHCP server.
IP Configuration
which is displayed
in the bottom of the Configuration
Status screen shows the IP setting
assigned from CO on the WAN.
Therefore, any IP setting is not
displayed in case that you use a
Static IP.
2.3 System Infomation
Using CLI(Command Line

Interface), you can check SYSTEM information of the modem by the following
commands;
Wel+8010S> chips info
Wel+8010S ADSL Modem version 7.1.0.25.2/4.6.4.1.3.5b (25 July 2001)
Machine Name: Wel+8010S
MAC address: 0:20:2b:0:55:20
In this version string, 7.1.0.25.2 of the front part refers to the ATMOS version of
available OS, 4.6.4 refers to a bsp s/w version of the ADSL chips, and 1.3.5b refers
to a firmware version of the ADSL chipset.
Using Webconsole, you can check the SYSTEM Information of the modem by selecting
“STATUS”/”System info” of the starting menu.
Ⅲ. Configuration of Wel+8010S
3.1 Changing Wel+8010S ADSL Mode
Using CLI(Command Line Interface), you can select a specific ADSL Mode with the
following commands.
Wel+8010S> bsp gdmt
ADSL Mode is now Gdmt (0x00000002)
Wel+8010S> config save
Saving configuration...Configuration saved.
Wel+8010S> restart

A modem is set as a Multi Mode in default.
You can change the ADSL Mode using bsp glite(G.Lite), bsp ansi(T1.413) and bsp
multi(Multi sensing) instead of bsp gdmt.
You can confirm the Mode with the following commands.
Wel+8010S> bsp mode
ADSL Modem Mode is: gdmt (State : SHOWTIME_L0)
Using Webconsole, you can change the ADSL Mode by clicking Config/ADSL Mode and
selecting the specific ADSL Mode.
On ADSL Mode screen,
“Modem State”shows the ADSL Sync. Status
and “Modem Mode”displays the
current setting mode of the modem.
If you want to change the mode to
Specific Mode, select a Mode you
want and click on “SAVE”button.
During the alteration of a
Configuration value in System, you can see the following screen.
If the configuration is changed successfully, you can see the following message.

3.2 Establishing of HI-NET 1120 Protocol
3.2.1 RFC1483 bridged
Using CLI(Command Line Interface), you can change the Protocol of the modem to
RFC1483 bridged mode.
On the Terminal console screen,
remove the current configuration.
> config reset bridge
> ip device flush
> config reset ppp
> config save
Saving configuration...Configuration saved.
> restart
In this way, setup for rfc1483 bridged mode is completed.
> bridge device add edd
> bridge device add
bun/port=atm/rfc1483=true/mode=llcbridged/vpi=x/vci=y
> config save
Saving configuration...Configuration saved.
> restart
Among the above commands,"
bridge device add edd”
meansan add Ethernet Port on
the bridge.

“bridge device add bun/port=atm/rfc 1483=true/mode=llcbridged/vpi=x/vci=y"
isaPort
configuration using RFC1483 Protocol. The "x","y" refers to the value of VPI and VCI
which is set by the information from ISPs.
Wel+8010S supports up to 16 PVC value simultaneously.
You can check the protocol setting by the following commandson the consol screen.
> bridge device list
Port 1: 'edd'
Port 2: 'bun/port=atm/rfc1483=true/mode=llcbridged/vpi=x/vci=y'
After Protocol installation, if ADSL Sync LED is in the stable condition, the modem is
online.
If you need to connect a PPP server for PPPoE service, you can access by executing
the PPP Client Program such as EnterNet300 (WinPoet,etc)
Using Webconsole, you can change the protocol of the modem to RFC1483 bridged
mode by clicking on “Config/rfc1483 Bridged”
For setting asRFC1483 bridge, you
need to have the information for
VPI(Virtual Path
Identifier)/VCI(Virtual Channel
Identifier) from the ISP.
The range of VPI value is from 0 to
4095,
and the range of VCI value is from 1
to 65535.
As well, you need to select a proper Data Encapsulation Method.
Usually, LLC(Logical Link Control) encapsulation Method is used for RFC1483 bridge
mode.
3.2.2 RFC1483 Routed Mode (dhcpserver+NAT)
This is an example of setup for rfc1483 routed mode.
You can set the DHCP server as follows;
PC Side
subnet1: 192.168.1.0
netmask: 255.255.255.0 (this has set up as dhcpserver)
gateway: 192.168.1.1

Telco Side
subnet2: 202.1.136.0
gateway:202.1.136.1
Modem's WAN IP : 202.1.136.2
Using CLI(Command Line Interface), you can change the protocol of the modem to
RFC1483 bridged mode by the following steps;
At terminal Console Screen:
Remove all of the existing module devices
> config reset bridge
> ip device flush
> config reset ppp
> config save
Saving configuration...Configuration saved.
> restart
In this way, setup for rfc1483 routed mode is completed.
Ethernet block gateway setup;
> ip device add ethernet ether //edd 192.168.1.1
> ip subnet add ethernet.home . 192.168.1.1 ff:ff:ff:00
if subnetmask is the C class(255.255.255.0), subnet command is not needed.
Set up pvc value of WAN and IP to be given from telco;
> ip device add rfc1483 ptp //bun/port=atm/rfc1483=true/mode=llcrouted/vpi=x/
vci=y 202.1.136.2
("x" and "y" are VPI and VCI value for LLC capsulation respectively)
Or,
>ip device add rfc1483 ptp //bun/port=atm/rfc1483=true/mode=vcmuxrouted/vpi
=x/vci=y 202.1.136.2
("x" and "y" are VPI and VCI value for VCMUX capsulation respectively)

>ip relay all
>ip route add default 0.0.0.0 202.1.136.1 0:0:0:0
(Sets up default routing table between LAN subnet and WAN subnet)
> ip nat rfc1483
(this activates rfc1483 at net interface)
> config save
Saving configuration...Configuration saved.
> restart
After completing setup, connectthe modem to HUB and PC to HUB, to use several PCs
for ADSL service at the same time. In this case, RJ-45 UTP Ethernet cable must be
straight cable, not cross cable.
Select "Obtain an IP address automatically" in "IP Address" tab of the "TCP/IP
Properties" on PC connected a HUB.
And give no gateway IP address at gateway tab.
Using Webconsole, you can change the protocol of the modem to RFC1483 Routed
mode by clicking on “Config/rfc1483 Routed”
In the mode of RFC1483 Routed, the
modem has two subnet for LAN and
WAN, each.
LAN IP address and Netmasktake a
role as a gateway for LAN and
construct Private Subnet in case of
using NAT.
For setting asRFC1483 Routed, you
need to have the information for
VPI(Virtual Path Identifier)/VCI(Virtual Channel Identifier) from ISP.
The range of VPI value is from 0 to 4095,
and the range of VCI value is from 1 to 65535.
As well, you need to select a proper Data Encapsulation Method.
In case that the modem acts as a DHCP client and IP of WAN is assigned from CO
automatically, make DHCP enable. On the other hand, if IP is assigned from an ISP,
fill the blank of WAN IP Address and WAN Gateway.
If you want to set up LAN as a Private Subnet, make the NAT enable.

3.2.3 PPPoA Routed Mode(RFC2364/dhcpclient mode)
Here isan example of setup for PPPoA routed mode (dhcpclient mode)
If set up is as follows,
PC Side
subnet1: 192.168.1.0
netmask: 255.255.255.0
gateway: 192.168.1.1
Using CLI(Command Line Interface), you can change the protocol of the modem to
PPPoA Routed Mode by the following commands;
At terminal Console Screen:
Remove all of the existing module devices
> config reset bridge
> ip device flush
> config reset ppp
> config save
Saving configuration...Configuration saved.
> restart
Now, ppp configuration setup is ready.
Ethernet block gateway setup
> ip device add ethernet ether //edd 192.168.1.1
> ip subnet add ethernet.home . 192.168.1.1 ff:ff:ff:00
if subnetmask is the C class(255.255.255.0), subnet command is not needed.
Set up pvc value of WAN and PPP session item(User ID and Password) to be given
from telco
If assume that user ID is "hinet10", password is "1234", vpi="0", vci="32",
> ip device add ppp_device ether //ppp/DEVICE=1
> ppp 1 welogin hinet10 1234 chap

> ppp 1 pvc 0 32 ip
> ppp 1 llc 0
(0 =LLC encapsulation/ 1=VCMUX encapsulation)
> ppp 1 enable
> ip nat add ppp_device
> ip relay all
> config save
Saving configuration...Configuration saved.
> restart
In case of using DEVICE 1 and interface 1, add up default router when the modem is
linked and finish ip configuration for routing interface. That is, the modem will receive
IP address automatically by the operation of dhcpclient.
If the contents of ID, password, vpi, vci change in the above, then retry the above
commands related to ppp.
After finishing the configuration, if the ADSL Sync LED is in the "turn-on" condition
after it had been blinked in couple of seconds, you can use Internet.
At this time, you can check out PPP interface information by using the following
commands.
> ip device
device Ethernet ether //edd mtu 1500 192.168.1.1
device ppp_device ether //ppp/DEVICE=1 mtu 1500 O.O.O.O <-Assigned by DHCP
server on CO side
As above, IP address will be allocated to ppp_device.
If checking out the aboves, all setting for PPPoA service is completed.
As below, you can check out data transmission flow through PPPoA service.
> ppp 1 info all
If the modem has set up dhcpserver, select "Obtain an IP address automatically, and do
not need to setup IP address of gateway at the gateway tab on your PC conneted to
modem.
Using Webconsole, you can change the protocol of the modem to PPPoA Routed mode
by clicking on “Config/ PPPoA Routed”

In the mode of PPPoA Routed, the
modem has two subnet for LAN and
WAN, each.
LAN IP address and Netmasktake a
role as a gateway for LAN and
construct Private Subnet in case of
using NAT.
For setting as PPPoA Routed, you
need to have the information for
VPI(Virtual Path Identifier)/VCI(Virtual Channel Identifier) from ISP.
The range of VPI value is from 0 to 4095,
and the range of VCI value is from 1 to 65535.
As well, you need to select a proper Data Encapsulation Method.
IP of WAN is assigned from CO automatically through the authentication. In this case,
required User ID and Password are given from the ISP.
If you want to set up LAN as a Private Subnet, you should make the NAT enable. If
you make the Primary DNS Relay Enable, the modem acts as a DNS client. In this
case, DNS IP is assigned automatically and it is relayed to PC.
At the side of PC, modem act like a DNS Server, so you can use the Modem LAN IP as
DNS Server IP.
3.2.4 PPPoA Bridged Mode(RFC2364)
Using CLI(Command Line Interface),you can change the protocol of the modem to
PPPoA Bridge mode by the following steps.
At terminal Console Screen:
Remove all of the existing module devices

> config reset bridge
> ip device flush
> config reset ppp
> config save
Saving configuration...Configuration saved.
> restart
Now, ppp configuration setup is ready.
> bridge device add edd
> bridge device add ppp/DEVICE=1
> config save
Saving configuration...Configuration saved.
> restart
Among the above commands,"
bridge device add edd"
is used toadd Ethernet Port on
the bridge
As well, "
bridge device add ppp/DEVICE=1
refers to setup bridge port usingRFC2364
(PPPoA) protocol on the WAN.
Set up pvc value of WAN and PPP session item(User ID and Password) to be given
from telco
If assume that user ID is "hinet10", password is "1234", vpi="0", vci="32",
> ppp 1 welogin hinet10 1234 chap
> ppp 1 pvc 0 32 mac
> ppp 1 llc 0
(0 =LLC encapsulation/ 1=VCMUX encapsulation)
> ppp 1 enable
> config save
Saving configuration...Configuration saved.
> restart
If the contents of ID, password, vpi, vci change in the above, then retry the above
commands related to ppp.
After finishing the configuration, if the ADSL Sync LED is in the "turn-on" condition
after it had been blinked in couple of seconds, you can use Internet.

Using Webconsole, you can change the protocol of the modem to PPPoA Bridged mode
by clicking on “Config/PPPoA Bridged”
For setting asPPPoA bridged, you
need to have the information for
VPI(Virtual Path
Identifier)/VCI(Virtual Channel
Identifier) from ISP.
The range of VPI value is from 0 to
4095,
and the range of VCI value is from 1
to 65535.
As well, you need to select a proper Data Encapsulation Method.
To set the Bridge Port on the WAN, User ID and Password for authentication are given
from the ISP.
You can select a proper authentication method.
3.2.5 PPPoE Routed Mode(RFC2516/No using PPP client S/W)
Here isan example of setup for PPPoE routed mode(No using PPP client S/W)
If set up is as follows,
PC Side
subnet1: 192.168.1.0
netmask: 255.255.255.0
gateway: 192.168.1.1
Using CLI(Command Line Interface),you can change the protocol of the modem to
PPPoERoute mode by the following steps.
At the Terminal Console Screen:
Remove all of the existing module devices
> config reset bridge
> ip device flush
> config reset ppp
> config save
Saving configuration...Configuration saved.

> restart
Now, ppp configuration setup is ready.
Ethernet block gateway setup
> ip device add ethernet ether //edd 192.168.1.1
> ip subnet add ethernet.home . 192.168.1.1 ff:ff:ff:00
if subnetmask is the C class(255.255.255.0), subnet command is not needed.
Set up pvc value of WAN and PPP session item(User ID and Password) to be given
from telco
If assume that user ID is "hinet10", password is "1234", vpi="0", vci="32",
> ip device add ppp_device ether //ppp/DEVICE=1 mtu 1492
> ppp 1 welogin hinet10 1234 chap
> ppp 1 pppoe 0 32
> ppp 1 llc 0
(0 =LLC encapsulation/ 1=VCMUX encapsulation)
> ppp 1 enable
> ip nat add ppp_device
> ip relay all
> config save
Saving configuration...Configuration saved.
> restart
In case of using DEVICE 1 and interface 1, add up default router when the modem is
linked and finish ip configuration for routing interface. That is, the modem will receive
IP address automatically by the operation of dhcpclient.
The mtu value of PPPoE should be 1492.
If the contents of IP, password, vpi, vci change in the above, then retry the above
commands related to ppp.
After finishing the configuration, if the ADSL Sync LED is in the "turn-on" condition
after it had been blinked in couple of seconds, you can use Internet.
In this case, you can check out PPP interface information by using the following
commands.

> ip device
device Ethernet ether //edd mtu 1500 192.168.1.1
device ppp_device ether //ppp/DEVICE=1 mtu 1492 O.O.O.O
(Assigned by DHCP server on CO side)
As above, IP address will be allocated to ppp_device.
If checking out the aboves, all setting for PPPoA service is completed.
As below, you can check out data transmission flow through PPPoE service.
> ppp 1 info all
If the modem has set up dhcpserver, select "Obtain an IP address automatically, and do
not need to setup IP address of gateway at the gateway tab on your PC conneted to
modem.
Using Webconsole, you can change the protocol of the modem to PPPoERouted mode
by clicking on “Config/ PPPoERouted”
LAN IP address and Netmasktake a
role as a gateway for LAN and
construct Private Subnet in case of
using NAT.
For setting as PPPoE Routed,you
need to have the information for
VPI(Virtual Path
Identifier)/VCI(Virtual Channel
Identifier) from ISP.
The range of VPI value is from 0 to 4095,
and the range of VCI value is from 1 to 65535.
As well, you need to select a proper Data Encapsulation Method.
IP of WAN is assigned from CO automatically through the authentication. In this case,
required User ID and Password are given from the ISP.
If you want to set up LAN as a Private Subnet, you should make the NAT enable. If
you make the Primary DNS Relay Enable, the modem acts as a DNS client. In this
case, DNS IP is assigned automatically and it is relayed to PC.
At the side of PC, modem act like a DNS Server, so you can use the Modem LAN IP as
DNS Server IP.
Table of contents
Popular Modem manuals by other brands

Adeunis RF
Adeunis RF ARF45 quick start guide

Huawei
Huawei Vodafone Pocket Wi-Fi 4G Get connected

Daktronics
Daktronics DD3486291 Installation quick guide

ZyXEL Communications
ZyXEL Communications P-2602R/RL-DXA quick start guide

SEOWON INTECH
SEOWON INTECH SWC-1104 user guide

Pacific Crest
Pacific Crest ADL Vantage Pro user guide