Westinghouse WKCPPC100 User manual

PRESSURE COOKER AND
HALOGEN BAKER
WKCPPC100
Instructions
Bedienungsanweisungen
Instructions
Instrucciones
Gebruiksaanwijzing
P.2
P.18
P.35
P.53
P.70
EN
DE
FR
ES
NL

2
EN
INTENDED USE
Use the appliance only for the intended purpose. Any other use may result in
damage to the appliance or injuries.
IMPORTANT SAFEGUARDS
General
1. Read this manual thoroughly before first use. It contains important information
for your safety as well as for the use and maintenance of the appliance. Keep
these instructions for future reference and pass them on to possible new owners
of the appliance.
2. Use the appliance only for its intended purpose. Improper use may lead to
hazards.
3. This appliance is intended for normal household use only. It is not intended for
commercial or outdoor use.
4. Do not use the appliance for any purpose other than described in this manual.
5. In the event of improper use or incorrect operation, we will not accept any
liability for resulting damages.
6. This appliance is not intended to be used by persons (including children below
8 years of age) with reduced physical, sensory or mental abilities, or lack of
experience and knowledge, unless they are supervised or instructed on the use
of the appliance by a person who is responsible for their safety.
7. Keep the appliance and its power cord out of the reach of children younger than
8 years of age.
8. Children should be supervised to ensure that they do not play with the
appliance.
9. Never operate the appliance unattended.
10. Do not cover the appliance during use. Do not place anything on top of the
appliance.
11. Do not operate the appliance when it is empty.
12. Before each use, ensure that the sealing ring, pressure regulator and float valve
are clean and properly installed in the lid of the pressure cooker.
13. Never attempt to open the lid during pressure cooking.
14. Do not move the appliance during the cooking process.
15. Warning: To avoid being scalded, do not touch the lid of the pressure cooker
during use, and keep your keep hands and face away from the exhaust and float
valve.
16. Warning: This electrical appliance contains a heating function. Surfaces
(including non-functional surfaces) may become extremely hot during use. The
appliance will emit hot steam through the air outlet vents. Always keep your
hands and face at a safe distance from the appliance. Only handle the appliance
using the handles and buttons provided.
17. To protect your hands from burns or scalds, always use oven mitts, pot holders
or fetch tools when handling hot surfaces of the appliance or hot accessories.
18. Always rest the lid of the pressure cooker or halogen baker on a heatproof mat
to protect the countertop surface.
19. When filling the cooker, do not exceed the MAX level as indicated on the inner
pot.
20. Warning: Never fill the inner pot with oil. Do not use the appliance as a deep
fryer. Only use the Fry preset program without the lid for shallow frying.

3
EN
21. Caution: Ensure the lid of the pressure cooker is removed when using the Fry or
Saute preset program.
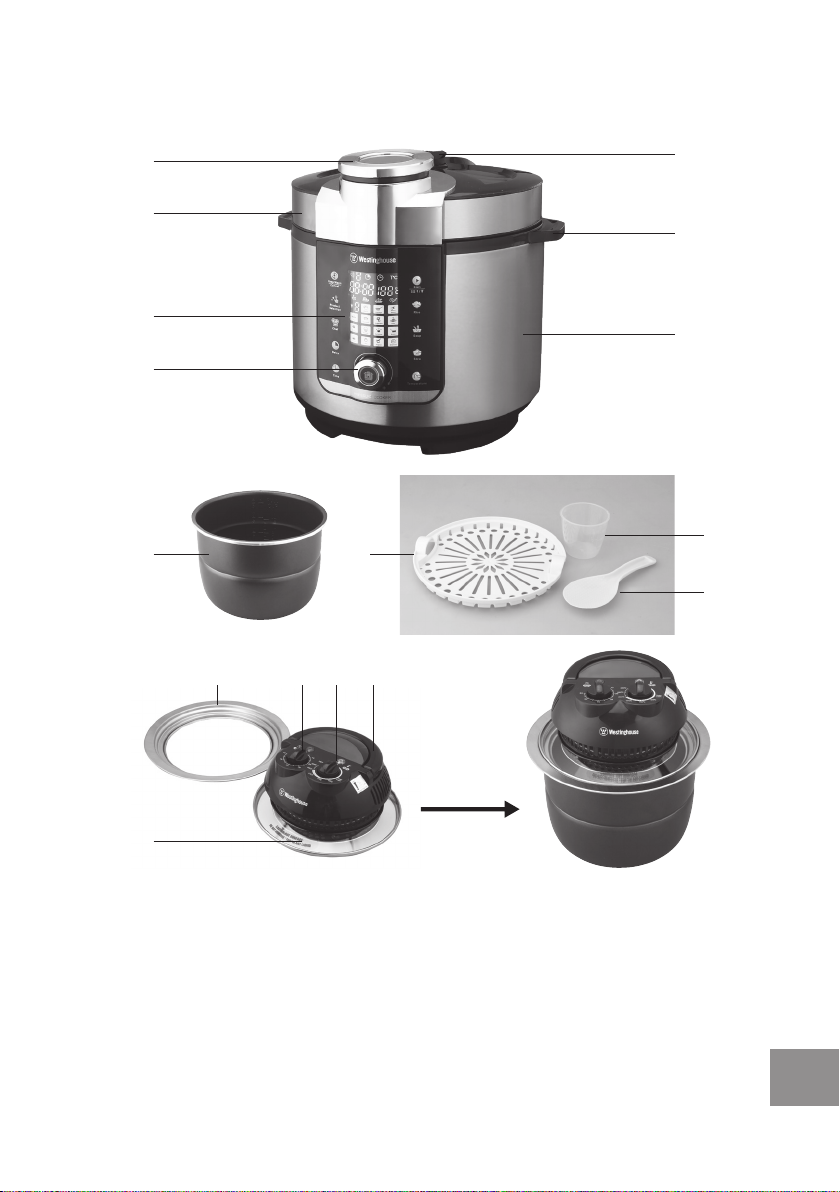
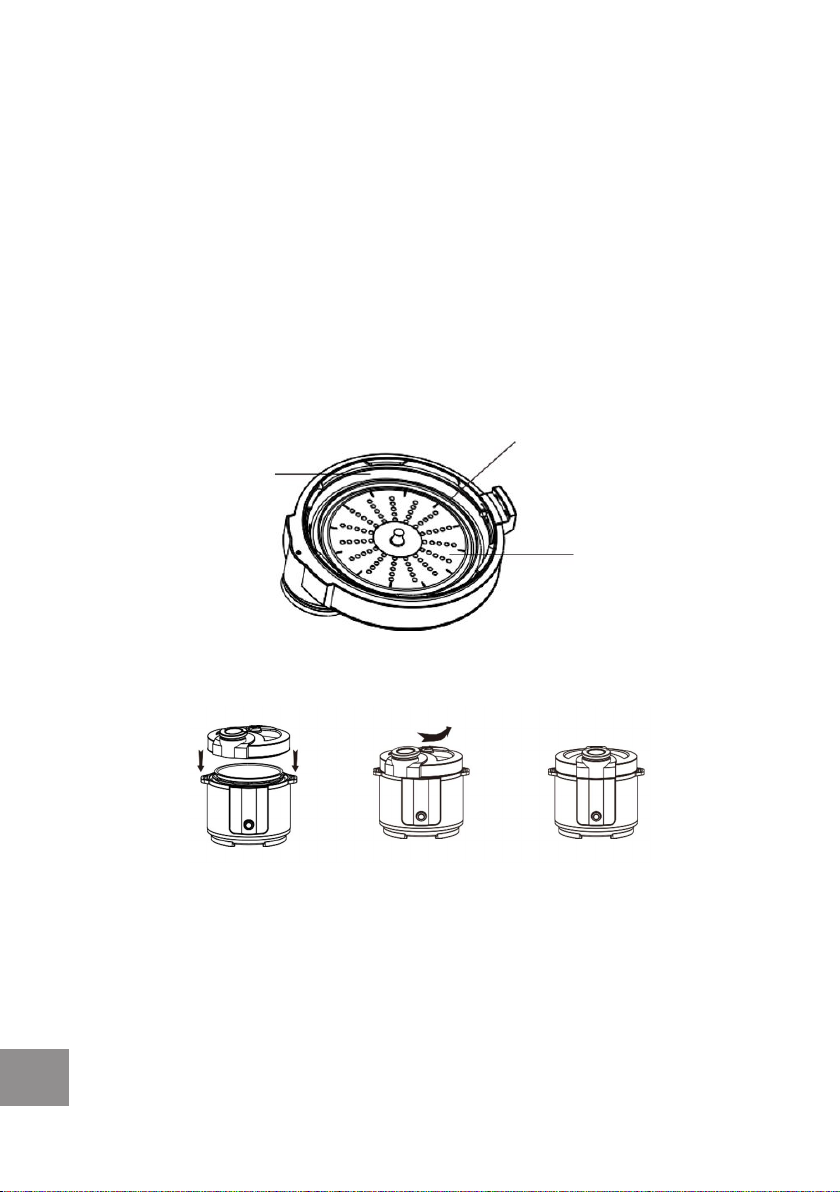
22. Never use the pressure cooker without the inner pot (8).
23. Warning: Only operate the halogen lid (13) with the support ring (12) and inner
pot (8) on a heatproof mat. Never operate the halogen lid (13) on the electric
base unit (7) of the pressure cooker. Failure to follow this warning may cause
damage to the appliance, fire, electric shock or serious injury.
24. Always place a high grade heatproof mat (not provided) under the inner pot (8)
of the halogen baker to protect the countertop surface and prevent the risk of
a fire. The inner pot becomes hot during and after cooking. Never operate the
halogen baker without a heatproof mat.
25. The inner pot, accessible surfaces and heating element of the halogen baker
become hot during use. Always use oven mitts, pot holders or fetch tools when
touching hot surfaces or handling hot accessories.
26. Do not immerse the base unit (7) and the halogen lid (13) in water, as they
contain electrical components and heating elements. Do not rinse under the tap.
27. Do not under any circumstances attempt to repair the appliance yourself. For
servicing and repairs, contact our after-sales service team to arrange a repair or
replacement.
28. Never connect this appliance to an external timer switch or separate remote-
control system.
29. The use of accessory attachments not recommended by the appliance
manufacturer may cause injuries.
30. Do not use the inner pot (8) on a stovetop or burner, as it is made specifically
for the base unit (7).
31. Do not put frozen substances into the appliance or wash the inner pot with cold
water when it is very hot.
32. The outer surfaces and inner pot of the appliance may become hot during use.
Wear oven mitts or use fetch tools when handling hot components or touching
hot surfaces.
33. Do not use the halogen baker near the pressure cooker. The heat generated by
the halogen baker will melt the plastic parts of the pressure cooker.
Power supply
1. Before connecting the appliance to a power socket, check that the voltage
indicated on the appliance rating label matches the voltage of your local mains
supply.
2. The power plug is used to disconnect the appliance from the mains. Please
ensure that the power plug is in an operable condition.
3. Removing the power plug is the only way to completely separate the appliance
from the power supply.
4. Disconnect from the power supply by pulling the power plug instead of the
power cord.
5. Do not use an extension cord with the appliance.
6. Keep the power cord away from hot surfaces. Do not plug in the power cord or
operate the appliance with wet hands.
7. Always attach the power cord to the appliance first, and then plug the power
cord into the wall outlet. To disconnect, power o the appliance first before
removing the power cord from the wall outlet.
8. Disconnect the power plug when the appliance is not in use, in case of
malfunctions, prior to attaching accessories and prior to cleaning.

4
EN
9. If the power cord or the casing of the appliance is damaged or if the appliance
is dropped, the appliance should not be used before being examined by a
professional electrician.
10. If the power cord is damaged, it must be replaced by the manufacturer, an
authorized service agent or a similarly qualified person in order to avoid hazards.
11. To avoid electrical shock, do not put liquids of any kind into the main unit
housing containing the electrical components.
12. Make sure the appliance is plugged into a wall outlet. Always make sure the plug
is inserted into the wall outlet properly.
Installation location
1. Place the appliance on a flat, dry and heat-resistant surface.
2. Always operate the appliance on a horizontal surface that is level, stable and
non-combustible.
3. Put the appliance in a place which is out of reach of children. Do not let children
near the appliance when in use. Close supervision is necessary when there are
children and pets around.
4. Warning: Do not let the cord hang over the edge of a table or counter. Ensure
that the cord is not in a position where it can be pulled by children or pets or
tripped over accidentally.
5. Do not operate this appliance near flammable materials (e.g. curtains, textiles
or walls) or cover it. Ensure that there is always a sucient safe distance from
flammable materials.
6. Warning: Do not use this appliance near water or heavy moisture (e.g. in a damp
basement or next to a swimming pool or bathtub).
7. In order to reduce the risk of fire and electric shock, do not expose the appliance
to fire (e.g. fireplace, grill, candles and cigarettes) or water (e.g. water drops,
water splashes, vases, tubs and ponds).
8. Keep this appliance away from all heat sources such as ovens, hot plates and
other heat-producing devices/objects.
RETAIN THESE INSTRUCTIONS
-----------------
FOR HOUSEHOLD USE ONLY

5
EN
PRESSURE COOKER AND HALOGEN BAKER
DESCRIPTION OF PARTS
1. Lid handle
2. Lid
3. Control panel
4. Control knob +/-
5. Pressure regulator
6. Base handle
7. Base unit
8. Inner pot
9. Steamer basket
10. Measuring cup
11. Meal spoon
12. Support ring for halogen lid
13. Halogen lid
14. Timer
15. Temperature dial
16. Handle and safety ON/OFF
1
2
3
4
5
6
7
13
8 9
10
11
12 14 15 16

6
EN
CONTROL PANEL
The Control Panel shows the current status of the cooker by displaying the cooking
temperature, the countdown of the Delay start and/or the cooking time. Active
buttons and icons light up for easy guidance.
CONTROL BUTTONS
Button Function
START/CANCEL
Press and hold the Start button for 5 seconds to:
- Wake the cooker from Standby Mode (activated if no
buttons are pressed for 30 seconds after the power supply is
connected).
- START a cooking program.
- CANCEL a cooking program.

7
EN
Control knob
Rotate the Control knob +/- to:
- Select a preset cooking program.
- Adjust the settings after pressing the Time, Temperature or
Delay button.
Product Selection
In the Soup, Stew or Steam cooking programs:
Press the Product Selection button to indicate the food type for a
more precise preset cooking time.
Press repeatedly to toggle the food options Fish, Meat, Poultry or
Vegetables. The cooking time will change automatically.
Time
Press the Time button to set the cooking time. Rotate the Control
knob +/- to adjust the time.
Press the Time and Temperature buttons at the same time to
adjust the volume level of the alert sounds (1 – 4). The default alert
volume will flash on the display. Rotate the Control knob +/-
to adjust the volume.
Temperature
Press the Temperature button to adjust the cooking temperature.
The button and “180°C” will flash. Rotate the Control knob +/- to
adjust the temperature.
Delay
After choosing a preset program or Chef mode, press the Delay
button to delay the start of the cooking time. Rotate the Control
knob +/- to adjust the delay up to 24 hours. Cooking begins after
the delay countdown has elapsed.
Keep Warm
Press the Keep Warm button to turn the Auto Keep Warm
function ON or OFF.
The Auto Keep Warm function turns ON by default after a
cooking program is complete and stays on for 24 hours. The keep
warm temperature is 70°C, which is not displayed.
This function is not available in the Fry and Yoghurt preset
programs.

8
EN
PRESET COOKING PROGRAMS
Preset
Program
Food type
/ Remarks
Pressure
Cooking
Time Temperature (⁰C) Delay
button
Preset Adjustable
Range Preset Adjustable
Range
Chef
For general
pressure
cooking
Yes 2 minutes 1-59 minutes
1-24 hours N/A Not
adjustable Yes
Rice -Yes 10 minutes 1-59 minutes
1-24 hours N/A Not
adjustable Yes
Soup
Fish Yes 15 minutes 1-59 minutes
1-24 hours N/A Not
adjustable Yes
Meat Yes 30 minutes 1-59 minutes
1-24 hours N/A Not
adjustable Yes
Poultry Yes 25 minutes 1-59 minutes
1-24 hours N/A Not
adjustable Yes
Vegetables Yes 10 minutes 1-59 minutes
1-24 hours N/A Not
adjustable Yes
Stew
Fish Yes 15 minutes 1-59 minutes
1-24 hours N/A Not
adjustable Yes
Meat Yes 30 minutes 1-59 minutes
1-24 hours N/A Not
adjustable Yes
Poultry Yes 25 minutes 1-59 minutes
1-24 hours N/A Not
adjustable Yes
Vegetables Yes 10 minutes 1-59 minutes
1-24 hours N/A Not
adjustable Yes
Braise -Yes 45 minutes 1-59 minutes
1-24 hours N/A Not
adjustable Yes
Porridge -Yes 10 minutes 1-59 minutes
1-24 hours N/A Not
adjustable Yes
Steam
Fish Yes 10 minutes 1-59 minutes
1-24 hours N/A Not
adjustable Yes
Meat Yes 20 minutes 1-59 minutes
1-24 hours N/A Not
adjustable Yes
Poultry Yes 15 minutes 1-59 minutes
1-24 hours N/A Not
adjustable Yes
Vegetables Yes 5 minutes 1-59 minutes
1-24 hours N/A Not
adjustable Yes
Fry -
No
(remove
lid)
45 minutes 1-59 minutes
1-24 hours 170⁰C 30–180⁰C No
Slow Cook -No 2 hours 1-59 minutes
1-24 hours 95⁰C Not
adjustable Yes
Vegetable -Yes 15 minutes 1-59 minutes
1-24 hours N/A Not
adjustable Yes
Cake -Yes 40 minutes 1-59 minutes
1-24 hours 140⁰C 30–180⁰C Yes
Crisp -Yes 1 hour 1-59 minutes
1-24 hours 160⁰C 30–180⁰C Yes
Cereals -Yes 35 minutes 1-59 minutes
1-24 hours N/A Not
adjustable Yes

9
EN
Preset
Program
Food type
/ Remarks
Pressure
Cooking
Time Temperature (⁰C) Delay
button
Preset Adjustable
Range Preset Adjustable
Range
Galantine -Yes 45 minutes 1-59 minutes
1-24 hours N/A Not
adjustable Yes
Saute
No
(remove
lid)
20 minutes 1-59 minutes
1-24 hours 170⁰C 30–180⁰C Yes
Pasta -Yes 10 minutes 1-59 minutes
1-24 hours N/A Not
adjustable Yes
Jam -Yes 10 minutes 1-59 minutes
1-24 hours 100⁰C Not
adjustable Yes
Yoghurt -No 5 hours
(5-9 hours)
1-59 minutes
1-24 hours 40⁰C Not
adjustable Yes
Omelette -No 10 minutes 1-59 minutes
1-24 hours 140⁰C 30–180⁰C No
BEFORE FIRST USE
1. Unpack the product and all accessories carefully. Retain the packaging for
future reference or later use. For information on packaging disposal or recycling,
contact your local authority.
2. Make sure the product is not damaged and that there are no missing
accessories. Return the product to the retailer if there are any missing or
damaged parts.
3. Clean the product and all accessories (see ‘Care and Maintenance’ section).
Halogen baker
Before first use, heat up the empty pot (8) in the halogen baker at the maximum
temperature of 250⁰C for 5–10 minutes (see USING THE HALOGEN BAKER).
This will help eliminate any odours as well as the protective lubricant from the
manufacturing process.
NOTE: The halogen baker may emit a small amount of smoke or odour during the
first few uses. This is normal due to the newness of the product.
USING THE PRESSURE COOKER
Fill the inner pot
1. To open the lid, grasp the lid handle (1) and turn the lid clockwise to the open
position (Figure 1 and 2). Lift the lid straight up to remove it (Figure 3).
Figure 1 Figure 2 Figure 3
2. Remove the inner pot (8) from the base unit (7).

10
EN
3. Fill the inner pot (8) with the ingredients and liquid, observing the following:
• The total amount of food and liquid (water, broth, stock, wine etc.) should
never exceed the “4/5” MAX marking on the inner pot.
• IMPORTANT: For food that expands during cooking (e.g. rice, beans, pasta,
etc.), the level should not exceed the “1/5” marking on the inner pot.
• For pressurized cooking, add a minimum of 350 ml (1 ½ cup) water or liquid
to the inner pot. The suggested food to water ratio is 1:1, which you can
adjust provided that you observe the minimum liquid requirement.
• For porridge, the suggested water to rice ratio is 8:1. Adjust to your
preference.
• Do not wash rice in the inner pot, as this may scratch the non-stick coating.
4. Insert the inner pot (8) back into the base unit (7), ensuring the bottom of the
inner pot is dry and clean.
Closing the lid
5. Before closing the lid, check that the sealing ring is properly in place.
CAUTION: Do not use the product without the sealing ring.
Anti-block shield
Sealing ring
Aluminum plate
6. To close the lid, cover the base unit with the lid in the open position (Figure4).
Then turn the lid anti-clockwise to the close position until you hear a “click”
(Figure 5 and 6).
Figure 4 Figure 5 Figure 6
7. Plug the power cord into the wall socket. The display will light up and show “0”.
After 30 seconds of inactivity, the display will show “F” and the Control Panel
will switch o, indicating that the cooker has entered Standby Mode.
NOTE: To wake the cooker from Standby Mode, press and hold the Start button
for 5 seconds.
Open or close the pressure regulator
8. Open or close the pressure regulator (5) on the lid as required by the Preset
Cooking Program that you will select in Step 9:
- Close the pressure regulator (5) if the selected preset program requires
pressure cooking.

11
EN
- Open the pressure regulator (5) if the selected preset program does not
require pressure cooking.
CLOSED OPEN
Pressure regulator
NOTE: Remove the lid (2) when using the Fry or Saute preset program.
Select a preset program
9. Turn the Control knob (4) to select the desired Preset Cooking Program (see
PRESET COOKING PROGRAMS table).
Touch the Temperature or Time button and rotate the Control knob to adjust the
cooking temperature or time according to your preference or recipe, if required.
10. You can press the Product Selection button to set the product type Fish / Meat
/ Poultry / Vegetables in the Soup, Stew or Steam program only.
Set the Delay start (optional)
11. Skip this step if not required. To delay the start of the cooking process, press
the Delay button and turn the Control knob to adjust the delay (5 minutes –
24hours).
• CAUTION: Do not leave raw food inside the cooker for an extended period
of time prior to cooking, otherwise the food may spoil. Use this function to
cook food that will not spoil easily, such as beans, rice and grains.
• NOTE: The delay start function is not available in the Fry and Omelette
cooking programs.
Start the cooking process
12. Press and hold the Start button for 5 seconds to confirm and start.
NOTE: In some programs, the cooking time countdown starts only after the
cooker reaches the preset temperature.
13. Once cooking is complete, if the Auto Keep Warm function is ON, the cooker
beeps and automatically enters Keep Warm mode (up to 24 hours, default
70⁰C).
NOTE: To maintain freshness, food should not be kept warm for more than
4hours.
14. Press the Start button for 5 seconds to stop the Keep Warm function and exit to
Standby Mode.
15. Unplug the cooker from the wall socket.
Depressurize the cooker
16. Before opening the lid, always release the steam and pressure from the cooker
using one of the following methods:
• Natural depressurization: Wait for about 10 minutes for the cooker and food
to cool down. The cooker is depressurized when the float valve goes DOWN.
• Quick depressurization: Wear oven mitts, and then turn the pressure
regulator (5) to the left or right to open it and release the steam (see picture
in step 8) until the float valve goes DOWN.

12
EN
Lid handle
Float valve
Pressure
regulator
WARNING: Escaping steam is extremely hot. Always keep your face and arms
away from the lid.
NOTE: To cancel the cooking process at any time during cooking, press the Start
button for 5 seconds.
FRY PRESET PROGRAM
Make sure the lid is removed when using this preset program. Use this function for
shallow frying.
USING THE HALOGEN BAKER
Use the halogen baker for baking, broiling, roasting and grilling.
Operation
1. Place the inner pot (8) on a heatproof mat.
2. Place the prepared and seasoned food in the inner pot (8).
3. Position the support ring (12) and then the halogen lid (13) on the inner pot (8).
4. Plug the power cord of the halogen lid (13) into the wall socket.
5. Push down the ON/OFF safety handle (16) until it snaps into place.
NOTE: The appliance will not turn ON if the handle is not pushed down
completely.
6. Turn the Temperature dial (15) to set the cooking temperature (0⁰C – 250⁰C).
7. Turn the Timer (14) to set the cooking time (0 – 60 minutes). Once the
temperature and time have been set, the appliance will turn ON.
8. If you need to turn the food halfway through cooking for an even browning:
- Lift the handle (16) and remove the halogen lid. The appliance switches OFF
(pauses) when the handle is up.
- Close the lid and push down the handle to continue cooking.
At the end of the Timer (14), the appliance will emit an alert sound and switch
OFF.
9. Unplug the appliance from the wall socket after use.
NOTE: If you wish to end the cooking process before the Timer ends, lift the handle
(16), and then turn the Timer (14) and Temperature dial (15) to the “0” position.
WARNING: The halogen lid, support ring and inner pot (8) become hot during and
after the cooking process. Never operate the halogen baker without the heatproof
mat under the inner pot to protect the countertop surface and prevent the risk of a
fire. Always use oven mitts, pot holders or fetch tools to handle the lid, inner pot or
hot accessories.

13
EN
SAFETY ON/OFF HANDLE
The handle (16) of the halogen baker is fitted with a safety ON/OFF switch.
• The appliance switches OFF (pauses) when the handle is lifted UP.
• The appliance switches ON when the handle is pushed DOWN and the
Temperature and the Timer are both set.
COOKING TIPS
• To bake, place the baking dish or pan on a low rack.
• To broil, place the baking pan or the food directly on a high rack.
• To roast, grill or air fry, place the food directly on a low rack to allow the air to
circulate around the food.
NOTE: The baking dish or pan should not touch the sides of the inner pot (8).
Ensure the food does not touch the heating element of the halogen lid (13) during
cooking.
CLEANING AND MAINTENANCE
1. Unplug the appliance from the power supply when it is not in use and before
cleaning.
2. Let the appliance cool down before cleaning.
3. Never use solvents and abrasives, hard brushes, metallic or sharp objects
for cleaning. Solvents are harmful to health and may attack the plastic parts.
Abrasive cleaners and tools may scratch the surface.
4. Never immerse the base unit (7), halogen lid (13) or any electrical parts in water
or other liquids. Do not place them under running water.
CLEANING
Base unit, Halogen lid
• Wipe the external surfaces of the base unit (7) and halogen lid (13) with a soft
cloth moistened with warm water or warm soapy water. Wipe clean and allow to
dry thoroughly.
• After each use, remove the condensation collector from the base unit to empty
its contents and rinse it.
Lid of pressure cooker
• Remove the lid (2) from the pressure cooker.
• Remove the sealing ring, aluminium plate, pressure regulator (5) and float valve
from the lid for cleaning. Wash them with a sponge in warm soapy water, and
then rinse well and allow to dry. Ensure all parts are properly reassembled to the
lid.
• Wipe the lid with a soft cloth or sponge moistened with water. Allow to dry.
• Ensure all parts are re-attached properly to the lid before use.
• Do not use the lid if any parts are missing.

14
EN
Anti-block shield
Sealing ring
Aluminum plate
Float valve core
Float valve
sealing washer
Inner pot
• Remove the inner pot (8) and wash it with a soft cloth or a non-abrasive sponge
in warm soapy water. Rinse well and dry thoroughly.

15
EN
TROUBLESHOOTING
Problem Possible cause Solution
Unable to operate the
appliance.
No electricity. Check the power source.
The appliance is not plugged
into the wall socket.
Ensure the appliance is plugged into the
wall socket and that the plug is inserted
properly.
Unable to close the
lid.
The sealing ring is not properly
installed.
Ensure the sealing ring is correctly
installed in the lid.
The float valve is stuck in the
UP position.
Ensure the float valve is correctly installed
in the lid.
Unable to open the
lid.
The cooker is still pressurized.
The float valve is UP.
Turn the pressure regulator (5) left or right
to depressurize the cooker. Wait until the
steam is released and the float valve goes
DOWN.
The float valve did not go
down after depressurization.
Use a stick to gently push down the float
valve.
Steam leaks from the
rim of the lid.
The lid is not properly closed. Check and close the lid again.
The sealing ring is not properly
installed in the lid.
Ensure the sealing ring is properly installed
in the lid.
The sealing ring is not installed
in the lid.
Install the sealing ring in the lid. DO NOT
operate the appliance without the sealing
ring.
Food residue is obstructing the
sealing ring. Clean the sealing ring.
The sealing ring is broken or
worn. Replace the sealing ring.
Steam leaks from the
float valve.
Food residue is obstructing
the sealing washer of the float
valve.
Clean the sealing washer of the float valve.
The sealing washer or the float
valve is broken or missing.
DO NOT operate the appliance. Replace
the sealing washer or the float valve.
The float valve does
not go UP during
pressurization.
The sealing washer is not
properly installed in the float
valve.
Install the sealing washer in the float valve
properly.
There is not enough food and
water in the inner pot to build
up steam pressure.
Add enough food and water to the inner
pot (8). For pressurized cooking, add a
minimum of 350 ml (1 ½ cup) water or
liquid to the inner pot. The recommended
food to liquid ratio is 1:1, which you can
adjust provided that you observe the
minimum liquid requirement.
There is a leakage from the
lid or the pressure regulator
(5) even after cleaning and
installing the parts properly.
Contact customer service for maintenance.

16
EN
Problem Possible cause Solution
Food is undercooked
or takes too long to
cook.
Power disruption. Check the power source.
The cooking time was too
short for the food portion. Set a longer cooking time.
There is food residue between
the inner pot and the heating
plate.
Unplug the pressure cooker and clean any
food residue between the inner pot and
the heating plate.
If the problem persists, contact customer
service centre for maintenance.
The heating plate or the inner
pot is distorted. Contact customer service for maintenance.
The heating plate is not
working properly. Contact customer service for maintenance.
The Auto Keep Warm
function did not
switch ON after the
cooking program
finished.
The Keep Warm button was
pressed during the Delay
countdown or during the
cooking process, which
switched the Auto Keep Warm
function o.
Press the Keep Warm button to turn the
Auto Keep Warm function ON. The button
should be illuminated.
Auto Keep Warm is not available after the
Fry and Yoghurt programs.
Faulty Keep Warm
components. Contact customer service for maintenance.
Mild electric shocks
or tingling sensation
when touching the lid.
Electricity leakage. DO NOT use the appliance.
Contact customer service for maintenance.
Display is
showing error
code
E1 Open circuit of the sensor.
Unplug the power cord from the wall
socket for 10 minutes, and then plug it
again.
If the error code persists, contact
customer service for maintenance.
E2 Short circuit of the sensor.
Unplug the power cord from the wall
socket for 10 minutes, and then plug it
again.
If the error code persists, contact
customer service for maintenance.
E3
Overheating.
Unplug the power cord from the wall
socket for 10 minutes, and then plug it
again. Observe the suggestions in the two
boxes below.
If the error code persists, contact
customer service for maintenance.
Overheating. There is no liquid
in the inner pot.
For pressurized cooking, add a minimum
of 350 ml (1 ½ cup) water or liquid to the
pressure cooker.
Overheating. The inner pot is
positioned incorrectly in the
base unit.
Ensure the inner pot is level and properly
inserted in the base unit.
E4 Signal switch malfunction.
Unplug the power cord from the wall
socket for 10 minutes, and then plug it
again.
If the error code persists, contact
customer service centre for maintenance.

17
EN
DISPOSAL
Proper disposal of this product
This label indicates that, in the EU, electronic devices cannot be disposed of
with regular household waste.
Please use the return or collection systems in your municipality or contact the
retailer where you purchased this product.
INFORMATION AND SERVICE
If you have questions or concerns about your product, please visit our website:
www.westinghousehomeware.com, or contact our overseas oces/agents.
In line with our policy of continuous product development, we reserve the right to
change product, packaging and documentation specifications without prior notice.

18
DE
ZWECKGEMÄSSE VERWENDUNG
Das Gerät darf nur für den vorgesehenen Zweck benutzt werden. Jeder davon
abweichende Gebrauch kann zu Schäden am Gerät oder zu Verletzungen führen.
WICHTIGE HINWEISE ZUR SICHERHEIT
Allgemeines
1. Diese Anleitung vor dem ersten Gebrauch sorgfältig durchlesen. Sie enthält
wichtige Informationen zu Ihrer Sicherheit sowie zum Gebrauch und zur Pflege
des Geräts. Diese Anweisungen für künftige Nachschlagezwecke aufbewahren
und zusammen mit dem Gerät an künftige Besitzer weitergeben.
2. Das Gerät darf nur für den vorgesehenen Zweck benutzt werden. Der
unsachgemäße Gebrauch kann Gefahren hervorrufen.
3. Dieses Gerät ist nur für den normalen Gebrauch in Privathaushalten vorgesehen.
Es ist nicht für den Gebrauch im Freien noch für gewerbliche Zwecke
vorgesehen.
4. Dieses Gerät nur für den in dieser Anleitung beschriebenen Zweck benutzen.
5. Im Falle eines unsachgemäßen Gebrauchs oder Bedienungsfehlers lehnen wir
jede Haftung für daraus folgende Schäden ab.
6. Dieses Gerät ist nicht für die Nutzung durch Personen (einschließlich Kindern
unter 8 Jahren) mit verringerten körperlichen, sensorischen oder geistigen
Fähigkeiten noch für Personen mit einem Mangel an Erfahrungen und
Kenntnissen geeignet, es sei denn, sie werden von einer für ihre Sicherheit
verantwortlichen Person beaufsichtigt oder sie haben eine Einweisung in den
Gebrauch des Geräts erhalten.
7. Das Gerät und das Netzkabel müssen außerhalb der Reichweite von Kindern
aufbewahrt werden, die jünger als 8 Jahre sind.
8. Um dafür zu sorgen, dass Kinder nicht mit dem Gerät spielen, müssen diese
beaufsichtigt werden.
9. Das Gerät nie unbeaufsichtigt in Betrieb lassen.
10. Das Gerät während des Gebrauchs nicht abdecken. Nichts auf dem Gerät
abstellen.
11. Das Gerät nicht leer betreiben.
12. Vor jedem Gebrauch prüfen, ob der Dichtring, Druckregler und das
Schwimmerventil gereinigt und im Deckel des Dampfgarers korrekt eingesetzt
sind.
13. Während des Dampfgarens nie versuchen, den Deckel zu önen.
14. Das Gerät während des Garvorgangs nicht versetzen.
15. Warnung: Den Deckel des Dampfgarers während des Gebrauchs nicht berühren
und Hände und Gesicht von den Dämpfen und vom Schwimmerventil fern
halten. Andernfalls besteht Verbrennungsgefahr.
16. Warnung: Dieses Elektrogerät ist mit einer Heizfunktion ausgestattet. Während
des Gebrauchs können die Flächen (auch die funktionslosen Flächen) sehr heiß
werden. Das Gerät setzt über die Lüftungsauslässe heißen Dampf frei. Hände
und Gesicht sollten immer einen Sicherheitsabstand zum Gerät einhalten. Zum
Handhaben des Geräts nur die Grie und Tasten benutzen.
17. Um Hände und Gesicht vor Verbrennungen zu schützen, immer
Ofenhandschuhe, Topfhalter oder Haltevorrichtungen benutzen, um die heißen
Flächen des Geräts oder heißes Zubehör zu handhaben.
18. Den Deckel des Dampfgarers oder den Halogenofen immer auf einer hitzefesten
Unterlage abstellen, um die Oberfläche der Arbeitsplatte zu schonen.

19
DE
19. Beim Befüllen des Garers die MAX-Marke im Innentopf nicht überschreiten.
20. Warnung: Den Innentopf nicht mit Öl befüllen. Das Gerät nicht als Fritteuse
benutzen. Zum flachen Anbraten das Garprogramm Fry (Braten) nur ohne den
Deckel benutzen.
21. Achtung: Bei Verwendung der Programme Fry (Braten) oder Saute (Anbraten)
daran denken, den Deckel vom Dampfgarer abzunehmen.
22. Den Dampfgarer nie ohne Innentopf (8) benutzen.
23. Warnung: Den Halogendeckel (13) immer zusammen mit dem Stützring (12) und
dem Innentopf (8) auf einer hitzefesten Unterlage einsetzen. Den Halogendeckel
(13) nie auf dem elektrischen Unterteil (7) des Dampfgarers benutzen. Wird
diese Warnung missachtet, kann das Gerät beschädigt werden oder es besteht
Brand-, Stromschlag- und schwere Verletzungsgefahr.
24. Zum Schutz der Arbeitsplatte und zum Brandschutz immer eine hochgradig
hitzefeste Unterlage (nicht mitgeliefert) unter den Innentopf (8) des
Halogenofens stellen. Der Innentopf ist während und nach dem Garen heiß. Den
Halogenofen nie ohne hitzefeste Unterlage benutzen.
25. Der Innentopf, die zugänglichen Flächen und das Heizelement des Halogenofens
werden während des Betriebs heiß. Immer Ofenhandschuhe, Topfhalter oder ein
Hilfsmittel für den Transport benutzen, wenn heiße Oberflächen angefasst oder
heißes Zubehör transportiert werden muss.
26. Das Unterteil (7) und den Halogendeckel (13) nicht in Wasser tauchen, da sie
Elektroteile und Heizelemente enthalten. Nicht unter dem Wasserhahn abspülen.
27. Das Gerät unter keinen Umständen versuchen, selbst zu reparieren. Im
Wartungs- und Reparaturfall unseren Kundendienst kontaktieren, um eine
Reparatur oder einen Austausch zu vereinbaren.
28. Das Gerät nie an eine externe Zeitschaltvorrichtung oder ein separates
Fernbediensystem anschließen.
29. Durch die Verwendung von externem Zubehör, das vom Gerätehersteller nicht
empfohlen wird, besteht Verletzungsgefahr.
30. Den Innentopf (8) nicht auf einer Kochmulde oder einem Brenner benutzen, da
er speziell für das Unterteil (7) hergestellt wurde.
31. Kein gefrorenes Material in das Gerät geben und den Innentopf nicht mit kaltem
Wasser abwaschen, wenn er sehr heiß ist.
32. Während des Gebrauchs werden die Außenflächen und der Innentopf des Geräts
heiß. Beim Handhaben oder Berühren heißer Teile oder Flächen Ofenhandschuhe
tragen oder ein Hilfsmittel für den Transport benutzen.
33. Den Halogenofen nicht in der Nähe des Dampfgarers benutzen. Die
Kunststoteile des Dampfgarers schmelzen durch die von dem Halogenofen
erzeugte Hitze.
Stromversorgung
1. Vor dem Anschließen des Geräts an eine Steckdose nachprüfen, ob die
Spannungsangabe auf dem Typenschild mit der Haushaltsspannung
übereinstimmt.
2. Zum Trennen des Geräts vom Netz den Netzstecker ziehen. Der Netzstecker
muss in einem betriebsfähigen Zustand sein.
3. Die einzige Möglichkeit, das Gerät vollständig von der Stromversorgung zu
trennen, besteht im Ziehen des Netzsteckers.
4. Beim Trennen von der Stromversorgung immer am Stecker und nicht am
Netzkabel ziehen.
5. Kein Verlängerungskabel für das Gerät benutzen.

20
DE
6. Das Netzkabel von heißen Flächen fern halten. Nicht mit nassen Händen das
Netzkabel anschließen oder das Gerät bedienen.
7. Das Netzkabel immer zuerst am Gerät und danach an eine Steckdose
anschließen. Zum Trennen des Geräts vom Netz, zuerst das Gerät abschalten
und erst dann den Netzstecker aus der Steckdose ziehen.
8. Den Netzstecker ziehen, wenn das Gerät nicht benutzt wird, bei einer
Funktionsstörung, bevor Zubehörteile angebracht werden und vor dem
Reinigen.
9. Falls das Netzkabel oder das Gehäuse des Geräts beschädigt ist oder das Gerät
auf den Boden gefallen ist, sollte es vor dem nächsten Gebrauch von einem
zugelassenen Elektriker überprüft werden.
10. Ein beschädigtes Netzkabel darf nur vom Hersteller, von einem
Vertragskundendienst oder von einer ähnlich qualifizierten Person ausgetauscht
werden, um Gefahren zu vermeiden.
11. Zur Vermeidung von Stromschlägen keine Flüssigkeiten in das Hauptgerät mit
den Elektrokomponenten einbringen.
12. Darauf achten, dass das Gerät an einer Steckdose angeschlossen ist. Immer
darauf achten, dass der Netzstecker korrekt in die Steckdose eingeführt ist.
Aufstellort
1. Das Gerät auf einer ebenen, trockenen und hitzefesten Fläche aufstellen.
2. Das Gerät immer auf einer waagerechten Fläche benutzen, die lotrecht, stabil
und nicht brennbar ist.
3. Das Gerät an einem Ort aufstellen, der für Kinder nicht erreichbar ist. Keine
Kinder in die Nähe des Geräts lassen, wenn es in Gebrauch ist. Wenn Kinder und
Haustiere anwesend sind, ist eine engmaschige Beaufsichtigung notwendig.
4. Warnung: Das Netzkabel nicht über Tisch- oder Tresenkanten herabhängen
lassen. Dafür sorgen, dass das Kabel nicht so verlegt ist, dass Kinder oder
Haustiere daran ziehen können oder dass es zu einer Stolpergefahr wird.
5. Das Gerät nicht in der Nähe entzündlicher Materialien benutzen (z. B.
Vorhängen, Textilien oder Wänden) oder abdecken. Ein ausreichender
Sicherheitsabstand zu entzündlichen Materialien ist stets einzuhalten.
6. Warnung: Das Gerät nicht in der Nähe von Wasser oder erheblicher Feuchtigkeit
benutzen (beispielsweise in einem feuchten Keller oder neben einem
Schwimmbecken oder einer Badewanne).
7. Zur Vermeidung einer Brand- oder Stromschlaggefahr das Gerät vor Feuer
(z. B. Kamin, Grill, Kerzenlicht und Zigaretten) bzw. Wasser (Wassertropfen,
Wasserspritzer, Vasen, Wannen und Teichen) fern halten.
8. Das Gerät von allen Wärmequellen wie etwa Öfen, Herdplatten und anderen
Gegenständen/Geräten fern halten, die Wärme produzieren.
DIESE ANLEITUNG AUFHEBEN
-----------------
NUR FÜR DEN HAUSGEBRAUCH GEEIGNET
This manual suits for next models
1
Table of contents
Languages:
Other Westinghouse Electric Pressure Cooker manuals