manuals.online logo
Brands
  1. Home
  2. •
  3. Brands
  4. •
  5. Westinghouse
  6. •
  7. Oven
  8. •
  9. Westinghouse WFEP917 User manual

Westinghouse WFEP917 User manual

Quick Start Guide
WFEP917
Ready
Set...
Before you start, please make sure:
Your oven has been correctly installed by a qualified person.
Your oven has power and is switched on.
You’ve removed all relevant packaging.
Get to know your control panel:
To access your detailed user manual online, simply scan the QR code on your smart phone.
For more detailed information and installation guide refer to user manuals
at westinghouse.com.au/manuals
This is a Quick Start Guide. Please refer to user manual
online for detailed information and installation
Most of the packaging
materials can be recycled.
Please dispose of them at
your local recycling centre
or in your own recycling bin.
Dear Customer,
Thank you for purchasing a Westinghouse appliance. You have chosen a product that
comes from a history of durable and reliable products loved by many families. We look
to help you make the most of your time at home, so you can spend your time doing
what you really love, with the ones you love.
Welcome to Westinghouse.
1Oven function selector
2Oven/grill temperature
control
3Cook time icon
4End time icon
5Touch to start timer mode.
Hold to turn oven light on/off
6Toggle through timer modes
7Toggle through cooking time
& oven set temperature
8Gas hob burner controls
9Time of day icon
10 On when timer is set
11 On when oven warming up
12 3 bars displayed when oven
reaches set temperature
13 On when oven cooling down
81 2 5
3 4 6 7
11910 12 13
Set the time
You must set the time before you can operate the appliance.
1. After the appliance has been electrically connected,
the clock icon will be displayed. Along with the
clock icon, the “12” will be flashing.
2. Toggle the temperature selector or , then touch
when you have the right hour.
3. The minutes will flash and can be set in the same
manner. 5 seconds after the last change, the clock
display will stop flashing, confirming that the time has
been set.
Note: The clock has a 24 hour display.
Condition the oven (to burn o any residue)
New appliances can have oil or residue left from
manufacturing. You will need to heat your oven for
2 hours before using it for the first time.
1. Turn the oven selector dial to “Fan Bake”.
2. Using the temperature control knob, set the oven at
180°C for approximately 2 hours. Please ensure that
the room is well ventilated during this process.
Installing the accessories
1. Install the telescopic slides (where supplied)
to the side racks. Refer to the installation
guide supplied with the telescopic slides.
2. Insert side racks.
There is a left hand and right hand version (see image).
1. Insert the rear peg into the rear access hole,
ensuring that the peg is fully inserted.
2. Then locate the front peg into the front access
hole and push in firmly.
Set...
Left hand side rack
Rear pegFront peg
4. Fit shelf/tray (where
supplied) to telescopic slides
1. Push the shelf or tray along the
top of the slide until it hits the
back post.
Shelf Back post
2. Drop the front of the shelf or tray
onto the slide ensuring it sits behind
the front post of the slide.
ShelfFront post
3. When fully inserted the shelf/tray
should not interfere with the closed
oven door.
3. To fit a shelf or tray to side racks:
1. Locate the rear edge of the shelf
in between guide rails of the side
rack. Ensure the same rail positions
on both sides of the oven are being
engaged.
2. With the front edge raised, slide the
shelf into the oven.
3. Once the detents have passed the
front edge of the side rack, the shelf
can be pushed completely in.
Detent
Bake/
Pizza
EasyBake
+Steam
Steam Assist
Clean
Go!
You’re ready to use your new Westinghouse appliance. A few tips from us:
Remember to pre-heat each time.
For best cooking results pre-heat the oven. Pre-heating allows the oven to reach the required temperature
quickly and eciently as well as cook food at the correct temperature for the entire cook time. Recommended
pre-heat time is 30 minutes for baking and 3 minutes for grilling.
Set your temperature
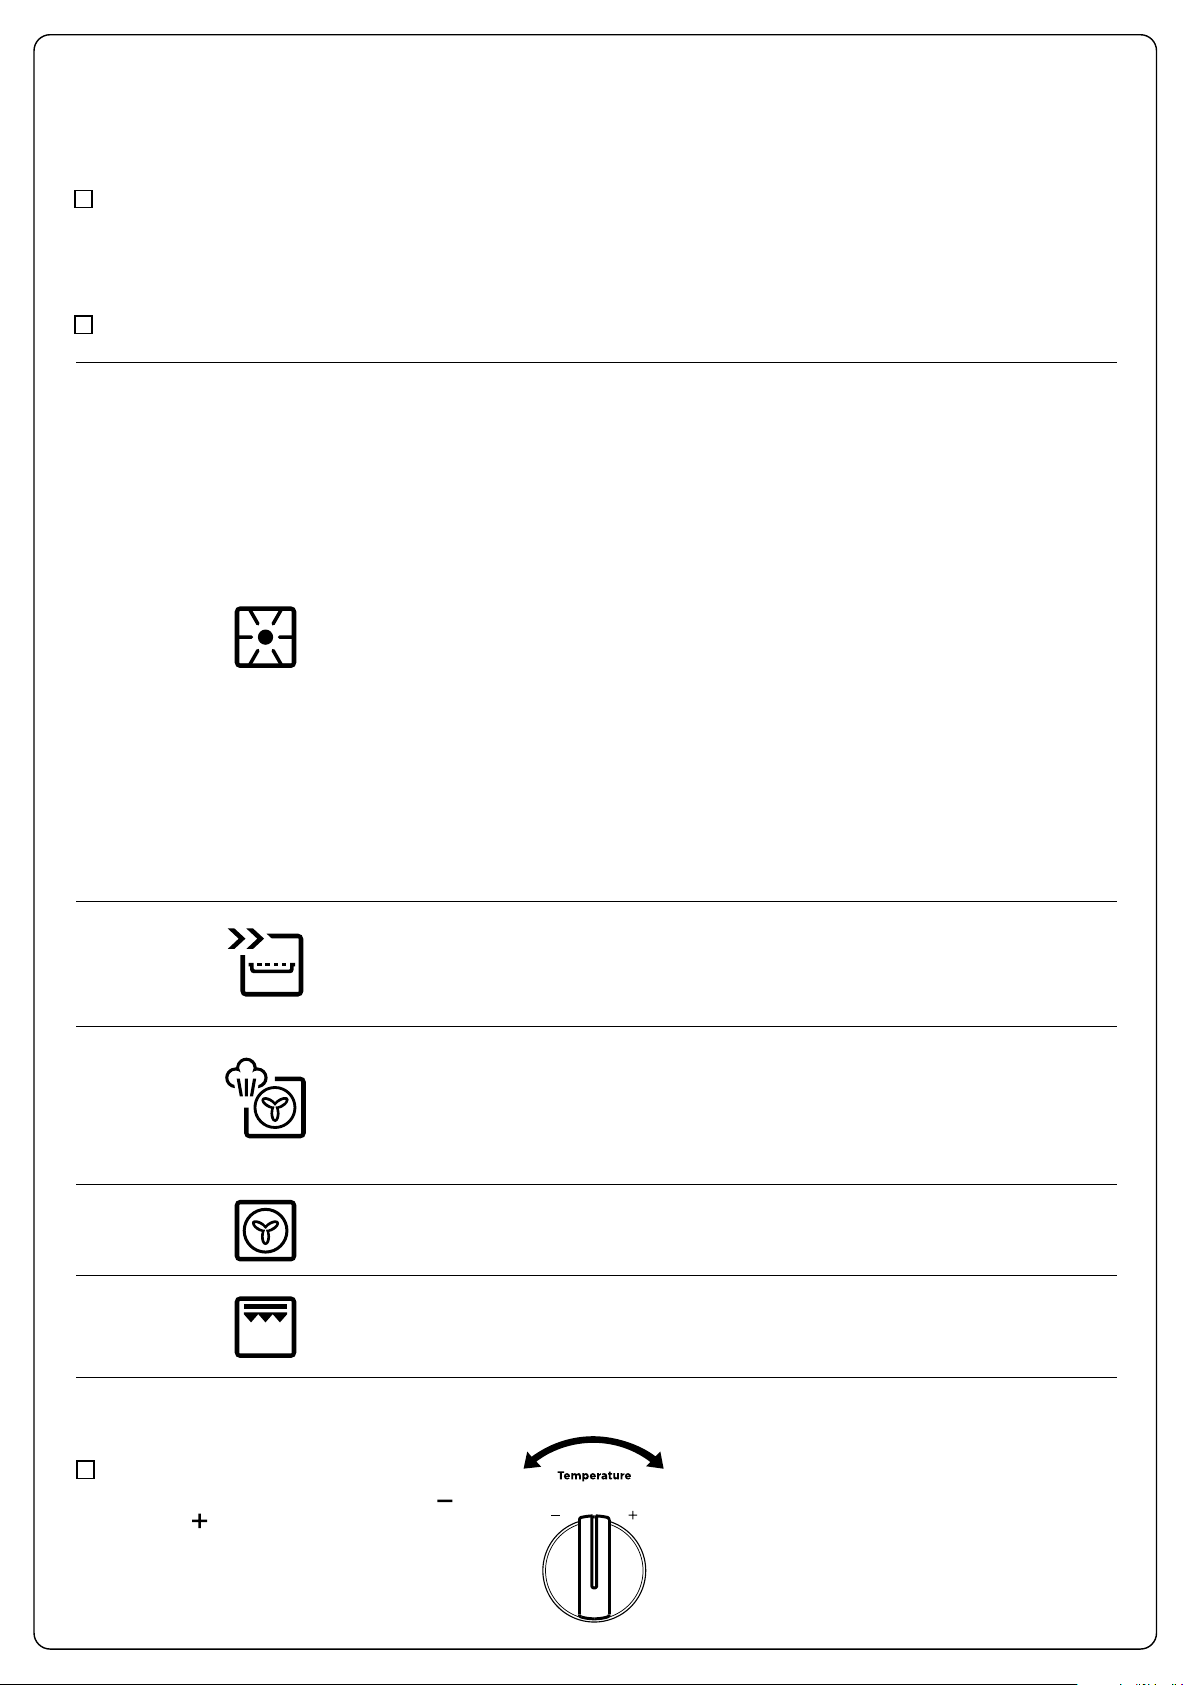
Toggle the temperature selector left ( )
or right ( ) as required to set the desired
cooking temperature.
Note: the temperature can be adjusted at
any time throughout the cooking time.
GAS
COOKTOP
Gas cooktop
Whether you’re cooking a stir fry, searing a steak, grilling vegetables or boiling water,
our intense burners provide high heat to help lock in the flavours or to speed things up.
To light a burner, firstly press the knob and turn it anti-clockwise to the ‘High’ flame
position. Release the knob once the flame is established and turn it further anti-
clockwise to reduce the flame height as desired.
Dual flame wok hot plate
Our smart dual ring flame control wok burner offers flexibility and precision to
instantly increase and drop flame intensity so you can enjoy cooking up a quick and
heated stirfry as well as simmering away your soup and gravy to perfection using the
same wok burner.
To light the wok burner, press the knob and turn anti-clockwise to ignite the inner and
outer rings. Release the knob when both inside and outside flames are established.
Turning the knob further anti-clockwise will reduce the height of the outer flame.
Turning the knob to ‘Mid’ and further will extinguish the outer flame and control the
height of the inner flame. Turning the knob back to ‘High’ will reignite the outer flame.
Note 1: Gas control has limited movement.
Note 2: If the flame goes out when either knob is released, simply press the knob
again, this time holding it down for approximately 5 seconds.
AIRFRY
AirFry for that perfect, healthy crunch. When a food craving hits, make healthier and
delicious food right in your oven. Deliver all the flavour and none of the guilt. AirFry
allows you to make healthier tasty meals for the entire family – right in your oven. The
first oven range with AirFry.
EASYBAKE
+STEAM
EasyBake +Steam adds humidity at the beginning of the baking process. In bakery
products, this allows the dough to rise and helps create a moist interior while
obtaining a golden and crispy crust. Before preheating, when the oven is cold, add
water to the cavity well. Refer to the chapter “EasyBake +Steam” in the full user
manual for more details. For best results preheat the empty oven for 10 minutes prior
to inserting food.
FAN BAKE This setting is best used when cooking on multiple shelves at once or reheating
complete meals for your family.
MAXI
GRILL
You can use the “Maxi Grill” function for tender cuts of meat, steak, chops, sausages,
fish, cheese toasties and other quick cooking food. Grill with the oven door closed.
“Maxi Grill” allows you to take full advantage of the large grill dish area.
Refer to your full user manual for more details on oven functions.
Choose the right program for the best result:
Quick Start Guide
WFEP917
and WESTINGHOUSE are trademarks of Westinghouse Electric Corporation. Used under license by Electrolux Home Products Pty Ltd. All Rights Reserved.
© 2020 Electrolux Home Products Pty Ltd. ABN 51 004 762 341 W_QSG_WFEP917_A4_Aug20 ANC A20499401 RevA(Assy ANC A20659101 RevA)
Need more help?
To access your detailed user manual
online, simply scan the QR code on
your smart phone.
Easily register your product with your smartphone for quick access
to all services and downloads
Locate the label on the inside of your product door
Photograph the camera icon, including the 4 dots (
00000000000
)
Text image to 0488 446 622 (AUS only) or upload at westinghouse.com.au/photoregister
Step 1
Step 2
Step 3
00000000000
EXAMPLE
Electrolux Home Products Australia
telephone: 13 13 49
email: customercare@electrolux.com.au
web: electrolux.com.au
Electrolux Home Products New Zealand
telephone: 0800 436 245
email: customercare@electrolux.co.nz
web: electrolux.co.nz
Contact us if you need more help
Customer Care Centre
Easy register with your smartphone
1. Photograph the camera icon, including the 4 dots( )
2. Then text it to 0488 446 622 (AUS only) or upload it
at westinghouse.com.au/photoregister
00000000000
EXAMPLE

Other Westinghouse Oven manuals

Westinghouse WVEP6727 Series User manual

Westinghouse

Westinghouse WVEP6727 Series User manual

Westinghouse GOP476 User manual

Westinghouse

Westinghouse GOP476 User manual

Westinghouse WVE645 User manual

Westinghouse

Westinghouse WVE645 User manual

Westinghouse WVE613 User manual

Westinghouse

Westinghouse WVE613 User manual

Westinghouse GOR474 User manual

Westinghouse

Westinghouse GOR474 User manual

Westinghouse WTO2010S User manual

Westinghouse

Westinghouse WTO2010S User manual

Westinghouse WVG6314 Series User manual

Westinghouse

Westinghouse WVG6314 Series User manual

Westinghouse WLE620 Series User manual

Westinghouse

Westinghouse WLE620 Series User manual

Westinghouse WFE9516 User manual

Westinghouse

Westinghouse WFE9516 User manual

Westinghouse WFE915 User manual

Westinghouse

Westinghouse WFE915 User manual

Westinghouse WFE9515 User manual

Westinghouse

Westinghouse WFE9515 User manual

Westinghouse WVES6314SD-L User manual

Westinghouse

Westinghouse WVES6314SD-L User manual

Westinghouse WVE626S User manual

Westinghouse

Westinghouse WVE626S User manual

Westinghouse WFEP9757 User manual

Westinghouse

Westinghouse WFEP9757 User manual

Westinghouse WVG6555SD User manual

Westinghouse

Westinghouse WVG6555SD User manual

Westinghouse WFE904SD User manual

Westinghouse

Westinghouse WFE904SD User manual

Westinghouse WVE612 User manual

Westinghouse

Westinghouse WVE612 User manual

Westinghouse WVG6555 Series User manual

Westinghouse

Westinghouse WVG6555 Series User manual

Westinghouse PEK1370W User manual

Westinghouse

Westinghouse PEK1370W User manual

Westinghouse WVE6515SD User manual

Westinghouse

Westinghouse WVE6515SD User manual

Westinghouse OG18KRS-CG User manual

Westinghouse

Westinghouse OG18KRS-CG User manual

Westinghouse WVEP6716 User manual

Westinghouse

Westinghouse WVEP6716 User manual

Westinghouse WVE655 User manual

Westinghouse

Westinghouse WVE655 User manual

Westinghouse POH967S User manual

Westinghouse

Westinghouse POH967S User manual

Popular Oven manuals by other brands

GE JVM1600 Series installation instructions

GE

GE JVM1600 Series installation instructions

Gaggenau BS 260 installation instructions

Gaggenau

Gaggenau BS 260 installation instructions

AEG COMPETENCE B8920-1 Installation and operating instructions

AEG

AEG COMPETENCE B8920-1 Installation and operating instructions

Siemens HB38AB 90 Series instruction manual

Siemens

Siemens HB38AB 90 Series instruction manual

Baumatic BYO152.5SS user manual

Baumatic

Baumatic BYO152.5SS user manual

Carawela Pro600 user manual

Carawela

Carawela Pro600 user manual

TurboChef ENCORE owner's manual

TurboChef

TurboChef ENCORE owner's manual

Artusi AO676B Operation manual

Artusi

Artusi AO676B Operation manual

Wood Stone WS-DS-6348 Installation and operation manual

Wood Stone

Wood Stone WS-DS-6348 Installation and operation manual

Whirlpool 311434 Rev. D installation instructions

Whirlpool

Whirlpool 311434 Rev. D installation instructions

EFBE-SCHOTT OT 800 manual

EFBE-SCHOTT

EFBE-SCHOTT OT 800 manual

Gaggenau BO 450 610 installation instructions

Gaggenau

Gaggenau BO 450 610 installation instructions

North SPM-30 Technical Instruction

North

North SPM-30 Technical Instruction

Wood Stone WS-TS-5-RFG-(IR)-(W) Installation and operation manual

Wood Stone

Wood Stone WS-TS-5-RFG-(IR)-(W) Installation and operation manual

Franke FMY 45 MW XS Installation and safety information

Franke

Franke FMY 45 MW XS Installation and safety information

Electrolux EOB53000X user manual

Electrolux

Electrolux EOB53000X user manual

Electrolux EOG2100 user manual

Electrolux

Electrolux EOG2100 user manual

Kuppersberg SGG 663 C Bronze Technical Passport

Kuppersberg

Kuppersberg SGG 663 C Bronze Technical Passport

manuals.online logo
manuals.online logoBrands
  • About & Mission
  • Contact us
  • Privacy Policy
  • Terms and Conditions

Copyright 2025 Manuals.Online. All Rights Reserved.