Westinghouse LTB20 User manual

USER MANUAL
12” CORDLESS STRING
TRIMMER AND EDGER
Thank you for choosing Westinghouse!
PLEASE READ BEFORE RETURNING
THIS PRODUCT FOR ANY REASON.
If you have a question or experience a problem with your Westinghouse
purchase, call us at 855-944-3571 to speak with an agent.
USE THIS TOOL WITH 20V WESTINGHOUSE BATTERIES ONLY
SAVE THIS MANUAL FOR FUTURE REFERENCE.
HOW TO REGISTER YOUR WESTINGHOUSE PRODUCT
To register your new product, call 855-944-3571 or visit
www.westinghouseoutdoorpower.com/register
MAKE SURE TO HAVE SERIAL NUMBER ON HAND

2
SAFETY GUIDELINES - DEFINITIONS
It is important to read and understand this manual. The
information it contains relates to protecting YOUR SAFETY
and PREVENTING PROBLEMS. The symbols below are used
to help you recognize this information.
DANGER: Indicates an imminently hazardous situation
which, if not avoided will result in death or serious injury.
WARNING: Indicates a potentially hazardous situation
which, if not avoided, could result in death or serious injury.
CAUTION: Indicates a potentially hazardous situation
which, if not avoided, may result in minor or moderate injury.
NOTICE: Used without the safety alert symbol indicates
potentially hazardous situation which, if not avoided, may result
in property damage.
DISCLAIMERS:
All information, illustrations and specications in this manual
are based on the latest information available at the time of
publishing. The illustrations used in this manual are intended as representative reference views only.
Moreover, because of our continuous product improvement policy, we may modify information,
illustrations and/or specications to explain and/or exemplify a product, service or maintenance
improvement. We reserve the right to make any change at any time without notice. Some images
may vary depending upon which model is shown.
ALL RIGHTS RESERVED:
No part of this publication may be reproduced or used in any form by any means – graphic,
electronic or mechanical, including photocopying, recording, taping or information storage and
retrieval systems – without the written permission of Westinghouse Outdoor Power Equipment.
DANGER: This manual contains important instructions for operating this product. For your safety
and the safety of others, be sure to read this manual thoroughly before operating the battery/charger.
Failure to properly follow all instructions and precautions can cause you and others to be seriously
hurt or killed.
TRIMMER SPECIFICATIONS
Model
Part
Number Motor
No-load
speed
Cutting
Head
Cutting
Path Di-
ameter
Cutting
Line Di-
ameter
Works with
Battery
Westinghouse 20V
Cordless 12” String
Trimmer and Edger
LTB20 20V DC 7000 RPM AutoFeed 25/30 cm 1.60 mm LBC202Z-2
LBC204Z-1
WHERE IS MY SERIAL NUMBER? Serial number on
this product is located on bottom of handle.
Some dust created by this product
contains chemicals known to the
State of California to cause cancer,
birth defects or other reproductive
harm. Some examples of these
chemicals are:
• compounds in fertilizers
• compounds in insecticides,
herbicides and pesticides
• arsenic and chromium from
chemically treated lumber
To reduce your exposure to these
chemicals, wear approved safety
equipment such as dust masks that
are specially designed to lter out
microscopic particles.
WARNING
WHAT COMES WITH TOOL
• Telescoping trimmer pole with
handle and head
• 1 spool of 1.6mm trimmer line
• Trimmer guard
• 5 screws to secure trimmer guard
• 10 mm handle nut
• Handle tightener knob
• Adjustable handle
• Warranty
• Manual

3
SAFETY SYMBOLS
Some of the following symbols may be used on this product. Please study them and learn their
meaning. Proper interpretation of these symbols will allow you to operate the product better and safer.
Symbols Name Designation/Explanation
V Volts Voltage
A Amperes Current
Hz Hertz Frequency (cycles per second)
W Watts Power
min Minutes Time
noNo Load Speed Rational speed, at no load
Alternating Current Type of current
Direct Current Type or a characteristic of current
/min Per Minute Revolutions, strokes, surface speed, orbits etc., per minute
Wet Conditions Alert Do not expose to rain or use in damp locations
Read the Operator’s
Manual
To reduce the risk of injury user must read and understand
operator’s manual before using this product.
Eye Protection Always wear eye protection with side shields marked to
comply with ANSI Z87.1 when operating this equipment.
Safety Alert Precautions that involve your safety.
No Blade Do not install or use any type of blade
on a product displaying this symbol.
Keep Bystanders
Away
Keep all bystanders at least 50 ft. away.
Ricochet Thrown objects can ricochet and result in personal injury or
property damage.

4
SAFETY INFORMATION
IMPORTANT SAFETY WARNINGS & INSTRUCTIONS
WARNING: TO REDUCE RISK OF INJURY:
• Before any use, be sure everyone using this unit reads and understands all safety instructions and
other information contained in this manual.
• Save these instructions and review frequently prior to use and in instructing others.
• Do not point unit discharge at self or bystanders.
• Keep long hair and loose clothing away from openings and moving parts.
WARNING: When using an electric tool, basic safety precautions should always be followed to
reduce risk of re, electric shock, and personal injury, including the following.
WARNING: When using trimmer be aware of your surroundings. Dust generated by your
surrounding has the potential of containing harmful chemicals such as: compounds in fertilizers,
compounds in insecticides, herbicides and pesticides, arsenic and chromium from chemically
treated lumber. To reduce your exposure to these chemicals, wear approved safety equipment such
as dust masks that are specially designed to lter out microscopic particles.
GENERAL SAFETY WARNINGS FOR TRIMMER
BEFORE USING
• Use extra care when cleaning on stairs.
• Do not use on wet surfaces.
• Do not allow to be used as a toy. Close attention is necessary when used by or near children.
• Use only as described in this manual. Use only manufacturer’s recommended attachments.
• Keep hair, loose clothing, ngers, and all body parts away from openings and moving parts.
• Don’t expose to rain when operating the machine.
• Store indoors. Do not expose to rain or water. Avoid direct sunshine.
WHEN USING
DANGER: Keep hands away from trimmer string. Contact with moving trimmer string will result in
serious personal injury.
• ALWAYS WEAR EYE PROTECTION – Wear safety glasses or goggles at all times when battery
pack is installed.
• GUARD – Do not use this trimmer without guard attached.
• DRESS PROPERLY – Do not wear loose clothing or jewelry. They can be caught in moving parts.
Rubber gloves and substantial rubber soled footwear are recommended when working outdoors.
Don’t operate the trimmer when barefoot or wearing open sandals. Wear heavy long pants to
protect your legs. Wear protective hair covering to contain long hair.
• NYLON LINE – Keep all body parts, including face, hands and feet clear of rotating nylon line at all times.
• THE ROTATING LINE PERFORMS A CUTTING FUNCTION – Use care when trimming around
screens and desirable plants.
• KEEP ALL BYSTANDERS AWAY – at a safe distance from work area, especially children.
• IMPORTANT WARNING – When being used as an Edger, stones, pieces of metal and other objects
can be thrown out at high speed by the line. The trimmer and guard are designed to reduce the
danger. However, the following special precautions should be taken:
• MAKE SURE that other persons and pets are at least 100 feet (30m) away.

5
SAFETY INFORMATION
• TO REDUCE THE RISK of rebound (ricochet) injury, work going away from any nearby solid object
such as wall, steps, large stone, tree, etc. Use great care when working close to solid objects and
where necessary, do edging or trimming by hand.
• AVOID ACCIDENTALLY STARTING – Don’t carry plugged-in trimmer with nger on trigger.
• DO NOT FORCE THE Appliance – at a rate faster than the rate at which it is able to cut eectively.
• USE THE RIGHT Appliance – Do not use this appliance for any job except that for which it is
intended.
• DAMAGE TO UNIT – If you strike or become entangled with a foreign object, stop appliance
immediately, remove battery, check for damage and have any damage repaired before further
operation is attempted. Do not operate with a broken hub or spool.
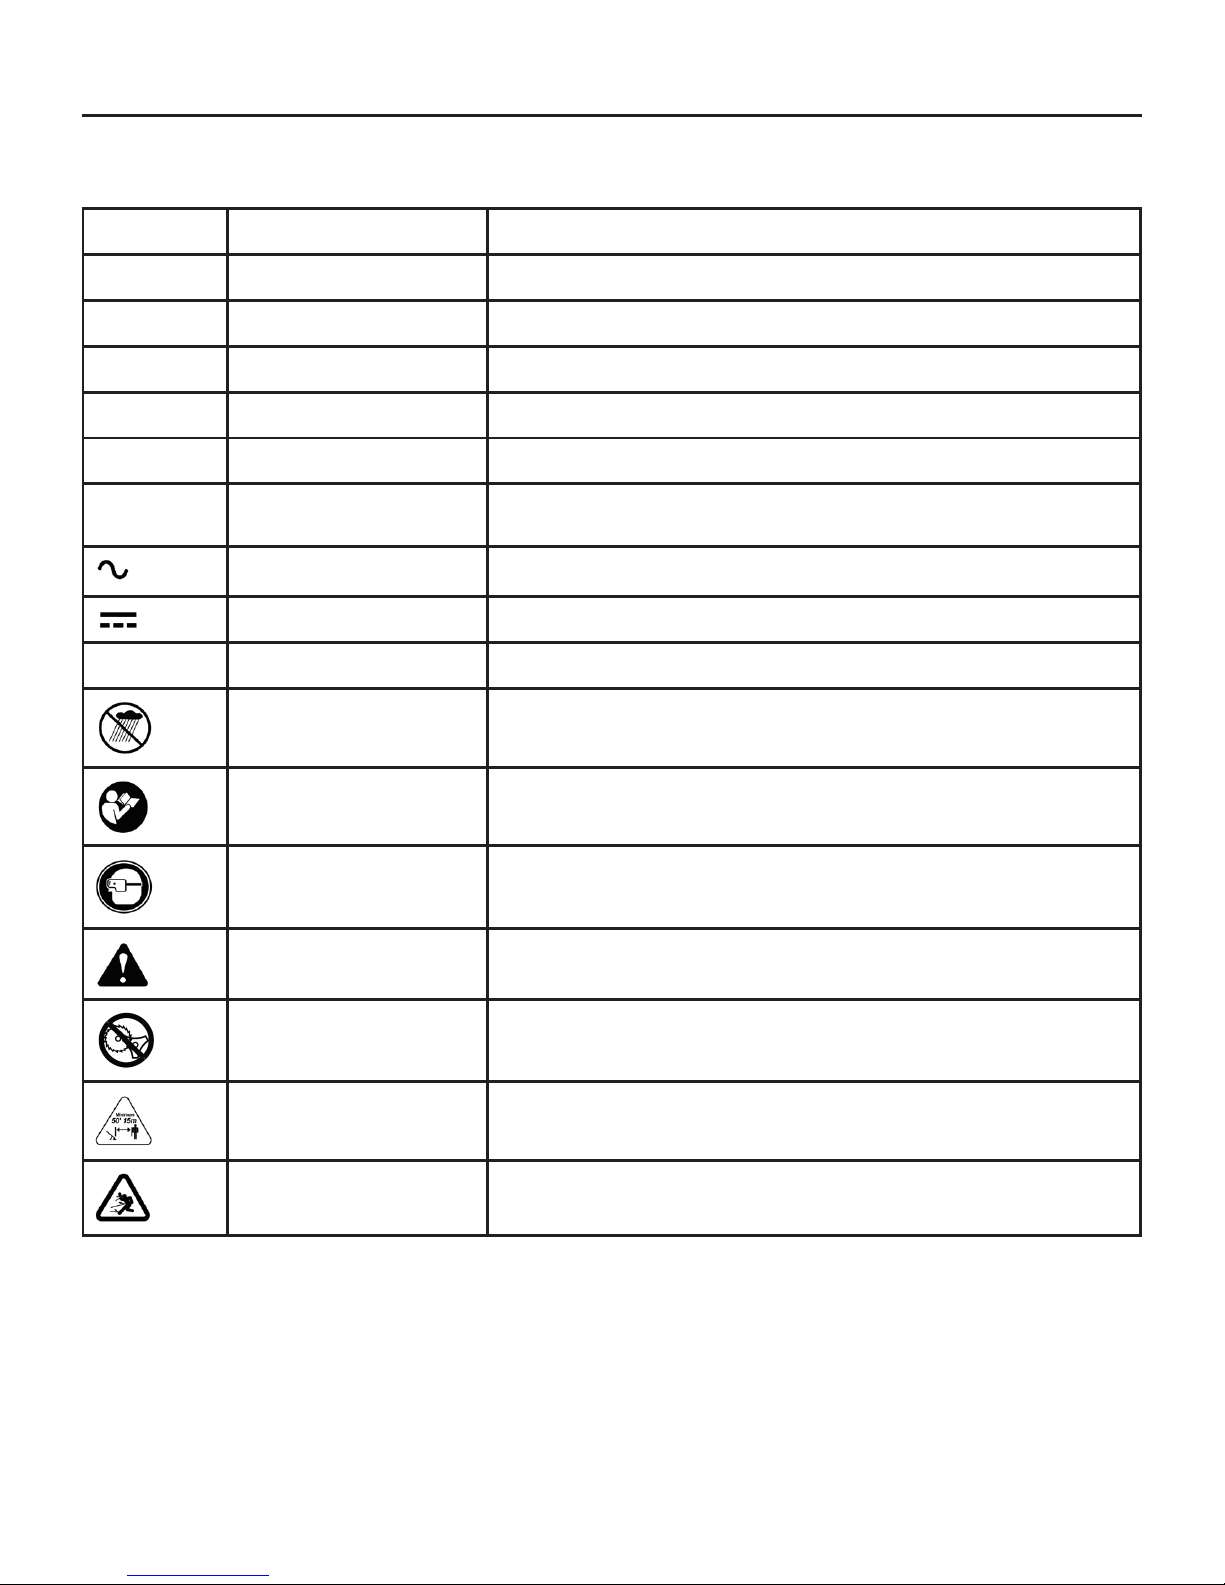
• AVOID DANGEROUS ENVIRONMENTAL CONDITIONS – Do not use electric appliances in damp or
wet locations. Follow all instructions in this Instruction Manual for proper operation of your trimmer.
Don’t use the trimmer in the rain.
GENERAL SAFETY WARNINGS AND INSTRUCTIONS FOR ALL TOOLS
• A BATTERY OPERATED UNIT with integral batteries or a separate battery pack must be recharged
only with the specied charger for the battery. A charger that may be suitable for one type of battery
may create a risk of re when used with another battery.
• USE BATTERY OPERATED UNIT ONLY with Westinghouse 20V battery pack. Use of any other
batteries may create a risk of re.
• AVOID accidental starting. Be sure switch is in the o position before inserting battery pack. Car-
rying units with your nger on the switch or inserting the battery pack into a unit with the switch on
invites accidents.
• DO NOT use unit if switch does not turn it on or o. A unit that cannot be controlled with the switch
is dangerous and must be repaired.
• DISCONNECT battery pack from unit or place the switch in the locked or o position before making
any adjustments, changing accessories, or storing the unit. Such preventative safety measures
reduce the risk of starting the unit accidentally.
• ALWAYS WEAR EYE PROTECTION – Wear safety glasses or goggles at all times when this unit is
in use. Also use face or dust mask.
• DO NOT place outlet of sweeper near eyes or ears when operating.
• STORE IDLE UNITS. When not in use, the unit should be stored in a dry, high or locked-up place -
out of reach of children.
• DON’T OVERREACH. Keep proper footing and balance at all times.
• MAINTAIN UNIT WITH CARE. Keep unit clean for best and safest performance. Follow instructions
for proper maintenance.
• DO NOT attempt to repair the sweeper. To assure product safety and reliability, repairs, mainte-
nance, and adjustments should be performed by Westinghouse service centers or authorized service
centers, always using Westinghouse replacement parts.
• DO NOT operate sweeper in a gaseous or explosive atmosphere. Motors in these units normally
spark, and the sparks might ignite fumes.
• AVOID DANGEROUS ENVIRONMENTAL CONDITIONS – Do not use electric units in damp or wet
locations. Don’t use the unit in the rain.
• STAY ALERT - Watch what you are doing. Use common sense. Do not operate unit when you are
tired.
• USE THE RIGHT UNIT – Do not use this unit for any job except that for which it is intended.
• USE EXTRA CARE when cleaning on stairs.
• DO NOT allow to be used as a toy. Close attention is necessary when used by or near children. Not
recommended for use by children.

6
SAFETY INFORMATION
• DO NOT attempt to clear clogs from unit without rst removing battery.
• USE ONLY as described in this manual. Use only manufacturer’s recommended attachments.
• DO NOT put any objects into openings. Do not use with any opening blocked; keep free of dust,
lint, hair and everything that may reduce air ow.
• KEEP hair, loose clothing, ngers, and all parts of body away from openings and moving parts.
• DO NOT immerse any part of the unit in liquid.
• DO NOT handle charger, including charger plug, and charger terminals with wet hands.
• KEEP CHILDREN, BYSTANDERS AND ANIMALS AWAY from the work area a minimum of 30
feet (10 meters) when starting or operating the unit.
• INSPECT THE AREA before using the unit. Remove all debris and hard objects such as rocks,
glass, wire, etc. that can ricochet, be thrown, or otherwise cause injury or damage during opera-
tion.
• USE ONLY charger supplied by the manufacturer to recharge.
• EXERCISE CARE in handling batteries in order not to short the battery with conducting materials
such as rings, bracelets and keys. The battery or conductor may overheat and cause burns.
• DO NOT OPEN OR MUTILATE the batteries. Released electrolyte is corrosive and may cause
damage to the eyes or skin. It may be toxic if swallowed.
• DO NOT CHARGE the unit outdoors.
WARNING: To reduce the risk of electrical shock; do not expose to rain, do not use on wet sur-
faces. Store indoors.
IMPORTANT SAFETY INSTRUCTIONS FOR BATTERY CHARGERS
WARNING: Shock hazard. Do not allow any liquid to get inside charger.
CAUTION: Burn hazard. To reduce the risk of injury, charge only designated Westinghouse batter-
ies. Other types of batteries may burst causing personal injury and damage.
CAUTION: Under certain conditions, with the charger plugged in to the power supply, the charger
can be shorted by foreign material. Foreign materials of a conductive nature such as, but not limited
to, steel wool, aluminum foil, or any buildup of metallic particles should be kept away from charger
cavities. Always unplug the charger from the power supply when there is no battery pack in the cavi-
ty. Unplug charger before attempting to clean.
• DO NOT attempt to charge the battery pack with any chargers other than the ones in this manual.
The charger and battery pack are specically designed to work together.
• These chargers are not intended for any uses other than charging designated Westinghouse re-
chargeable batteries. Any other uses may result in risk of re, electric shock or electrocution.
• DO NOT expose charger to rain or snow.
• Pull by plug rather than cord when disconnecting charger. This will reduce risk of damage to elec-
tric plug and cord.
• Make sure that cord is located so that it will not be stepped on, tripped over, or otherwise subject-
ed to damage or stress.
• DO NOT use an extension cord unless it is absolutely necessary. Use of improper extension cord
could result in risk of re, electric shock, or electrocution.
• DO NOT operate charger with damaged cord or plug — have them replaced immediately.
• DO NOT operate charger if it has received a sharp blow, been dropped, or otherwise damaged in
any way. Take it to an authorized service center.

7
SAFETY INFORMATION
• DO NOT disassemble charger; take it to an authorized service center when service or repair is
required. Incorrect reassembly may result in a risk of electric shock, electrocution or re.
• Disconnect the charger from the outlet before attempting any cleaning. This will reduce the risk of
electric shock. Removing the battery pack will not reduce this risk.
• NEVER attempt to connect 2 chargers together.
• The charger is designed to operate on standard household electrical power (120 Volts). Do not
attempt to use it on any other voltage.
• An extension cord should not be used unless absolutely necessary. Use of improper extension
cord could result in a risk of re and electric shock. If extension cord must be used, make sure:
a. That pins on plug of extension cord are the same number, size and shape as those of plug on
charger.
b. That extension cord is properly wired and in good electrical condition; and
c. That wire size is large enough for AC ampere rating of charger as specied below:
Cord Length (Feet) 25’ 50’ 100’
Cord Size (AWG) 16 16 16
IMPORTANT SAFETY INSTRUCTION FOR BATTERY PACKS
WARNING: For safe operation, read this manual and manuals originally supplied with tool before
using the charger. The battery pack is not fully charged out of the carton. Before using the battery
pack and charger, read the safety instructions below. Then follow charging procedures outlined.
READ ALL INSTRUCTIONS
• DO NOT incinerate the battery pack even if it is severely damaged or is completely worn out. The
battery pack can explode in a re. Toxic fumes and materials are created when battery packs are
burned.
• DO NOT charge or use battery in explosive atmospheres, such as in the presence of ammable
liquids, gases or dust. Inserting or removing the battery from the charger may ignite the dust or
fumes.
• If battery contents come into contact with the skin, immediately wash area with mild soap and
water. If battery liquid gets into the eye, rinse water over the open eye for 15 minutes or until
irritation ceases. If medical attention is needed, the battery electrolyte for Lithium-Ion batteries is
composed of a mixture of liquid organic carbonates and lithium salts.
• Contents of opened battery cells may cause respiratory irritation. Provide fresh air. If symptoms
persist, seek medical attention.
WARNING: Burn hazard. Battery liquid may be ammable if exposed to spark or ame.
• Charge the battery packs only in Westinghouse chargers.
• DO NOT splash or immerse in water or other liquids. This may cause premature cell failure.
• Do not store or use the tool and battery pack in locations where the temperature may reach or
exceed 105°F (40˚C) (such as outside sheds or metal buildings in summer).
WARNING: Never attempt to open the battery pack for any reason. If battery pack case is
cracked or damaged, do not insert into charger. Do not crush, drop or damage battery pack. Do not
use a battery pack or charger that has received a sharp blow, been dropped, run over or damaged in
any way (i.e., pierced with a nail, hit with a hammer, stepped on). Damaged battery packs should be
returned to service center for recycling.

8
SAFETY INFORMATION
WARNING: Fire hazard. Do not store or carry battery so that metal objects can contact exposed
battery terminals. For example, do not place battery in aprons, pockets, tool boxes, product kit
boxes, drawers, etc., with loose nails, screws, keys, etc. Transporting batteries can possibly cause
res if the battery terminals inadvertently come in contact with conductive materials such as keys,
coins, hand tools and the like. The US Department of Transportation Hazardous Material Regulations
(HMR) actually prohibit transporting batteries in commerce or on airplanes (i.e., packed in suitcases
and carry on luggage) UNLESS they are properly protected from short circuits. So when transporting
individual batteries, make sure that the battery terminals are protected and well insulated from
materials that could contact them and cause a short circuit. NOTE: Lithium-Ion batteries should not
be put in checked baggage.
STORAGE RECOMMENDATIONS
1. The best storage place is one that is cool and dry away from direct sunlight and excess heat or
cold.
2. Long storage will not harm the battery pack or charger.
CHARGING PROCEDURE:
Battery packs are shipped in a low charge condition to prevent possible problems. Therefore, you
should charge them before rst use. If the charger does not charge your battery pack under normal
circumstances, return both the battery pack and charger to your nearest repair center for electrical
check
Charge time varies and is dependent upon the amp hour capacity of battery pack.
• Make sure the power supply is normal household voltage,120 volts, AC only, 60 Hz.
• Connect the charger to a power supply.
• Attach the battery pack to the charger by aligning the raised ribs on the battery pack with the
grooves in the charger, then slide the battery pack onto the charger.
• Press down on the battery pack to be sure contacts on the battery pack engage properly with
contacts in the charger.
• Do not place the charger in an area of extreme heat or cold. It will work best at normal room
temperature.
• The battery pack will become slightly warm to the touch while charging. This is normal and does
not indicate a problem.
• After charging is complete, the green LED will remain on.
• To remove the battery pack from the charger, pull up on the battery pack.
IMPORTANT CHARGING NOTES
1. Longest life and best performance can be obtained if the battery pack is charged when the air
temperature is between 65°F and 75°F (18°- 24°C). DO NOT charge the battery pack in an air
temperature below +40°F (+4.5°C), or above +105°F (+40.5°C). This is important and will prevent
serious damage to the battery pack.
2. The charger and battery pack may become warm to touch while charging. This is a normal
condition, and does not indicate a problem. To facilitate the cooling of the battery pack after use,
avoid placing the charger or battery pack in a warm environment such as in a metal shed, or an
uninsulated trailer.

9
1
11
14
6
7
8
10
9
13
5
12
3
2
4
SAFETY INFORMATION
3. If the battery pack does not charge properly:
a. Check current at receptacle by plugging in a lamp or other appliance
b. Check to see if receptacle is connected to a light switch which turns power o when you turn
out the lights.
c. Move charger and battery pack to a location where the surrounding air temperature is
approximately 65°F - 75°F (18°- 24°C).
d. If charging problems persist, take the tool, battery pack and charger to your local service center.
4. The battery pack should be recharged when it fails to produce sucient power on jobs which were
easily done previously. DO NOT CONTINUE to use under these conditions. Follow the charging
procedure. You may also charge a partially used pack whenever you desire with no adverse aect
on the battery pack.
5. Foreign materials of a conductive nature such as, but not limited to, steel wool, aluminum foil, or
any buildup of metallic particles should be kept away from charger cavities. Always unplug the
charger from the power supply when there is no battery pack in the cavity. Unplug charger before
attempting to clean.
6. Do not freeze or immerse the charger in water or any other liquid.
WARNING: Do not allow any liquid to get inside charger. Never attempt to open the battery pack
for any reason. If the plastic housing of the battery pack breaks or cracks, return to a service center
for recycling.
FEATURES
Description of the parts
1. On/o switch
2. Starter switch
3. Handle
4. Additional handle
5. Handle support bracket
6. Telescopic tube
7. Height adjustment
8. Trimmer head angle adjuster
9. Trimmer head
This product can accept any of the batteries and char-
gers listed in the chart below:
Westinghouse 20V Lithium-Ion Packs and Chargers
Description Part number
20V Batteries: LI-ION LBC202Z-2, LBC204Z-1
Chargers JLH482102000U1
10. Protective cover
11. Edge cutter adjuster
12. Edge cutter head
13. Handle knob
14. Rechargeable battery
15. Battery interlock

10
ASSEMBLY
INSTALLING THE TRIMMER GUARD
WARNING: Always remove the rechargeable
battery from the device before all work.
This product can be only t with cutting attachment
of nylon spool with line, it can not t with metal or
blade. Feed the head of the trimmer and line through
the top of the guard hole. Then align the four pins
(1,2,3,4) of the protective cover with the holes of the
spool base drum A, B, C, D one-to-one match. Use
screws provided (5) to x them together.
INSTALLING THE ADJUSTABLE HANDLE
WARNING: Always remove the rechargeable battery from the
device before all work.
Align the hole at the bottom of the handle (4) with the hole in the
pole bracket (5), use knob (3) and 10mm nut (18) to tighten handle
into place. NOTE: The rubber side of the handle is on the side of the
spool, while the groove side of the handle faces the operator.
INSTALLING AND REMOVING THE RECHARGEABLE BATTERY
WARNING: Always switch the tool o before you insert or remove the rechargeable battery.
If you want to remove the rechargeable battery from the tool, press the interlock of the battery (15)
and pull the it from the tool. To insert the rechargeable battery in the tool, rst line up the base of the
rechargeable battery with the guide on the housing (14). Then push the rechargeable battery rmly
into the tool until hear the locking click
into place. If the rechargeable battery
is not locked into place, you or other
persons may be injured.
CHANGING THE TRIMMER SPOOL
WARNING: Always remove the rechargeable battery from the device before all work.
Press the spool head cap buttons (2) and pull down to remove spool head cap (1). Place new spool
in place, make sure words on spool are facing toward you. Feed trimmer line through hole in trimmer
head (4). Replace spool head cap until it clicks in place. NOTE: The nylon head is with single line, not
double. Only use 1.6mm single
line nylon spools.
CAUTION: To avoid trimmer
damage, if the cutting line
protrudes beyond the trimming
blade, cut it o so that it just
reaches the blade.

11
OPERATION
1
6
7
34
2
5
1
8
CHARGING BATTERIES WITH RAPID CHARGER
WARNING: Only use 20V Westinghouse rechargeable battery packs and Westinghouse 2A
Rapid Charger.
1. Plug the charging device (8) into the mains socket.
2. Make sure that the mains voltage cited on the charging station
complies with the voltage supplied by your socket. The green light on
the right side of the charging station will blink.
3. Slide the rechargeable battery (6) into the charging station. It can only
be inserted in one position.
4. The battery charging process now begins and is signaled by the red
indicator light on the charging station (9). The 4 green LEDs on battery
(6) light up in turn.
5. Once the rechargeable battery has been fully charged, the green
indicator light on the charger will illuminate (9) and red LED turns o.
The charging process ends automatically.
6. Charging takes approx. 1-1.2 hours. The battery heats up during the
charging process. This is normal and does not signal a fault. Do not let
battery remain on charger for more than 5 hours.
Note: Occasionally, the permissible temperature range may be exceeded during the charging cycle.
In this case, the electronic charging control interrupts the charging cycle to avoid any damage to the
battery. The red control light will then glow continuously. If you should witness this, pull the battery
from the charging station and let it cool down for about 30 minutes. Then, restart the charging cycle
by sliding the battery back onto the charging station.
ADJUSTING POLE LENGTH
Turn the height adjustment sleeve clockwise to unlock and loosen the
connection. Adjust the tube to the suitable length and fasten the connection
by turning the sleeve counter-clockwise.
TRIMMER OPERATION
Adopt a safe stance. Hold the trimmer in both hands. Do not set the cutting
device down on the ground. Press the starter switch on side of handle (2) and hold down trigger (1).
After switching on, let go of the starter switch. In order to switch o, release the trigger (1).
With the unit on, angle unit and slowly swing the trimmer side.
Maintain a cutting angle of 5° to 10°. Do not exceed 10°. Cut
with the tip of the line. To keep distance from hard surfaces
use edge guide. Maintain a minimum distance of 24 inches
(609.6 mm) between the guard and your feet. To achieve this
distance adjust the overall height of the trimmer.
FEEDING TRIMMER LINE
Your trimmer uses .065 inch (1.65 mm) diameter, ROUND
nylon line. During use, the tips of the nylon lines will become
frayed and worn and the special self feeding spool will
automatically feed and trim a fresh length of line. Do not bump on ground in attempt to feed line
or for any other purposes. Cutting line will wear faster and require more feeding if the cutting or
edging is done along sidewalks or other abrasive surfaces or heavier weeds are being cut.

12
CARE AND MAINTENANCE
WARNING: Always remove the rechargeable battery from the device before all work.
• Always clean and oil the blades after prolonged use of the hedge trimmer. This will greatly aect
the life of the equipment. Damaged cutting units must be properly repaired immediately.
• Clean the shearing blades with a dry cloth or - in case of heavier dirt -with a brush.
• NOTICE: Oiling of the blades should ideally be carried out using an environmentally friendly
lubricant.
STORAGE AND CLEANING
Fertilizers and other garden chemicals contain agents which greatly accelerate the corrosion of
metals. Do not store the unit on or adjacent to fertilizers or chemicals. With the battery removed,
use only mild soap and a damp cloth to clean the unit. Never let any liquid get inside the unit; never
immerse any part of the unit into a liquid. Prevent the blades from rusting by applying a lm of light
machine oil after cleaning.
REPLACING TRIMMER LINE
Before you begin trimming, only use the appropriate type of cutting line. Use 1.6 mm nylon
Westinghouse replacement spool and replacement cap. Reload nylon line (either bulk or prewound
replacement spool) as shown in this manual. USE ONLY .065 inch (1.65 mm) DIAMETER ROUND
NYLON MONOFILAMENT LINE. Do not use serrated or heavier gauge line, as they will overload the
motor and cause overheating, and will not feed properly.
WARNING: The use of any accessory not recommended by Westinghouse for use with this
trimmer could be hazardous.
CHANGING TILT ANGLE
Press the tilt button on the trimmer head angle adjuster (8). The trimmer head will
disengage and can be pivoted into 5 dierent angles relative to the shaft. Make
sure tilt button is locked before operating trimmer.
CONVERTING TO EDGER
WARNING: When being used as an Edger, stones, pieces of metal
and other objects can be thrown out at high speed by the line. The
trimmer and guard are designed to reduce the danger. However, MAKE
SURE that other persons and pets are at least 100 feet (30m) away
Click the tilt button on the trimmer head and allow the trimmer head to
rotate perpendicular to the shaft. Then press the edge cutter adjuster
(11) and rotate the handle with clockwise 180°, like the photo to the
right.
CONVERTING TRIMMER DIAMETER FROM 12”-10”
To increase torque for thick grass you can change the trimmer
path diameter from 12” to 10”. Follow steps below:
1. Use a Phillips screwdriver to remove 2 screws on trimmer
line cutter located under guard.
2. Rotate trimmer line cutter and tighten screws.
OPERATION

13
CARE AND MAINTENANCE
REWINDING SPOOL FROM BULK LINE
It is not recommended to hand rewind spool from bulk line as this leads to issues with the trimmer
if it is not spooled correctly. You can purchase pre-wound spools for this model from Westinghouse
dealers.
MAINTENANCE
• To assure product SAFETY and RELIABILITY, repairs, maintenance and adjustment should be
performed by authorized service centers or other qualied service organizations, always using
identical replacement parts.
• Keep the air intake slots clean to avoid overheating.
• Your trimmer line can dry out over time. To keep your line in top condition, store spare pre-wound
spools or bulk line in a plastic, sealable bag with a tablespoon of water.
• Plastic parts may be cleaned by using a mild soap and a damp rag.
• The line cutter on the edge of the guard can dull over time. It is recommended you periodically
touch-up the sharpness of the blade with a le.
AUTOMATIC LINE FEED DOES NOT WORK
• Remove battery from tool.
• Remove the spool cap.
• Pull the cutting line until it protrudes approximately 5-3/8 inches (136mm) from the spool. If
insucient cutting line is left on the spool, install a new spool of cutting line.
• Ensure that the line is not crisscrossed on the spool. If it is, unwind the cutting line, then wind it
back on the spool neatly so that the lines do not cross.
• Ensure the beginning of the cutting line is pulled tight against the spool.
• Align the tabs on the spool cap with the cut outs in the housing.
• Push the spool cap onto the housing until it snaps securely into place.
• If the cutting line protrudes beyond the trimming blade, cut it o so that it just reaches the blade.
• If the automatic line feed still does not work or the spool is jammed, try the following suggestions:
• Carefully clean the spool and housing.
• Remove the spool and check if the lever in the spool housing can move freely.
• Remove the spool and unwind the cutting line, then wind it on neatly again. Replace the spool
into the housing
BATTERY PACK REMOVAL AND PREPARATION FOR RECYCLING
To preserve natural resources, please recycle or dispose of batteries properly.
This product contains lithium-ion batteries. Local, state or federal laws may
prohibit disposal of lithium-ion batteries in ordinary trash. Consult your local
waste authority for information regarding available recycling and/or disposal
options.
WARNING: Upon removal, cover the battery pack’s terminals with heavy-
duty adhesive tape. Do not attempt to destroy or disassemble battery pack
or remove any of its components. Lithium-ion batteries must be recycled or
disposed of properly. Also, never touch both terminals with metal objects and/or body parts as short
circuit may result. Keep away from children. Failure to comply with these warnings could result in re
and/or serious injury.

14
TROUBLESHOOTING
PROBLEM POSSIBLE CAUSE POSSIBLE SOLUTION
Trimmer runs slowly
Check that the spool housing can
rotate freely Carefully clean it if necessary
Check that the cutting line does not
protrude more than approximately
5-3/8 inches (136mm)
from the spool.
If it does, cut it o so that it
just reaches the line trimming
blade.
Unit will not start
Battery not installed properly Check battery installation
Battery not charged Check battery charging re-
quirements
Battery will not charge
Battery not inserted into charger Insert battery into charger
until red LED appears
Charger not plugged in
Plug charger into a working
outlet.
Check current at receptacle
by plugging in a lamp or other
appliance.
Check to see if receptacle is
connected to a light switch
which turns power o when
you turn out the lights.
Surrounding air temperature too
hot or too cold
Move charger and tool to a
surrounding air temperature of
above 40 degree F (4.5°C) or
below 105 degree F (+40.5°C).

15
MANUAL DE USUARIO
CORTADOR Y
BORDEADORA
INALÁMBRICOS DE 12”
COMO REGISTRAR SU PRODUCTO DE WESTINGHOUSE
Para registrar su nuevo producto, llame al 855-944-3571 o visite
www.westinghouseoutdoorpower.com/register
ASEGÚRESE DE TENER UN NÚMERO DE SERIE A MANO
¡Gracias por elegir Westinghouse!
POR FAVOR LEA ANTES DE DEVOLVER
ESTE PRODUCTO POR CUALQUIER MOTIVO.
Si tiene una pregunta o tiene algún problema con su compra de
Westinghouse, llámenos al 855-944-3571 para hablar con un agente.
UTILICE ESTA HERRAMIENTA CON 20 BATERÍAS WESTINGHOUSE
SOLAMENTE
GUARDE ESTE MANUAL PARA FUTURAS REFERENCIAS.

16
DIRECTRICES DE SEGURIDAD - DEFINICIONES
Es importante leer y entender este manual. La información que
contiene se reere a proteger SU SEGURIDAD y PREVENIR
PROBLEMAS. Los siguientes símbolos se utilizan para
ayudarlo a reconocer esta información.
PELIGRO: indica una situación de peligro inminente que,
de no evitarse, causará la muerte o lesiones graves.
ADVERTENCIA: Indica una situación potencialmente
peligrosa que, de no evitarse, podría causar la muerte o
lesiones graves.
PRECAUCIÓN: indica una situación potencialmente peligrosa
que, si no se evita, puede provocar lesiones leves o moderadas.
AVISO: utilizado sin el símbolo de alerta de seguridad indica
una situación potencialmente peligrosa que, si no se evita,
puede causar daños a la propiedad.
RENUNCIAS:
Toda la información, las ilustraciones y las especicaciones
de este manual se basan en la información más reciente
disponible en el momento de la publicación. Las ilustraciones utilizadas en este manual están
pensadas únicamente como vistas de referencia representativas. Además, debido a nuestra política
de mejora continua del producto, podemos modicar información, ilustraciones y / o especicaciones
para explicar y / o ejemplicar una mejora de producto, servicio o mantenimiento. Nos reservamos
el derecho de realizar cualquier cambio en cualquier momento sin previo aviso. Algunas imágenes
pueden variar según el modelo que se muestra.
TODOS LOS DERECHOS RESERVADOS:
Ninguna parte de esta publicación puede reproducirse ni utilizarse de ninguna forma por ningún
medio (gráco, electrónico o mecánico, incluidos los sistemas de fotocopiado, grabación, grabación
o almacenamiento y recuperación de información) sin el permiso por escrito de Westinghouse
Outdoor Power Equipment.
PELIGRO: Este manual contiene instrucciones importantes para operar este producto. Para su
seguridad y la seguridad de los demás, asegúrese de leer detenidamente este manual antes de
operar la batería / cargador. Si no sigue correctamente todas las instrucciones y precauciones, usted
y otras personas pueden sufrir lesiones graves o incluso morir.
ESPECIFICACIONES DE LA RECORTADORA
Modelo Número
de pieza Motor
No-Sin ve-
locidad de
carga load
speed Cabeza
de corte
Diámetro de
la trayectoria
de corte
Diámetro
de la
línea de
corte Funciona
con batería
Cortadora y
bordeadora de
cuerdas Westinghouse
20V sin cable de 12”
LTB20 20V DC 7000 RPM AutoFeed 25/30 cm 1.60 mm LBC202Z-2
LBC204Z-1
¿DONDE ESTA MI NUMERO DE SERIE? Número de serie en
Este producto se encuentra en la parte inferior del mango.
Parte del polvo creado por este
producto contiene sustancias químicas
que, según el estado de California,
causan cáncer, defectos de nacimiento
u otros daños reproductivos. Algunos
ejemplos de estos químicos son:
• Compuestos en fertilizantes.
• Compuestos en insecticidas,
herbicidas y pesticidas.
• Arsénico y cromo de la madera
tratada químicamente.
Para reducir su exposición a estos
productos químicos, use equipo
de seguridad aprobado, como
máscaras contra el polvo que estén
especialmente diseñadas para ltrar
partículas microscópicas.
ADVERTENCIA
LO QUE VIENE CON LA HERRAMIENTA
• Poste telescópico con mango y cabeza
• 1 carrete de línea de recorte de 1,6 mm.
• Guardia de ajuste
• 5 tornillos para asegurar la protección de
la recortadora
• Tuerca de mango de 10 mm
• Perilla de apriete de la manija
• Asa ajustable
• Garantía
• Manual

17
SÍMBOLOS DE SEGURIDAD
Algunos de los siguientes símbolos pueden usarse en este producto. Por favor estudialas y aprende su
signicado. La interpretación correcta de estos símbolos le permitirá operar el producto mejor y más seguro.
Simbolos Nombre Designación / Explicación
V Voltios Voltaje
A Amperios Corriente
Hz Hertz Frecuencia (ciclos por segundo)
W Vatios Poder
min Minutos Hora
noSin velocidad de
carga
Velocidad racional, sin carga
Corriente alterna Tipo de corriente
Corriente continua Tipo o característica de la corriente.
/min Por minuto Revoluciones, golpes, velocidad de supercie, órbitas, etc.,
por minuto
Alerta de condiciones
húmedas
No exponer a la lluvia o usar en lugares húmedos.
Lea el manual del
operador
Para reducir el riesgo de lesiones, el usuario debe leer y
comprender el manual del operador antes de usar este
producto.
Protección para los
ojos
Siempre use protección para los ojos con protectores
laterales marcados para cumplir con ANSI Z87.1 cuando
opere este equipo.
Alerta de seguridad Precauciones que involucran su seguridad.
Sin cuchilla No instale ni utilice ningún tipo de cuchilla.
en un producto que muestra este símbolo.
Mantener a los
espectadores lejos
Mantenga a todos los espectadores al menos a 50 pies de
distancia.
Rebotar Los objetos lanzados pueden rebotar y provocar lesiones
personales o daños a la propiedad.

18
INFORMACIÓN DE SEGURIDAD
ADVERTENCIAS E INSTRUCCIONES IMPORTANTES DE SEGURIDAD
ADVERTENCIA: PARA REDUCIR EL RIESGO DE LESIÓN:
• Antes de cualquier uso, asegúrese de que todos los que usen esta unidad lean y comprendan todas las
instrucciones de seguridad y otra información contenida en este manual.
• Guarde estas instrucciones y revíselas con frecuencia antes de usarlas e informar a otros.
• No apunte la descarga de la unidad a sí mismo ni a otras personas.
• Mantenga el cabello largo y la ropa suelta alejados de las aberturas y piezas móviles.
ADVERTENCIA: Al usar una herramienta eléctrica, siempre se deben seguir las precauciones básicas de
seguridad para reducir el riesgo de incendio, descarga eléctrica y lesiones personales, incluidas las siguientes.
ADVERTENCIA: Al usar la recortadora, tenga en cuenta su entorno. El polvo generado por su entorno tiene el
potencial de contener químicos dañinos como: compuestos en fertilizantes, compuestos en insecticidas, herbicidas y
pesticidas, arsénico y cromo de madera tratada químicamente. Para reducir su exposición a estos productos químicos,
use equipo de seguridad aprobado, como máscaras contra el polvo que estén especialmente diseñadas para ltrar
partículas microscópicas.
ADVERTENCIAS GENERALES DE SEGURIDAD PARA LA RECORTADORA
ANTES DE USAR
• Tenga especial cuidado al limpiar escaleras.
• No usar en supercies mojadas.
• No permita ser utilizado como juguete. Es necesario prestar mucha atención cuando es usado por o cerca de
niños.
• Use solo como se describe en este manual. Use solo los accesorios recomendados por el fabricante.
• Mantenga el cabello, la ropa suelta, los dedos y todas las partes del cuerpo alejadas de las aberturas y las
partes móviles.
• No exponga a la lluvia al operar la máquina.
• Almacenar en el interior. No exponer a la lluvia ni al agua. Evite el sol directo.
CUANDO USAS
PELIGRO: mantenga las manos alejadas de la cuerda. El contacto con la cuerda de la cortadora móvil resultará
en lesiones personales graves.
• SIEMPRE USE PROTECCIÓN PARA LOS OJOS: use gafas de seguridad o gafas de protección en todo
momento cuando instale la batería.
• PROTECTOR: no utilice este recortador sin el protector instalado.
• Vístase apropiadamente - No use ropa suelta o joyas. Pueden quedar atrapados en las partes móviles. Se
recomienda el uso de guantes de goma y calzado con suela de goma cuando se trabaje al aire libre. No opere la
recortadora con los pies descalzos o con sandalias abiertas. Use pantalones largos y gruesos para proteger sus
piernas. Use una cubierta protectora del cabello para contener el cabello largo.
• LÍNEA DE NYLON: mantenga todas las partes del cuerpo, incluyendo la cara, las manos y los pies alejados de
la línea de nailon giratoria en todo momento.
• LA LÍNEA GIRATORIA REALIZA UNA FUNCIÓN DE CORTE: tenga cuidado al recortar pantallas y plantas
deseables.
• MANTENGA LEJOS A TODOS LOS PADRES, a una distancia segura del área de trabajo, especialmente de los
niños.
• ADVERTENCIA IMPORTANTE: cuando se utilizan como bordeadoras, la línea puede arrojar piedras, piezas de
metal y otros objetos a gran velocidad. El recortador y la protección están diseñados para reducir el peligro. Sin
embargo, se deben tomar las siguientes precauciones especiales:
• ASEGÚRESE de que otras personas y mascotas estén a una distancia de al menos 100 pies (30 m).

19
INFORMACIÓN DE SEGURIDAD
• PARA REDUCIR EL RIESGO de lesiones por rebote (rebote), trabaje alejándose de cualquier objeto sólido cercano,
como paredes, escalones, piedras grandes, árboles, etc. Tenga mucho cuidado cuando trabaje cerca de objetos
sólidos y, cuando sea necesario, haga bordes o recorte mediante mano.
• EVITE INICIAR ACCIDENTAMENTE - No lleve la recortadora enchufada con el dedo en el gatillo.
• NO FUERCE EL Dispositivo: a una velocidad más rápida que la velocidad a la que puede cortar de manera
efectiva.
• UTILICE EL DISPOSITIVO ADECUADO: no utilice este dispositivo para ningún trabajo, excepto para el que está
destinado.
• DAÑO A LA UNIDAD: si golpea o se enreda con un objeto extraño, detenga el aparato inmediatamente, retire la
batería, verique si hay daños y repare cualquier daño antes de intentar realizar más operaciones. No lo haga
funcionar con un cubo o carrete roto.
• EVITE LAS CONDICIONES AMBIENTALES PELIGROSAS: no utilice aparatos eléctricos en lugares húmedos o
mojados. Siga todas las instrucciones en este manual de instrucciones para el correcto funcionamiento de su
recortadora. No uses el recortador bajo la lluvia.
ADVERTENCIAS E INSTRUCCIONES GENERALES DE SEGURIDAD PARA TODAS LAS HERRAMIENTAS
• Una UNIDAD OPERADA POR BATERÍA con baterías integrales o un paquete de baterías por separado debe
recargarse solo con el cargador especicado para la batería. Un cargador que puede ser adecuado para un tipo de
batería puede crear un riesgo de incendio cuando se usa con otra batería.
• UTILICE LA UNIDAD OPERADA POR BATERÍA SOLAMENTE con el paquete de baterías Westinghouse 20V. El uso
de cualquier otra batería puede crear un riesgo de incendio.
• EVITAR arranque accidental. Asegúrese de que el interruptor esté en la posición de apagado antes de insertar
la batería. Llevar unidades con el dedo en el interruptor o insertar la batería en una unidad con el interruptor encen-
dido invita a accidentes.
• NO use la unidad si el interruptor no la enciende o apaga. Una unidad que no se puede controlar con el interruptor
es peligrosa y debe repararse.
• DESCONECTE la batería de la unidad o coloque el interruptor en la posición de bloqueo o apagado antes de
realizar cualquier ajuste, cambiar accesorios o guardar la unidad. Tales medidas de seguridad preventivas reducen
el riesgo de que la unidad se arranque accidentalmente.
• SIEMPRE USE PROTECCIÓN PARA LOS OJOS: use gafas de seguridad o gafas de protección en todo momento
cuando esta unidad esté en uso. También use máscara facial o antipolvo.
• NO coloque la salida de la barredora cerca de los ojos u oídos durante la operación.
• GUARDAR UNIDADES IDLEAS. Cuando no esté en uso, la unidad debe almacenarse en un lugar seco, alto o
cerrado, fuera del alcance de los niños.
• NO SE EXTRAIGA Mantenga la postura y el equilibrio en todo momento.
• MANTENGA LA UNIDAD CON CUIDADO. Mantenga la unidad limpia para un mejor y más seguro desempeño.
Siga las instrucciones para el mantenimiento adecuado.
• NO intente reparar la barredora. Para garantizar la seguridad y conabilidad del producto, las reparaciones, el
mantenimiento y los ajustes deben ser realizados por los centros de servicio de Westinghouse o los centros de
servicio autorizados, utilizando siempre piezas de repuesto de Westinghouse.
• NO opere la barredora en una atmósfera gaseosa o explosiva. Los motores en estas unidades normalmente pro-
ducen chispas, y las chispas pueden encender los humos.
• EVITE LAS CONDICIONES AMBIENTALES PELIGROSAS: no utilice unidades eléctricas en lugares húmedos o
mojados. No uses la unidad bajo la lluvia.
• MANTENTE ALERTA - Mira lo que estás haciendo. Usa el sentido común. No opere la unidad cuando esté cansa-
do.
• UTILICE LA UNIDAD ADECUADA: no use esta unidad para ningún trabajo, excepto para el que está destinada.
• UTILICE CUIDADO EXTRA al limpiar en escaleras.
• NO permita que se use como un juguete. Es necesario prestar mucha atención cuando es usado por o cerca de
niños. No recomendado para uso en niños.

20
INFORMACIÓN DE SEGURIDAD
• NO intente eliminar las obstrucciones de la unidad sin retirar primero la batería.
• USE SOLAMENTE como se describe en este manual. Use solo los accesorios recomendados por el fabricante.
• NO coloque ningún objeto en las aberturas. No usar con ninguna abertura bloqueada; Manténgalo libre de
polvo, pelusas, cabello y todo lo que pueda reducir el ujo de aire.
• MANTENGA el cabello, la ropa suelta, los dedos y todas las partes del cuerpo lejos de las aberturas y las partes
móviles.
• NO sumerja ninguna parte de la unidad en líquido.
• NO manipule el cargador, incluido el enchufe del cargador, y los terminales del cargador con las manos moja-
das.
• MANTENGA A LOS NIÑOS, PADRES Y ANIMALES ALEJADOS del área de trabajo un mínimo de 30 pies (10
metros) cuando inicie u opere la unidad.
• INSPECCIONE EL ÁREA antes de usar la unidad. Retire todos los escombros y objetos duros como piedras,
vidrios, alambres, etc. que puedan rebotar, ser arrojados o causar lesiones o daños durante la operación.
• UTILICE ÚNICAMENTE el cargador suministrado por el fabricante para recargar.
• CUIDADO DEL EJERCICIO en el manejo de baterías para no cortocircuitar la batería con materiales conductores
como anillos, pulseras y llaves. La batería o el conductor pueden sobrecalentarse y provocar quemaduras.
• NO ABRIR NI MUTILAR las baterías. El electrolito liberado es corrosivo y puede causar daños a los ojos o la
piel. Puede ser tóxico si se ingiere.
• NO CARGUE la unidad al aire libre.
ADVERTENCIA: Para reducir el riesgo de descarga eléctrica; No exponer a la lluvia, no usar sobre supercies
mojadas. Almacenar en el interior.
INSTRUCCIONES IMPORTANTES DE SEGURIDAD PARA LOS CARGADORES DE BATERÍAS
ADVERTENCIA: Peligro de choque. No permita que ningún líquido entre en el cargador.
PRECAUCIÓN: Peligro de quemaduras. Para reducir el riesgo de lesiones, cargue solo las baterías designadas
de Westinghouse. Otros tipos de baterías pueden explotar y causar lesiones personales y daños.
PRECAUCIÓN: Bajo ciertas condiciones, con el cargador enchufado a la fuente de alimentación, el cargador
puede ser cortocircuitado por material extraño. Los materiales extraños de naturaleza conductiva, como la lana
de acero, el papel de aluminio o cualquier acumulación de partículas metálicas, deben mantenerse alejados de las
cavidades del cargador. Siempre desenchufe el cargador de la fuente de alimentación cuando no haya un paquete
de baterías en la cavidad. Desenchufe el cargador antes de intentar limpiar.
• NO intente cargar la batería con otros cargadores que no sean los de este manual. El cargador y la batería están
diseñados especícamente para funcionar juntos.
• Estos cargadores no están diseñados para ningún otro uso que no sea la carga de las baterías recargables
designadas de Westinghouse. Cualquier otro uso puede resultar en riesgo de incendio, descarga eléctrica o
electrocución.
• NO exponga el cargador a la lluvia o nieve.
• Tire del enchufe en lugar del cable al desconectar el cargador. Esto reducirá el riesgo de daños al enchufe y
cable eléctrico.
• Asegúrese de que el cable esté ubicado de manera que no se pise, tropiece ni se someta a daños o tensiones.
• NO use un cable de extensión a menos que sea absolutamente necesario. El uso de un cable de extensión
inadecuado puede provocar un incendio, descarga eléctrica o electrocución.
• NO opere el cargador con el cable o el enchufe dañado, hágalos reemplazar de inmediato.
• NO opere el cargador si ha recibido un golpe fuerte, se ha caído o se ha dañado de alguna otra manera. Llévelo
a un centro de servicio autorizado.
Table of contents
Languages:
Other Westinghouse Trimmer manuals
Popular Trimmer manuals by other brands

Electrolux
Electrolux 24800400B00 instruction manual

Husqvarna
Husqvarna 324L X-series Operator's manual

Elem Garden Technic
Elem Garden Technic CBE1201 Original instructions

SNOWJOE
SNOWJOE SUNJOE 24V-SB10-LTE Operator's manual

Elem Garden Technic
Elem Garden Technic CBE25022-18 Original instructions

Titan
Titan TTT831HDC instructions