Westlab 300 - 4200RPM User manual

1
PRODUCT MANUAL
Digital Vortex Mixer
300 - 4200RPM
Code 664-740

2
PRODUCT MANUAL
1800 358 101
sales.au@westlab.com
www.westlab.com.au
+64 9 553 3677
sales.nz@westlab.com
www.westlab.co.nz
646 568 5391
sales.us@westlab.com
www.westlab.com
1 877 822 1455
sales.ca@westlab.com
www.westlab.com
Australia New Zealand United StatesCanada
1. Product Description
1.1 Introduction
Powered with a BLDC motor, the vortex mixer guarantees maintenance-free longevity
and a quiet performance.
A microprocessor based closed loop control allows for an ecient performance even
under high loads. The mixer’s built-in counterbalance ensures stability and the 3-way
switch for touch, continuous and stand-by modes for unmatched convenience.
In addition, the programmable pulse mode with the Run-Pause-Run function allows for
the thorough mixing of the solution. The digital display toggles between the speed and
time values every ve seconds.
1.2 Intended Use
Intended for general laboratory mixing, this vortex mixer is indented for applications
where the mixing of single or multiple tubes is required.
1.3 Features
• Brushless DC Motor
• Programmable Pulse Mode Function
• Adjustable Speed 300 to 4200RPM
• Visual Indicator of Permissible Speed for Various Attachments
• Usable Inside Hoods & Cold Rooms
• Non-Corrosive Body Design
• Orbital Diameter of 4mm
• Built-In Counterbalance
1.4 Accessories
Standard attachments
Round Disc Cup Attachment
TABLE OF CONTENT
1. Product Description
1.1 Introduction
1.2 Intended Use
1.3 Features
1.4 Accessories
2. Technical Specications
3. Safety Precautions
4. Maintenance & Cleaning
5. Installation
6. Operation
7. Product Disposal
PRODUCT CODE
664-740
PLEASE READ THESE INSTRUCTIONS BEFORE USE.

3
PRODUCT MANUAL
1800 358 101
sales.au@westlab.com
www.westlab.com.au
+64 9 553 3677
sales.nz@westlab.com
www.westlab.co.nz
646 568 5391
sales.us@westlab.com
www.westlab.com
1 877 822 1455
sales.ca@westlab.com
www.westlab.com
Australia New Zealand United StatesCanada
Optional attachments
Micro Centrifuge Tube
24 x 1.5/2ml
96 Well Micro Plate Flask
2. Technical Specication
Motor Type Brushless DC Motor
Orbital Diameter 4mm
Digital Display Yes
Ambient Temperature 5°C to 40°C
Speed Setting Variable 300 to 4200 RPM
Timer Setting 0 to 999 minutes [min/sec display]
Run Time 1 to 999 minutes, and innite mode
Speed Accuracy ± 10 RPM
Pulse Mode Yes, programmable pulse
Load Capacity 500g maximum
Input Voltage 24V 1.5A
Power Consumption 20 W
Unit Dimensions 205mm W x 136mm D x 138.5mm H
Unit Weight 2.8kg
3. Safety Precautions
Read the following safety precautions prior to using the vortex mixer.
Never use the unit in any manner not specied in this manual.
• Wear personal protective equipment during the operation of the unit.
• Always install the unit on a at, stable, and non-slippery surface.
• Always unplug the power adaptor before cleaning the unit.
• Never touch moving parts.

4
PRODUCT MANUAL
1800 358 101
sales.au@westlab.com
www.westlab.com.au
+64 9 553 3677
sales.nz@westlab.com
www.westlab.co.nz
646 568 5391
sales.us@westlab.com
www.westlab.com
1 877 822 1455
sales.ca@westlab.com
www.westlab.com
Australia New Zealand United StatesCanada
• The unit is not to be operated in a hazardous, explosive, or ammable environment
and not to be used to mix explosive or highly reactive material. Do not use the unit
under water.
• Do not use the mixer if it shows signs of electrical of mechanical damage.
If any damage is found, contact your supplier immediately.
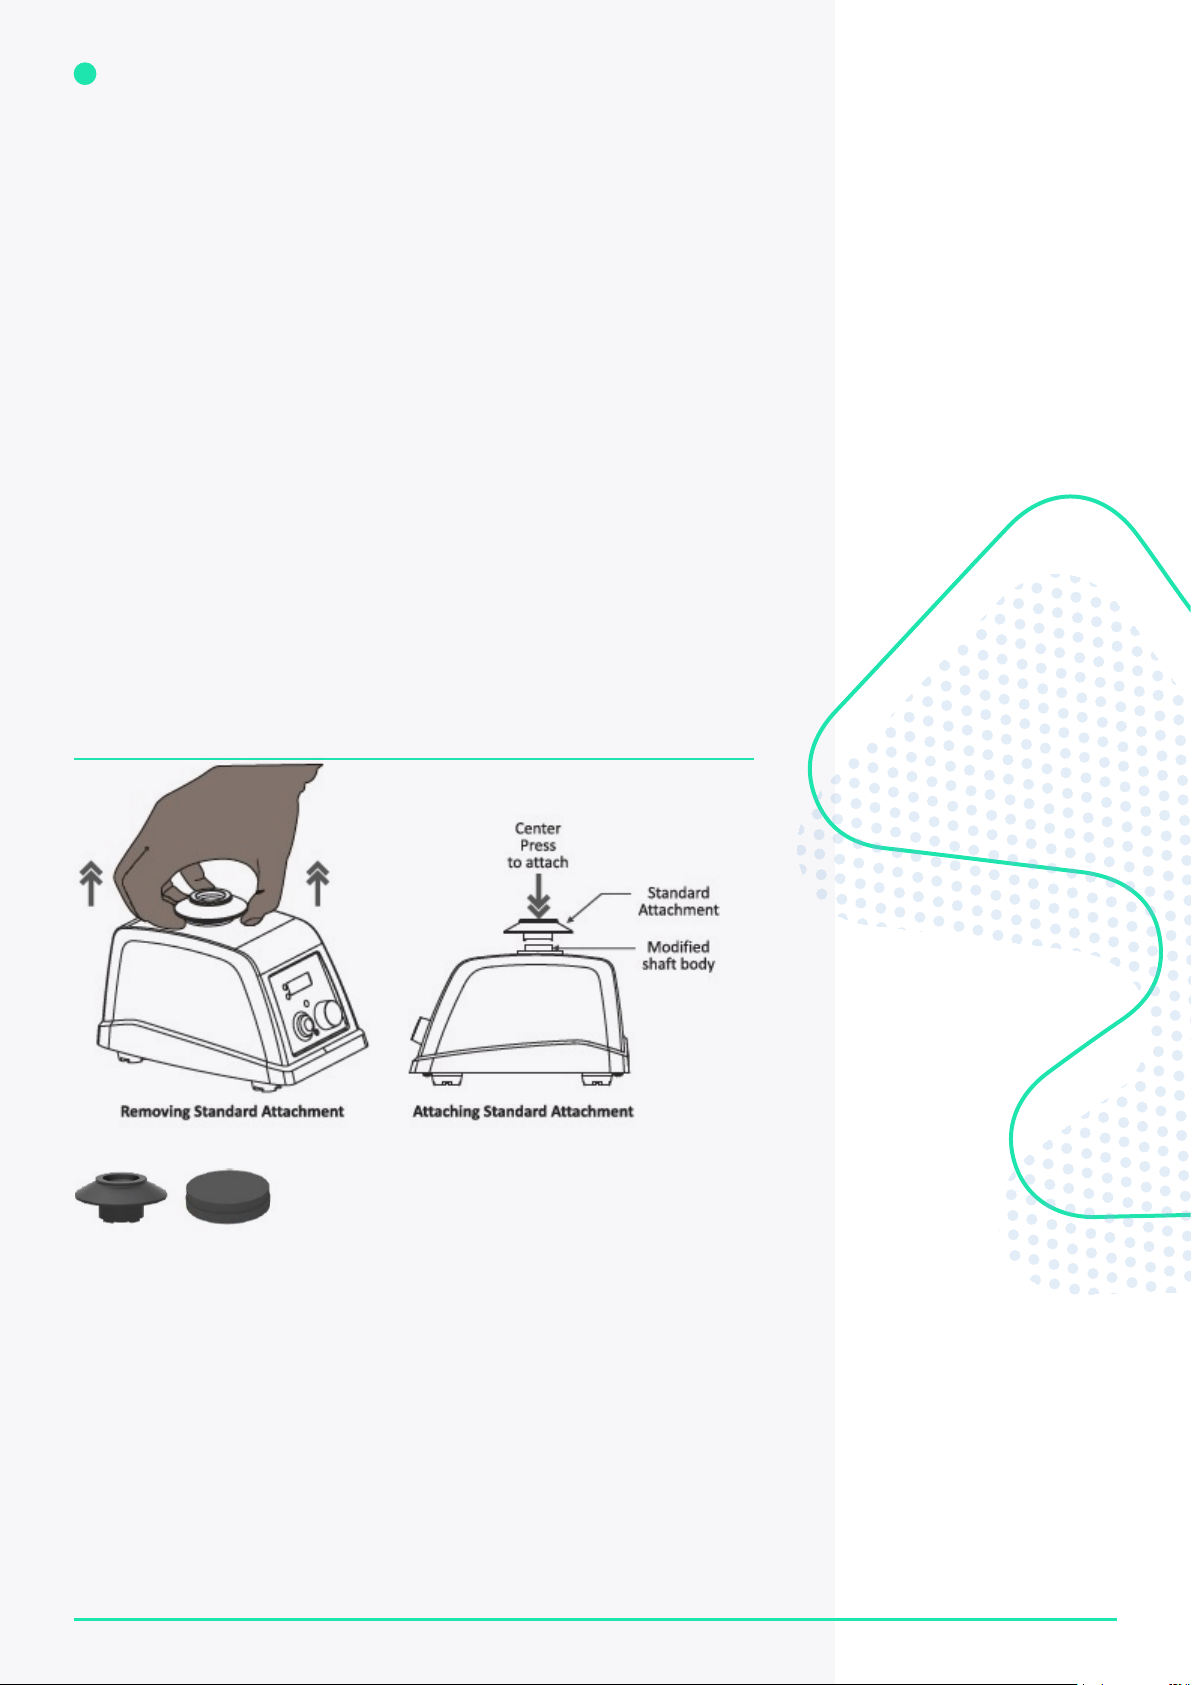
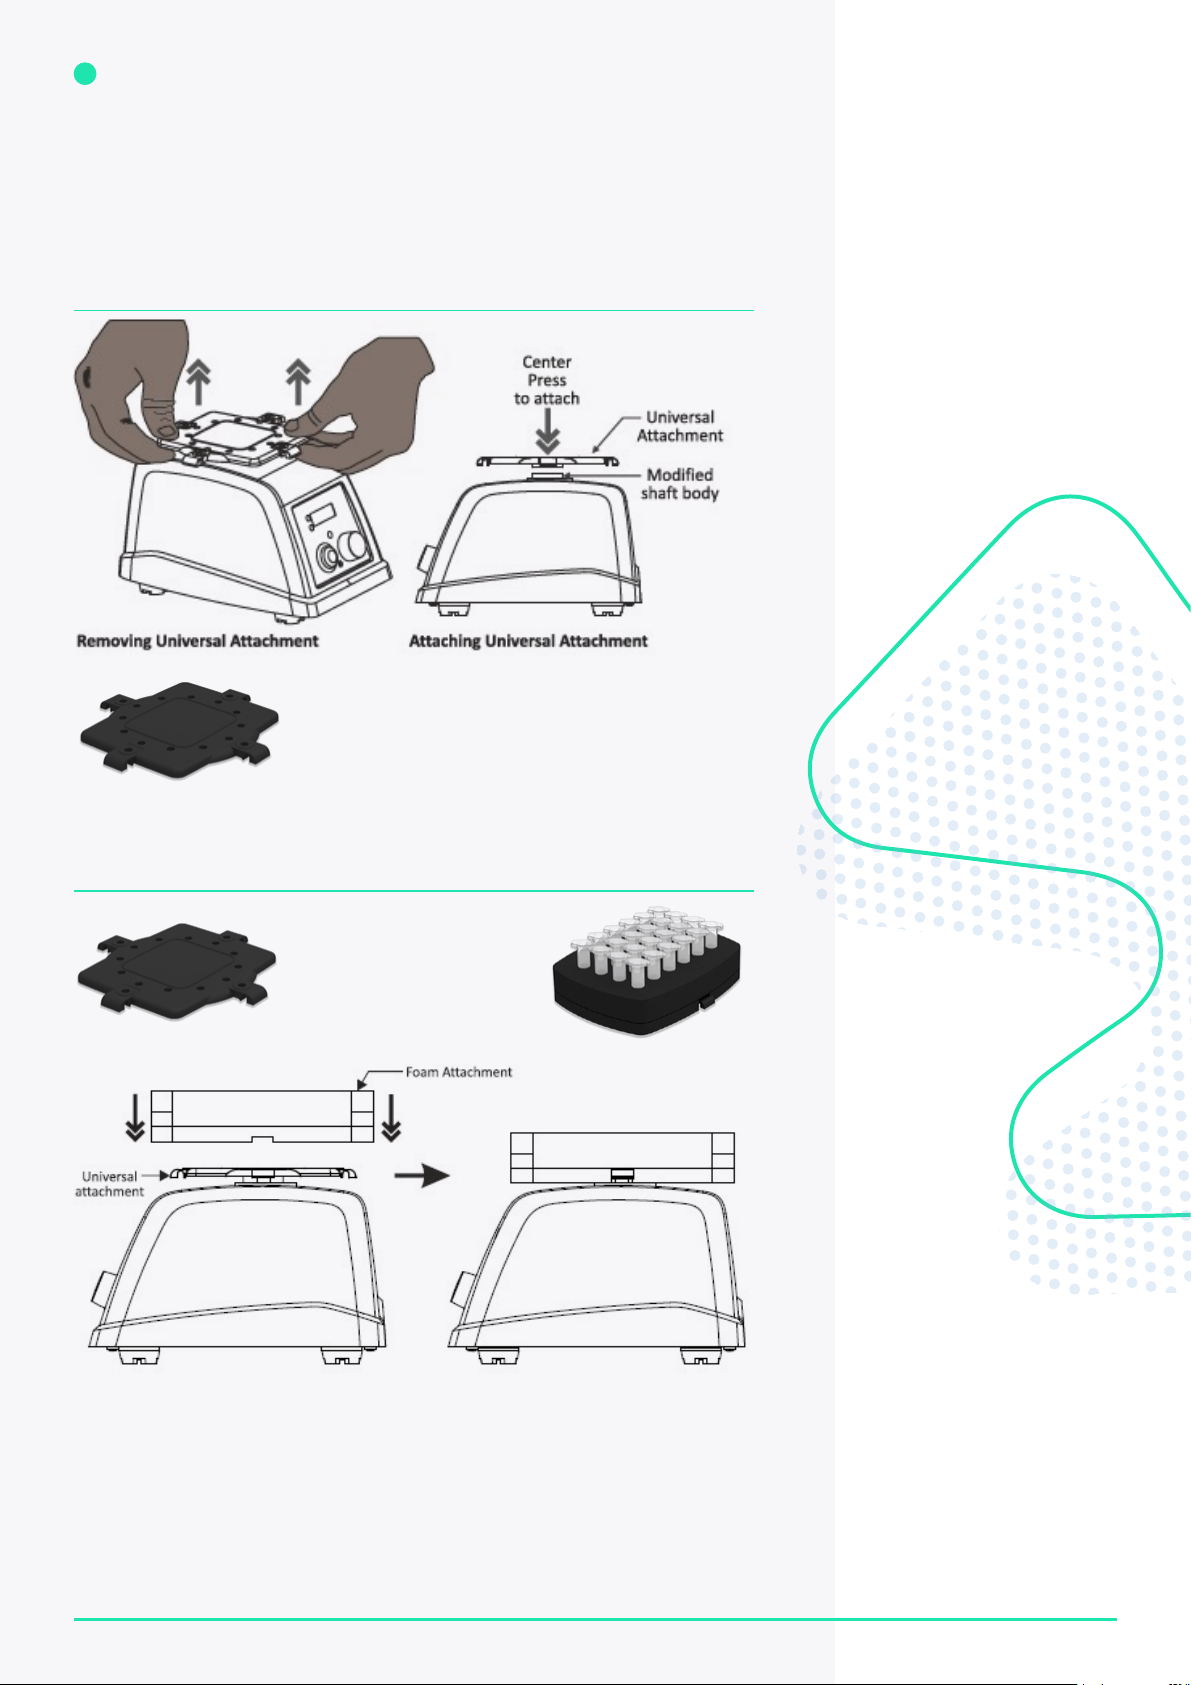
• Do not lift the vortex mixer by the attachments. Every attachment, including the
cup head, are designed to be removed separately for interchanging.
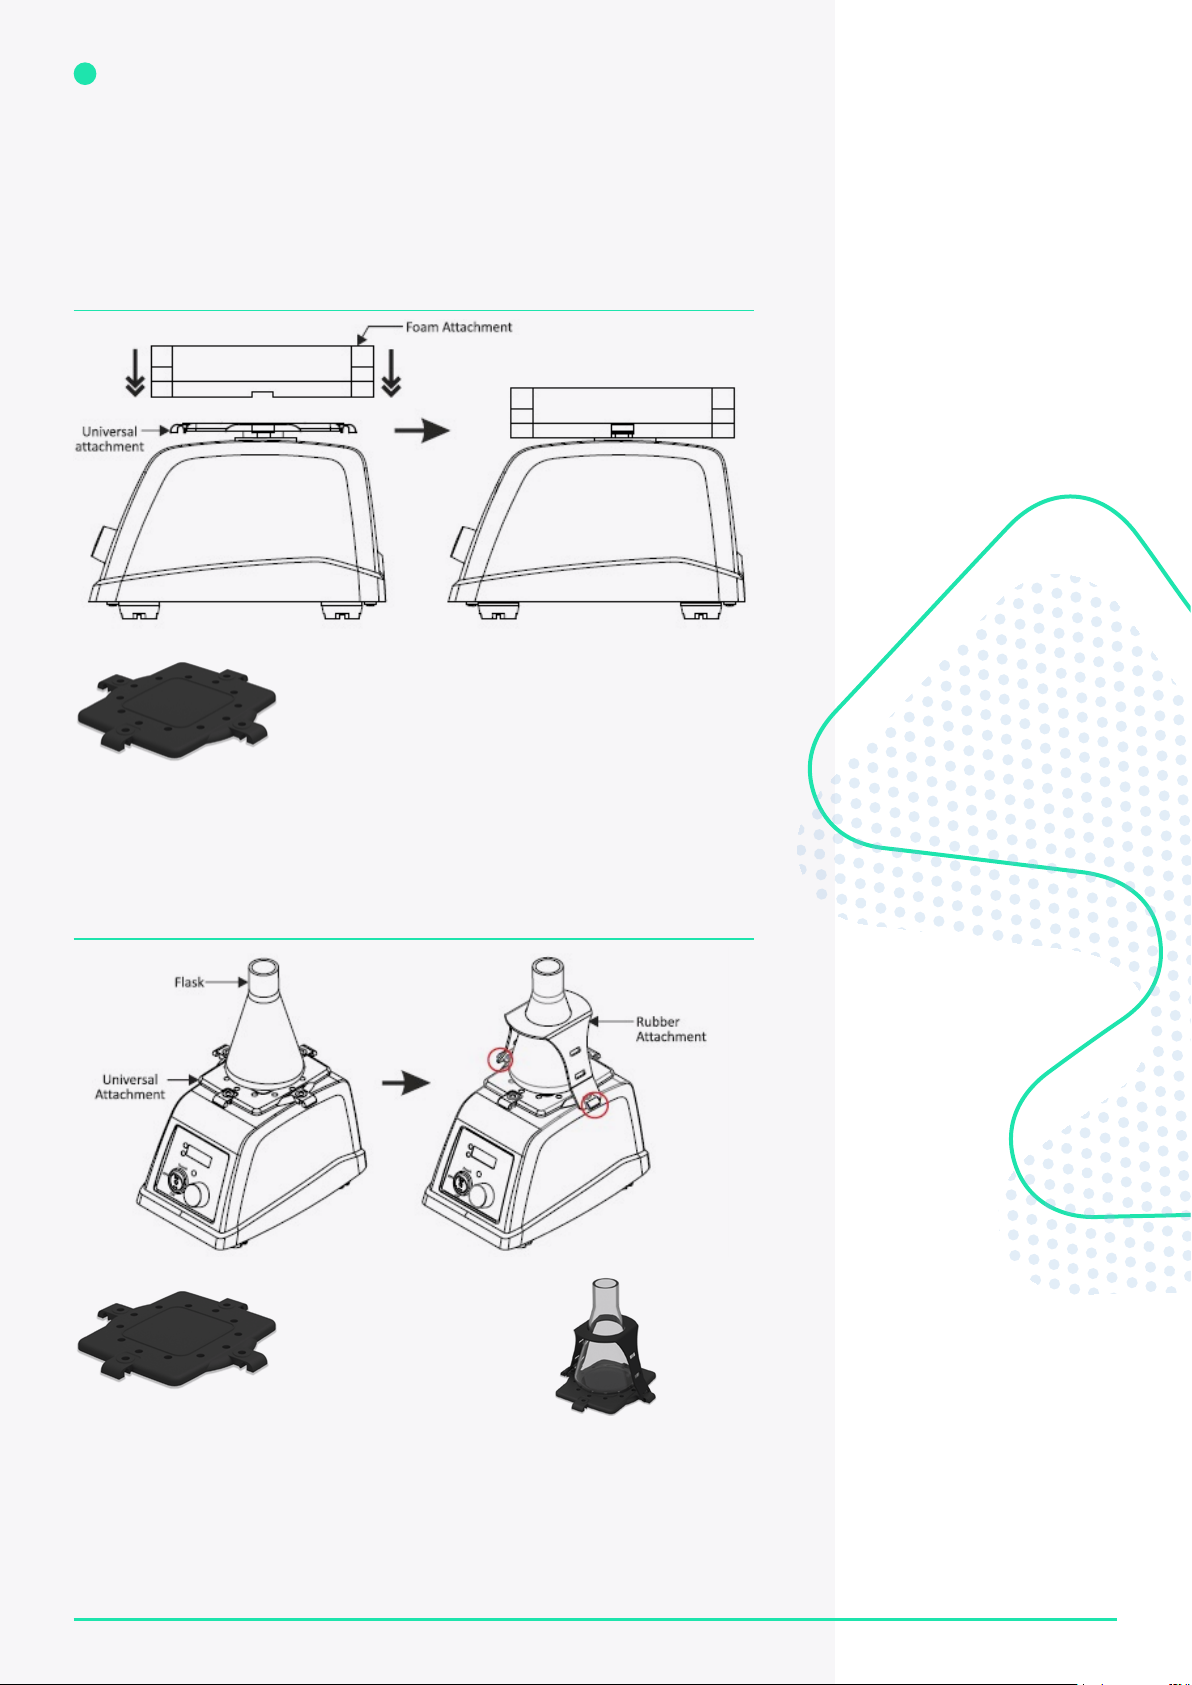
• Do not rotate or give full rotation to the attachments attached to the modied
shaft body.
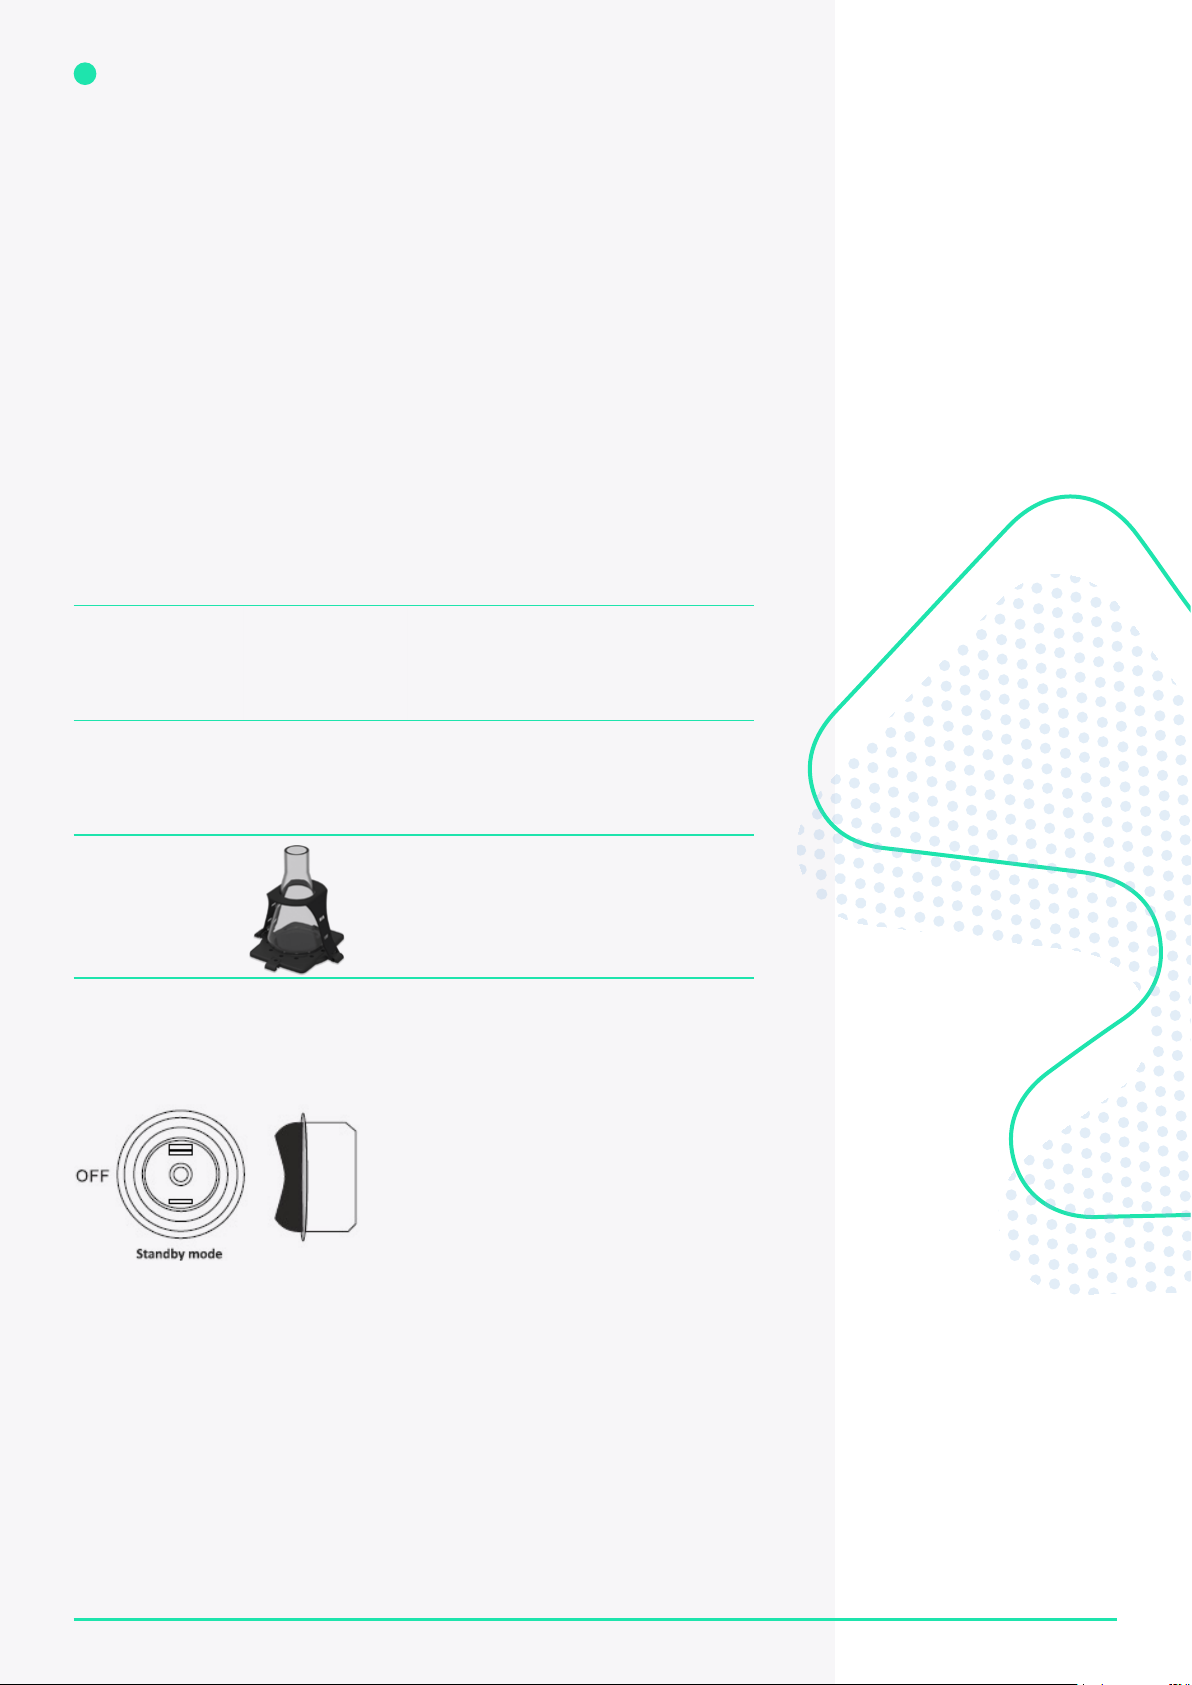
• Ensure that the attachments are secured properly prior to operation.
• Do not ll the microtubes, microplates or asks while they are attached to the
vortex mixer.
The safety of the user cannot be guaranteed if the unit:
• Is operated with accessories that are not supplied with the unit
• Is operated with accessories that are not supplied or recommended by the
manufacturer
• Is operated improperly or contrary to the manufacturer’s specications
4. Maintenance & Cleaning
• Always unplug the power adaptor before cleaning the unit.
• Wear protective gloves and safety glasses while cleaning the unit.
• Excessive amounts of liquid should be avoided. Liquids must not contact the motor.
• Clean the unit periodically with a damp cloth using a mild detergent only. Do not use
chemical cleaning agents. After cleaning, ensure that all the parts are dried.
• The brushless motor in the vortex mixer requires no routine maintenance.
• If repairs are performed by unauthorised personnel, the product warranty may
become void.
• Do not use the unit or attachments in direct sunlight or under water.
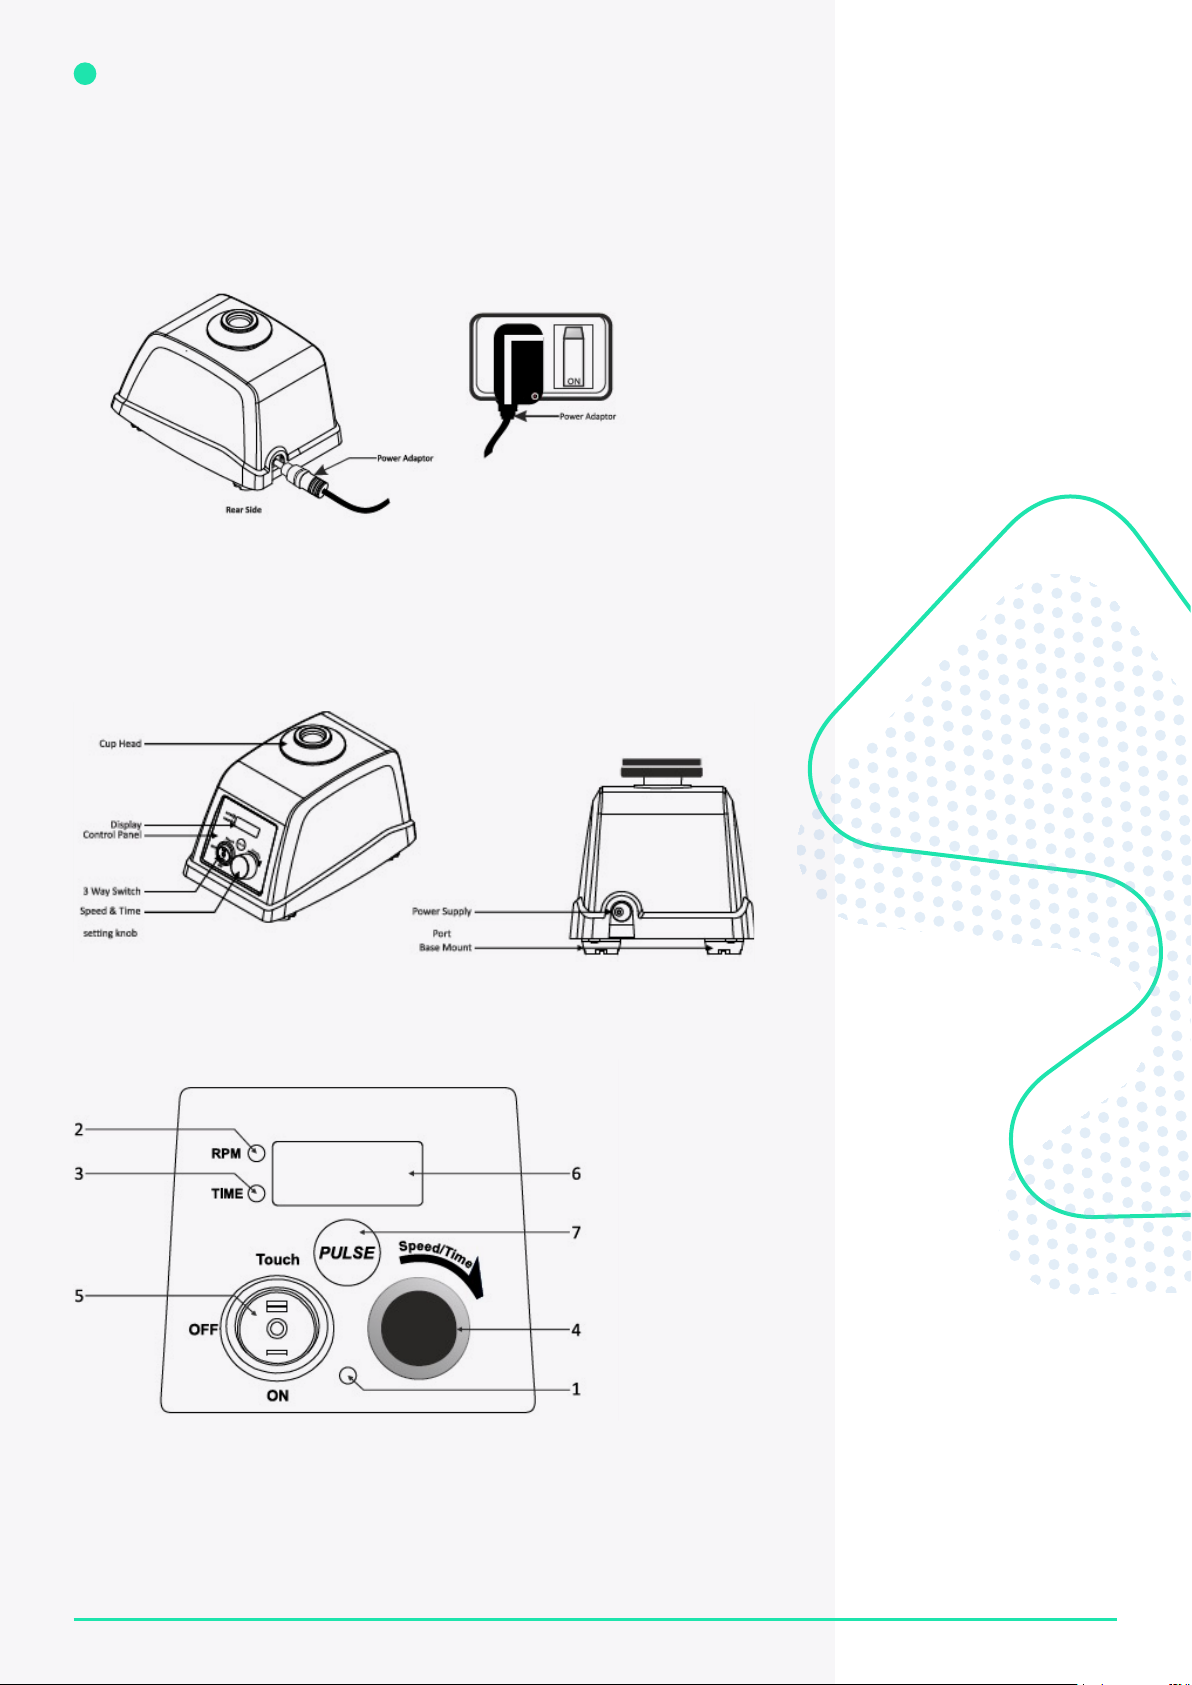
5. Installation
1. Open the packaging and gently remove the vortex mixer from the box.
2. Place the unit gently onto a rm and levelled surface.
3. Unpack every individual component.
4. Assemble the components as instructed in this manual for optimal performance.
Ensure that the cup head is rmly tightened.
ATTENTION: The manual should be kept with the device and all the packaging should be
kept in safe storage for at least two years for warranty purposes.

•
5
PRODUCT MANUAL
1800 358 101
sales.au@westlab.com
www.westlab.com.au
+64 9 553 3677
sales.nz@westlab.com
www.westlab.co.nz
646 568 5391
sales.us@westlab.com
www.westlab.com
1 877 822 1455
sales.ca@westlab.com
www.westlab.com
Australia New Zealand United StatesCanada
Location and mounting
Place the vortex mixer on a at, solid, and levelled surface. Ensure that all four feet stand
on the surface rmly. Avoid installing on a slippery surface or a bench prone to vibration.
• Keep a minimum clearance of 100mm from all directions to guarantee safe
operation.
• Keep the unit away from heat, water and direct sunlight to avoid sample
temperature issues.
• Do not place the vortex mixer in an area that makes it dicult to operate the unit.
Instalment and removal of the attachments
The standard attachment is normally used for vortexing samples in tubes.
The vortex mixer accommodates optional attachments when combined with the
optional universal attachment.
NOTE: Do not rotate the universal attachment or any attachments attached to the
modied shaft body.
Standard Attachment
To attach, place the standard attachment on the
modied shaft body and centre press the attachment
until it snaps into place. Ensure that it is attached rmly
with the modied shaft body.
To remove the standard attachment, pull the standard
attachment up with one hand.

6
PRODUCT MANUAL
1800 358 101
sales.au@westlab.com
www.westlab.com.au
+64 9 553 3677
sales.nz@westlab.com
www.westlab.co.nz
646 568 5391
sales.us@westlab.com
www.westlab.com
1 877 822 1455
sales.ca@westlab.com
www.westlab.com
Australia New Zealand United StatesCanada
Universal Attachment
To attach, place the universal attachment on the
modied shaft body and centre press the attachment
until it snaps into place. Ensure that it is attached rmly
with the modied shaft body.
To remove the universal attachment, pull the attachment
up with both hands.
24 Microtube Foam Attachment
First combine the universal attachment with the microtube attachment. Ensure that
the foam attachment is secure on the universal platform. Then attach the universal
attachment to the vortex mixer. Insert the lled microtubes to the foam attachment.
+ =

•
7
PRODUCT MANUAL
1800 358 101
sales.au@westlab.com
www.westlab.com.au
+64 9 553 3677
sales.nz@westlab.com
www.westlab.co.nz
646 568 5391
sales.us@westlab.com
www.westlab.com
1 877 822 1455
sales.ca@westlab.com
www.westlab.com
Australia New Zealand United StatesCanada
Microplate Foam Attachment
First combine the universal attachment with the microplate attachment. Ensure that
the foam attachment is secure on the universal platform. Then attach the universal
attachment to the vortex mixer. Insert the lled microtubes to the foam attachment.
250ml Flask Attachment
+ =
+ =

•
8
PRODUCT MANUAL
1800 358 101
sales.au@westlab.com
www.westlab.com.au
+64 9 553 3677
sales.nz@westlab.com
www.westlab.co.nz
646 568 5391
sales.us@westlab.com
www.westlab.com
1 877 822 1455
sales.ca@westlab.com
www.westlab.com
Australia New Zealand United StatesCanada
1. Attach the universal attachment.
2. Place the ask on the universal attachment.
3. Tighten the ask with the exible rubber attachment.
4. Lock the ask to the universal attachment by stretching the rubber attachment to suit.
First place the ask on the universal attachment. Then tighten and lock the exible rubber
ask attachment to the universal attachment. Ensure that the ask attachment is secure
on the universal platform. Then attach the universal attachment to the vortex mixer.
Recommended speed values
Attachments Image Maximum Fill
Maximum
Recommended Speed
24 Microtube
Foam Attachment
75% 700 RPM
Microplate Foam
Attachment
75% 700 RPM
Flask Rubber
Attachment
250ml 400RPM
Connecting the power adaptor
Before connecting the ends, ensure that the vortex mixer is in Stand-By mode and that
the cup attachment is secure in the modied shaft body.
Connect one side of the power adaptor pin to the rear side of the unit and the other end
to the main supply as pictured. Ensure that the main switch is not switched ON until
the adaptor is connected at both ends.

•
9
PRODUCT MANUAL
1800 358 101
sales.au@westlab.com
www.westlab.com.au
+64 9 553 3677
sales.nz@westlab.com
www.westlab.co.nz
646 568 5391
sales.us@westlab.com
www.westlab.com
1 877 822 1455
sales.ca@westlab.com
www.westlab.com
Australia New Zealand United StatesCanada
For the desktop adaptor, ensure that the power adaptor and the power cord are
connected properly prior to connecting to the main power supply and the unit.
6. Operation
User interface and display

•
10
PRODUCT MANUAL
1800 358 101
sales.au@westlab.com
www.westlab.com.au
+64 9 553 3677
sales.nz@westlab.com
www.westlab.co.nz
646 568 5391
sales.us@westlab.com
www.westlab.com
1 877 822 1455
sales.ca@westlab.com
www.westlab.com
Australia New Zealand United StatesCanada
Number Name Description
1Power LED The power LED indicates the status of the mains power.
If the LED glows, the power is connected and if there is
no light, the power is disconnected.
2Speed LED The speed LED will glow when the speed value is
displayed or selected.
3Time LED The time LED will glow when the time value is displayed
or selected.
4Speed & Time
Setting Knob
Press the dial to toggle between the speed and time
selection modes. Rotate the knob clockwise to increase
the values and counter clockwise to decrease the values.
53-Way Switch This switch is for the mode selection. The options
include OFF, Stand-By, Continuous or Touch operation.
6Display The digital display shows the speed value, time value
and pulse parameters.
7Pulse The pulse button is activated only on continuous mode.
In pulse mode, the power LED will begin blinking to
indicate an activated pulse mode. While in this mode,
the user can set the ON and OFF time of the vortex
action as per their requirements.
Setting the speed and time values
Always set the required speed and time values rst. Rotate the knob to select and set
the speed value. By default, the speed will be selected every time the knob rotates.
The LED adjacent to the ‘RPM’ will glow while selecting the speed value. The minimum
and maximum speed of the vortex mixer is 300 RPM and 4200 RPM respectively.
To activate the timer, press the knob once and the LED adjacent to ‘Time’ will glow.
Then rotate the knob clockwise to increase the time value or rotate counter-clockwise
to decrease the value. The timer can be set from one minute to 999 minutes or in
continuous/innite mode.
The innite timer mode is displayed by the symbol ‘ ’.

•
11
PRODUCT MANUAL
1800 358 101
sales.au@westlab.com
www.westlab.com.au
+64 9 553 3677
sales.nz@westlab.com
www.westlab.co.nz
646 568 5391
sales.us@westlab.com
www.westlab.com
1 877 822 1455
sales.ca@westlab.com
www.westlab.com
Australia New Zealand United StatesCanada
3-Way Switch
Switch Position Mode Guide
Stand-By In Stand-By mode, the vortex mixer will
not operate in the touch or continuous
modes. It is recommended to use
the Stand-By mode when replacing
the attachments, when the mixer is
not in use or while setting operation
parameters.
Touch The Touch mode is usually used with
the standard attachment. In this mode,
the vortex action will begin only when
the cup attachment is pressed.
Continuous In Continuous mode, the vortex action
will start automatically at the set speed
and time values without needing the cup
attachment to be pressed. This mode is
generally used with attachments.
Touch mode operation
Prior to operation, check that the upper cup head is rmly tightened to the modied
shaft body. Set the required speed using the knob in Stand-By mode and then select
the Touch mode using the 3-way switch. Once selected, gently press and hold the
cup head using the tube for as long as required. Release your hold on the tube to halt
operation.
Note: The time value cannot be set in the Touch mode as it only operates when the cup
head is pressed.

•
12
PRODUCT MANUAL
1800 358 101
sales.au@westlab.com
www.westlab.com.au
+64 9 553 3677
sales.nz@westlab.com
www.westlab.co.nz
646 568 5391
sales.us@westlab.com
www.westlab.com
1 877 822 1455
sales.ca@westlab.com
www.westlab.com
Australia New Zealand United StatesCanada
Continuous mode operation
Prior to operation, keep the vortex mixer in Stand-By mode and set the operation
parameters. Check that the attachment being used is rmly tightened to the modied
shaft. Select the Continuous mode using the 3-way switch. Once selected, the speed
value will blink for three seconds indicating set speed.
In this mode, the vortex action will start automatically at the set speed and time values
without needing the cup attachment to be pressed. The set RPM and remaining time will
be displayed alternatively. At any time, the user can modify the speed and time values.
Pulse mode
The pulse mode is used for intermittent shaking on a run-pause-run action. This
vortex mixer includes a default pulse mode and a user programmable pulse mode.
In the default pulse mode, the ON and OFF times are pre-set for ve seconds each.
Meanwhile in the programmable pulse mode, the user can set the ON time and OFF
time as per their requirements.
Default pulse [ON & OFF time stable]
The pulse mode can only be activated in the continuous mode. To activate the pulse
mode, press the pulse button while in the continuous mode. Once activated, the power
LED will start blinking to indicate a successful activation. In the default pulse mode, the
vortex operation remains ON for ve seconds and OFF for ve seconds.
Programming pulse [Setting ON & OFF times]
This vortex mixer includes a programmable pulse mode that allows the ON time and
OFF time to be modied. In this mode, users can select the ON time and the OFF time
alternatively while in continuous mode.
1. Activate the pulse mode by pressing the pulse button. Once activated, the power
LED will begin blinking.
2. Press the knob to select the ON time and rotate to modify the ON time value.
When the ON time is selected, press the knob again to select the OFF time and
rotate the modify the value.
3. Press the knob once again to start the pulse mode operation with the modied ON
and OFF time values. The user can set the ON and OFF time between one second
and 99 seconds.

•
ORDERING WITH
WESTLAB IS EASY
Online
www.westlab.com.au
Order online with our easy
Express Order form for fast,
secure ordering.
Phone
1800 358 101
Speak to one of our friendly,
ecient staff from
8.00am - 5.00pm (Mon/Fri)
Email
24 hours, 7 days a week
convenience.
13
PRODUCT MANUAL
1800 358 101
sales.au@westlab.com
www.westlab.com.au
+64 9 553 3677
sales.nz@westlab.com
www.westlab.co.nz
646 568 5391
sales.us@westlab.com
www.westlab.com
1 877 822 1455
sales.ca@westlab.com
www.westlab.com
Australia New Zealand United StatesCanada
Press activated pulse function
The press activated pulse function is used when the user wants to select a specic
ON time for repeat operation activated by touch. Set the ON time as mentioned above.
For the OFF time, set it as innite.
For example, 10 similar samples require vortex action at x speed for 8 seconds. In
this scenario, set the ON time value as 8 seconds and the OFF time as innite in the
programmable pulse mode. Once the 8 seconds for one sample is completed, take
another sample, press, and hold the cup attachment to start another 8 seconds of
vortex action. Follow this process for all 10 similar samples.
• To reset or modify the pulse time value, restart the pulse mode.
• It is recommended to use the pulse mode with the standard attachment.
• The default and programmable pulse modes can be used with the universal
attachment only if the maximum speed of the universal attachment is taken into
consideration to avoid spillage.
• It is not advisable to use the press activated pulse mode with the universal
attachment.
7. Product Recycling
In the case that the product is to be disposed of, the relevant legal regulations are to
be observed.

Westlab in every discovery.
This manual suits for next models
1
Table of contents
Popular Mixer manuals by other brands

AUSTRALIAN MONITOR
AUSTRALIAN MONITOR ZONEMIX4 Installation and operation manual

Winget
Winget Crocker RP1500XD Parts & operation manual

STARING
STARING SM 90 instruction manual

hebvest
hebvest SM30HD Operator's manual

Estia
Estia PREMIER CHEF 06-11949 Instruction manual and warranty

Sunbeam
Sunbeam Mixmaster MX8900W Instruction/recipe booklet

John Lewis
John Lewis JLSM618 instruction manual

Altec Lansing
Altec Lansing 1628A SIGNAL PROCESSING manual

Breville
Breville Scraper Mixer Twin BEM820 Instruction booklet

Fast & Fluid Management
Fast & Fluid Management GA450 manual

Klarstein
Klarstein 10030085 manual

resto italia
resto italia SK Series Manual for use and maintenance