Weston Products Roma 01-0701-W User manual

REV032911
Bucatini, Mezze Penne, Tortiglioni, Rigatoni & Fusilli
Tube
Pasta Machine
MODEL NO. 01-0701-W
SAVE THESE INSTRUCTIONS!
Refer to them often and use them to instruct others.
ATTENTION!
If any components of this unit are broken, do not operate properly, or for product returns, please
contact Weston Products LLC
Phone: 1-800-814-4895 (Outside the U.S. 440-638-3131)
20365 Progress Drive, Strongsville, Ohio 44149
WestonProducts.com
All Trademarks and Registered Trademarks are property of the respective companies.

-2-
Weston Products LLC warrants to the ORIGINAL RETAIL PURCHASER of this product that if operated in
accordance with the printed instruction accompanying it, then for a period of 1 year from the date of purchase,
the product shall be free from defects in material and workmanship.
The Warranty Card, along with a copy of the original receipt, must be received by Weston Products LLC
within 30 days from purchase date for the warranty to apply. Failure to send the completely lled out Warranty
Card, along with a copy of the original receipt, will void the warranty.
The product must be delivered to or shipped freight prepaid to Weston Products LLC for warranty services,
in either its original packaging or similar packaging affording an equal degree of protection. Damage due to
shipping is not the responsibility of the company. Weston Products LLC charges a $35.00 per hour bench
charge. NOTE: No repairs will be started without the authorization of the customer. The return shipping cost
to the customer will be added to the repair invoice.
Weston Products LLC will repair (or at its discretion, replace) the product free of charge, if in the judgment
of the company, it has been proven to be defective as to seller’s labor and material, within the warranty period.
New or rebuilt replacements for factory defective parts will be supplied for one (1) year from the date of
purchase. Replacement parts are warranted for the remainder of the original warranty period.
For non-warranty repairs, contact Weston Products LLC’s Customer Service at 1-800-814-4895 M-F
8am-5pm EST (outside of the United States 440-638-3131) to obtain a Return Merchandise Authorization
Number (RMA Number). Weston Products LLC will refuse all returns that do not contain this number. DO
NOT RETURN THE UNIT WITHOUT PROPER AUTHORIZATION FROM WESTON PRODUCTS LLC.
LIMITATIONS: The warranty is void if the product is used for any purpose other than that for which it is
designed. The product must not have been previously altered, repaired, or serviced by anyone else other
than Weston Products LLC. If applicable, the serial number must not have been altered or removed. The
product must not have been subjected to accident in transit or while in the customer’s possession, misused,
abused, or operated contrary to the instructions contained in the instruction manual. This includes failure
caused by neglect of reasonable and necessary maintenance, improper line voltage and acts of nature. This
warranty is not transferable and applies only to U.S. and Canadian sales.
Except to the extent prohibited by applicable law, no other warranties whether expressed or implied,
including warranty merchantability and tness for a particular purpose, shall apply to this product. Under no
circumstances shall Weston Products LLC be liable for consequential damages sustained in connection with
said product and Weston Products LLC neither assumes nor authorizes any representative or other person to
assume for it any obligation or liability other than such as is expressly set forth herein. Any applicable implied
warranties are also limited to the one (1) year period of the limited warranty.
This warranty covers only the product and its specic parts, not the food or other products processed in it.
CUT ALONG THE DOTTED LINE AND SEND THE WARRANTY CARD ALONG WITH A COPY OF YOUR ORIGINAL
PURCHASE RECEIPT TO: Weston Products LLC
20365 Progress Drive, Strongsville, OH 44149
Customer Name: _________________________________
Address: _______________________________________
City/State/Zip: ___________________________________
Telephone Number: (_________) ____________________
E-Mail Address: _________________________________
Original Date of Purchase: ______/________/________
Product Model #: _________________________________
Serial # (if applicable): ______________________
WESTON WARRANTY INFORMATION
SAVE THIS WARRANTY INFORMATION FOR YOUR RECORDS!
WESTON WARRANTY CARD
SEND THIS CARD ALONG WITH A COPY OF YOUR ORIGINAL PURCHASE RECEIPT TO:
WESTON WARRANTY, WESTON PRODUCTS LLC, 20365 PROGRESS DRIVE, STRONGSVILLE, OH 44149
1
2
3
4
5 A.
5 B.
5 C.
6
7
8
9 D. 9 E. 9 F. 9 G. 9 H.
9 I.
10 J.
10 K.
10 L.

DIAGRAM PART PART
NUMBER DESCRIPTION NUMBER
1 Pasta Machine Body N/A
2 C-Clamp 01-0217
3 Handle 01-0216
4 Pasta Lid 01-0705
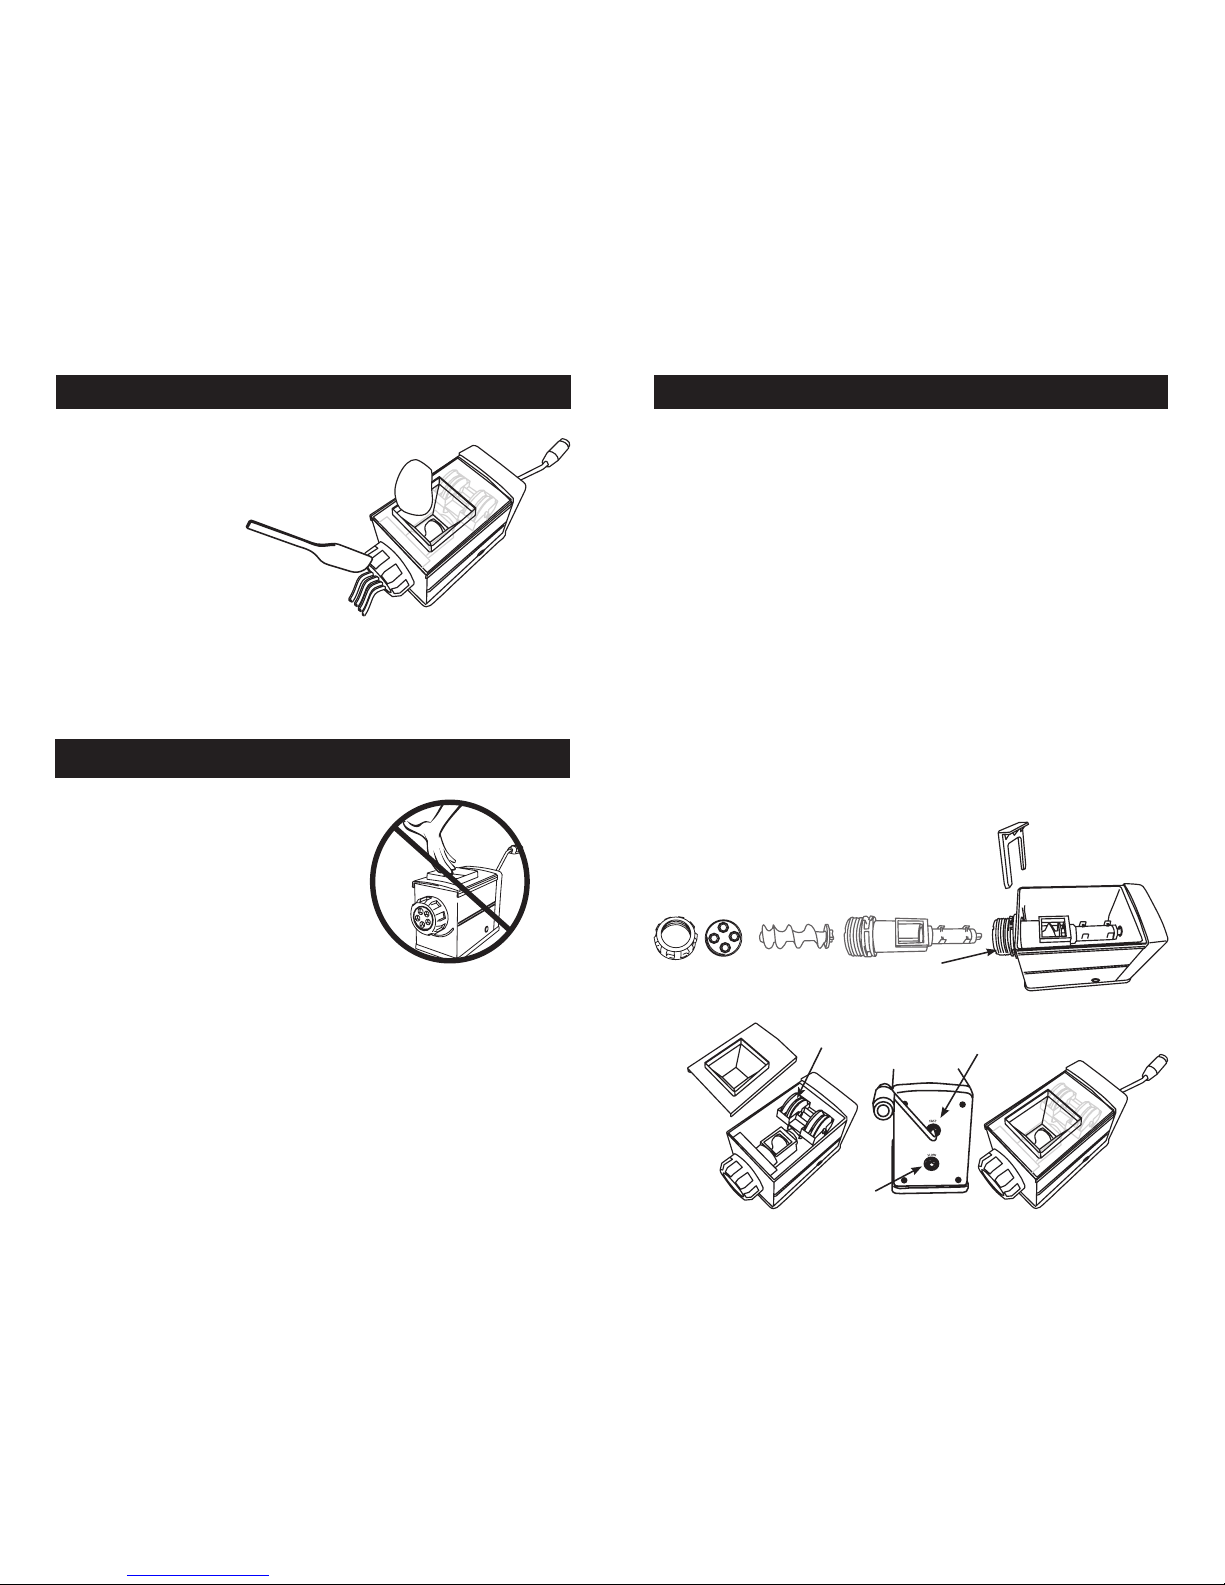
5 Auger Assembly 01-0703
A. Auger
B. Auger Housing
C. Auger Lock
6 Front Ring Nut 01-0706
7 Ring Nut Wrench 01-0707
8 Cutter Spatula 01-0708
9 Disc Kit 01-0704
D. Bucatini Disc
E. Mezze Penne Disc
F. Tortiglioni Disc
G. Rigatoni Disc
H. Fusilli Disc
I. Disc Rack
Not Shown Rubber Foot (4) 01-0211
10 Mixing Kit 01-0702
J. Mixing Paddle
K. Front Cap
L. Enclosed Mixer Lid
COMPONENT LIST
-3--14-
PART PART
DESCRIPTION NUMBER
Traditional Pasta Machine 01-0201
Deluxe Electric Pasta machine 01-0601-W
5.5 Quart Stainless Steel Colander 66-0105-W
Food Strainer & Sauce Maker 07-0801
Deluxe Electric Tomato Strainer 82-0202-W
ADDITIONAL ACCESSORIES AVAILABLE
These products and many more products can be ordered by visiting
WestonProducts.com or by calling
Weston Products LLC Toll Free at 1-800-814-4895
Monday thru Friday 8:00am-5:00pm EST. Outside the U.S. call 440-638-3131
If any components of this unit are broken or the unit does not operate
properly, call Weston Products LLC Toll Free at
1-800-814-4895
Monday thru Friday 8:00am-5:00pm EST. Outside the U.S. call 440-638-3131
There are basic rules to follow when handling food.
They are COOK, SEPARATE, CLEAN, and CHILL.
COOK
It’s crucial to cook food to a safe internal temperature to destroy bacteria that is present. The safety of
hamburgers and other foods made with ground meat has been receiving a lot of attention lately, and with
good reason. When meat is ground, the bacteria present on the surface is mixed throughout the ground
mixture. If this ground meat is not cooked to at least 160oF to 165oF (71oC to 74oC), bacteria will not be
destroyed and there’s a good chance you will get sick.
Solid pieces of meat like steaks and chops don’t have dangerous bacteria like E. coli on the inside, so they
can be served more rare. Still, any beef cut should be cooked to an internal temperature of at least 145oF
(63oC) (medium rare). The safe temperature for poultry is 180oF (82oC) and solid cuts of pork should be
cooked to 160oF (71oC). Eggs should be thoroughly cooked too. If you are making a meringue or other
recipe that uses uncooked eggs, buy specially pasteurized eggs or use prepared meringue powder.
SEPARATE
Foods that will be eaten uncooked and foods that will be cooked before eating MUST ALWAYS be
separated. Cross-contamination occurs when raw meats or eggs come in contact with foods that will
be eaten uncooked. This is a major source of food poisoning. Always double-wrap raw meats and place
them on the lowest shelf in the refrigerator so there is no way juices can drip onto fresh produce. Then
use the raw meats within 1-2 days of purchase, or freeze for longer storage. Defrost frozen meats in the
refrigerator, not on the counter.
When grilling or cooking raw meats or sh, make sure to place the cooked meat on a clean platter. Don’t
use the same platter you used to carry the food out to the grill. Wash the utensils used in grilling after the
food is turned for the last time on the grill, as well as spatulas and spoons used for stir-frying or turning
meat as it cooks.
Make sure to wash your hands after handling raw meats or raw eggs. Washing hands with soap and water,
or using a pre-moistened antibacterial towelette is absolutely necessary after you have touched raw meat
or raw eggs. Not washing hands and surfaces while cooking is a major cause of cross-contamination.
CLEAN
Wash your hands and work surfaces frequently when you are cooking. Washing with soap and warm
water for at least 15 seconds, then dry with a paper towel.
CHILL
Chilling food is very important. The danger zone where bacteria multiply is between 40oF and 140oF (4oC
and 6oC). Your refrigerator should be set to 40oF (4oC) or below; your freezer should be 0oF (-17oC) or
below. Simple rule: serve hot foods hot, cold foods cold. Use chang dishes or hot plates to keep food hot
while serving. Use ice water baths to keep cold foods cold. Never let any food sit at room temperature for
more than 2 hours - 1 hour if the ambient temperature is 90oF (32oC) or above. When packing for a picnic,
make sure the foods are already chilled when they go into the insulated hamper. The hamper won’t chill
food - it just keeps food cold when properly packed with ice. Hot cooked foods should be placed in shallow
containers and immediately refrigerated so they cool rapidly. Make sure to cover foods after they are cool.
NOTE: Special considerations must be made when using venison or other wild game, since it can become
heavily contaminated during eld dressing. Venison is often held at temperatures that could potentially
allow bacteria to grow, such as when it is being transported. Refer to the USDA Meat and Poultry
Department for further questions or information on meat and food safety.
FOOD SAFETY
CAUTION! It is important to follow the “Food Safety” guidelines outlined in this
manual. For the most up to date instruction visit the USDA website.

-4- -13-
DISASSEMBLY & CLEANING
1. Remove the Handle from the driver.
2. Open the C-Clamp all the way open by turning the handle of the C-Clamp counter-
clockwise.
3. Remove the Pasta Lid by gently pulling up from one side, popping the Pasta Lid off.
If using the Mixer Lid, slide the Mixer Lid off.
4. Remove any left over dough in the Pasta Machine.
5. Twist the Front Ring Nut or the Front Cap counter-clockwise and remove. If the
Front Ring Nut or the Front Cap is too tight, place the Ring Nut Wrench over the Front
Ring Nut or the Front Cap and twist counter-clockwise to loosen it.
6. Remove all parts from the Pasta Machine.
7. Once all parts are removed, lay them all out and let the dough dry for a few hours.
8. Use a dry pastry brush to remove any dough from the parts.
9. Wash all of the parts in warm, soapy water. Rinse with clear water and dry. NEVER
WASH THE PASTA MACHINE or its parts in the dishwasher. It is best NOT to
immerse the Pasta Machine Body into water/liquids. Wash and rinse the Body and let
air dry completely. Some water may enter the openings of the Body, simply allow the
water to run out and dry.
10. Reassemble the dry unit following the “Assembly Instructions” as outlined in this
manual.
SPINACH PASTA DOUGH
3 cups our 2 eggs 1 Tbsp olive oil
1/4 tsp salt 1-3 cup water
8 oz fresh spinach
. Remove the stems from 8 oz. of fresh spinach
. Cook the spinach in boiling water for about 2 minutes or until the spinach is wilted
. Rinse the spinach to cool it quickly
. Squeeze the spinach dry, then puree it in a blender Add the 2 eggs to the pureed
spinach and blend well
. Add all of the pasta dough ingredients to the Body of the Pasta Machine.
. Turn the Handle at a consistent pace to mix the ingredients together.
. Follow the “Mixing Dough” instructions as outlined in this manual.
TOMATO SAUCE
2-1/4 lb peeled tomatoes 1 small onion, chopped 1 carrot, shredded
chopped parsley 1 stalk celery chopped
small bunch fresh basil 1/4 cup oil salt & pepper
. Put the peeled tomatoes in a saucepan with the oil, vegetables and herbs
. Cook at moderate heat for about half an hour with the lid on
. Remove the lid and simmer to allow sauce to thicken, add salt to taste
ARRABIATA SAUCE
1 tsp olive oil 4 cloves minced garlic 1 Tbsp white sugar
1 Tbsp chopped fresh basil 2 Tbsp tomato paste 1 Tbsp lemon juice
1/2 tsp Italian seasoning 2 Tbsp chopped parsley 3/8 cup red wine
1 cup chopped onion 1 Tbsp crushed red pepper akes
1/4 tsp ground black pepper 19 oz cans peeled and diced tomatoes
. Heat oil in a large skillet or saucepan over medium heat
. Sauté onion and garlic in oil for 5 minutes
. Stir in wine, sugar, basil, red pepper, tomato paste, lemon juice, Italian seasoning,
black pepper and tomatoes; bring to a boil
. Reduce heat to medium, and simmer uncovered about 15 minutes
. Stir in parsley
BÉCHAMEL SAUCE
1-3/4 oz butter 1-3/4 oz our
2-1/4 cups milk nutmeg salt
. Warm milk in a small saucepan
. Put the butter in a saucepan at moderate heat and when it melts, add the our and cook
slowly for a few minutes
. Stir continuously, without letting it brown
. Add the warmed milk to the butter and our mixture in small doses
. Smooth out any lumps with a whisk or a wooden spoon

-5--12-
DOUGH MIXER ASSEMBLY
Before using the Pasta Machine, clean all parts
as outlined in the “Cleaning Instructions” in this
manual.
1. Insert the plastic round end of the Mixing
Paddle into the top opening of the Pasta
Machine Body and slide the metal hexagon
end of the Mixing Paddle into the metal
hexagon opening inside the back of the Pasta
Machine Body (gure A).
2. Line up the Front Cap notches with the
notches in the opening of the Body. Place the
round plastic end of the Mixing Paddle inside
the notch in the center of the Front Cap. Place
the Ring Nut Wrench over the end of the Front
Cap and turn clockwise a quarter turn to lock
the Front Cap into place.
3. Insert the end of the Handle into the “Fast”
(for mixing dough) (“Slow” (for pasta making))
drive on the back of the Body (gure B).
4. Align the Enclosed Mixer Lid with the
arrow at the front to the tracks on the Body.
Gently slide the Mixer Lid onto the Pasta
Machine Body (gure C).
5. Open the C-Clamp all the way open by
turning the handle of the C-Clamp counter-
clockwise. Attach the Pasta Machine to a
table or countertop by inserting the end of the
C-Clamp into the opening on the side of the
Pasta Machine Body (gure D.). Turn the
handle of the C-Clamp clockwise to tighten the
vice onto the counter.
NOTE: Make sure the Handle of
the Pasta Machine is able to turn
freely before tightening the C-Clamp.
Make sure the Pasta Machine is sturdy
and tight onto the countertop.
Figure B. Fast Drive
Slow Drive
Handle
Figure A.
Figure C.
Figure D.
Front Cap
Body
Mixing
Paddle
Metal Hex
End
Round
Plastic
End
Mixer Lid
C-Clamp
Housing
C-Clamp
TRADITIONAL PASTA DOUGH
3 cups our 2 eggs 1 Tbsp olive oil
1/4 tsp salt 1-3 cup water
. Add all of the pasta dough ingredients to the Body of the Pasta Machine
. Turn the Handle at a consistent pace to mix the ingredients together
. Follow the “Mixing Dough” instructions as outlined in this manual
FLAVORED PASTA DOUGH
Pureed vegetables can be added to pasta dough to enhance the noodle color. Generally,
the avor of the vegetable is not very pronounced in the pasta.
LEMON PASTA DOUGH
2 Tbsp lemon juice 3 Tbsp nely grated lemon zest
2 eggs 1 egg yolk
2-1/2 cups all purpose our
. Add all of the pasta dough ingredients to the Body of the Pasta Machine
. Turn the Handle at a consistent pace to mix the ingredients together
. Follow the “Mixing Dough” instructions as outlined in this manual
GARLIC FLAVORED PASTA DOUGH
3 cups our 2 eggs 1 Tbsp olive oil
1/4 tsp salt 1-3 cup water
6 peeled, nely minced garlic cloves
. Add all of the pasta dough ingredients to the Body of the Pasta Machine
. Turn the Handle at a consistent pace to mix the ingredients together
. Follow the “Mixing Dough” instructions as outlined in this manual
RECIPES
Ring Nut
Wrench

-6- -11-
MIXING DOUGH
1. Slide open the Mixer Lid (gure E).
2. Add all of the pasta dough ingredients to
the Body of the Pasta Machine.
3. Slide the Mixer Lid closed.
4. Turn the Handle at a consistent pace to
mix the ingredients together. If the mixture is
wet, slowly add a little our; if the mixture is
dry, slowly add a little water.
5. Continue mixing until the dough has a
consistent color and texture.
6. Remove the dough from the Pasta Machine. Form the dough into a mound
shape and cover with a damp towel.
7. It is important to let the dough now rest for 10-15 minutes to allow the ingredients to blend
together.
8. After dough has rested, cut off a piece approximately 1/4” (0.6 cm) thick, re-cover
remaining dough with damp towel until needed.
9. Follow the “Pasta Machine Assembly” and “Making Pasta” instructions as outlined
in this manual.
Figure E.
Mixer
Lid
CAUTION! It is important to follow the “Food Safety” guidelines outlined in this
manual. For the most up to date instruction visit the USDA website.
COOKING THE PASTA
Whenever cooking pasta, keep the following points in mind:
• Always use plenty of boiling water so the pasta does not stick.
• One-half pound of noodles will require at least 2 quarts of water, 1 pound of
pasta will require 6 quarts.
• Add 1 tsp of salt for each quart of water.
• Always bring the water to a full, rolling boil before adding pasta or it will not cook
properly.
• Cooking time will vary based on the size, weight and ingredients of the noodles.
• Homemade noodles take very little time to cook and should be tested after 3-4
minutes.
• Pasta should be cooked al dente. This means it should not be mushy, but
tender, yet slightly hard to bite. Test the pasta frequently to test for doneness.
• It is better that the noodles be slightly under-cooked than overcooked.
• Once pasta is cooked, drain it but never rinse.
• For the best pasta dishes, add sauce to the drained noodles and serve
immediately.

-7--10-
PASTA MACHINE ASSEMBLY
Before using the Pasta Machine, clean all parts as outlined in the “Cleaning Instructions”
in this booklet.
1. Insert the metal hexagon end of the Auger Housing into the opening of the Pasta
Machine Body and into the metal hexagon opening inside the back of the Body (gure F).
2. Insert the “+” end of the Auger inside of the Auger Housing. Align the “+” of the
Auger with the “+” inside the Auger Housing. Make sure the Auger is fully seated
inside the Auger Housing.
3. Align the Auger Lock up with the channels inside the Body, on each side of the
Auger Housing. Slide the Auger Lock into the channels, locking the Auger Housing
into place.
4. Place the Pasta Disc of choice, metal side facing outwards, into the Front Ring
Nut. There are 4 tabs on the Pasta Disc the need to align with 4 notches on the Auger
Housing. NOTE: Each Pasta Disc is made of two pieces. Be sure the plastic portion
is lined up with the metal portion of the Pasta Disc.
5. By turning the Front Ring Nut in a clockwise direction, screw the Front Ring Nut
onto the Auger Housing. Make sure the Front Ring Nut is snug, but do not overtighten.
NEVER use the Ring Nut Wrench to tighten the Front Ring Nut, damage to the
machine may occur.
6. Optional: Place the unused Pasta Discs into the Disc Rack and place into the
brackets on the top of the Auger Housing (gure G).
7. Align the funnel hole in the Pasta Lid with the
opening on the Auger Housing. Gently snap the
Pasta Lid onto the Pasta Machine Body (gure I).
8. Insert the end of the Handle into the “Slow”
(for pasta making) (“Fast” (for mixing dough)) drive
on the back of the Body (gure H).
Figure F.
Figure G.
Figure I.
Figure H.
Auger Auger Housing
Pasta
Disc
Front
Ring Nut
Auger Lock
Body
Pasta Cover Disc
Rack Fast Drive
Slow Drive
Handle
MAKING PASTA
1. Turn the Handle clockwise while feeding
a piece of dough through the Pasta Lid and
into the Auger.
2. At a consistent pace, keep turning the
Handle.
3. The pasta will begin to
extrude out of the Pasta Disc.
Once the pasta reaches the
desired length, cut the pasta off of the Pasta
Disc using the Cutter Spatula (gure L).
4. Repeat this process for the remaining
dough.
5. Lay the cut pasta on a cheesecloth or
non-stick surface and let it dry for about an
hour.
If making pasta to store, extra drying time
is needed.
Figure L.
Cutter Spatula
Pasta
Dough
CAUTION! It is important to follow the “Food Safety” guidelines outlined in this
manual. For the most up to date instruction visit the USDA website.
WARNING!
KEEP FINGERS OUT OF THE
CHUTE OF THE PASTA LID!
NEVER TOUCH THE AUGER
WHILE IN USE OR WHILE THE
AUGER IS IN MOTION.

-8- -9-
CHANGING THE PASTA DISC
1. Turn the Handle a half of a turn counter-clockwise to reverse the dough in the Auger a bit.
2. If the Disc Rack and the Pasta Discs are stored inside the Pasta Machine Body,
remove the Pasta Lid by gently pulling up from one side, popping the Pasta Lid off.
3. Twist the Front Ring Nut counter-clockwise and remove. If the Front Ring Nut is too
tight, place the Ring Nut Wrench over the Front Ring Nut and twist counter-clockwise
to loosen the Front Ring Nut (gure K).
4. Remove the Pasta Disc.
5. Place the Pasta Disc of choice, metal side facing outwards, into the Front Ring
Nut. There are 4 tabs on the Pasta Disc the need to align with 4 notches on the Auger
Housing. NOTE: Each Pasta Disc is made of two pieces. Be sure the plastic portion
is lined up with the metal portion of the Pasta Disc.
6. By turning the Front Ring Nut in a clockwise direction, screw the Front Ring Nut
onto the Auger Housing. Make sure the Front Ring Nut is snug, but do not overtighten.
NEVER use the Ring Nut Wrench to tighten the Front Ring Nut, damage to the
machine may occur.
9. Open the C-Clamp all the way open by turning the
handle of the C-Clamp counter-clockwise. Attach the
Pasta Machine to a table or countertop by inserting
the end of the C-Clamp into the opening on the side
of the Pasta Machine Body (gure J.). Turn the
handle of the C-Clamp clockwise to tighten the vice
onto the counter.
NOTE: Make sure the Handle of the Pasta Machine
is able to turn freely before tightening the C-Clamp.
Make sure the Pasta Machine is sturdy and tight onto
the countertop. Figure J. C-Clamp
C-Clamp
Housing
Figure K.
Disc
Rack
Pasta
Disc
Front
Ring Nut
Ring Nut
Wrench
Table of contents
Other Weston Products Pasta Maker manuals