Wetstyle ELEMENT W2 User manual

- W2 ELEMENT INSTALL GUIDE -
(2015-09-17)
1/12
ELEMENT COLLECTION INSTALLATION GUIDE
INDEX
Before you begin p.1
Installation
Wall preparation p.3
Plumbing p.3
Cabinet installation p.4
Door adjustments p.7
Vanity installation p.8
Lavatory installation p.10
Drawer installation p.11
Cleaning guide p.12
Warranty p.12
BEFORE YOU BEGIN
Thank you for choosing from W2 by WETSTYLE’s line of quality products.
Please note that prior to shipment from the manufacturing facility, the furniture you have
received has passed quality control and was in excellent condition upon leaving the W2 by
WETSTYLE facility.
We recommend that you carefully inspect the product prior to its installation. If there are any
defects, please contact the dealer from whom you purchased the product and please DO
NOT install the furniture. W2 by WETSTYLE will not be held responsible for any defects or
damage discovered once the furniture is installed.
It is highly recommended that a professional undertake the installation of the cabinet and
vanity.
Please read this guide carefully to ensure the proper installation and reliability of your
product for many years to come.
For assistance, please call customer service at 1.888.536.9001.

- W2 ELEMENT INSTALL GUIDE -
(2015-09-17)
2/12
TOOLS AND EQUIPMENT
Drill and bits
Measuring tape
Protective paper
Silicone caulk
Pencil
Level
Protective eyeglasses
Wood screw #10 flat head, 3" and
4" long
IMPORTANT
This installation might require custom placement of studs relative to the position of the product
in the room. Please read the instructions related to your cabinet model carefully.
HEIGHTS DIAGRAM
IMPORTANT: Before drilling the vanity, you must remove the drawers
completely from the vanity AND cover the glides with masking tape to
protect them from dust produced as a result of the drilling. The removal
of the drawers will also facilitate the installation.

- W2 ELEMENT INSTALL GUIDE -
(2015-09-17)
3/12
WALL PREPARATION
The ELEMENT collection is designed to be wall-mounted and needs special wall preparation
for the vanity and for the mirrored and linen cabinets.
1. Make sure that walls and floor are straight and level.
2. Determine the desired location of the cabinet.
3. The distance between studs should not be more than 16". See diagram #1
4. Metal studs should be reinforced vertically by 2" x 4" wooden studs. This is applicable
for all furniture.
5. Metal and wooden studs should be reinforced horizontally with 2" x 6" wooden studs
at anchoring heights 29’’:
29" along the full width of the vanity
58’’ & 73-3/4" along the full width of the mirror cabinet
13-3/4 & 63" along the full width of the linen cabinet
6. Do not apply the product to the wall surface until all braces and mounting clips have
been installed and all plumbing and electrical rough ins have been completed.
PLUMBING
The pipes should be positioned at a height of 21’’.
The pipes are located inside the furniture.
Anchoring HEIGHTS
Vanity: 29’’
Mirror Cabinet: 58’’ & 73-3/4’’
Linen Cabinet: 13-3/4’’ & 63’’
Horizontal wooden studs heights
(Measured from floor to top of the
stud)
Vanity: 31’’
Mirror Cabinet: 60’’ & 75-3/4’’
Linen Cabinet: 15-3/4’’ & 65’’

- W2 ELEMENT INSTALL GUIDE -
(2015-09-17)
4/12
CABINET INSTALLATION
FOR WALL-MOUNT STORAGE MIRROR and LINEN
Prior to installation,
1. Carefully remove unit from packaging.
2. Gently remove packaged glass shelves, wooden shelves and hardware bag from
within furniture.
3. Remove and store doors while you continue installation.
Hinges
Lift-up
CAUTION - Do not close the lift-up mechanism!

- W2 ELEMENT INSTALL GUIDE -
(2015-09-17)
5/12
4. Align and level according to horizontally reinforced studs and desired cabinet height.
5. Pre-drill pilot holes into cabinets
6. Install to the wall using 3" long #10 flat head wood screws. Fasten securely.
7. Cover screw holes’ using the provided screw covers.
FINAL CABINET ASSEMBLY
Mirror Cabinet
1. Mount door onto Hinge plates.
2. Insert Lift-up mechanism

- W2 ELEMENT INSTALL GUIDE -
(2015-09-17)
6/12
3. Insert KRISTAL glass shelf pins at desired shelf location. Fasten securely by tightening
lock screw on the underside of pin.
Linen Cabinet
4. Insert single shelf pins at desired shelf location.
5. Mount door onto hinge plates.

- W2 ELEMENT INSTALL GUIDE -
(2015-09-17)
7/12
Door adjustments
Hinge adjustment features.
*use a Philips screw driver to adjust each hinge screw
Lift-up adjustment features.
Counter
Clockwise
Clockwise

- W2 ELEMENT INSTALL GUIDE -
(2015-09-17)
8/12
VANITY INSTALLATION
Prior to installation,
IMPORTANT
Before drilling the vanity, you must remove the drawers completely from the vanity AND cover
the glides with masking tape to protect them from dust as a result of the drilling. The removal
of the drawers will also facilitate the installation.
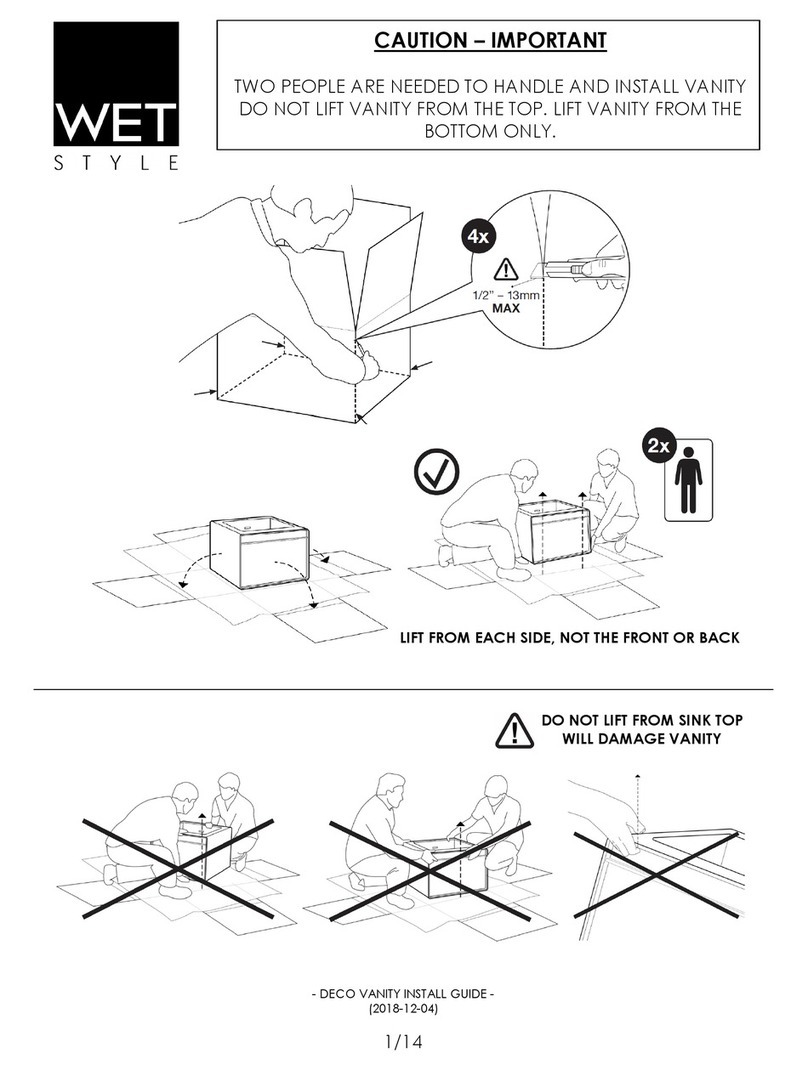
1. Carefully remove unit from packaging.
2. Remove drawers-Pull the drawer slides out to full extension. REFER TO IMAGE #1
3. Release locking mechanisms. REFER TO IMAGE #2
4. Remove Vanity drawers and cover glides with masking tape to protect them from
dust.
Drawer insertion and removal
1 2
Concealed full extension slides Locking device
All ELEMENT VANITIES must be wall-mounted with the specialty CAMAR mounting clips
provided with the furniture.
5. Align and level the mounting clips according to horizontally reinforced studs and
desired Vanity height.
Align & level

- W2 ELEMENT INSTALL GUIDE -
(2015-09-17)
9/12
6. Install mounting clips to the wall using 3" long #10 wood screws. Fasten securely.
7. Position Vanity onto mounting clips.
IMPORTANT
TO RELEASE VANITY- Insert screwdriver into wall mounting clips at depicted location hereby
above and press for the release mechanism to activate.
Optional inner pull-out Drawer
1. Carefully unpack optional drawer.
2. Remove glide anchors from drawer glides.
3. Align glide anchor holes and fasten with supplied hardware.
4. Install lavatory prior to inserting drawer.
Vanity adjustments
Insert
Release
mechanism

- W2 ELEMENT INSTALL GUIDE -
(2015-09-17)
10/12
LAVATORY INSTALLATION
IMPORTANT
Please be advised that the ELEMENT COLLECTION was designed to receive ELEMENT sinks as
noted in the W2 by WETSTYLE price list and catalogue. The manufacturer does not take
responsibility for the use of third party sink or countertop in conjunction with the ELEMENT
vanity
Sink Anchoring
*If possible, install faucet onto the lavatory before securing to the vanity.
1. Apply bead of silicone caulk onto the inside edge of the vanity perimeter.
2. Gently position and align Countertop Sink onto Vanity. Press down to make sure
there is good adhesion between the 2 surfaces.
3. Gently clean away excess silicone.
4. Connect faucet to wall plumbing (if applicable) and install drain.
5. Clean and remove dust prior to exposing glides.
6. Insert Vanity (see Drawer Installation bellow) drawers
7. Remove protective film on lavatory.
Silicone
Silicone

- W2 ELEMENT INSTALL GUIDE -
(2015-09-17)
11/12
DRAWER INSTALLATION
1. Clean the slides and make sure there is no dust that could interfere with the BLUM
slow-closing system.
2. Pull the drawer slides out to full extension. REFER TO IMAGE #1
3. Align the drawer onto the drawer slides.
4. Firmly hold the drawer open with one hand so that it remains fully extended.
5. Slide each clip tab toward the front of the drawer until it clicks into place. REFER TO
IMAGE #2
6. Close the drawer
1 2
Concealed full extension slides Locking device
VANITY DRAWER ADJUSTMENT
1. Tilt adjustment
Using the TANDEM front tilt
adjustment in the TANDEM plus
full extension, precise alignment
between the drawer front &
carcase is ensured. This is a
quick & easy procedure,
requiring no tools.
2. Height adjustment
Height adjustment is just as
easy. The height can be
adjusted up to 3mm without the
need for tools. This provides a
simple and precise way to adjust
the front spacing on your
furniture.

- W2 ELEMENT INSTALL GUIDE -
(2015-09-17)
12/12
CLEANING GUIDE
ELEMENT Furniture is ultra-easy to clean: after each use, simply wipe with a soft cloth to
remove any surface dirt. For standard cleaning, we recommend using warm water with mild
soap. Do not use abrasive products or cream cleaners. Never use petroleum-based products
when cleaning the wood, i.e. paint thinners or other solvents, as they may damage the wood
surface. Glass surfaces may be cleaned using standard glass cleaning products.
WARRANTY
W2 by WETSTYLE’s warranty on WETMAR BiO™ lavatories covers all defects in materials and
manufacturing for a period of five years.
W2 by WETSTYLE’s warranty on furniture and accessories covers all defects in materials and
manufacturing for a period of one year.
This limited warranty, starting on the original purchase date, is only offered to the original
purchaser who acquires the product directly from W2 by WETSTYLE or from its authorized
dealers.
This limited warranty does not apply to cases in which a product was incorrectly installed, nor
to damage due to negligence, misuse, thermal shock, cigarette burn, fire, natural disasters or
other accidents.
This limited warranty does not extend to products purchased over the Internet from
unauthorized W2 by WETSTYLE distributors.
This limited warranty does not extend to products purchased from unauthorized W2 by
WETSTYLE distributors or sub-dealers.
W2 by WETSTYLE is not responsible for costs and claims that may arise from purchase of a
product unsuited to the structure of the existing building.
Any transformation or alteration made to a W2 by WETSTYLE product automatically voids the
warranty.
The manufacturer’s warranty is limited to repair or replacement (with a product of equal value),
provided the claim is made to an authorized dealer or directly to W2 by WETSTYLE within the
warranty period. Labour costs and any other expenses entailed by replacement of a W2 by
WETSTYLE product are not covered by the warranty.
Printed in Canada
www.WETSTYLE.CA/W2 – Montreal – Canada
Tel. 450.536.9000 – 1.888.536.9001 – Fax. 450.536.0202
Table of contents
Other Wetstyle Indoor Furnishing manuals
Popular Indoor Furnishing manuals by other brands

GreenForest
GreenForest BEARD QU BK Assembly instruction

avaks nabytok
avaks nabytok REA AMY 33/225 Assembly instructions

Möbel AS
Möbel AS CLFV331 Assembling Instruction

Winners Only
Winners Only BCA1001Q Assembly instructions

porada
porada ABACUS Assembly instruction

Bell'O
Bell'O PR-35 Assembly instructions