manuals.online logo
Brands
  1. Home
  2. •
  3. Brands
  4. •
  5. Whale
  6. •
  7. Transformer
  8. •
  9. Whale Instant Match SDS131T Assembly instructions

Whale Instant Match SDS131T Assembly instructions

WITH
Quick Connect Guide
SDS131T
Instant atch Transformer
Important Information
Please read the following information before setting up a wireless connection between the Whale Instant
atch® wireless transformer and ira®Advance Flex Extra Wireless (J97P)
• The electrical wiring must conform to EU wiring regulations BS7671:2008 Part 7 (17th Edition).
• This Whale Instant atch®Wireless transformer cannot be connected wirelessly to the Bluetooth®
wireless technology enabled ira Advance Flex Extra Shower (J09N).
• Bluetooth® wireless technology enabled transformers can be easily identified by the blue test button.
• Wireless enabled transformers can be easily identified by the yellow test button.
• Locating the transformer outside of a 5 metre radius may cause a communication breakdown between
the transformer and shower, resulting in intermittent or complete failure to operate.
• Be aware that in very rare situations, dense building material, metallic objects such as steel baths and
foil lined plaster board, or electronic devices may interfere with the wireless signal and result in
intermittent failure. In this situation you should relocate the transformer closer to the shower.
• A hardwired connection should be established if a wireless connection cannot be made between the
shower and transformer.
• If any components or cords are damaged, it must be replaced by a qualified person to avoid a hazard.
Set Up
1. Shower settings
• Before beginning the registration process, please move the
jumper to the "wireless" position inside the ira®Advance
Flex Extra wireless shower as per the diagram shown.
• At this stage please ensure that your transformer is set to be
used with wireless: the flow sensor setting must be set to 7 for
“wireless” and the pipe inlet diameter must be set to 1 for 15mm.
WARNING
umbing of the Waste Pipe
Wireless System egistration
D R A I N P U M P
W I R E L E S S
HARDWIRED
O N
O F F
S 4
C N 5
C N 2
E C O
SIGNAL
Please set jumper on the
rear of the front cover
to “Wireless” position
• Ensure that the electric supply to the shower is turned OFF.
Then turn the dial on the shower to FULL COLD.
3. Shower set up
2. Transformer set up
• Switch the mains electric supply to the transformer ON.
The light on the transformer will now flash red to indicate
that a wireless connection has not yet been established.
• Press and HOLD the yellow test button on the transformer
until the light flashes red and green to indicate that the
transformer is now in pairing mode.
NOTE: You now have 120 seconds to pair the transformer
to the shower.
• Switch the mains electric supply to the shower ON.
• Press the Start/Stop button on the shower. The ira
shower and wireless transformer will now pair automatically
• The green LED on the transformer will now flash green.
4. Configuring the shower
Some service work that may need to be carried out on the ira Advance shower
e.g. the renewal of the control PCB board may require the wireless connection
between the shower and Whale Instant atch®transformer to be terminated and
paired again once the work has been completed. To unpair the transformer from
the shower, please follow these steps.
1. Switch the mains electric supply to the shower OFF.
2. The mains electric supply to the pump OFF.
• Remove hatch to access jumper settings.
umbing of the Waste Pipe
Wireless technology Unpairing
3. De-registration sequence
• ove jumper from position 7 to any other position.
• Power ON the transformer.
• Press and Hold yellow test button for 5 seconds to de-register.
• Power OFF the transformer.
• ove the jumper to position 7
• Replace and secure hatch.
• Power ON the transformer. Red light will flash to show unpaired.
D R A I N P U M P
W I R E L E S S
H A R D W I R E D
ON
OF F
S 4
C N 5
C N 2
E C O
Jumper
location
DRIVER SIGNAL
LK2
LK1
LK2
LK1
Mira®Advance Flex Extra wireless (J97P)
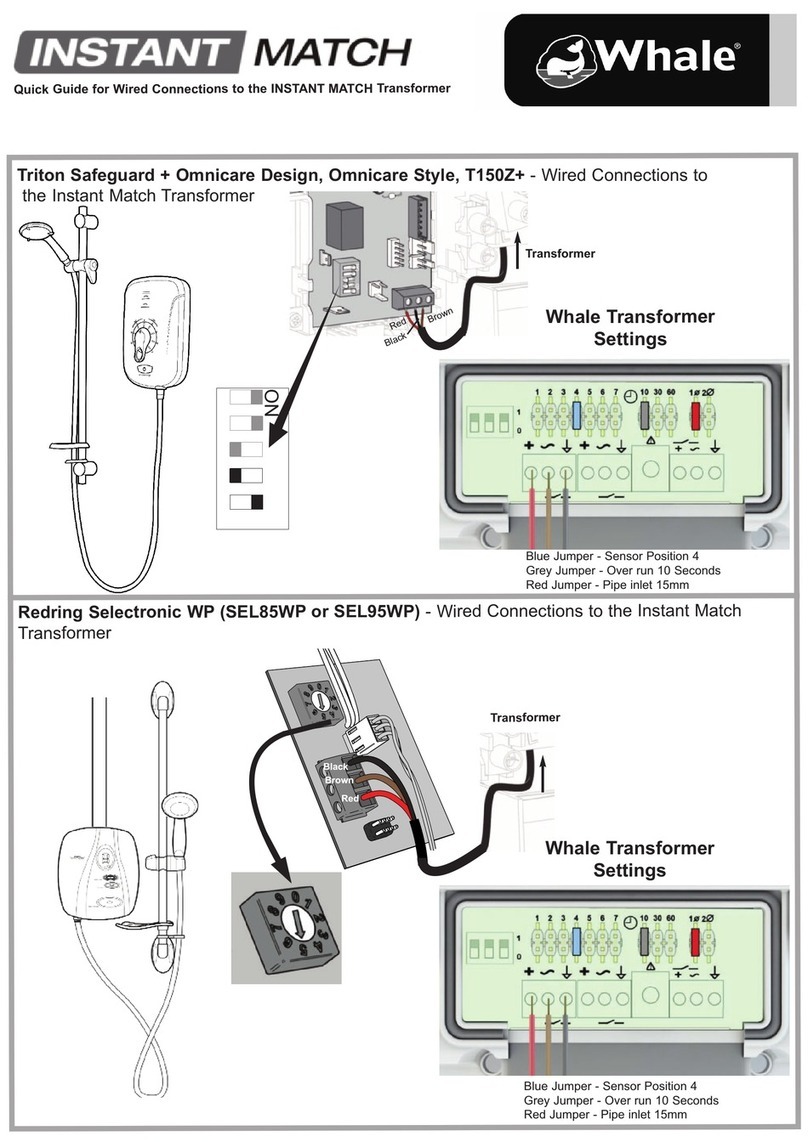
Wired Connections to the WHALE INSTANT ATCH®Transformer
Whale Transformer Settings
Blue Jumper - Sensor Position 6
Grey Jumper - Over run 10 Seconds
Red Jumper - Pipe inlet 15mm
Please ensure that the
jumper on the Mira J97P
shower is set to LK2
Flex Extra J09N
Plumbing of the Waste Pipe
Shower Hardwired Connections Cont'd
Please set jumper on the
rear of the front cover to
"Hardwired" position
Transformer
Whale
Transformer
Settings
Blue Jumper - Sensor Position 4
Grey Jumper - Over run 10 Seconds
Red Jumper - Pipe inlet 15mm
Plumbing of the Waste Pipe
Shower Hardwired Connections
Triton®Safeguard + Omnicare Design,
Omnicare Style, T150Z+
Wired Connections to the Whale
Instant atch®Transformer
edring®Selectronic WP
(SEL85WP or SEL95WP)
Wired Connections to the Whale
Instant atch®Transformer
Transformer
Whale
Transformer
Settings
Blue Jumper - Sensor Position 4
Grey Jumper - Over run 10 Seconds
Red Jumper - Pipe inlet 15mm
Please see below for jumper
and wiring connections.
There are two versions of Gems®flow sensor:
1000 pulses per litre (ppl) and 2200 ppl.
Blue jumper position 3 = 1000ppl
Blue jumper position 4 = 2200ppl (shown below)
Whale®Transformer Settings
Blue Jumper - Sensor Position 2
Grey Jumper - Over run 10 Seconds
Red Jumper - Pipe inlet 15mm
umbing of the Waste Pipe
Whale Instant Match®Transformer
Flow Sensor Connections
Whale®Transformer Settings
Blue Jumper - Sensor Position 4
Grey Jumper - Over run 10 Seconds
Red Jumper - Pipe inlet 15mm
Sika®Sensor
Gems®Sensor
Please ensure that water flow
through the sensor is in the
direction of the arrow.
Please ensure that water flow
through the sensor is in the
direction of the arrow.
Sika®Sensor Connection
Gems®Sensor Connection
When connecting to the Grundfos®Venturi sensor it is important
to connect an earth wire from the Venturi sensor to the signal
earth connection on Whale®transformer (shown below).
Whale®Transformer Settings
Blue Jumper - Sensor Position 5
Grey Jumper - Over run 10 Seconds
Red Jumper - Pipe inlet 15mm
Venturi sensor
Please ensure that water flow
through the sensor is in the
direction of the arrow.
Whale Instant Match® Transformer
Flow Sensor Connections Cont'd
Grundfos®(Venturi) Connection
Whale®Transformer Settings
Flow Switch
Step 1: Turn Dip switch 2 to the 'ON' position.
Step 2: ove red jumper to pipe size '1' for 15mm inlet pipe.
Step 3: ove the blue jumper to increase or decrease the pump
speed as required, using the table below as a guide.
Step 4: ove the grey jumper to increase or decrease the pump
overrun if necessary.
Whale Instant Match®Transformer
Flow Switch Connections
In a situation where a Bluetooth®wireless technology or hardwired connection with the shower
cannot be established, or a suitable flow sensor has not been fitted, the Whale SDS236T
Instant atch transformer can be used with an AK1568 flow switch to activate the pump.
Electric Shower Settings
Jumper Flow Rate
Position (LP )
1. 4.5 - As shown opposite
2. 5.0
3. 5.5
4. 6.0
5. 6.5
6. 7.0
7. 7.5
• Flow rates are nominal values only.
This will vary depending on pipework.
Dip Switches
Please ensure that water flow
through the sensor is in the direction
of the arrow on the sensor.
Whale Instant Match®Transformer
Flow Switch Connections Cont'd
©Copyright Whale 2019 - All rights reserved. eproduction in whole or in part without permission is prohibited. WHALE® and WHALE
INSTANT MATCH® are registered trademarks of Munster Simms Engineering Limited, Bangor, Northern Ireland trading as Whale.
Whale’s policy is one of continuous improvement and we reserve the right to change specications without prior notice. Illustrations are
for guidance purposes only. Neither the accuracy nor completeness of the information contained in this or any product literature is
guaanteed by the Company and may be subject to change at its sole discretion.
The Bluetooth® word mark and logos are registered trademarks owned by Bluetooth SIG, Inc. and any use of such marks by Munster
Simms Engineering Ltd (trading as Whale) is under licence. Other trademarks and trade names are those of their respective owners.
MI A® is a registered trade mark of Kohler Mira Limited.
T ITON® is a registered trade mark of Triton Showers a division of Norcros Group (Holdings).
ED ING® is a registered trade mark of edring Xpelair Group Limited.
SIKA® is a registered trade mark of Dr. Siebert & Kuhn GMbH & Co. KG
GEMS® is a registered trademark of Gems Sensors & Controls.
G UNDFOS® is a registered trademark owned by Grundfos Management A/S or Grundfos A/S, Denmark.
Blue Jumper - Sensor Position 1
Grey Jumper - Over run 10 seconds
Red jumper - Pipe inlet 15mm
Whale®Transformer Settings
Blue Jumper - Sensor Position 1
Grey Jumper - Over run 30 Seconds
Red Jumper - Pipe inlet 22mm
Note: An additional flow switch is available in the
AK1570 ixer Valve Conversion kit (sold separately).
Step 1: Turn Dip switch 2 to the 'ON' position.
Step 2: ove red jumper to pipe size '2' for 22mm inlet pipe.
Step 3: ove the blue jumper to increase or decrease the pump
speed as required, using the below table as a guide.
Step 4: ove the grey jumper to increase or decrease the pump
overrun if necessary. 30 is the recommended setting for
use on mixer showers.
Mixer Shower Settings
Flow Switch x 2
Jumper Flow Rate
Position (LP )
1. 7.5 - As shown opposite
2. 8.0
3. 8.5
4. 9.0
5. 9.5
6. 10.0
7. 11.0
• Flow rates are nominal values only.
This will vary depending on pipework.
Dip Switches
Please ensure that water flow
through the sensor is in the direction
of the arrow on the sensor.
0345 9090 912
drainagesupport@whalepumps.com
www.whalepumps.com
@Whalecare
Whale, 2 Enterprise Road,
Bangor, Co. Down,
BT19 7TA, N.Ireland
ef. 182.605_v3_0619

Other Whale Transformer manuals

Whale INSTANT MATCH SDS236T Assembly instructions

Whale

Whale INSTANT MATCH SDS236T Assembly instructions

Whale INSTANT MATCH User manual

Whale

Whale INSTANT MATCH User manual

Whale InstantMatch SDS236T Assembly instructions

Whale

Whale InstantMatch SDS236T Assembly instructions

Whale INSTANT MATCH SDS236T Assembly instructions

Whale

Whale INSTANT MATCH SDS236T Assembly instructions

Popular Transformer manuals by other brands

GE KOTEF-72 instruction manual

GE

GE KOTEF-72 instruction manual

Audio Note AN-S3 Owner's Information

Audio Note

Audio Note AN-S3 Owner's Information

Altec Lansing 15335A Specifications

Altec Lansing

Altec Lansing 15335A Specifications

Devine DI-P user manual

Devine

Devine DI-P user manual

Hasbro Oil Slick 83626 instructions

Hasbro

Hasbro Oil Slick 83626 instructions

FOREDOM Wax Carver quick start guide

FOREDOM

FOREDOM Wax Carver quick start guide

France P5G-2UE Series installation guide

France

France P5G-2UE Series installation guide

Dewenwils HSLT05A instruction manual

Dewenwils

Dewenwils HSLT05A instruction manual

CyberPower OL6KSTF Installation and operation manual

CyberPower

CyberPower OL6KSTF Installation and operation manual

Omicron VBO3 user manual

Omicron

Omicron VBO3 user manual

Solar Electronics FK 4000-R installation instructions

Solar Electronics

Solar Electronics FK 4000-R installation instructions

E&I Locked On HI-Z-800-D manual

E&I

E&I Locked On HI-Z-800-D manual

Universal ECO Series Installation instructions manual

Universal

Universal ECO Series Installation instructions manual

Eaton Ulusoy Maintenance, Operation, Installation and Instruction Manual

Eaton

Eaton Ulusoy Maintenance, Operation, Installation and Instruction Manual

Yamaha ST15 owner's manual

Yamaha

Yamaha ST15 owner's manual

Volt VTR-150SL-SS-R1 installation guide

Volt

Volt VTR-150SL-SS-R1 installation guide

SLV 138981 operating manual

SLV

SLV 138981 operating manual

Jobsite BT-RF Installation and user guide

Jobsite

Jobsite BT-RF Installation and user guide

manuals.online logo
manuals.online logoBrands
  • About & Mission
  • Contact us
  • Privacy Policy
  • Terms and Conditions

Copyright 2025 Manuals.Online. All Rights Reserved.