Whatman Biometra TProfessional 96 User manual

TProfessional
Thermocycler
User manual
070-901 TProfessional 96
070-801 TProfessional Gradient
070-902 TProfessional 384


TProfessional
User manual
February 2006
Order-No
070-901 TProfessional 96
070-801 TProfessional Gradient
070-902 TProfessional 384
Biometra
biomedizinische Analytik GmbH
Rudolf-Wissell-Str. 30, D-37079 Goettingen
Tel.: 0551/50 686-0; Fax: 0551/50 686-66
email:.info@biometra.com
www.biometra.com


Index___________________________________________________________________________ I
Introduction ...................................................................................................................................1
1.1 TProfessional Thermo block ...........................................................................................1
1.2 TProfessional Lid ............................................................................................................1
1.3 TProfessional User interface ...........................................................................................1
1.4 TProfessional Housing ....................................................................................................1
2Safety precautions .................................................................................................................2
3Installation .............................................................................................................................3
3.1 Content of delivery..........................................................................................................3
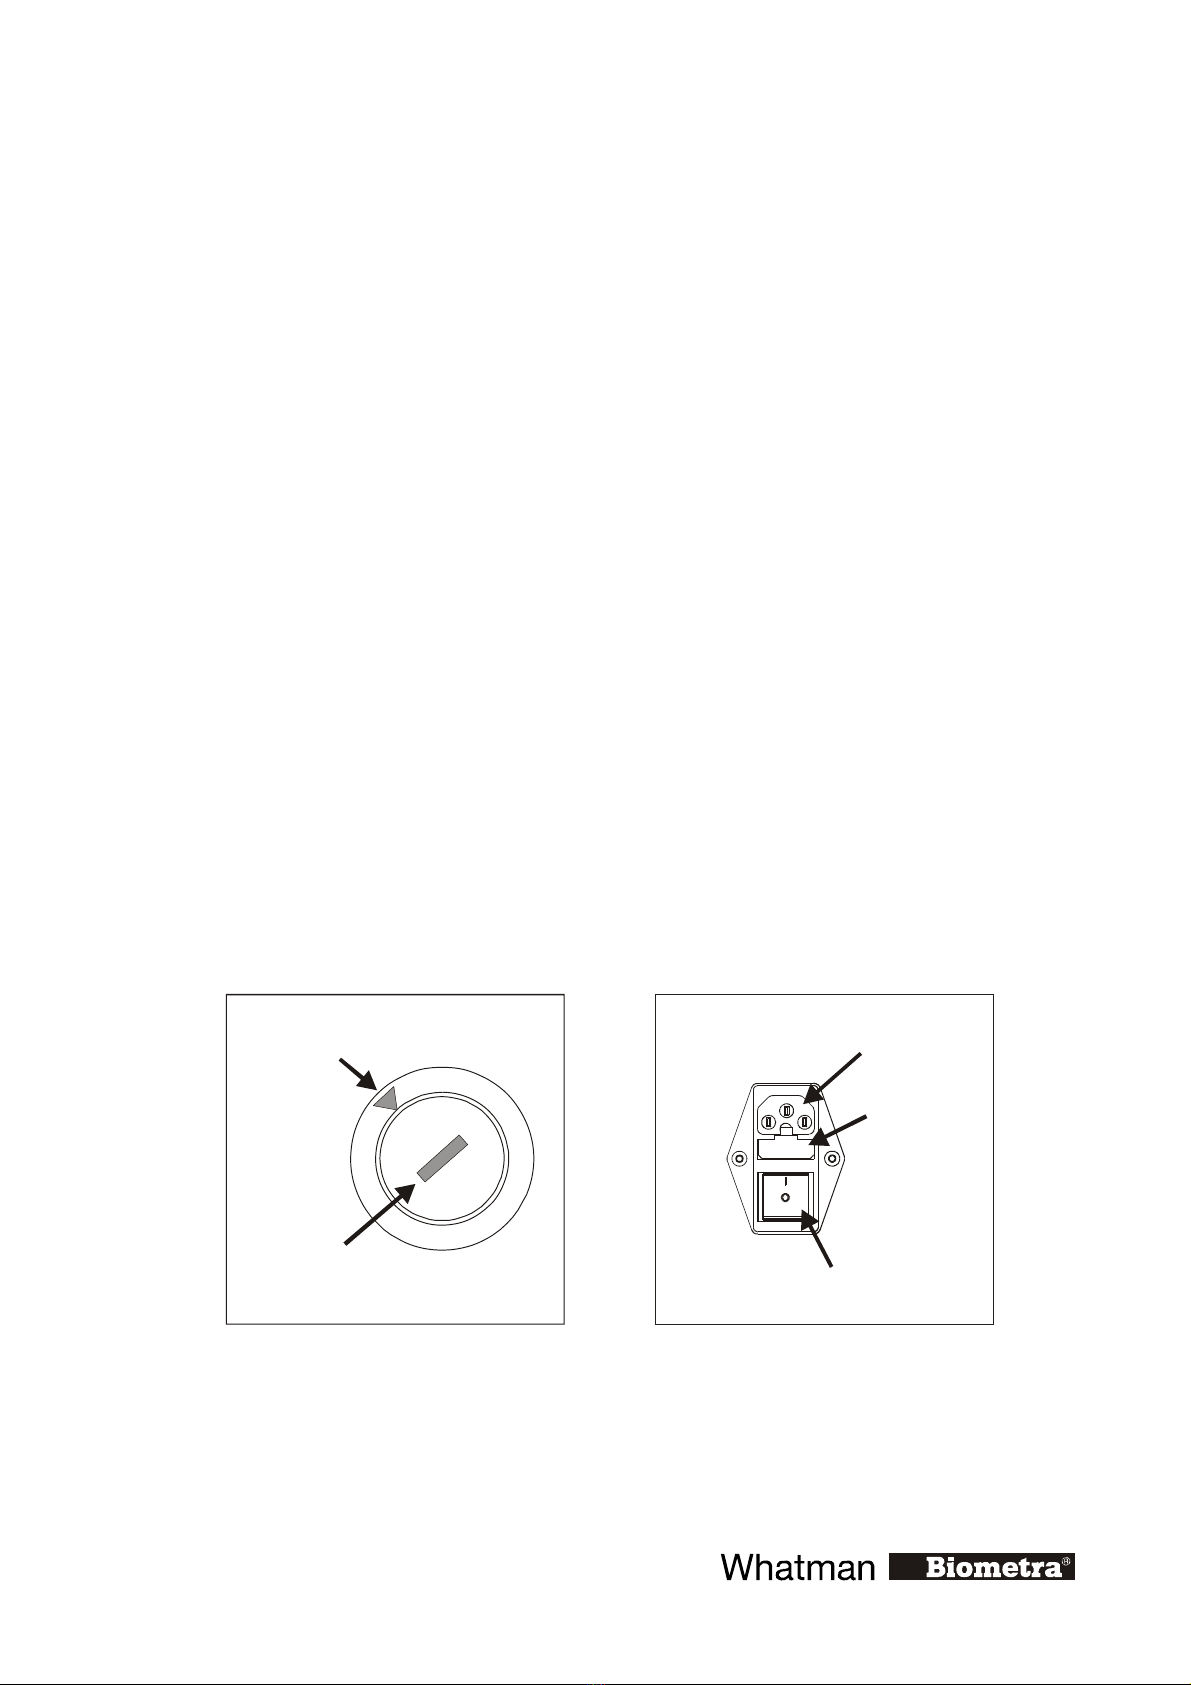
3.2 Operation Voltage ...........................................................................................................3
3.3 Setting up the TProfessional ...........................................................................................4
3.4 Initial self test (power on self test)..................................................................................4
4Getting familiar with the TProfessional..............................................................................5
4.1 TProfessional Thermocycler front view..........................................................................5
4.2 TPROFESSIONAL Thermocycler rear view .......................................................................5
4.3 Exchange of block module..............................................................................................6
4.4 The TProfessional control panel .....................................................................................6
4.5 High Performance Smart Lid (HPSL).............................................................................7
4.6 Releasing blocked lid wheel............................................................................................7
5The TProfessional User Interface ........................................................................................9
5.1 TProfessional Menu Buttons........................................................................................... 9
5.2 TProfessional Soft Keys..................................................................................................9
5.3 Log in Menu ..................................................................................................................10
5.4 Block Menu ...................................................................................................................10
5.5 System Menu.................................................................................................................11
5.6 Program Menu...............................................................................................................11
5.7 Navigation within software menus................................................................................12
6Login In ................................................................................................................................12
6.1 Log in existing User ......................................................................................................13
6.2 Create new user account................................................................................................14
6.3 Supervisor Log in .......................................................................................................... 15
6.4 Delete User....................................................................................................................16
7Create program ..................................................................................................................17
7.1 Set Block Type ..............................................................................................................17
7.2 Heated lid settings .........................................................................................................18
7.2.1 Set lid pre-heating mode .......................................................................................18
7.2.2 Set lid temperature ................................................................................................19
7.3 Enter step temperature and time....................................................................................19
7.4 Set loop..........................................................................................................................20
7.5 Cool below ambient temperature ..................................................................................21
7.6 Program Pause...............................................................................................................21
7.7 Save program.................................................................................................................21
8Set Gradient .........................................................................................................................24
9Edit programs......................................................................................................................25
9.1 Insert program step........................................................................................................25
9.2 Delete program step ......................................................................................................26
9.3 Copy program................................................................................................................28
9.4 Delete program..............................................................................................................29
9.5 Editing programs in the graphical mode .......................................................................30

II____________________________________________________________________________
10 Change program options.................................................................................................... 32
10.1 Heating and cooling rate ............................................................................................... 32
10.2 Time increment ÆΔt(s) ............................................................................................... 33
10.3 Temperature increment or decrement ÆΔT(°C) ......................................................... 33
11 Run program ....................................................................................................................... 35
11.1 Select program for start from User directories.............................................................. 35
11.2 Quick start programs from the block Menue ................................................................ 35
11.2.1 View program prior to start................................................................................... 36
11.3 Display during operation............................................................................................... 37
11.4 Pause Program duringt run............................................................................................ 38
11.5 Continue program ......................................................................................................... 38
12 Stop program....................................................................................................................... 39
12.1 Stop Program from a pause........................................................................................... 39
13 System settings..................................................................................................................... 40
13.1 User configuration......................................................................................................... 40
13.1.1 Set language .......................................................................................................... 40
13.1.2 Change individual PIN.......................................................................................... 40
13.1.3 Delete Account...................................................................................................... 41
13.2 System configuration .................................................................................................... 41
13.2.1 Configure beep...................................................................................................... 42
13.2.2 Configure Contrast................................................................................................ 42
13.2.3 Set time and date................................................................................................... 43
13.3 System info ................................................................................................................... 43
13.3.1 System info ........................................................................................................... 43
13.3.2 View Log files of the last five runs....................................................................... 44
13.4 Service........................................................................................................................... 45
13.4.1 View log files of Power on self test ...................................................................... 45
13.4.2 Execute extended self test..................................................................................... 45
13.4.3 View log files from extended self test .................................................................. 46
13.4.4 View Error log files............................................................................................... 46
13.4.5 Create Info file for Biometra Service Department................................................ 46
13.5 How to contact Biometra .............................................................................................. 46
14 Maintenance ........................................................................................................................ 47
14.1 Cleaning and Decontamination..................................................................................... 47
14.2 Trouble shooting ........................................................................................................... 47
14.2.1 Slow heating and cooling...................................................................................... 47
14.2.2 Restart due to unrecognised power failure............................................................ 47
14.2.3 Adaptation of protocols from other cyclers .......................................................... 47
14.2.4 Releasing wheel in case of blocked lid ................................................................. 47
14.3 Service and repair.......................................................................................................... 48
14.4 Firmware update ........................................................................................................... 48
15 Instructions for return shipment....................................................................................... 49
16 Equipment Decontamination Certificate.......................................................................... 50
17 Technical specification........................................................................................................ 51
18 Warranty.............................................................................................................................. 52
19 Declaration of Conformity ................................................................................................. 53

Manual TProfessional _____________________________________________________________ 1
Introduction
The Biometra TProfessional Thermocycler is inspired by the wish to simplify molecular biology
research. To reach this goal the instrument housing, lid and block were totally redesigned,
providing so far unrealised speed and temperature uniformity. Innovative user software was
developed, driven by Biometras 15 years experience in interface design.
The result is an easy to use Thermocycler with excellent technical specifications.
1.1 TProfessional Thermo block
The TProfessional Thermocycler offers three different block modules. To achieve ultimate
performance the 96 well modules are made of Silver. Due to its excellent heat conductivity
Silver equilibrates extremely quickly, thus providing maximum speed and temperature
uniformity. To protect the valuable silver blocks against corrosion, the block surfaces are Gold
plated.
The 96 well silver block is designed for daily routine work and can be used with 0.2 ml tubes,
strips or microplates. For rapid optimisation of new protocols, a 96 well Gradient version is
available. The third block module is designed for use with 384 well plates. All block modules
can be easily exchanged in less than 10 seconds.
1.2 TProfessional Lid
The TProfessional lid has been optimised to achieve two essential requirements: prevention of
condensation and reliable contact between samples and thermoblock. The lid is powered by
Biometras well know smart lid technology which automatically limits lid pressure to save tubes
from damage. In addition, the new design of the High Performance Lid ensures an even
temperature distribution between samples thus significantly improving temperature uniformity.
With one press on the front button, the lid gently swings open and arrests in its end position.
1.3 TProfessional User interface
The TProfessional user interface incorporates Biometras proven spreadsheet-programming
philosophy. Avoiding endless serial program windows, all steps of a program are entered in a
single screen. This makes the creation of new or editing existing programs fast and easy. One
touch leads from the spreadsheet to an alternative graphical programming mode. The
TProfessional manages up to 30 individual users (all password protected) and provides for a
large program store.
1.4 TProfessional Housing
The elegant TProfessional housing is designed for heavy use. Due to an optimised air stream
design even higher efficiency and better temperature uniformity is achieved. The instrument
works quietly and consumes little power, which in turn leads to low heat emission. The compact
footprint saves valuable bench space. Keyboard and display have been set to an angle that
ensures reflection-free viewing and ergonomic programming. To facilitate servicing the
TProfessional housing can be completely removed from the chassis.

2 ____________________________________________________________________________
2 Safety precautions
Please read this manual carefully before starting operation of the TProfessional Thermocycler.
The TProfessional Thermocycler is intended for sample incubation at varying temperatures.
• General safety precautions for laboratory work must be observed when working with the
TProfessional thermocycler.
• Be aware that samples are reaching high temperatures. Do not touch or open hot tubes or
microplates, because hot liquid may quickly spill out.
• Do not heat samples without having the lid locked securely.
• Before opening of the lid, release lid pressure (see section 4.5)
• Do not place fingers between lid and housing when opening or closing the lid.
• Do not touch the heated lid.
• When only few samples are put in the block place additional tubes in the four corner
positions. This is to evenly distribute the lid pressure and prevents single tubes from
excessive pressure. Use of few tubes may result in damage of the tubes by excessive
pressure.
• Use only suited plastic ware in the TProfessional thermocycler. Tubes and plates must show
good fit when placed in the thermoblock. Only use tubes that are suited for high
temperatures (tight lids).
• The TProfessional Thermocycler contains no user serviceable parts. Do not open the housing
instrument. Service and repair may only be carried out by the Biometra Service department
or otherwise qualified technical personal.
• Do not use the instrument when damages of the housing, block, cable or other parts are
visible.
• The TProfessional Thermocycler must not be used with explosive, flammable or volatile
liquids.
• Appropriate safety regulations must be observed when working with infectious or pathogenic
material.
• The Tprofessional does not produce a sound power level that could be hazardous for the
user.
The thermoblock and the heated lid will reach high temperatures
during operation. Both thermoblock and heated lid can burn you.
Rapid heating of the thermoblock can cause liquids to boil
explosively. Always wear safety goggles during operation. Close the
lid before starting a program.
It is not necessary to apply oil into the opening of the block in order
to improve the heat transfer between the block and the sample tubes.
If you still decide to use oil, do not use silicon oil. Mineral oil may
be used.

Manual TProfessional _____________________________________________________________ 3
3 Installation
3.1 Content of delivery
1) Thermocycler with exchangeable block module
2) Mains connector
3) Manual
4) Short Manual
Please keep the original packaging material for return shipment in case of servicing. The
TProfessional shipping box provides a specially developed system for contact-free transport of
this electronic device.
3.2 Operation Voltage
Important: Prior to connecting the TProfessional to the mains, make sure that the setting of the
Voltage selector is in accordance with your mains Voltage.
The TProfessional Thermocycler can operate at 100, 115 or 230 Volt. The operation Voltage is
shown on the Voltage selector which is located at the instrument bottom.
To change operation Voltage of the TProfessional, switch off the instrument and disconnect the
mains plug.
STEP 1 Use a coin or another round shape item to turn the adjustment slot of the Voltage
selector to the new Voltage.
Fuses
Mains plug
Fuses
Power switch
Voltage
indicator
Adjustment
slot
110
115
230
Instrument bottom Instrument backside
12
Important: After changing the operation Voltage, the instrument fuses have to be replaced. Fuse
specifications for each Voltage are shown on the type label on the instrument backside.
STEP 2: Insert Fuses according to selected Voltage at the backside of the instrument.

4 ____________________________________________________________________________
3.3 Setting up the TProfessional
• Place the TProfessional Thermocycler on a stable surface in a dry environment.
• Let equilibrate the TProfessional Thermocycler to room temperature before starting
operation (1 to 6h).
• Make sure that the appliance connector and the plug of the supply cord are accessible, so you
can separate the instrument from the mains.
• Make sure that the ventilation slots on the bottom and the rear are not obstructed (see section
4.2). Make sure that there is no object underneath the thermocycler that may block the
ventilation slots at the bottom (e.g. a piece of paper etc.)
• There must be sufficient distance between the ventilation slots on the rear side of the
Thermocycler and a wall or another instrument (min 10 cm).
Ensure that both the rear and bottom ventilation slits of the
rear and bottom of the instrument are unobstructed.
Insufficient ventilation can cause overheating of the
instrument.
• Make sure that the main supply voltage is in accordance with the label above the power
connection (see section 4.2)
• Connect the TProfessional Thermocycler to a grounded socket.
Prior to connecting the unit to the power source please ensure that the
voltage selector at the back side of the instrument is set to the required
voltage.
Danger of electric shock! Unplug the power cable before you open the
TProfessional Thermocycler.
• The display contrast can be adjusted to local lightning conditions (13.2.2)
3.4 Initial self test (power on self test)
After switching on the TProfessional serial number of the instrument and the software version is
displayed.
A log file of the power on self test is stored in the Thermocycler memory (see section 13.4.1).

Manual TProfessional _____________________________________________________________ 5
4 Getting familiar with the TProfessional
4.1 TProfessional Thermocycler front view
Display
Keypad
Lid pressure
adjustment wheel
Lid open
button
Start / Stop
Button
4.2 TPROFESSIONAL Thermocycler rear view
R232 serial Port
Power on / off
Block release
lever
Mains plug

6 ____________________________________________________________________________
4.3 Exchange of block module
Switch off the instrument.
Lift release lever on the backside (1) then pull block slowly to the back (2).
1
2
To install an new block module insert module carefully from the back in the base unit (2) until
the plugs at the front of the module are in contact with the socket inside the instrument. Then
carefully push down the release lever (1).
Switch on instrument. During boot up the block module (block format and serial number) is
automatically recognized.
4.4 The TProfessional control panel
Start
Stop
Navigation
LED
Block
status
Bac
k
Keypad
Menue Buttons
Soft Keys

Manual TProfessional _____________________________________________________________ 7
4.5 High Performance Smart Lid (HPSL)
To achieve optimum pressure on the tubes the TPROFESSIONAL is equipped with a height
adjustable heated lid.
Close the lid:
After the samples have been placed in the block close the lid. Turn the wheel clockwise until you
hear a clicking noise. In this mode the pressure will not increase further, even when you keep on
turning the wheel.
Note: The pressure of the lid has been optimised for a fully loaded block. If only very few tubes
are loaded to the block you should place dummy tubes in the four corner positions to avoid
damage of tubes by excessive pressure.
Open the lid:
First: Release pressure by turning the wheel counter clockwise. As soon as there is no more
resistance the pressure has been released.
Then: Open the lid with by pushing the front button.
Important: The lid should not be opened under pressure because this leads to damage of the
locking mechanism.
4.6 Releasing blocked lid wheel
Note: When the lid is in the very up or down position, it may happen that the wheel is
uncoupled. In this situation the clutch mechanism is active in both directions (clicking noise in
either direction).
To unlock wheel, press down metal pin with a ball pen and turn wheel carefully. This pin
overrides the automatic clutch mechanism. Thus, care must be taken not to apply excessive
pressure.

8 ____________________________________________________________________________
Release lid in upper position:
1) press pin
2) carefully turn wheel while holding
the pin down CLOCKWISE, until
you feel normal resistance (no more
clicking noise, clutch is released).
Release pin and turn lid down, until
the clutch mechanism is activated
(clicking noise, optimum pressure
applied).
Release lid in down position:
1) press pin
2) carefully turn wheel while holding
the pin down COUNTER
CLOCKWISE, until you feel
normal resistance (no more clicking
noise, clutch is released). Release pin
and turn wheel counter clockwise
until pressure is completely released.
Open lid.
1
2
Important: When the clutch mechanism is active (= optimum pressure is applied), do not use pin
to further increase lid pressure. This would lead to damage of tubes and instrument!

Manual TProfessional _____________________________________________________________ 9
5 The TProfessional User Interface
The TProfessional User interface provides four Menu Buttons above the screen and four Soft
Keys below the Screen,
Menu buttons
Softkeys
5.1 TProfessional Menu Buttons
The four MENU BUTTONS allow quick access to the TProfessional Main Menus. These are:
• Login /out Menu
• System Menu
• Block Menu
• Program Menu
The active menu is indicated by a graphical link to the respective menu button.
The example shows Program Menu is active.
The four Menu Buttons are permanent and always have the same function. This is in contrast to
the Soft Keys. The Soft Key functions change depending on the current software menu.
5.2 TProfessional Soft Keys
Below the Display there are four SOFT KEYS.

10 ___________________________________________________________________________
In contrast to the Menu Buttons, the Soft Keys have changing functionalities, which are shown in
the above display line.
5.3 Log in Menu
To enter the Log In menu, press the Menu Button [Log in/out] above the display.
When the instrument is switched on, the Log in screen is displayed. To use the instrument a user
has to be selected. Alternatively, a new user can be created.
5.4 Block Menu
To enter the Block Menu, press the Menu Button [Block] above the display.

Manual TProfessional ____________________________________________________________ 11
The block menu shows the current status of the block. The block can be active with a program or
free.
If the block is free (not running), the five most recently used programs (by the active User) are
listed. These programs can be started directly from the block menu (select with cursor and push
[start] Button).
5.5 System Menu
To enter the System Menu, press the System Menue Button above the display.
The System Menu allows global settings and provides information about the instrument. The
power on self test log files can be retrieved and service files generated, a detailed description of
this menu is shown in section 13, page 40.
5.6 Program Menu
To enter the Program Menu, press the Program Button above the Display.

12 ___________________________________________________________________________
In the Program Menu, existing programs can be edited or new programs can be created. Each
User has his own program directory, where individual programs are saved. Programs from other
user directories can be used, but not modified.
5.7 Navigation within software menus
Four navigation keys provide easy navigation within the software screens. The [left] and the
[right] key have additional functionalities as described below:
The right cursor key moves the cursor to the next field.
This cursor can also be used to confirm data entry. By pressing the right cursor
settings will be saved and the cursor moves to the next field.
In the file directory, this key moves to cursor forward to the next (lower) level.
The left cursor key moves the cursor back to the previous field.
In most screens this cursor is equivalent to the ”back” key.
In the file directory, this key moves the cursor back to the higher level.
6 Login In
The TProfessional manages up to 30 individual users. For each user a directory is created, where
programs are stored. Programs from other directories (i.e. users) can be read but not modified.
This allows to use all programs that are in the cycler memory, but to write only in the own user
directory.
Each User is identified by User Name plus Initials (2-3 letters).
Each User account can be protected by a PIN consisting of 1-7 digits. If no PIN protection is
wanted, leave the field “Enter PIN” empty and confirm with [Enter].

Manual TProfessional ____________________________________________________________ 13
Note: If no PIN protection is used, programs in the User directory may be changed or deleted by
unauthorized persons.
6.1 Log in existing User
Press Menu Button [Log in/out] above the Display. A list of Users is shown
Select User with cursor keys, or enter first initial. The cursor jumps to the first account starting
with this letter.
Press Soft Key [log in] and enter your PIN.

14 ___________________________________________________________________________
Confirm PIN with button [PIN code ok]. The current User is shown:
To proceed with editing or running a program, select one of the Menu Buttons above the display
6.2 Create new user account
Press Menu Button[Log in/out] above the Display.
This manual suits for next models
5
Table of contents
Popular Laboratory Equipment manuals by other brands

Aqua Ultraviolet
Aqua Ultraviolet SL 100 Watt instruction manual

Thermo Scientific
Thermo Scientific gibco CTS Rotea user guide

Applied Biosystems
Applied Biosystems QuantStudio 6 Flex user guide

IKA
IKA Oven 125 basic dry operating instructions

Fisher Scientific
Fisher Scientific 15-460-2Q Installation and operation manual

Auvs
Auvs UV Box KR615 Questions

Labconco
Labconco CentriVap DNA Systems user manual

Karl Storz
Karl Storz 110 Series manual

Granite River Labs
Granite River Labs GRL-PCIE-TX Quick start user guide

Thermo Scientific
Thermo Scientific Applied Biosystems GeneChip 645 user guide

PureAiro
PureAiro GUARDIAN 155 Installation & operation manual

Microscan
Microscan QX Hawk quick start guide