Whelen Engineering Company E1000 User manual

Page 1
®
51 Winthrop Road
Chester, Connecticut 06412-0684
Phone: (800) 63SIREN
Phone: (860) 526-9504
Fax: (860) 526-4784
Internet: www.whelen.com
Mass Notification
E1000 Encoder
Installation and Operating Manual
®
ENGINEERING COMPANY INC.
©2015 Whelen Engineering Company Inc.
Form No.14958B (060818)
For warranty information regarding this product, visit www.whelen.com/warranty

Page 2
Copyright, 2015 Whelen Engineering Company, Inc.
All rights reserved.
Printed in the United States of America.
The purpose of this manual is to provide operation and installation information about the use of a Whelen
Engineering Company, Inc. Model E1000 Central Control Station.
Prior to reading this manual or using this product you should be familiar with Whelen Engineering
Company’s family of High Power Voice and Siren Systems.
The information contained herein is proprietary to the Whelen Engineering Company, Inc. No part of this manual may
be reproduced, recorded or stored in a retrieval system, or transmitted, in any form without prior permission of Whelen
Engineering Company, Inc.
The software described in this manual is supplied with the understanding that it may not be copied or otherwise
redistributed without prior permission of Whelen Engineering Company, Inc.
All materials and specifications contained in this document are subject to change without notice.

Page 3
Table of Contents
Introduction........................................................................................................................................5
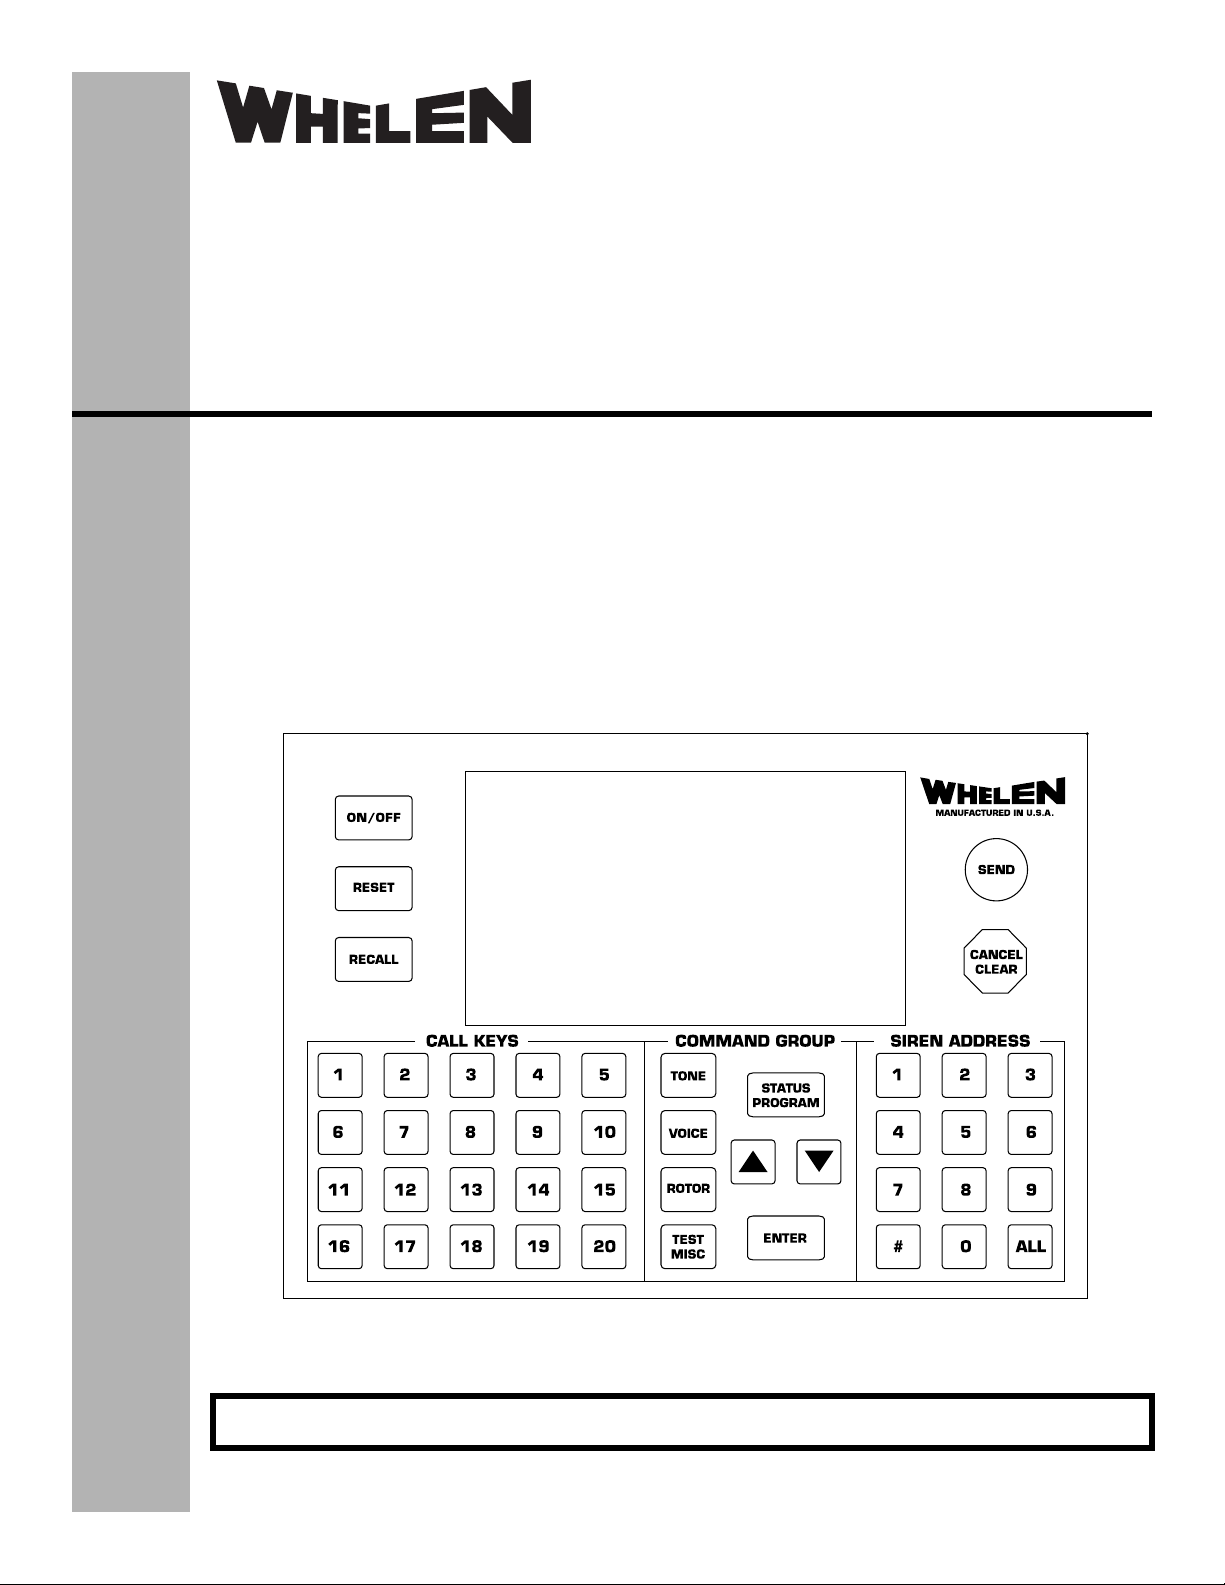
Understanding the Keyboard............................................................................................................6
Call Key Buttons...........................................................................................................................6
Command Group Buttons .............................................................................................................6
Manual Menu Activation...................................................................................................................8
Menu Selections..................................................................................................................................9
Tone ..............................................................................................................................................9
Voice.............................................................................................................................................9
Rotor .............................................................................................................................................9
Test Misc.......................................................................................................................................9
Status / Program............................................................................................................................10
Status.............................................................................................................................................10
Program.........................................................................................................................................10
Programming Menu...........................................................................................................................11
Polling Address.............................................................................................................................11
Call Key Programming .................................................................................................................14
Programming A Call Key..........................................................................................................14
Deleting A Call Key Sequence..................................................................................................19
Deleting A Call Key..................................................................................................................21
Remote Input Programming..........................................................................................................23
Timed Transmissions....................................................................................................................24
Programming A Timed Transmission.......................................................................................24
Deleting A Timed Transmission ...............................................................................................27
Area Code .....................................................................................................................................28
TMX Warm Up.............................................................................................................................29
Base I.D. .......................................................................................................................................30
Channel Grant Wait ......................................................................................................................31
Channel Grant Delay ....................................................................................................................32
Clock.............................................................................................................................................33
Date/Year ......................................................................................................................................34
Installation ..........................................................................................................................................35
Troubleshooting .................................................................................................................................37
Specifications ......................................................................................................................................37

Page 4
E1000 Software...................................................................................................................................38
Understanding Buttons and Icons .................................................................................................38
Logging Mode...............................................................................................................................39
Program Mode ..............................................................................................................................39
Remote Inputs RI1 and RI2 ..........................................................................................................39
Timed Activation TOD1 - TOD4 .................................................................................................39
Call Keys 1 - 20 ............................................................................................................................39
Blue “+” Icon ................................................................................................................................39
Red “X” Icon ................................................................................................................................39
System Settings.............................................................................................................................40
Polling Addresses, Manage...........................................................................................................40
Up Arrow ......................................................................................................................................40
Instructions Viewer.......................................................................................................................40
Sync Date and Time......................................................................................................................40
Restore System Settings Defaults .................................................................................................40
Logging Mode Window................................................................................................................41
Program Mode Window................................................................................................................41
Polling Addresses Window...........................................................................................................42
Instructions Viewer Window ........................................................................................................42
Programming......................................................................................................................................43
Polling Addresses .........................................................................................................................43
Area Code .....................................................................................................................................44
Base I.D., CH Grant Delay, CH Grant Wait, TX Audio Wait Duration, Transmit Warm Up .....44
Call Keys.......................................................................................................................................44
Remote Inputs ...............................................................................................................................46
Timed Activations.........................................................................................................................47

Page 5
Introduction
The E1000 Central Control Station is a full function, easy to use, activation and status display unit for
Whelen’s family of Mass Notification products. When connected to a PC running the E1000 Programming
and Logging software all siren system communications activity will be stored. The E1000 uses Whelen’s
standard and reliable 10 digit DTMF communication protocol.
The E1000 is an attractive, desktop unit designed for simple connection to a base station transmitter. The
E1000 has a sealed membrane keyboard and a low-power, liquid crystal display. The typical warning
activation sequence consists of selecting a Call Key or following a four-step process.
There are 20 Call Keys, which allow the user to program and execute pre-defined scenarios. All of the Call
Keys are “Hot Keys”.
The E1000 can be used to control a siren system without the use of the user programmed Call Keys. A
simple four-step procedure can be followed to control the siren system. This functionality can be helpful to
control the sirens in a way that may not have been programmed within a Call Key.
The user may select from different command, control, status or test functions. The E1000 supports up to
10,000 unique addresses.
The liquid crystal display (LCD) is a 16 line by 40 character configuration. The display is backlit for easy
reading in low ambient light. When the E1000 is not in use, a running 24 hour clock, day of the week, date
and a stand-by message are displayed.
An internal Super Capacitor is continuously “trickle” charged, to provide long life. The E1000 will
maintain its internal clock for up to 3 weeks after being unplugged. The E1000 comes with a UL listed,
AC, wall-mount, 12VDC power supply.
Rear panel screw terminal connectors are available for field wiring to the base station transceiver. The
connector supports transformer coupled audio, a Push to Talk relay closure, Squelch monitor input (active
high or low), and Channel Grant input for trunking systems.
A PC software interface stores all communication activity to the hard drive. In addition, this software can
be used to program all functions of the E1000.

Page 6
Understanding the Keyboard
CALL KEYS Buttons
There are twenty (20) Call Keys available on the E1000. These keys allow for the rapid deployment of pre-
programmed sequences of commands separated by delays. Therefore Call Keys are the easiest way to
control a siren system, for typical day-to-day and emergency situations. To run a call key is as simple as
selecting the required Call Key button followed by the SEND button. For example, A Wail command is
issued to all sirens, followed by a one minute run period. Then a Cancel is sent, followed by a five second
period. Next a Digital Voice command is sent, followed by a 30 second period. Then a Cancel is sent and
the Call Key is completed. The Call Key may contain any of the commands listed in the Command Table.
Each entry is referred to as a sequence. A single Call Key may have up to 100 sequences (001-100). When
a Call Key is selected and sent, it starts with sequence 001 and continues until the last programmed
sequence. It does not repeat. A Call Key cannot activate another Call Key and Call Keys cannot be stacked.
Command Group Buttons
The command group keys are for single command activations and call key programming. To send a single
command out for Tone activations, Status requests, Digital Voice activations, Rotor commands and Test
commands press the Command Group button for the desired operation, enter an address and press
“SEND”.
UP/DOWN
The UP/DOWN arrow keys allow for navigation in the menus and the command group selections.
ENTER
The ENTER key enables commands to be accepted inside the menus.
TONE
The TONE command button opens the Tone menu. There are 9 selections accessed by the arrow
keys.
VOICE
The VOICE command button opens the Digital voice menu. There are 28 selections accessed by
the arrow keys.
ROTOR
The ROTOR command button opens the Rotor menu. There are 6 selections accessed by the arrow
keys.
TEST/MISC
The TEST/MISC command button opens the Test/misc. menu. There are 12 selections accessed by
the arrow keys.
STATUS/PROGRAM
The STATUS/PROGRAM command button opens the Status menu. Pressing the Status/Program
button twice opens the programming mode. The Status menu has 9 selections accessed by the
arrow keys. The Program mode has 17 selections accessed by the arrow keys.

Page 7
SIREN ADDRESS Buttons, 0-9, #, ALL
The siren address buttons 0-9, #, ALL. This is the numeric entry keypad for all number data used in
entering siren addresses and numeric entries like delays and sequence numbers. The # and ALL enter
wildcard characters to be entered where allowed. The # key enters a single wildcard in a location and the
ALL key enters # in all locations.
Send Button
The SEND button has two functions, #1 to transmit an entered command. #2 select mode for save, erase,
and wipe in menus.
Cancel/Clear Button
The CANCEL/CLEAR button transmits an ALL CALL CANCEL Command and resets the encoder to
HOME screen.
Note: This function is for canceling commands on a global basis that were incorrectly sent.
On/Off Button
The ON/OFF button turns the E1000 off and will not allow transmission of DTMF commands.
Reset Button
The RESET button resets the E1000 to HOME screen and resets all commands to standby.
Recall Button
The RECALL button recalls the last feedback screen received.
Timed Trans. 1, 2, 3, 4
A timed transmission is a user programmable function that creates an automated activation of a user's
programmed Call Key or single command. The E1000 supports up to four separate timed transmissions.
The timed transmissions are based on the day of the week and the time of the day. Once programmed the
activation will occur every week on the time and day or days programmed.
Remote Input 1, 2
The E1000 can accept up to two momentary contact closure inputs. These inputs are available to use an
external device, supplied by others, to trigger the encoder to send control commands to the siren system. A
contact closure, capable of sinking at least 10 mA, will activate the E1000. The closure must remain active
for a minimum of 1/2 a second. When programmed by the user, the remote input can trigger the encoder to
send a single command to the sirens or run any programmed Call Key.

Page 8
Manual Menu Activation
The E1000 can be used to control a siren system without the use of the user programmed Call Keys. On the
E1000, a simple four step procedure can be followed to control the siren system. This functionality can be
helpful to control the sirens in a way that may not have been programmed within a Call Key.
STEP 1, Selecting a Command Group
Using the COMMAND GROUP section of the keyboard, push the button that contains the required
command. See the Menu Selections section of this manual for the commands within each button.
STEP 2, Selecting a Command
Using the COMMAND GROUP section of the keyboard push the UP/DOWN arrow buttons to scroll to the
required command.
STEP 3, Selecting an Address
Using the SIREN ADDRESS section of the keyboard, 0-9, # or ALL buttons, enter the four digit siren
address required. If all sirens are to be controlled at the same time, push the ALL button. The ALL button
will enter the All Call address, ####. The # sign represents a “wildcard” or all values 0 to 9.
Example: To enter the address 1001, press 1 first, then 0, then 0, and 1 is last. The display will change as
shown below.
ADDR = 1???
ADDR = 10??
ADDR = 100?
ADDR = 1001
Note that entering more than four values will “bump” the address to the right. For instance, assume the
user presses the 5 key, at the end of the previous example. The address will change to 5001. The last digit
entered will remain flashing as reminder as to where the next number press will be placed.
STEP 4, Sending the Command
Press “SEND” to make the transmission. This sends the command. There is no second chance!!
NOTE: To abort press the RESET button before pressing the SEND button. If the SEND button was
pressed you can press the CANCEL/CLEAR button to shut the sirens down. CANCEL/CLEAR will send
an All Call Cancel command to the sirens.

Page 9
Menu Selections
Tone
CANCEL Terminates all siren activity.
WAIL Activates the Wail Tone.
ATTACK Activates the Attack Tone.
ALERT Activates the Alert Tone.
PUBLIC ADDR Enables the Public Address mode. (WPS & IPS Series Only)
AIR HORN Activates the Air Horn Tone.
HI-LO Activates the Hi-Lo Tone.
WHOOP Activates the Whoop Tone.
NOON TEST Activates the Noon Test Tone.
Voice
MESSAGE 1 thru 28 Activates Digital Voice Message 1 - 28. (WPS & IPS Series Only)
Rotor
NORTH Positions a WPS4000 Series Speaker to rotor North.
EAST Positions a WPS4000 Series Speaker to rotor East.
SOUTH Positions a WPS4000 Series Speaker to rotor South.
WEST Positions a WPS4000 Series Speaker to rotor West.
CLOCKWISE Positions a WPS4000 Series Speaker to 45 Clockwise.
COUNTER CW Positions a WPS4000 Series Speaker to 45 Counter-Clockwise.
Test M isc
SILENT TEST Initiates the Silent Test function.
TX AUDIO TEST Transmits a steady DTMF tone for testing transmit audio levels.
STROBE TEST Activates Strobe/LED controller to run light for a 10 second test.
TRANSMIT OFF Legacy command for ESC864 sirens only.
SIREN OFF Terminates all siren activity and disables all siren audio.
SIREN ON Enables all siren audio. Only required after sending SIREN OFF.
COUNTER CLEAR Clear the software tone activation counter to zero.
DIS-ARM SYSTEM Disable the Instant Status response.
ARM SYSTEM Enable the Instant Status response.
STROBE OFF De-activate a strobe through the Strobe Control Board.
STROBE ON Activate a strobe through the Strobe Control Board.
TEST CLEAR Clears siren stored status and turns OFF siren status LEDs.

Page 10
Status Program
Status
STATUS REQUEST Request siren status stored during Silent Test and Siren Tone activation.
ACTIVATION COUNTER Request the siren tone activation count.
SIG-NOISE REQUEST Executes the signal to noise check in the Remote Siren.
SIG-NOISE STATUS Request signal to noise measurement.
ROTOR POSITION Rotor/speaker position request.
BATTERY AC STATUS Request battery voltage and AC line voltage.
BATT-TEMP STATUS Request battery voltage and cabinet temperature.
ACTIVE STATUS Request multiple system status parameters.
INSTANT STATUS Get real time (instant) status of Remote Siren.
AMPLIFIER STATUS Requests siren speaker driver/amplifier status.
Program
CLOCK Day of week and time of day programming.
DATE/YEAR Month, day and year programming.
CALL KEY Call Key programming
TIMED TRANS. 1 Automatic timed activation programming.
TIMED TRANS. 2 Automatic timed activation programming.
TIMED TRANS. 3 Automatic timed activation programming.
TIMED TRANS. 4 Automatic timed activation programming.
REMOTE INPUT 1 External momentary closure activation programming.
REMOTE INPUT 2 External momentary closure activation programming.
TMX WARM UP Push to talk (PTT) relay to transmit audio delay programming.
AREA CODE Siren system numeric name.
BASE I.D. Encoder identifier
PRECHECK DURATION Adjusts length TX AUDIO TEST tone. (6 Second Default)
CH. GRANT WAIT Adjusts length of time E1000 waits for clear to send.
CH. GRANT DELAY Adjusts length of time E1000 waits after receiving clear to send.
RESET PROGAMMING Restores E1000 to factory default.
POLLING ADDRESS Automatic siren address polling list programming.

Page 11
Programming Menu
Polling Address
Entering the siren addresses into the E1000 is one of the very first steps in configuring the encoder for
operation. For feedback functions, the E1000 automatically accesses each remote siren, one at a time,
based on the addresses entered in POLLING ADDRESS Setup menu. This saves the user a considerable
amount of time in collecting information about an entire system. To initiate a Polling function, select a
Status feedback Command under the STATUS PROGRAM button then press ENTER. Now enter the siren
address group to be polled, on the SIREN ADDRESS section of the keypad, or press the ALL button to
enter the all sirens address of ####. Then press the SEND button to begin the polling routine.
The following commands can be polled.
STATUS REQUEST
AMPLIFIER STATUS
INSTANT STATUS
ACTIVE STATUS
ACTIVATION COUNTER
SIG-NOISE STATUS
ROTOR POSITION (WPS4000 Series Only)
BATTERY AC STATUS
BATT-TEMP STATUS
The polling addresses (200) are the four digit addresses used in the siren system that will be used in the
polling function of the siren. Certain commands activate the polling function, all of these commands are
found in the “STATUS PROGRAM” command group with the exception of the signal to noise request
function. When a wildcard character (#) is used in an address for a call key or a single command for any
polling command the polling will automatically engage. When no addresses are entered into this menu the
command is sent without the polling function.
Adding Siren Addresses into the POLLING ADDRESS Menu
From the Standby screen press the STATUS PROGRAM button two times. The display will read:
PROGRAM ENCODER WEDNESDAY 15:37:00
CLOCK MAR 16 2016
Press the DOWN ARROW button one time. The display will read:
PROGRAM ENCODER WEDNESDAY 15:37:00
POLLING ADDRESS MAR 16 2016
Press the ENTER button. The display will read:
POLLING ADDRESS < 100 WEDNESDAY 15:37:00
ENTER DATA? ADDR = ???? MAR 16 2016
Using the SIREN ADDRESS section of the keypad, enter the four digit siren address. As each digit is
entered the last digit entered will flash. With the first address entered the display will read:
POLLING ADDRESS < 100 WEDNESDAY 15:37:00
ENTER DATA? ADDR = 1001 MAR 16 2016

Page 12
Press the ENTER button. The display will read:
POLLING ADDRESS < 100 WEDNESDAY 15:37:00
ENTER DATA? ADDR = 1001 MAR 16 2016
1001
Repeat the steps above for every address to be entered. When all addresses have been added to the list
press the SEND button. The display will read:
POLLING ADDRESS < 100 WEDNESDAY 15:37:00
SAVE DATA? ADDR = 1001 MAR 16 2016
1001
Press the ENTER button to store the addresses to the E1000 memory. The display will read:
PROGRAM ENCODER DAY 15:37:00
POLLING ADDRESS MAR 16 2016
To exit press the RESET button.

Page 13
Removing a Siren Address from the POLLING ADDRESS Menu
From the Standby screen press the STATUS PROGRAM button two times. The display will read:
PROGRAM ENCODER WEDNESDAY 15:37:00
CLOCK MAR 16 2016
Press the DOWN ARROW button one time. The display will read:
PROGRAM ENCODER WEDNESDAY 15:37:00
POLLING ADDRESS MAR 16 2016
Press the ENTER button. The display will read:
POLLING ADDRESS < 100 WEDNESDAY 15:37:00
ENTER DATA? ADDR = ???? MAR 16 2016
1001 1002
Using the SIREN ADDRESS section of the keypad, enter the four digit siren address to be removed. As
each digit is entered the last digit entered will flash. With the address entered the display will read:
POLLING ADDRESS < 100 WEDNESDAY 15:37:00
ENTER DATA? ADDR = 1002 MAR 16 2016
1001 1002
Press the SEND button two times. The display will read:
POLLING ADDRESS < 100 WEDNESDAY 15:37:00
ERASE DATA? ADDR = 1002 MAR 16 2016
1002
Press the ENTER button to remove the address. The display will read:
POLLING ADDRESS < 100 WEDNESDAY 15:37:00
ENTER DATA? ADDR = 1002 MAR 16 2016
1001
Press the SEND button one time. The display will read:
POLLING ADDRESS < 100 WEDNESDAY 15:37:00
SAVE DATA? ADDR = 1002 MAR 16 2016
1001
Press the ENTER button to store the addresses to the E1000 memory. The display will read:
PROGRAM ENCODER WEDNESDAY 15:37:00
POLLING ADDRESS MAR 16 2016
To exit press the RESET button.

Page 14
CALL KEY Programming
Call Keys are programmed one sequence at a time. Each sequence consists of a sequence number, a
command (see “Menu Selection”), siren address (individual (1001) or all (####), a time (the time period
before the next sequence) and finally the selection of an Edit function. Normally the function will be
'ENTER' when creating a new Call Key. However, it may be 'ERASE', 'SAVE' or 'WIPE'. These will be
discussed later.
Programming a CALL KEY
The example below will show how to program Call Key 1 to activate all sirens for the Alert siren tone for
3 minutes, followed by Cancel command.
From the Standby screen press the STATUS PROGRAM button two times. The display will read:
PROGRAM ENCODER WEDNESDAY 15:37:00
CLOCK MAR 16 2016
Press the UP ARROW button two times. The display will read:
PROGRAM ENCODER WEDNESDAY 15:37:00
CALL KEY MAR 16 2016
Press the ENTER button. The display will read:
PROGRAM ENCODER WEDNESDAY 15:37:00
ENTER CALL KEY #?? MAR 16 2016
Using the CALL KEYS section of the keypad press the Call Key number button 1. The display will read:
PROGRAM ENCODER WEDNESDAY 15:37:00
ENTER CALL KEY #01 MAR 16 2016
Press the ENTER button. The display will read:
PROGRAM ENCODER WEDNESDAY 15:37:00
CALL KEY #01 MAR 16 2016
ENTER CALL KEY SEQ # 001 OF 000
CALL KEY CMD
CALL KEY ADDR
CALL KEY DELAY
Press the ENTER button to move from CALL KEY SEQ 001 to CALL KEY CMD. The display will read:
PROGRAM ENCODER WEDNESDAY 15:37:00
CALL KEY #01 MAR 16 2016
CALL KEY SEQ # 001 OF 000
ENTER CALL KEY CMD
CALL KEY ADDR ????
CALL KEY DELAY ???-SEC

Page 15
Using the COMMAND GROUP section of the keypad press the TONE button. The display will read:
PROGRAM ENCODER WEDNESDAY 15:37:00
CALL KEY #01 MAR 16 2016
CALL KEY SEQ # 001 OF 000
ENTER CALL KEY CMD CANCEL
CALL KEY ADDR ????
CALL KEY DELAY ???-SEC
Press the UP ARROW button three times to change the command from CANCEL to ALERT. The display
will read:
PROGRAM ENCODER WEDNESDAY 15:37:00
CALL KEY #01 MAR 16 2016
CALL KEY SEQ # 001 OF 000
ENTER CALL KEY CMD ALERT
CALL KEY ADDR ????
CALL KEY DELAY ???-SEC
Press the ENTER button to move from CALL KEY CMD to CALL KEY ADDR. The display will read:
PROGRAM ENCODER WEDNESDAY 15:37:00
CALL KEY #01 MAR 16 2016
CALL KEY SEQ # 001 OF 000
CALL KEY CMD ALERT
ENTER CALL KEY ADDR ????
CALL KEY DELAY ???-SEC
Using the SIREN ADDRESS section of the keypad press the ALL button. The display will read:
PROGRAM ENCODER WEDNESDAY 15:37:00
CALL KEY #01 MAR 16 2016
CALL KEY SEQ # 001 OF 000
CALL KEY CMD ALERT
ENTER CALL KEY ADDR ####
CALL KEY DELAY ???-SEC
Press the ENTER button to move from CALL KEY ADDR to CALL KEY DELAY. The display will read:
PROGRAM ENCODER WEDNESDAY 15:37:00
CALL KEY #01 MAR 16 2016
CALL KEY SEQ # 001 OF 000
CALL KEY CMD ALERT
CALL KEY ADDR ####
ENTER CALL KEY DELAY ???-SEC

Page 16
Using the SIREN ADDRESS section of the keypad press the 1, 8, 0 buttons to enter 180 seconds (3
minutes). The display will read:
PROGRAM ENCODER WEDNESDAY 15:37:00
CALL KEY #01 MAR 16 2016
CALL KEY SEQ # 001 OF 000
CALL KEY CMD ALERT
CALL KEY ADDR ####
ENTER CALL KEY DELAY 180-SEC
Press the ENTER button to move from CALL KEY DELAY to SAVE DATA?. The display will read:
PROGRAM ENCODER WEDNESDAY 15:37:00
CALL KEY #01 MAR 16 2016
CALL KEY SEQ # 001 OF 000
CALL KEY CMD ALERT
CALL KEY ADDR ####
CALL KEY DELAY 180-SEC
SAVE DATA?
Press the ENTER button to save the first sequence. The display will read:
PROGRAM ENCODER WEDNESDAY 15:37:00
ENTER CALL KEY #?? MAR 16 2016
The first Call Key sequence (sequence 001) to send the Alert command to all sirens and wait 3 minutes is
now saved. Continue below to program the next sequence (sequence 002).
Using the CALL KEYS section of the keypad press the Call Key number button 1. The display will read:
PROGRAM ENCODER WEDNESDAY 15:37:00
ENTER CALL KEY #01 MAR 16 2016
Press the ENTER button. The display will read:
PROGRAM ENCODER WEDNESDAY 15:37:00
CALL KEY #01 MAR 16 2016
ENTER CALL KEY SEQ # 001 OF 001
CALL KEY CMD ALERT
CALL KEY ADDR ####
CALL KEY DELAY 180-SEC
Using the SIREN ADDRESS section of the key pad press the 0, 0, 2 buttons to enter sequence 002. The
display will read:
PROGRAM ENCODER WEDNESDAY 15:37:00
CALL KEY #01 MAR 16 2016
ENTER CALL KEY SEQ # 002 OF 001
CALL KEY CMD
CALL KEY ADDR
CALL KEY DELAY

Page 17
Note: At this step it is possible to scan through the call key programming just by changing the sequence
number. Once the ENTER button is pressed you will no longer be able to scan through the call key
programming.
Press the ENTER button to move from CALL KEY SEQ 001 to CALL KEY CMD. The display will read:
PROGRAM ENCODER WEDNESDAY 15:37:00
CALL KEY #01 MAR 16 2016
CALL KEY SEQ # 002 OF 001
ENTER CALL KEY CMD ALERT
CALL KEY ADDR ????
CALL KEY DELAY ???-SEC
Press the DOWN ARROW button three times to change the command from ALERT to CANCEL. The
display will read:
PROGRAM ENCODER WEDNESDAY 15:37:00
CALL KEY #01 MAR 16 2016
CALL KEY SEQ # 002 OF 001
ENTER CALL KEY CMD CANCEL
CALL KEY ADDR ????
CALL KEY DELAY ???-SEC
Press the ENTER button to move from CALL KEY CMD to CALL KEY ADDR. The display will read:
PROGRAM ENCODER WEDNESDAY 15:37:00
CALL KEY #01 MAR 16 2016
CALL KEY SEQ # 002 OF 001
CALL KEY CMD CANCEL
ENTER CALL KEY ADDR ????
CALL KEY DELAY ???-SEC
Using the SIREN ADDRESS section of the keypad press the ALL button. The display will read:
PROGRAM ENCODER WEDNESDAY 15:37:00
CALL KEY #01 MAR 16 2016
CALL KEY SEQ # 002 OF 001
CALL KEY CMD CANCEL
ENTER CALL KEY ADDR ####
CALL KEY DELAY ???-SEC
Press the ENTER button to move from CALL KEY ADDR to CALL KEY DELAY. The display will read:
PROGRAM ENCODER WEDNESDAY 15:37:00
CALL KEY #01 MAR 16 2016
CALL KEY SEQ # 002 OF 001
CALL KEY CMD CANCEL
CALL KEY ADDR ####
ENTER CALL KEY DELAY ???-SEC

Page 18
Using the SIREN ADDRESS section of the keypad press the 0, 0, 1 buttons to enter 1 second. The display
will read:
PROGRAM ENCODER WEDNESDAY 15:37:00
CALL KEY #01 MAR 16 2016
CALL KEY SEQ # 002 OF 001
CALL KEY CMD CANCEL
CALL KEY ADDR ####
ENTER CALL KEY DELAY 001-SEC
Press the ENTER button to move from CALL KEY DELAY to SAVE DATA?. The display will read:
PROGRAM ENCODER WEDNESDAY 15:37:00
CALL KEY #01 MAR 16 2016
CALL KEY SEQ # 002 OF 001
CALL KEY CMD CANCEL
CALL KEY ADDR ####
CALL KEY DELAY 001-SEC
SAVE DATA?
Press the ENTER button to save the second sequence (sequence 002). The display will read:
PROGRAM ENCODER WEDNESDAY 15:37:00
ENTER CALL KEY #?? MAR 16 2016
Press the RESET button to exit.

Page 19
Deleting a CALL KEY Sequence
The example below will show how to delete a Call Key sequence within Call Key 1.
From the Standby screen press the STATUS PROGRAM button two times. The display will read:
PROGRAM ENCODER WEDNESDAY 15:37:00
CLOCK MAR 16 2016
Press the UP ARROW button two times. The display will read:
PROGRAM ENCODER WEDNESDAY 15:37:00
CALL KEY MAR 16 2016
Press the ENTER button. The display will read:
PROGRAM ENCODER WEDNESDAY 15:37:00
ENTER CALL KEY #?? MAR 16 2016
Using the CALL KEYS section of the keypad press the Call Key number button 1. The display will read:
PROGRAM ENCODER WEDNESDAY 15:37:00
ENTER CALL KEY #01 MAR 16 2016
Press the ENTER button. The display will read:
PROGRAM ENCODER WEDNESDAY 15:37:00
CALL KEY #01 MAR 16 2016
ENTER CALL KEY SEQ # 001 OF 002
CALL KEY CMD ALERT
CALL KEY ADDR ####
CALL KEY DELAY 180-SEC
Using the SIREN ADDRESS section of the keypad enter the last sequence number of the Call Key. In this
example the last sequence number is 002. The display will read:
PROGRAM ENCODER WEDNESDAY 15:37:00
CALL KEY #01 MAR 16 2016
ENTER CALL KEY SEQ # 002 OF 002
CALL KEY CMD CANCEL
CALL KEY ADDR ####
CALL KEY DELAY 001-SEC

Page 20
Press the ENTER button to move from CALL KEY SEQ 002 to CALL KEY CMD. The display will read:
PROGRAM ENCODER WEDNESDAY 15:37:00
CALL KEY #01 MAR 16 2016
CALL KEY SEQ # 002 OF 002
ENTER CALL KEY CMD CANCEL
CALL KEY ADDR ????
CALL KEY DELAY 001-SEC
Press the ENTER button to move from CALL KEY CMD to CALL KEY ADDR. The display will read:
PROGRAM ENCODER WEDNESDAY 15:37:00
CALL KEY #01 MAR 16 2016
CALL KEY SEQ # 002 OF 002
CALL KEY CMD CANCEL
ENTER CALL KEY ADDR ????
CALL KEY DELAY ???-SEC
Press the ENTER button to move from CALL KEY ADDR to CALL KEY DELAY. The display will read:
PROGRAM ENCODER WEDNESDAY 15:37:00
CALL KEY #01 MAR 16 2016
CALL KEY SEQ # 002 OF 002
CALL KEY CMD CANCEL
CALL KEY ADDR ####
ENTER CALL KEY DELAY ???-SEC
Press the ENTER button to move from CALL KEY DELAY to SAVE DATA?. The display will read:
PROGRAM ENCODER WEDNESDAY 15:37:00
CALL KEY #01 MAR 16 2016
CALL KEY SEQ # 002 OF 002
CALL KEY CMD CANCEL
CALL KEY ADDR ####
CALL KEY DELAY 001-SEC
SAVE DATA?
Press the SEND button one time to change SAVE DATA? to ERASE DATA?. The display will read:
PROGRAM ENCODER WEDNESDAY 15:37:00
CALL KEY #01 MAR 16 2016
CALL KEY SEQ # 002 OF 002
CALL KEY CMD CANCEL
CALL KEY ADDR ####
CALL KEY DELAY 001-SEC
ERASE DATA?
Press the ENTER button to delete the last Call Key sequence (sequence01). The display will read:
PROGRAM ENCODER WEDNESDAY 15:37:00
ENTER CALL KEY #?? MAR 16 2016
Press the RESET button to exit.
Table of contents
Other Whelen Engineering Company Media Converter manuals
Popular Media Converter manuals by other brands

StarTech.com
StarTech.com ET10GSFP manual

Terahertz Technologies
Terahertz Technologies TIA-2000 operating instructions

GSS
GSS HDMC 1000 SPTS Assembly instructions

Burr-Brown Corporation
Burr-Brown Corporation SpeedPLUS 165MSPS manual

Kramer
Kramer VP-439 user manual

Bonart
Bonart ART Marquee ART-M3II instruction manual