manuals.online logo
Brands
  1. Home
  2. •
  3. Brands
  4. •
  5. Whirlpool
  6. •
  7. Dishwasher
  8. •
  9. Whirlpool DU95OOXS Series User manual

Whirlpool DU95OOXS Series User manual

Other Whirlpool Dishwasher manuals

Whirlpool WBO 3T341 P X Installation and operation manual

Whirlpool

Whirlpool WBO 3T341 P X Installation and operation manual

Whirlpool WDT720PADM User manual

Whirlpool

Whirlpool WDT720PADM User manual

Whirlpool DU1055XTSB0 User manual

Whirlpool

Whirlpool DU1055XTSB0 User manual

Whirlpool W2I HD526 A Installation and operation manual

Whirlpool

Whirlpool W2I HD526 A Installation and operation manual

Whirlpool ADP 262 User manual

Whirlpool

Whirlpool ADP 262 User manual

Whirlpool ADG 221 User manual

Whirlpool

Whirlpool ADG 221 User manual

Whirlpool ADG 422 User manual

Whirlpool

Whirlpool ADG 422 User manual

Whirlpool ADP 741 WH User manual

Whirlpool

Whirlpool ADP 741 WH User manual

Whirlpool GDP6881XL User manual

Whirlpool

Whirlpool GDP6881XL User manual

Whirlpool ADG450 User manual

Whirlpool

Whirlpool ADG450 User manual

Whirlpool ADG 6566 User manual

Whirlpool

Whirlpool ADG 6566 User manual

Whirlpool GU940SCGZ1 User manual

Whirlpool

Whirlpool GU940SCGZ1 User manual

Whirlpool ADG 7450 User manual

Whirlpool

Whirlpool ADG 7450 User manual

Whirlpool ADP 952 WHM User manual

Whirlpool

Whirlpool ADP 952 WHM User manual

Whirlpool W10435040C User manual

Whirlpool

Whirlpool W10435040C User manual

Whirlpool DU5000XL User manual

Whirlpool

Whirlpool DU5000XL User manual

Whirlpool ADP 431 WT User manual

Whirlpool

Whirlpool ADP 431 WT User manual

Whirlpool DU4000XR Series User manual

Whirlpool

Whirlpool DU4000XR Series User manual

Whirlpool WSIC 3M17 User manual

Whirlpool

Whirlpool WSIC 3M17 User manual

Whirlpool 940 series User manual

Whirlpool

Whirlpool 940 series User manual

Whirlpool ADG 699 User manual

Whirlpool

Whirlpool ADG 699 User manual

Whirlpool Roper RUD4000MB2 User manual

Whirlpool

Whirlpool Roper RUD4000MB2 User manual

Whirlpool 400011511936 Installation and operation manual

Whirlpool

Whirlpool 400011511936 Installation and operation manual

Whirlpool WDF550SAAS0 User manual

Whirlpool

Whirlpool WDF550SAAS0 User manual

Popular Dishwasher manuals by other brands

Samsung DW-FN320T user manual

Samsung

Samsung DW-FN320T user manual

LG LDS 5811WW Service manual

LG

LG LDS 5811WW Service manual

Elba EDW-B1462D owner's manual

Elba

Elba EDW-B1462D owner's manual

VESTEL NOVUS Series Service manual

VESTEL

VESTEL NOVUS Series Service manual

Bosch SMS4EMW00E Instructions for use

Bosch

Bosch SMS4EMW00E Instructions for use

Global-Tek GT-CR 2 manual

Global-Tek

Global-Tek GT-CR 2 manual

Smeg Dishwasher 85028 Instructions for installation and use

Smeg

Smeg Dishwasher 85028 Instructions for installation and use

LG LD-4080W Service manual

LG

LG LD-4080W Service manual

Bauknecht GCF 625 operating instructions

Bauknecht

Bauknecht GCF 625 operating instructions

Sharp QW-HX13F47EI-EU user manual

Sharp

Sharp QW-HX13F47EI-EU user manual

Asko D5536XLFI operating instructions

Asko

Asko D5536XLFI operating instructions

Modena WP 7134 WVM User manual book

Modena

Modena WP 7134 WVM User manual book

Beko DFN39340X instruction manual

Beko

Beko DFN39340X instruction manual

AEG FAVORIT 65050 VI1P user manual

AEG

AEG FAVORIT 65050 VI1P user manual

Siemens SN23HI37VE user manual

Siemens

Siemens SN23HI37VE user manual

Maytag MDB4651AWB - Tall Tub Dishwasher User instructions

Maytag

Maytag MDB4651AWB - Tall Tub Dishwasher User instructions

Hotpoint Ariston LL 42 Instruction book

Hotpoint Ariston

Hotpoint Ariston LL 42 Instruction book

Siemens SN45ZW56CS user manual

Siemens

Siemens SN45ZW56CS user manual

manuals.online logo
manuals.online logoBrands
  • About & Mission
  • Contact us
  • Privacy Policy
  • Terms and Conditions

Copyright 2025 Manuals.Online. All Rights Reserved.

rs, Freezers, Refrigerator-freezers. Ice Makers, Dishwashers, Built-In Ovens and Surface Units, Ranges, MIcrowave Ovens, Trash Compactors, Room Air Condltloners. Dehumldlf
Contents
Page Page
BEFORE YOU USE YOUR DISHWASHER. 2 STARTING YOUR DISHWASHER 8
IMPORTANT SAFETY INSTRUCTIONS 2 Selecting a Program.. 8
PARTS AND FEATURES, 3 Selecting an Option 9
POWER CLEAN* WASHING SYSTEM,, 4 Changing or Cancelling a Program 10
Quiet Operating Tips 4 Electronic Display and
PROPER LOADING 5 Status Indicators.. 10
Top Rack Loading 5 Adding a Dish After Starting 10
Bottom Rack Loading 6 ENERGY SAVING TIPS
11
Loading Silverware Basket 6 SPECIALTIPS 12
ADDING DETERGENT. 7 COMMON DISHWASHING PROBLEMS..
13
RINSE AID DISPENSER. 7 IF YOU NEED SERVICE OR ASSISTANCE
15
‘Tmk.
01987 Whirlpool Corporation
Before you use your dishwasher
It is your personal responsibility and obligation to be sure your dishwasher:
l
Is installed by a qualified installer.
l
Has been installed where it is protected from the elements.
l
Has been installed on a floor strong enough to support its weight.
l
Has been properly connected to electricity, water and drain.
l
Has been properly electrically grounded.
l
Is not used by children or anyone unable to operate it properly.
l
Is properly maintained.
See installation instructions for complete information.
Parts and features
Model DU95OOXS Series
ADJUSTABLE TOP RACK
UPPERSPRAYARM
RACK BUMPER
SILVERWAREBASKET Q’ ii.:
DETERGENTDISPENSERS
RINSE AID
DISPENSER
p-p
F MODEL AND SERIAL
L NUMBER PLATE
WATERCOLUMN
LOWERSPRAYARM
THEOVERFLOW
PROTECTOR is
designed to prevent
too much water
from entering the
dishwasher. It is
not removable.
DOOR PANEL COLOR PACK
CONTROL PANELAND
ELECTRONIC DISPLAY
\ THEPOWERCLEAN’ MODULE is designed to
keep the wash and rinse water clean. It also
grinds up and removes food particles. During
grinding, some sound will be heard.
* Tmk
Copy your Model and Serial Numbers here...
When you need service or call with a question,
have this information ready:
1. Complete Model and Serial Numbers(from the
Model Number
plate located as shown).
2. Purchase date from sales slip.
Serial Number
Copy this information in these spaces. Keep this
book, your warranty and sales slip togethei in a
handy place. Purchase ,,a,e
Please complete and mail the Owner Regis-
tration Card furnished with this product.
Service Compony ond Telephone Number
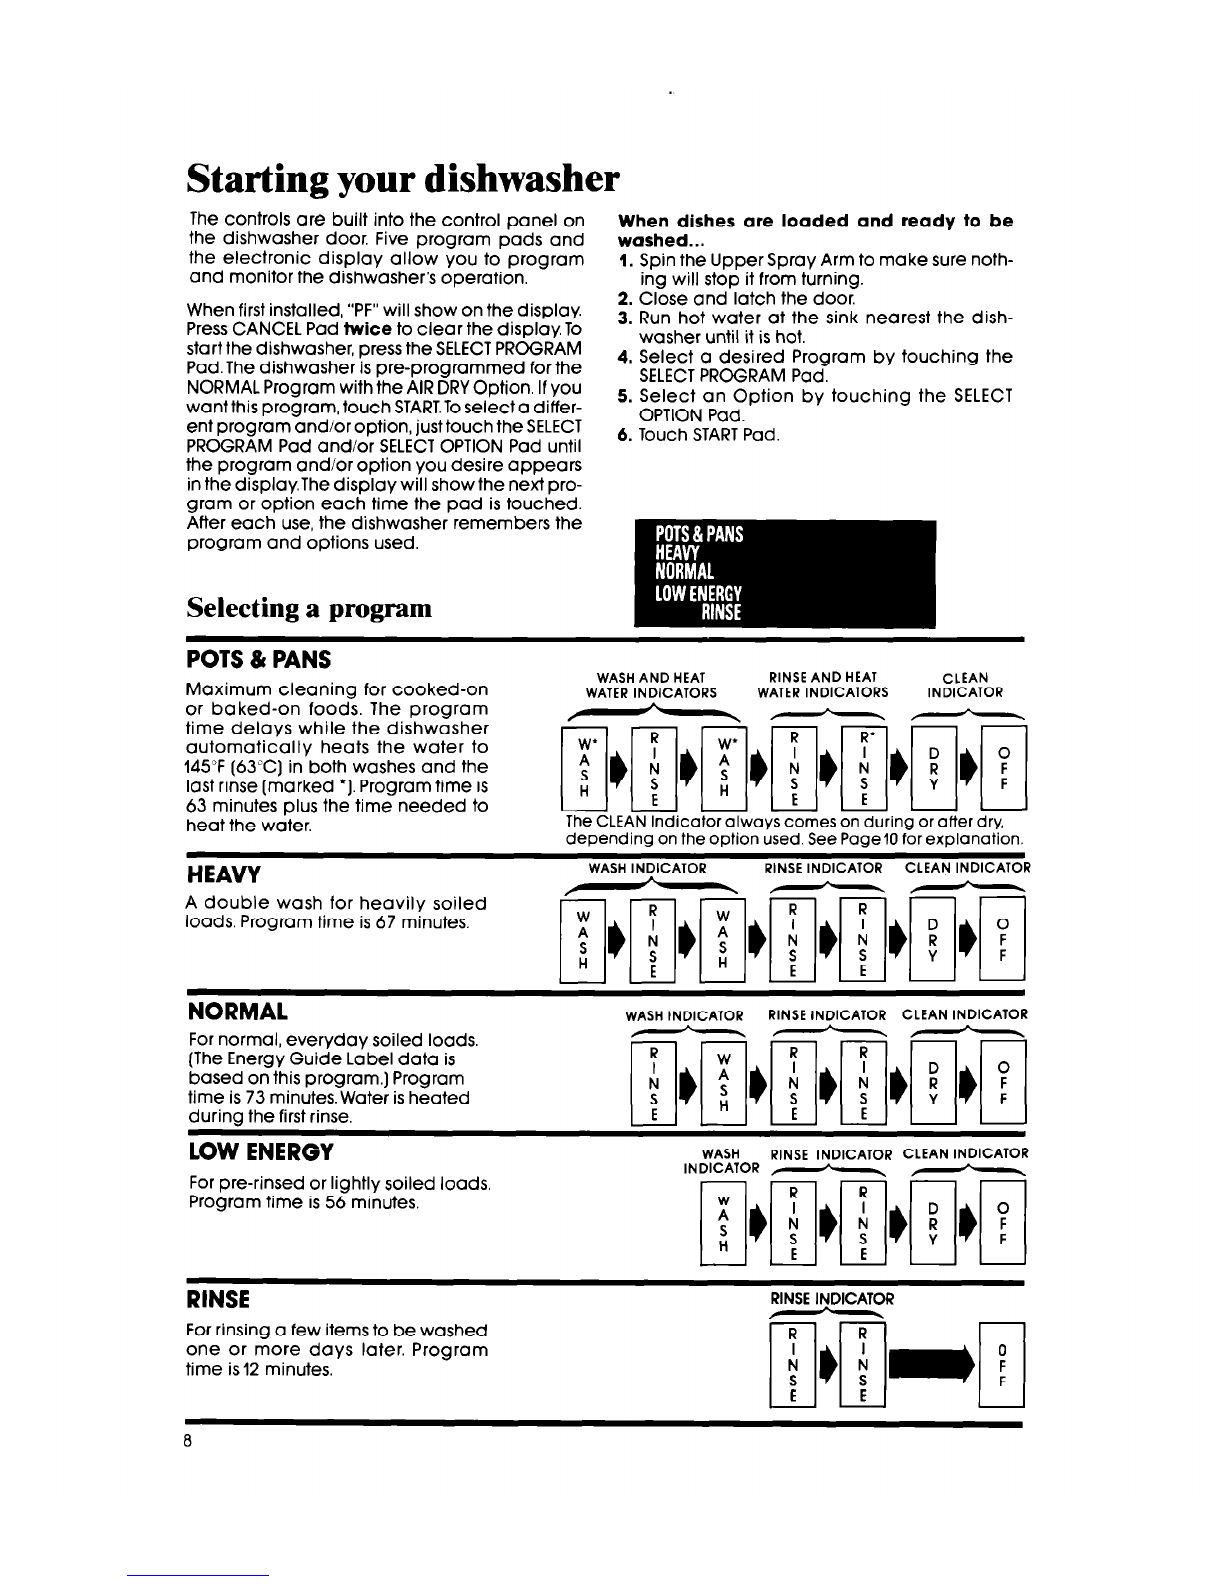
POWER CLEAN* Washing System
Your dishwasher cleans by spraying a mixture of hot, clean water and detergent
against soiled surfaces of dishes. When a program is started, the dishwasher fills with
water to about the level of the heating element. This water is pumped through the rotating
spray arms, through the POWER CLEAN Module which removes food particles, and back
through the rotating spray arms. Soiled water is pumped out and replaced with clean
water during a program -the number of times depends on the program being used.
The POWER CLEAN* Module removes food
particles from the water, stores them, then
washes them down the drain.
Load dishes so soiled surfaces face pow.
erful spray from rotating arms.
Step-saving preparation for washing
It Is not necessary to rinse dishes before
putting them into the dlshwasher. Just remove
large pieces, bones, and other hard items. The
POWER CLEAN* Module will remove food parti-
cles from the water. It contains a chopping de-
vice which will reduce the size of food items.
If hard items such as fruit seeds, nuts and egg
shells enter the POWER CLEAN’ Module, You
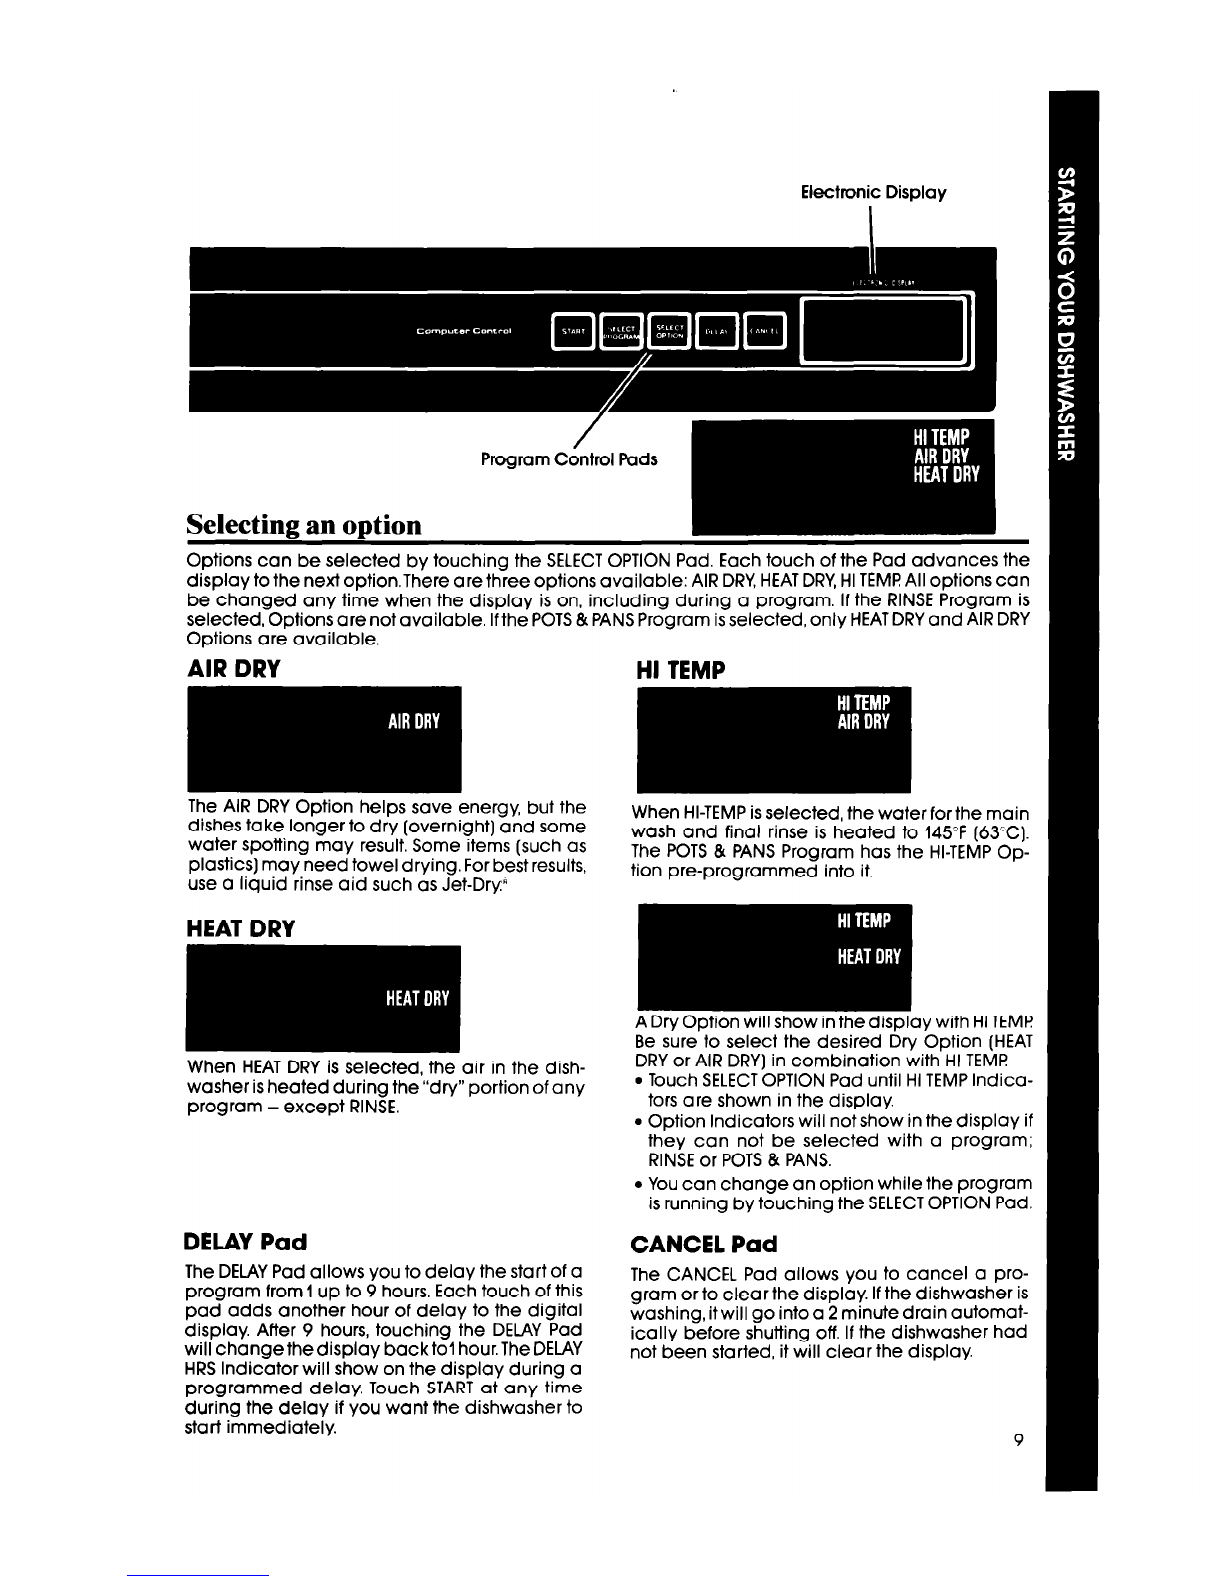
Hot water is a must
Hot water dissolves and activates the dish-
washing detergent. Hot water dissolves grease
on dishes and helps dry glasses spot-free. Make
certain loads are washed in hot water (at least
140°F - 60°C). Two ways to have a reliable hot
water supply...
1. Maintain 140°F water supply at central water
heater. To check water temperature, turn on
hot water faucet nearest the dishwasher. Let
water run until it is as hot as possible, then
check with a candy or meat thermometer. If
Quiet operating tips
To avoid thumping and clattering noises during
operation:
l
Makesure lightweight load items aresecured
in the rack.
l
Make sure pot lids and handles, pizza pans,
4 cookie sheets, etc. do not touch interior walls
might hear chopping, grinding, crunching or
buzzing sounds. Those sounds are normal when
hard items enter the module. DO NOT LET
METALLIC ITEMS (I.E. POT HANDLE SCREWS)
GET INTO THE POWER CLEAN* MODULE. THIS
COULD RESULT IN DAMAGE TO THE POWER
CLEAN* MODULE.
the temperature is too low, have a qualified
person raise the water heater thermostat
setting.
2. Use HI-TEMP WASHING Option. Ifwater heating
is needed, a thermostat will delay the cycle
until temperature reaches 145°F (63°C). If
water is hot enough, the cycle will proceed
with no delay. This lets You turn down your
water heater, if You choose, without cutting
back on hot water needed for good dish-
washing.
or interfere with either of the spray arms
rotation.
l
Load dishes so they don’t touch one another.
NOTE; Keep slnk dmin plugs Inserted durlng
dlshwasher opemtlon to prevent noise tmns-
fer through dmlns.
‘Tmk.
Proper loading
Always load dishes so soiled surfaces are reached by spray from rotating spray arms.
Water must be able to drain off completely for best drying results. Be careful to separate
items so spray can reach all surfaces.
Top rack loading
CUP AND GLASS LOAD
The top rack is designed for cups, glasses
and smaller items.
l
Place so open ends face down for clean-
ing and draining.
l
load glasses in top rack only. Bottom rack
is not designed for glasses. Damage may
occur.
l
Load plastic items only in the top rack.
Only plastic items marked “dishwasher
safe” are recommended.
l
Plastic items can be melted in the bottom
rack.
l
Place items in the rows between prongs.
Placing them over the prongs can be lead
to breakage.
l
Be sure lightweight items are held firmly in
place.
l
China, crystal and other delicate items
must not touch another item during dish-
washer operation, Damage may occur.
l
Small bowls, pans and other utensils can
be placed in the top rack.
ADJUSTABLE TOP RACK
The top rack does not have to be level.
LOWER
l
Raise or lower one or both sides to help fit
tall items in the top or bottom rack.
l
Turn knob clockwise to raise a side.
l
Turn knob counterclockwise to lower a
side.
l
Items with cooked-on or dried-on foods should be loaded in the bottom rack with soiled
surfaces facing the spray.
Bottom rack loading
l
Place plates, soup bowls, etc., between
prongs and facing the spray.
l
Securely place heavily soiled cookware
face down in rack.
NOTE:
l
Do not load glasses, cups or plastic items in
the bottom rack.
l
When lower rack is removed, replace with
bumpers in front.
l
Load cookie sheets, cake pans and other
items atsides or back. Loading items in front
may keep water spray from reaching de-
tergent dispenser and silverware basket
l
Make sure pot handles and other items do
not stop rotation of either the upper or lower
spray arm. Spray arms must move freely.
Loading silvenrare basket
To remove the
Load forks and basket, slide it to-
spoons so they don’t ward the top of the
nest together. Spray NO
~~~~
YES door - by the han-
can’t reach nested dle. Lift it off the
items. , loading buttons.
Replace it in re-
verse order.
Mix items in each section of the basket.
Small items - baby bottle caps, jar lids, etc.
- can be put in any section
Make sure sharp items [knives, forks,
skewers, etc.] are put in point down. To open the basket, unhook the latch as
shown. Be sure the cover is
completely latched before
The silverware pulling out the bottom rack
basket can be and before closing the dish-
loaded while washer door.
it’s in place on
the door, or it
can be taken
out for loading
on the counter
I or table. It can
also be removed for easy unloading. Al-
ways unload or remove the basket before
unloading the racks to avoid spilling water
droplets on the silverware.
6
Adding detergent
The kind and amount of dishwasher detergent you use is an important part of getting
your dishes clean. Read this section carefully
Use automatic dish- I-
The detergent dispenser
washer detergent only.
Other detergents are
too mild and much too
sudsy to work in the dish-
washer.
Different brands of
dishwasher detergent
have different amounts
of phosphorus. Phos-
phorus softens water
and helps prevent water
spots on dishes. I
If water is hard and
phosphorus content is
low (8.7% or less], you
may need to use more
detergent or use a brand
with a higher phosphorus
content (12% or higher).
Do not add detergent
until you are ready to
wash. When using Delay
Wash, make sure the de-
tergent dispensers are
clean and dry before
adding the detergent.
Fresh automatic dish-
The detergent dispenser has one section with a
cover and one without.
l
Put detergent in both sections for programs with
two washes.
l
Put detergent in the covered section only
for
programs with one wash.
l
Push the cover down
until it is latched.
The cover opens auto-
matically when the main
wash starts. Detergent in
the open section falls into
the dishwasher when the
door is closed.
WVER LATCH
-I I
Use covered section for... ” Use both
_
washer detergent is necessary for best washing NORMAL and sections for...
results. Store detergent tightly in a
COOI
dry place. LOW ENERGY POTS & PANS and
Programs HEAVY Programs
How much detergent to use
The amount of detergent to use
depends on the hardness of your
water. Iftoo little is used, dishes won’t
be clean. However, if too much is
used in soft water, glassware will
begin to etch.
Find out your water’s hardness by
l
HARD - Fill 1 or both sections to top
line if water is 8 or more grains of
l
MEDIUM- Fill1 or both sections to mid-
water is 5 to 7 grains of
asking your local waterdepartment,
water softener company or county
extension agent.
l
SOFT- Fill 1or both sections to bottom
line if water is 0 to 4 grains of hardness.
Rinse aid dispenser
A rinse aid helps keep water from forming droplets and drying
as spots. Keep the dispenser filled with a rinse aid such as Jet-
DV A small amount is released automatically during the final
rinse of each program. Check the dispenser periodically to see
if it needs refilling.
Keep the dispenser fill cap tightly closed.
Starting your dishwasher
The controls are built into the control panel on
the dishwasher door. Five program pads and
the electronic display allow you to program
and monitor the dishwasher’s operation,
When first installed, “PF” will show on the display.
Press CANCEL Pad twice to clear the display. To
start the dishwasher, press the SELECTPROGRAM
Pad.The dishwasher is pre-programmed for the
NORMAL Program with the AIR DRY Option. If you
want this program, touch START.Toselect a differ-
ent program and/or option, just touch the SELECT
PROGRAM Pad and/or SELECT OPTION Pad until
the program and/or option you desire appears
in the display.The display will show the next pro-
gram or option each time the pad is touched.
When dishes are loaded and ready to be
washed...
1. Spin the Upper Spray Arm to make sure noth-
ing will stop it from turning.
2. Close and latch the door.
3. Run hot water at the sink nearest the dish-
washer until it is hot.
4. Select a desired Program by touching the
SELECTPROGRAM Pad.
5. Select an Option by touching the SELECT
OPTION Pad.
6. Touch STARTPad.
POTS & PANS
Maximum cleaning for cooked-on
or baked-on foods. The program
time delays while the dishwasher
automatically heats the water to
145°F (63°C) in both washes and the
last rinse (marked ‘1. Program time is
63 minutes plus the time needed to
heat the water.
WASHAND HEAT RINSEAND HEAT CLEAN
WATERINDICATORS WATERINDICATORS INDICATOR
---
The CLEAN Indicator always comes on during or after dry,
depending on the option used. See Page10 for explanation.
HEAVY
A double wash tor heavily soiled
loads. Program time is 67 minutes.
WASHINDICATOR RINSEINDICATOR CLEAN INDICATOR
NORMAL
For normal, everyday soiled loads,
(The Energy Guide Label data is
based on this program.) Program
time is 73 minutes. Water is heated
during the first rinse.
WASHINDICATOR RINSEINDICATOR CLEAN INDICATOR
LOW ENERGY
For pre-rinsed or lightly soiled loads,
Program time is 56 minutes,
WASH RINSE INDICATOR CLEAN INDICATOR
INDICATOR F-~-\ ,-*-.
RINSE
RINSE INDICATOR
For rinsing a few items to be washed
one or more days later. Program
time is 12 minutes.
Electronic DisplayElectronic Display
Selecting an option
Options can be selected by touching the SELECTOPTION Pad. Each touch of the Pad advances the
display to the next optionThere are three options available: AIR DRY,HEATDRY,HI TEMF!All options can
be changed any time when the display is on, including during a program. If the RINSE Program is
selected, Options are not available. Ifthe POTS & PANS Program is selected, only HEATDRY and AIR DRY
Options are available.
AIR DRY HI TEMP
The AIR DRY Option helps save energy, but the
dishes take longer to dry (overnight) and some
water spotting may result. Some items (such as
plastics) may need towel drying. For best results,
use a liquid rinse aid such as Jet-Dry”
HEAT DRY
When HEAT DRY is selected, the air in the dish-
washer is heated during the”dry” portion of any
program - except RINSE.
DELAY Pad
The DELAY Pad allows you to delay the start of a
program from 1up to 9 hours. Each touch of this
pad adds another hour of delay to the digital
display. After 9 hours, touching the DELAY Pad
will change the display back to1 hour. The DELAY
HRS Indicator will show on the display during a
programmed delay. Touch START at any time
during the delay if you want the dishwasher to
start immediately.
When HI-TEMP is selected, the water for the main
wash and final rinse is heated to 145°F (63°C).
The POTS & PANS Program has the HI-TEMP Op-
tion pre-programmed into it.
A Dry Option will show in <he display with HI TEMl?
Be sure to select the desired Dry Option (HEAT
DRY or AIR DRY] in combination with HI TEMP
l
Touch SELECTOPTION Pad until HI TEMP Indica-
tors are shown in the display.
l
Option Indicators will not show in the display if
they can not be selected with a program;
RINSE or POTS & PANS.
l
You can change an option while the program
is running by touching the SELECTOPTION Pad.
CANCEL Pad
The CANCEL Pad allows you to cancel a pro-
gram or to clear the display. If the dishwasher is
washing, it will go into a 2 minute drain automat-
ically before shutting off. If the dishwasher had
not been started, it will clear the display.
9
Changing or cancelling a program
After a program has started, touch CANCEL
Pad once.The dishwasher will automatically go
into a 2 minute drain period, then shut off. Check
detergent dispensers to make sure they are
filled properly for the new program. To restart
the dishwasher, touch SELECTPROGRAM and SE-
LECT OPTION Pads, then touch START.
To cancel a program:
l
Touch CANCEL Pad once. The dishwasher Will
automatically drain for 2 minutes, then shut off.
OR
l
Touch CANCEL Pad twice. The display will
clear and the dishwasher will immediately
shut off.
Electronic display and status indicators
The electronic display shows...
l
“E4 or E2” shows whenever there has been a
control panel malfunction.
Touch CANCEL Pad to clear display. The dish-
washer may drain before shutting off. If the
display will not clear, call your TECH-CARE”
service technician. (See page 15.)
l
The number of minutes remaining in a pro-
gram (60, 59, 58 minutes, etc.). This displayed
time only represents the wash, rinse and HEAT
DRY time. The program time delays while the
water is heating.
l
The number of delay hours selected (1,2, ....9). CLEAN shows on the display immediately after
Status Indicators let you know what your dish-
washer is doing during a program.
WASH shows on the display during the wash
portion of the program. The indicator goes off
when the last wash is completed.
RINSE shows on the display during the two final
rinses before drying.
l
“PF” shows on the display whenever there has
been a power interruption or failure.
To add a dish after starting
1. To be sure the added item is washed, make 3. Open the door and add the dish.
sure the WASH Indicator is still on. The
display flashes when the door is left ajar.
2. To stop the program, unlatch the door by
pushing in the latch handle under the con-
trol panel. Do not open the door until the
spray arms stop spinning. The display will
flash.
4. Close the door. Do not latch it. Wait 30 set
ondsforairin thedishwashertowarmup.Thi
helps reduce the amount of moisture the
can come from the vent when restarting the
program.
5. Push in on door until it latches. The dish
washer will restart and continue the
program.