manuals.online logo
Brands
  1. Home
  2. •
  3. Brands
  4. •
  5. Whirlpool
  6. •
  7. Washer
  8. •
  9. Whirlpool AWZ 9995 User manual

Whirlpool AWZ 9995 User manual

5019 307 00528
GB
AWZ 9995 Quick Reference Guide
Before using the machine, please also read the instructions for use carefully!
(Subject to technical modifications)
Whirlpool is a registered trademark of Whirlpool USA
4
Programme selector knob
The drying programme is selected by turning
this knob.
“Départ (Pause)” button
The drying programme is started by pressing
this button. The indicator lamp flashes during
the selection phase and lights up during
drying.
Indicator lamps
Water container
The indicator lamp lights up when the water
container needs to be emptied. The drying
cycle is automatically interrupted. Empty the
container and restart the drying programme.
Empty the water container after every
drying cycle.
Filter
The indicator lamp lights up when the filter
and/or heat exchanger need cleaning.
Clean the filter at the end of every cycle.
Time remaining display
Dependingontheprogramme selected, once
the drying cycle has been started, a default
drying time is displayed. The time displayed is
corrected by a few minutes depending on the
volume, type and dampness of the laundry.
The drying time specified is a calculated
value which will be updated during the
drying programme.
Theflashinglinesindicatethat the calculationis
running. The remaining time will be updated.
Overdry protection
The indicator lamp lights up when a humidity
controlled programme is selected, to indicate
the working protection function. Function is
not active in time controlled programmes 20’
40’ 60’ and “ ”.
Programme sequence
Overdry
protection Drying End
of cycle Anti-
crease
Options
Gentle
Reduces drying intensity
(recommended for delicate items).
Rapid
Shortens drying duration (recommended for
thin items of the same size).
Buzzer
Signals/sounds end of drying cycle.
Anti-crease
Prevents laundry from creasing up to 12
hours. Buzzer and Anti-crease cannot be
selected together.
Delayed Start
Delays the start of the drying cycle by 1 to 9
hours.
Each time the button is pressed, the start
time is delayed by 1 hour.
Then press the “Départ (Pause)” button to
confirm the final selection and to start the
dryer.
The delayed start indicator lamp flashes and
the countdown counts down in 1-hour
intervals. The countdown is indicated by the
indicator lamp above the button flashing.
During the countdown, the drum will turn
from time to time to re-distribute the
laundry. To cancel or change the previously
set time delay, set the programme selector
knob to “ ” or open the door.
+
1
Machine operation
Additional information (including troubleshooting and service) can be found in the individual chapters of the
instructions for use.
Sort by:
Material thickness: Whenever there is greater load than the dryer can handle,
separate laundry according to weight (e.g. dry towels and thin underwear
separately).
Type of material: Cotton (linen); synthetic textiles (easy care).
Degree of drying: Cupboard dry, iron dry etc.
Do not tumble dry: Woollens, silk, nylon stockings, delicate embroidery, fabrics
with metallic decorations, bulky items such as sleeping bags, etc.
Check that all fastenings are closed and that pockets are empty. Please ensure that
there are no cigarette lighters in the wash. Turn laundry inside out.
Pull the door handle. If the child safety lock is activated, please deactivate it
(additional information can be found in the “Door Reversibility/Child Safety Lock”
chapter of the instructions for use).
Place laundry loosely in the drum to achieve equal drying throughout. Then close
the door.
Select the drying programme required by turning the programme selector knob
(for information, refer to programme table).
Select the option required by pressing the corresponding button.
The indicator lamp above the relevant button lights up to confirm your selection. An
alarm sounds if an incorrect selection is made (incompatible options). Press the
button again to cancel the option.
The drying programme is started by pressing the “Départ (Pause)” button.
The relevant indicator lamp lights up.
Changing programme selection: If the programme selected is changed during
drying, the dryer stops. The “Départ (Pause)” indicator lamp flashes. To operate
the new programme, again press the “Départ (Pause)” button.
Interrupting programme: To interrupt the dryer during the drying cycle, set the
programme selector knob to “ ” and press the “Départ (Pause)”
button. Wait at least 5 minutes before opening the door to allow the dryer to cool
down. For your safety the drying cycle stops automatically if you open the door. To
restart, after door opening, close the door and press the “Départ (Pause)” button
again.
End: Take the laundry out of the dryer. The drying process is complete
and the anti-crease phase has been reached (active).
Anti Crease: If the laundry is not removed at the end of the drying
cycle, an automatic anti-crease cycle will operate for maximum 60 min.
The drum rotates at regular intervals to prevent the laundry from
creasing.
Set the programme selector knob to “ ”.
Cleaning the lint filter: Open door, pull lint filter up and out of machine and open
it. Brush lint using a soft brush or your fingertips. Close lint filter and push firmly
back into place.
Emptying water container: Pull container out by the handle and empty. Replace
the container when empty by pushing it completely back into place.
If required, activate child safety lock (additional information can be found in the “Door
Reversibility/Child Safety Lock” chapter of the instructions for use).
Please note: Only use additives/plastic items specified as dryer safe and rinse items that have been treated with stain remover
thoroughly in plenty of water before drying. Never dry rubber objects or objects stained with vegetable oils in the dryer.
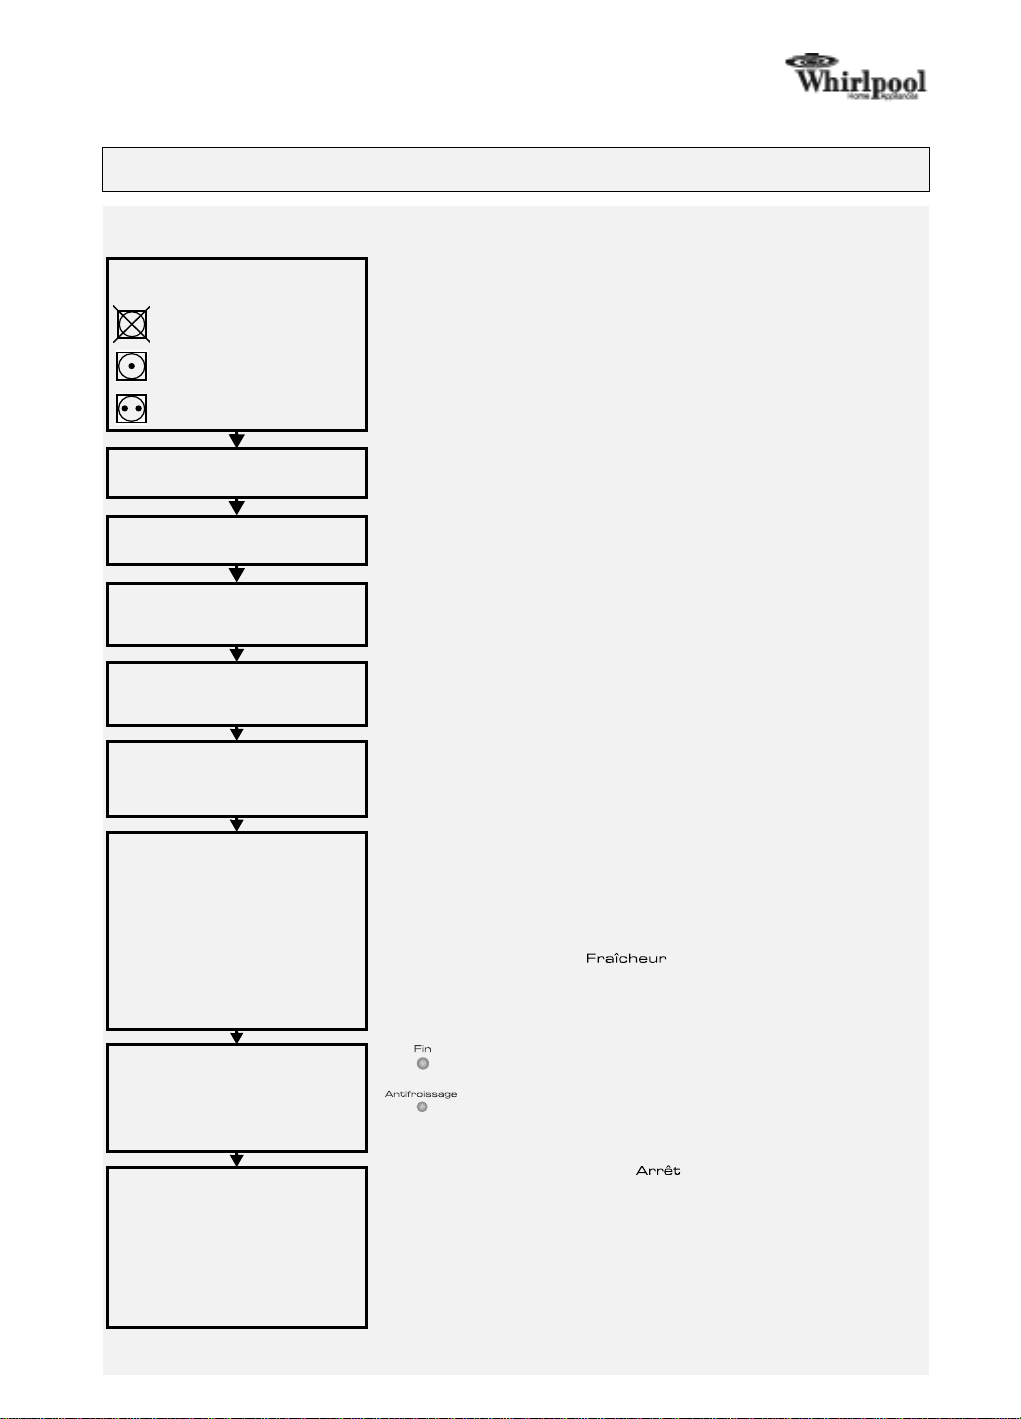
Sort laundry according to
care symbols:
Do not tumble dry
Suitable for tumble drying -
Suitable for tumble drying
at low drying temperature
Preparing laundry
Opening door
Loading dryer and
closing door
Switching on machine and
selecting programme
Selecting options
(if available)
Starting dryer
Programme end -
unloading dryer
Switching dryer off
* Test programme in accordance with EN 61121. 2
Overview of programmes Options Approximate
drying times
(in minutes)
Programmes / Drying levels
Type of textile Fabrics Volume
of load
kg
Gentle Rapid Buzzer Anticrease Start
Delay Very
wet
load Wet
load
Cupboard dry +
Multi-layered, thick laundry such as:
terry towels, dish cloths and dry
towels, bed linen, underwear, terry
towelling bath robes. Cotton or linen hot wash /
coloured laundry
Max. 7 kg
3.0
7.0 X X X X X 85’
150’ 70’
120’
Cupboard dry *
Similar types of laundry which do
not require ironing such as: dry
towels, bed linen, underwear, baby
clothes, T-shirts, cotton socks.
3.0
7.0 X X X X X 80’
130’ 60’
110’
Iron dry * Laundrywhichrequiresironing such
as: bed and table linen, dry towels,
T-shirts, polo shirts, work clothes. 3.0
7.0 X X X X X 60’
110’ 50’
85’
Cupboard dry + Laundry with thick, multi-layered
areas such as: bed and table linen,
track suits, anoraks, blankets. Synthetic, mixed fibre or
cotton easy care (ironing not
required) laundry
Max. 2.5 kg
1.0
2.5 X - X X X 30’
55’ 25’
45’
Cupboard dry * Laundry which does not require
ironing such as: shirts, blouses,
T-shirts, sportswear. 1.0
2.5 X - X X X 25’
45’ 20’
35’
Iron dry * Laundrywhichrequiresironing such
as: trousers, dresses, skirts, shirts,
blouses. 1.0
2.5 X - X X X 20’
35’ 15’
25’
Cupboard dry Low drying intensity for delicates
and items labelled with , such as:
trousers, dresses, shirts, blouses.
Laundry made from synthetic
fibres such as polyamide,
nylon, polyacrylic, etc.
Max. 2.5 kg
2.5 X - X X - 100’ 85’
Laundry is aired and refreshed for
30 minutes without heating. - - - - - - - -
Completes drying or dries single
items (suitable for all fabrics).
Programme with fixed
duration - X - X X -
Cotton
Mixed fabrics
Delicate
plus
Airing
Time/cycle
3
How to proceed if ...
...you want to
correctly care for
and clean your
dryer:
Clean the filter at the end
of every cycle.
• Open the door.
• Pull the filter upwards.
• Open the filter.
• Brush lint using a soft brush or your
fingertips.
• Close the filter.
• Push the filter back into place.
Empty the water container
at the end of each drying
cycle.
• Pull the handle to remove the water
container.
• Empty the water container.
• Replace the water container whenempty
by pushing it completely back in place.
• Remove fibres in and around the water
evacuation hole at least once per month.
Clean the heat exchanger
at least every month.
(For further information
see chapter “Heat
Exchanger” in the
Instructions for Use).
...you want to check the
dryer yourself first:
(If your machine is not
functioning correctly, please
check the following points
before phoning for the
customer service – also refer
to relevant chapter in the
instructions for use)
Drying takes too long /
laundry is not dry enough
• Has the correct drying programme been
selected?
• Was the inserted laundry too wet
(washing machine spin speed less than
1000 rpm)?
• Is the lint filter dirty (filter indicator light on)?
• Is the heat exchanger dirty? (for more
information, refer to the instructions for use)
• Is the room temperature too high?
• Are the END “ ” and Anti-crease
“ ” indicator lamps lighting
up? The drying cycle is complete and the
laundry can be taken out.
The dryer will not operate
(after a power failure,
always press the
“Départ (Pause)” button).
• Is the plug properly inserted into the
mains electricity socket?
• Is there a power failure?
•Hasthefuseblown?
• Is the door properly closed?
• Has a drying programme been selected?
•Hasthe“Départ (Pause)” button been
pressed?
Lint filter or water
container indicator lamp
on.
• Is the lint filter clean?
• Is the water container empty?
• Has the water container been inserted
correctly?
• Is the heat exchanger clean?
Water droplets underneath
the dryer.
• Has the heat exchanger been inserted
correctly?
• Has any fluff on the heat exchanger seal
been wiped away?
• Has any fluff on the door seal been
wiped away?
• Has the water container been inserted
correctly?
AFTER-SALES SERVICE
If the fault is still present once the above checks have been undertaken or should the fault occur for a second time, switch the
machine off. Please contact your after-sales service representative (for more information, refer to the warranty manual).
Please have the following details ready when calling your after-sales service representative:
• the nature of the fault.
• the dryer type and model
• theservice code (the numberafterthe word Service on the adhesive
rating plate) on the right-hand side when the door is open.

Other Whirlpool Washer manuals

Whirlpool AWE7101N Installation guide

Whirlpool

Whirlpool AWE7101N Installation guide

Whirlpool WFW5090GW0 User manual

Whirlpool

Whirlpool WFW5090GW0 User manual

Whirlpool WTW4616FW User manual

Whirlpool

Whirlpool WTW4616FW User manual

Whirlpool WWDC-9440 User manual

Whirlpool

Whirlpool WWDC-9440 User manual

Whirlpool CAE2743BQ User manual

Whirlpool

Whirlpool CAE2743BQ User manual

Whirlpool AWM276 User manual

Whirlpool

Whirlpool AWM276 User manual

Whirlpool AMAZONE CO User manual

Whirlpool

Whirlpool AMAZONE CO User manual

Whirlpool WFW80HEBW User manual

Whirlpool

Whirlpool WFW80HEBW User manual

Whirlpool AWG812/PRO Service manual

Whirlpool

Whirlpool AWG812/PRO Service manual

Whirlpool 8315954 User manual

Whirlpool

Whirlpool 8315954 User manual

Whirlpool 3XWTW5705 User manual

Whirlpool

Whirlpool 3XWTW5705 User manual

Whirlpool FWG81284SBS EG User manual

Whirlpool

Whirlpool FWG81284SBS EG User manual

Whirlpool White Magic Guide

Whirlpool

Whirlpool White Magic Guide

Whirlpool LSP880GP User manual

Whirlpool

Whirlpool LSP880GP User manual

Whirlpool WFC7500V Series User manual

Whirlpool

Whirlpool WFC7500V Series User manual

Whirlpool Duet HT GHW9200LQ0 User manual

Whirlpool

Whirlpool Duet HT GHW9200LQ0 User manual

Whirlpool Cabrio WTW6200S User manual

Whirlpool

Whirlpool Cabrio WTW6200S User manual

Whirlpool TDLR70112 User manual

Whirlpool

Whirlpool TDLR70112 User manual

Whirlpool FWDG 961483 User manual

Whirlpool

Whirlpool FWDG 961483 User manual

Whirlpool Cabrio WTW5610XW1 User manual

Whirlpool

Whirlpool Cabrio WTW5610XW1 User manual

Whirlpool CAM2752TQ - COMMCL WSHR 2SP 3CYC WH DIG D User manual

Whirlpool

Whirlpool CAM2752TQ - COMMCL WSHR 2SP 3CYC WH DIG D User manual

Whirlpool AWM 5500 User manual

Whirlpool

Whirlpool AWM 5500 User manual

Whirlpool WFW94HEAC Assembly instructions

Whirlpool

Whirlpool WFW94HEAC Assembly instructions

Whirlpool LC4500XT User manual

Whirlpool

Whirlpool LC4500XT User manual

Popular Washer manuals by other brands

LG P7058N1F owner's manual

LG

LG P7058N1F owner's manual

Amana NFW7200TW user manual

Amana

Amana NFW7200TW user manual

Indesit LWE 91483 Instructions for use

Indesit

Indesit LWE 91483 Instructions for use

LG WM3885HCA owner's manual

LG

LG WM3885HCA owner's manual

Kenmore 3953630 Ower's manual

Kenmore

Kenmore 3953630 Ower's manual

Beko WTV8814MMC0 user manual

Beko

Beko WTV8814MMC0 user manual

LG F12C3QDP owner's manual

LG

LG F12C3QDP owner's manual

Siemens WG44G2ALDN User manual and installation instructions

Siemens

Siemens WG44G2ALDN User manual and installation instructions

Milnor 30015C4A installation instructions

Milnor

Milnor 30015C4A installation instructions

Hisense WFGE10141VMB User's operation manual

Hisense

Hisense WFGE10141VMB User's operation manual

Indesit Arcadia sevice Guide

Indesit

Indesit Arcadia sevice Guide

Panasonic NA-FD135Z3 Operating & installation instructions

Panasonic

Panasonic NA-FD135Z3 Operating & installation instructions

Maytag MHWE300VW10 parts list

Maytag

Maytag MHWE300VW10 parts list

LG WT7900HWA-DLGX7901WE owner's manual

LG

LG WT7900HWA-DLGX7901WE owner's manual

Smeg LBS129F2 user manual

Smeg

Smeg LBS129F2 user manual

Philco PLD 1261-5TL user manual

Philco

Philco PLD 1261-5TL user manual

Maytag Atlantis III Service manual

Maytag

Maytag Atlantis III Service manual

Hotpoint Ariston AQXXF 129 H Instruction booklet

Hotpoint Ariston

Hotpoint Ariston AQXXF 129 H Instruction booklet

manuals.online logo
manuals.online logoBrands
  • About & Mission
  • Contact us
  • Privacy Policy
  • Terms and Conditions

Copyright 2025 Manuals.Online. All Rights Reserved.