White and Brown EX 802 EQUATOR User manual

EXPRESSO COMBINÉ
3 in 1 espresso cappuccino - coffee maker
EX 802 - “EQUATOR”
MODE D’EMPLOI
MODE D’EMPLOI
USER MANUAL
USER MANUAL
EX_802_notice 25/10/06 10:36 Page 1

CONSIGNES DE SECURITE
Dans toute utilisation d’appareils électriques, des précautions de base sont à respecter.
Lire attentivement cette notice avant la première utilisation de l’appareil.
• Vérifier que le voltage indiqué sur la plaque signalétique de l’appareil correspond bien à
celui de votre installation électrique. Si ce n’est pas le cas, adressez-vous au revendeur et
ne branchez pas l’appareil.
• Ne jamais laisser l’appareil sans surveillance lorsqu’il est en fonctionnement. Si vous devez
vous absenter même un court instant, arrêtez l’appareil.
• Ne pas le laisser à la portée d’enfants ni des personnes irresponsables.
• Employer cet appareil exclusivement à un usage domestique, et conformément aux
indications de ce mode d’emploi.
• Ne jamais plonger l’appareil dans l’eau ou tout autre liquide ni l’exposer à un
environnement humide.
• Ne pas utiliser l’appareil avec les mains mouillées ou humides.
• Ne pas utiliser l’appareil sur ou près de surfaces chaudes.
• Ne jamais déplacer ou débrancher l’appareil en tirant sur le cordon d’alimentation.
• Avant de ranger ou de nettoyer l’appareil, s’assurer qu’il est bien débranché et
complètement refroidi.
• Ne pas nettoyer l’appareil avec des produits chimiques abrasifs.
• Vérifier régulièrement l’état du cordon d’alimentation. Ne pas utiliser l’appareil si le cordon
d’alimentation, la prise ou l’appareil sont endommagés.
• Ne jamais réparer l’appareil vous-même. Vous perdriez le bénéfice de la garantie. Comme
tout appareil électrique, il doit être réparé par une personne qualifiée. De même, le
changement du cordon d’alimentation représente un réel danger et il est nécessaire de
contacter un réparateur agréé.
RECOMMANDATIONS SPÉCIFIQUES :
• Utiliser uniquement de l’eau froide pour le remplissage du réservoir.
• La pression à l’intérieur de l’appareil peut parfois produire un jet de vapeur ou d’eau chaude.
• Avant la première utilisation, nettoyer complètement l’appareil puis le faire fonctionner
plusieurs fois avec de l’eau seulement pour le rincer complètement. Ainsi, votre premier
café sera parfaitement savoureux.
• Pour préparer un premier café plus chaud, placer le filtre dans l’appareil et laisser couler
une ou deux tasses d’eau chaude. Ceci permet de chauffer les composants et d’obtenir un
café à la température optimale.
• Ne jamais faire fonctionner avec le réservoir à vide. Cela pourrait abîmer la pompe.
• Pendant le fonctionnement, l’appareil peut vibrer et émettre un peu de bruit . Ceci est
parfaitement normal.
2
FRANÇAIS
FRANÇAIS
WHITE & BROWN vous félicite d’avoir choisi ce produit et vous remercie de votre confiance.
Pour votre confort et votre sécurité, votre article a été vérifié à toutes les étapes de sa fabrication
et a passé avec succès tous nos tests de qualité. Nos produits sont conçus pour vous plaire tant
par leur design que par leur facilité d’utilisation et dans l’objectif constant de vous apporter
complète satisfaction.
EX_802_notice 25/10/06 10:36 Page 2

DESCRIPTION
DESCRIPTION
CAFETIÈRE FILTRE
A. Couvercle du réservoir d’eau et du filtre à café
B. Interrupteur M/A du café filtre
C. Support du porte-filtre
D. Verseuse
E. Plaque chauffante
F. Cordon d’alimentation
G. Réservoir d’eau
H. Porte-filtre amovible
EXPRESSO
a. Bouton de réglage du débit vapeur
b. Interrupteur M/A expresso et cappuccino
c. Interrupteur vapeur
d. Interrupteur expresso
e. Porte-filtre à expresso
f. Buse vapeur
g. Grille récolte-gouttes
h. Filtre à expresso
i. Adaptateur silicone pour dosette
3
EX_802_notice 25/10/06 10:36 Page 3

MODE D’EMPLOI
MODE D’EMPLOI
CAFÉ EXPRESSO
COMMENT PRÉPARER UN AUTHENTIQUE EXPRESSO
L’expresso est un café puissant, au goût caractéristique extrêmement riche en arôme. Pour
le réaliser, l’eau arrive sur le filtre à température très élevée, puis est poussée rapidement
au travers de la masse de café par une forte pression. Elle extrait le nectar de la mouture et
puise les parfums essentiels du café.
Pour réaliser un délicieux café, utiliser de préférence un café spécial « expresso », à la
torréfaction et à la mouture bien adaptées, ou une dosette spéciale papier adaptée pour
café expresso. De façon générale, l’expresso nécessite une mouture plus fine que le café
filtre. Tasser légèrement la mouture. Si l’écoulement de café est plus long que quelques
secondes, c’est que la mouture a été broyée trop fine ou qu’elle a été trop tassée.
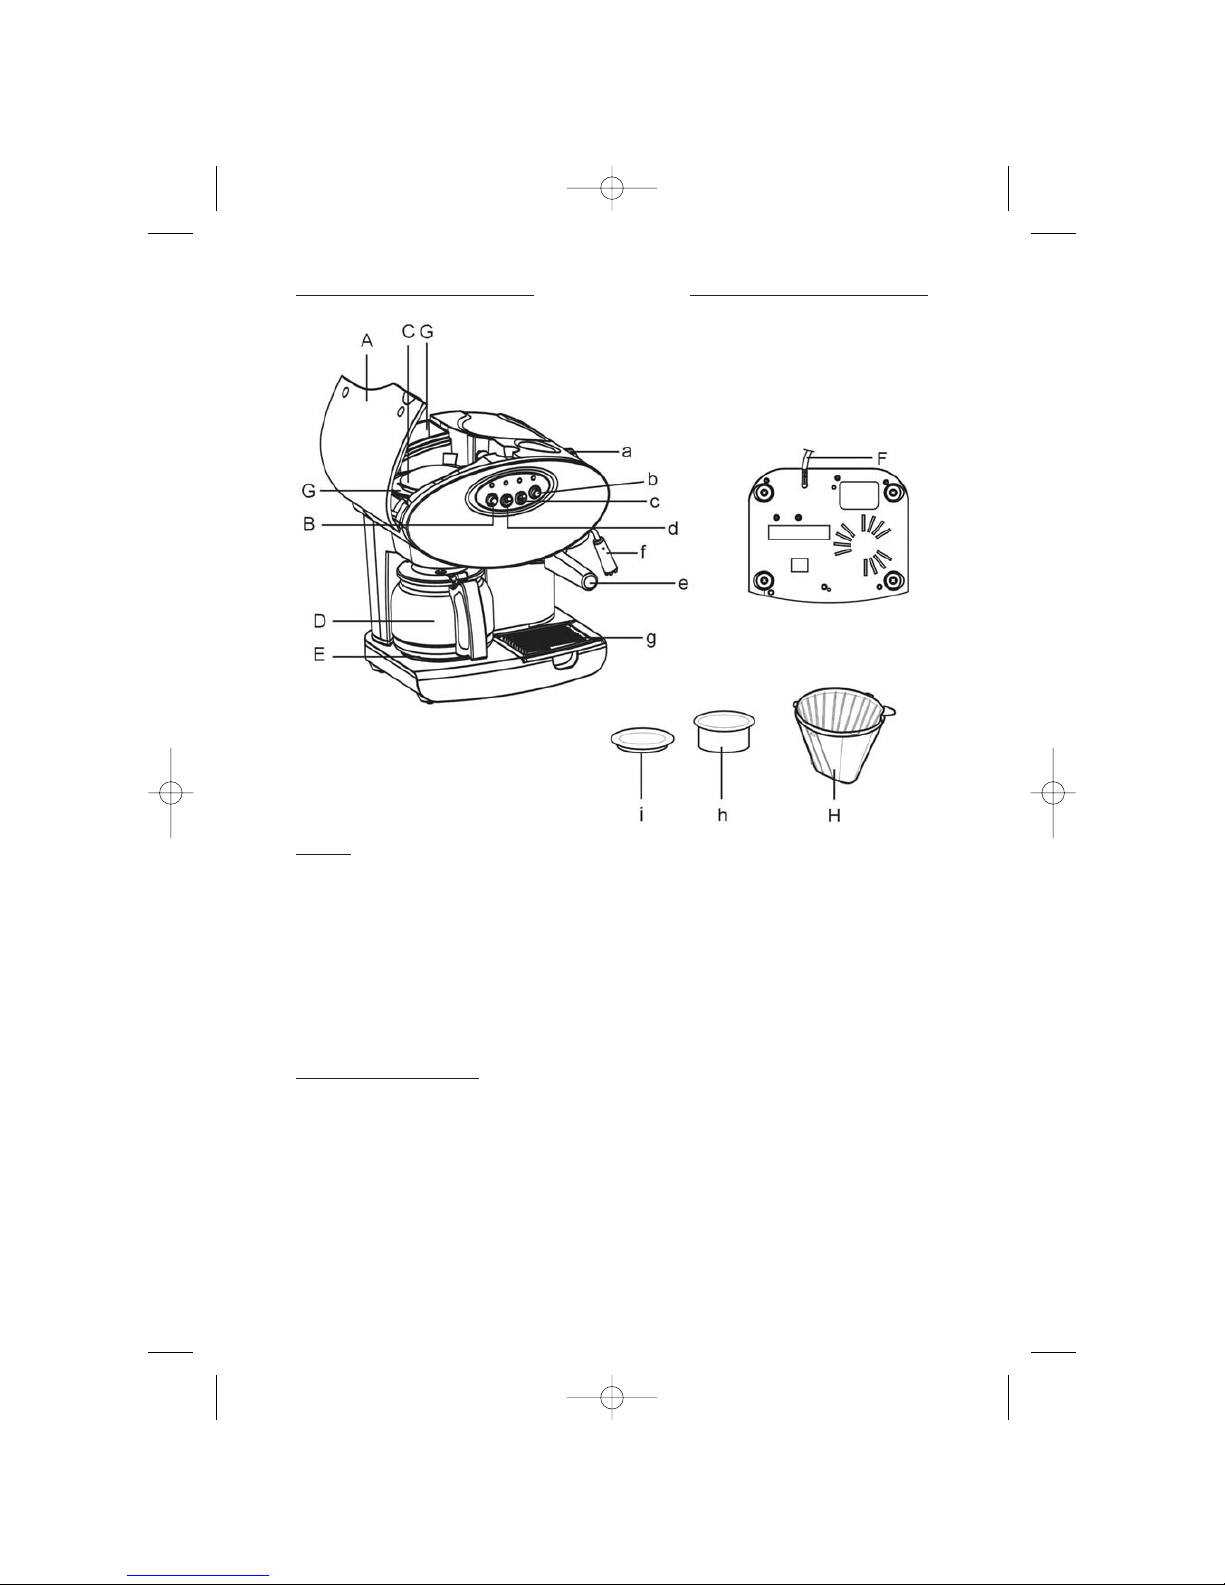
- Ouvrir le couvercle (A) et remplir le réservoir d’eau froide. Vous
pouvez remplir le réservoir en versant l’eau à partir d’un récipient
approprié (fig 1).
- Brancher l’appareil.
- Presser l’interrupteur M/A (b).
- Pendant que l’appareil préchauffe, préparer le filtre pour une
ou deux tasses. Remplir le filtre avec le café moulu et tasser
doucement (fig 2), ou placer la dosette correspondante
(voir paragraphe ci-après).
- Placer le filtre dans le porte-filtre (e). Positionner l’ensemble à
l’emplacement du porte-filtre en poussant vers le haut et tournant
de gauche à droite. S’assurer que le porte-filtre soit bien
positionné pour éviter les fuites d’eau (fig 3).
- Placer une ou deux tasses sur la grille, sous le porte-filtre
(fig 4).
- Quand le voyant lumineux «expresso» passe au vert, l’appareil est
prêt à l’emploi.
- Appuyer sur l’interrupteur expresso (d) pour faire couler le café.
Appuyer à nouveau pour arrêter l’écoulement (fig 5).
NOTE : pour un meilleur café, toujours attendre que l’appareil soit
chaud avant de fixer le porte-filtre.
- Attention : afin d’éviter tout risque de brûlure due à la pression, ne
pas retirer le porte-filtre lorsque l’interrupteur expresso est actif
(b), ni juste après l’utilisation.
- Cet appareil est équipé d’une fonction d’auto-amorçage : lorsque
le réservoir d’eau est vide ou après une longue période sans
utilisation, aucune manipulation particulière n’est nécessaire.
ATTENTION : le porte-filtre ainsi que les parties métalliques peuvent
être chaudes pendant le fonctionnement de l’appareil. Pour les
refroidir rapidement (afin de remplir à nouveau le porte-filtre par
exemple), faire couler de l’eau fraîche sur les parties chaudes
jusqu’à ce qu’elles refroidissent.
4
EX_802_notice 25/10/06 10:36 Page 4

UTILISATION DE DOSETTES
Cet appareil permet de réaliser un excellent café expresso à partir de café moulu (une ou
deux tasses) ou de dosettes.
- Monter le filtre dans le porte-filtre comme pour l’utilisation de café moulu, puis placer
l’adaptateur silicone bien au fond du filtre.
- Installer la dosette sur l’adaptateur, puis monter le porte-filtre sur l’appareil comme décrit
ci-dessus.
- En utilisant des dosettes, il n’est pas possible de préparer deux cafés simultanément.
Préparer le premier expresso, puis passer le porte-filtre sous l’eau froide pour le refroidir,
rincer l’adaptateur silicone avant de remonter le tout et d’installer une nouvelle dosette
pour le café suivant.
BUSE VAPEUR
- Cet appareil est équipé d’une buse vapeur permettant de chauffer
du lait ou d’autres liquides, et de réaliser d’excellents cappuccinos.
- IMPORTANT : avant utilisation de la buse vapeur, retirer le
porte-filtre de son logement (e).
- Remplir le réservoir d’eau. Brancher l’appareil et mettre la fonction
expresso cappuccino en marche (b).
- Allumer l’interrupteur vapeur (c).
- Attendre que le témoin lumineux « expresso » s’allume (fig 6).
- Placer un récipient sous la buse vapeur. Tourner le bouton de débit
de vapeur (a) dans le sens contraire des aiguilles d’une montre
(fig 7), d’un tour à un tour et demi, pour évacuer l’eau ou la vapeur
restant dans la buse. Arrêter le débit de vapeur en tournant le
bouton en sens inverse (fig 8).
- Pendant cette opération, une petite quantité d’eau ou de vapeur
peut s’échapper. Ceci est parfaitement normal.
- Plonger la buse vapeur dans le liquide sans toucher le fond du
récipient, et tourner le bouton de débit de vapeur (a) (fig 9). Quand
le liquide est chaud, tourner le bouton en sens inverse pour arrêter
la vapeur. Quelques secondes sont suffisantes pour obtenir un lait
épais et mousseux.
5
Poignée du
porte-filtre
Disque thermocream
Porte-filtre
Filtre
Adaptateur dosette
EX_802_notice 25/10/06 10:36 Page 5

IMPORTANT :
- Nettoyer la buse vapeur immédiatement après l’emploi. Démonter
la partie plastique amovible de la buse en prenant toute les
précautions utiles pour éviter les brûlures.
- La rincer à l’eau claire avant de la remonter. (fig 10)
- Nettoyer régulièrement le filtre à expresso à l’aide d’une petite
brosse (fig 11).
POUR REFAIRE UN EXPRESSO APRÈS L’EMPLOI DE LA BUSE
CAPPUCCINO
- Eteindre l’interrupteur vapeur (c) pour permettre à l’appareil de refroidir.
- Placer un récipient sous la sortie de café, presser l’interrupteur expresso (d). De l’eau
coule jusqu’à ce que le témoin lumineux Expresso s’éteigne.
- L’appareil est à nouveau prêt à fonctionner en mode expresso.
PRÉPARATION D’UN CAFÉ FILTRE
- Ouvrir le couvercle (A) et placer un filtre en papier dans le porte-filtre (fig 13 et 14).
- Verser la dose souhaitée de café moulu dans le filtre en papier (fig 15).
- Refermer correctement le porte-filtre (fig 16).
- Remplir le réservoir d’eau selon la quantité de café désirée (fig 17).
- Placer la verseuse sur la plaque chauffante.
- Presser la touche café filtre (B). Le témoin lumineux s’allume, indiquant que le cycle a
débuté (fig 18).
6
EX_802_notice 25/10/06 10:36 Page 6

ENTRETIEN ET NETTOY
ENTRETIEN ET NETTOYAGE
AGE
- Bien débrancher l’appareil avant de le nettoyer. S’assurer qu’il soit parfaitement refroidi.
- Démonter les parties démontables : verseuse, porte-filtre et filtres espresso et porte-filtre
pour café filtre ainsi que le bac récolte-gouttes et les laver au lave-vaisselle, ou dans une
eau additionnée de liquide vaisselle. Bien rincer et sécher chaque élément avant de le
remonter.
- Nettoyer l’extérieur de l’appareil avec un chiffon humide.
- Ne pas utiliser de produits abrasifs qui risqueraient d’abîmer la surface de l’appareil.
- Il est nécessaire de détartrer l’appareil au moins une fois par an. Pour cela, utiliser un
produit détartrant pour cafetières.
- Suivre les instructions d’utilisation du produit.
- Après le détartrage, rincer plusieurs fois l’appareil en le faisant fonctionner sans café.
- Nettoyage de la buse vapeur : voir paragraphe « utilisation de la buse vapeur »
7
EX_802_notice 25/10/06 10:36 Page 7

8
EX_802_notice 25/10/06 10:36 Page 8

9
CAUTION
CAUTION
READ ALL THESE INSTRUCTIONS CAREFULLY BEFORE USING THIS PRODUCT.
• Make sure that the voltage rating on the typeplate corresponds to your main voltage.
• Never leave the appliance unsupervised when in use.
• Keep out of children or incompetent persons and do not allow them to operate this applian-
ce.
• Only use the appliance for domestic purposes and in the way indicated in these instruc-
tions.
• Never immerse the product in water or any liquid for any reasons. This appliance must be
placed in a dry environment.
• Do not use if you have wet hands.
• Never use the appliance on or near hot surfaces.
• Never move or range the appliance by pulling the cord.
• Before ranging or cleaning the appliance, make sure that it is unplugged from the power
supply and that it is completely cooled.
• Do not clean the appliance with abrasive chemicals.
• From time to time, check the cord for damages. Never use the appliance if cord or applian-
ce show any sign of damage.
• All interventions made by a non-qualified person can be dangerous; in this case guarantee
conditions would cancel. As all electrical products, a competent electrician must repair it.
SPECIFIC RECOMMENDATION
• Use only cool water to fill the tank
• At certain time, and due to the pressure within the coffee maker, there may be some water
or steam coming out of the coffee spout.
• Before using the coffee maker for the first time, wash it thoroughly as indicated below and
use only with water a couple of times. This to clean the system out completely.
• If you wish your first coffee to be hotter, place the filter in the appliance and allow one or
two cupfuls of water to flow. This way you shall warm up the components of the coffee
maker.
• Do not use without water inside the appliance. This may damage the pump.
• A slight noise and some vibrations when the coffee maker is working is absolutely normal.
THE MANUFACTURER WILL NOT ASSUME ANY RESPONSIBILITY IN CASE OF
NON ADHERENCE TO THIS RECOMMENDATION.
SAVE THESE INSTRUCTIONS CAREFULLY
ENGLISH
ENGLISH
Congratulations for having chosen this WHITE & BROWN product, and thank you for trusting us.
For your comfort and safety, your appliance has been checked at every step of manufacturing
and has successfully gone through all our tests of quality.
WHITE & BROWN creates original products to please you, as far as design and easiness to use
are concerned in order to give you complete satisfaction.
EX_802_notice 25/10/06 10:36 Page 9

10
DESCRIPTION
DESCRIPTION
COFFEE
A - Hinged water chamber lid
B - Filter coffee On/Off button
C - Swing-out filter holder
D - Glass carafe
E - Warming plate
F - A/C cord and cord storage
G - Water tank
H - Filter cone
ESPRESSO/CAPPUCCINO
a - Steam control knob
b - Espresso/cappuccino On/Off button
c - Steam button
d - Espresso ready button
e - Filter holder
f - Steam nozzle
g - Removable overflow grid
h - Filter
i - Coffee pads adaptor
EX_802_notice 25/10/06 10:36 Page 10

11
INSTRUCTIONS OF USE
INSTRUCTIONS OF USE
GENUINE ESPRESSO
Espresso is a far richer and stronger brew than regular coffee. Most people find that they
enjoy it in small quantities because of its richness, and for that reason, espresso is usually
served in small cups. Properly used with the BaRCREAM ® disk will always produce a crea-
my espresso that is deep, dark and delicious. Remember: Espresso requires a finer grind
than regular coffee.
The ground coffee in the filter must be lightly pressed (can be done with the end of the mea-
suring spoon). The quality and the fineness of ground coffee will allow you to get a stronger
or lighter coffee. If the outflow time is longer than a few seconds, it means that the ground
coffee is too fine or has been pressed too much.
PREPARING ESPRESSO
- Plug the appliance to the mains.
- Turn on the machine by pressing the ESPRESSO ON/OFF button (b).
- Fill the water tank (G) with water (fig. 1)
- Measure out the coffee into the filter : completely fill 2 spoonfuls
for 2 cups of coffee and 1 spoonful to the filter for one cup of
coffee (fig.2). To use coffee pads please see next paragraph. Make
sure that the overflow grid is in place.
- Place the holder by turning anticlockwise as far as possible
without forcing (fig.3). If the filter is not at least in the middle of the
lock range, do not operate the machine. Rather, remove the filter
holder and reinsert it as described above until the filter is within
the lock range. By following this procedure this will prevent the
filter holder from being disloged as pressure builds up during the
brewing process.
- Place cups directly under the two spouts (fig. 4).
- When the ESPRESSO READY light goes on in green, then press the
button ESPRESSO READY (d) for the outflow of coffee (fig.6). Press
the same button a second time will stop the outflow of the coffee.
NOTE : for a tasty result, always wait for the appliance to be warm
before assembling the filter holder.
- Attention: do not remove the filter holder when the espresso button
is on. Do not remove filter holder immediately after operation as
some pressure may still remain.
- When the water in the tank is finished or after a long period of time
without using it, no particular manipulation is necessary as the
appliance is assembled with a special self-priming system.
ATTENTION
The filter holder may be hot during operation, to remove the filter
holder, turn the filter holder to the right, until the holder dislodges
from the machine. The metal parts might still be hot and can be
cooled down by running cold water over them.
EX_802_notice 25/10/06 10:36 Page 11

12
TO USE COFFEE PADS
This appliance is intended to prepare an excellent espresso with ground coffee (one or two
cups) as well as with coffee pads.
- Place the filter inside of the filter holder as for using with ground coffee, then set firmly the
silicone adapter in the bottom of the filter.
- Put the coffee pad on the adapter, then set the filter holder on the appliance as described
above.
- When using coffee pads, it is not possible to prepare two cups of coffee in the same time.
First prepare one espresso, then rinse the filter holder under fresh water to cool it before
preparing a second cup of coffee.
STEAM
The coffee maker is equipped with a super steamer for heating milk
or other liquids.
Attention: Before using the cappuccino nozzle make sure that the
filter holder (e) has been removed from its housing.
- Fill the water tank.
- Switch on the espresso button (b).
- Press the STEAM button and wait until the warning light of the
ESPRESSO READY button lights on red (fig.6).
- Turn anticlockwise the steam control knob (fig.7) to draw out any
water condensation remaining in the steam tube. Place a suitable
container under the steam nozzle (f) to collect the water (fig. 8).
Then close the steam control knob by turning clockwise.
- During this operation, a little quantity of water or steam will come
out from the filter holder or from the steam nozzle; this fact is
absolutely normal due to evaporation to reach the right
temperature to make a creamy cappuccino.
- Immerse the steam nozzle in the jug with the milk and rotate the
steam knob (a) to let the steam out and froth the milk (fig.10). Just a
few seconds are necessary to get a thick and creamy froth. The
nozzle must not touch the bottom of the jug, otherwise the flow of
steam may be hindered.
Filter holder
handle
Thermocream attachment
Filter holder
Filter
Coffee pad adapter
EX_802_notice 25/10/06 10:36 Page 12

13
- Important : clean the steam nozzle immediately after frothing the
milk by rotating the steam knob (a) allowing the appliance to
produce steam for a few seconds to clean out the nozzle (pay
attention to avoid any risk of burn).
- Unscrew the attachment from the cappuccino tube (fig.11) and
wipe outside of spout with a damp non-abrasive cloth (Caution: do
not remove or reinstall the steam nozzle when hot). The attachment
can be washed under running water.
FROM CAPPUCCINO BACK TO COFFEE
- Press the STEAM button (turn off) allowing the appliance to cool.
- Place a container under the espresso spout.
- Then press the ESPRESSO READY button (d) allowing water to flow out until the green
warning light ESPRESSO READY turns off again.
- The appliance is ready to make new cups of espresso.
PREPARING COFFEE
- Open the lid (A) and place a paper filter into the filter holder (fig 13 and 14).
- Pour the filter with the desired quantity of grinded coffee (fig 15).
- Close the filter holder (fig 16).
- Fill the tank with the desired quantity of water (fig 17).
- Place the carafe on the warming plate.
- Turn on the filter coffee on/off button (B). The indicator light will illuminate indicating that
the brewing process has begun (fig.18).
EX_802_notice 25/10/06 10:36 Page 13

14
MAINTENANCE AND CLEANING
- Before cleaning, make sure the appliance is unplugged from the mains.
- Allow the appliance to cool down completely.
- Dismantle the carafe, filter holders, espresso filters and overflow grid and wash them in
dishwasher or with soap and water. Rinse and dry thoroughly.
- The outside of the appliance may be cleaned with a slightly damp cloth.
- Do not use abrasive or chemical products which may deteriorate the surfaces of the
appliance.
- It is convenient to descale the appliance at least once a year. To do so, use a descaler apt
for coffee machines.
- Follow the instructions of the product.
- After treatment, rinse the conducts several times by operate the appliance just with water.
- To clean the steamer, remove the rubber piece it has by pulling downwards.
EX_802_notice 25/10/06 10:36 Page 14

15
EX_802_notice 25/10/06 10:36 Page 15

16
Indications relatives à la protection de l’environnement
Au terme de sa durée de vie, ce produit ne doit pas être éliminé avec les ordures ménagères
mais doit être remis à un point de collecte destiné au recyclage des appareils électriques et
électroniques. Le symbole figurant sur le produit, la notice d’utilisation ou l’emballage vous
indique cela. Les matériaux sont recyclables conformément à leur marquage. Vous apporterez
une large contribution à la protection de l’environnement par le biais du recyclage, de la
réutilisation matérielle ou par les autres formes de réutilisation des appareils usagés. Veuillez
vous adresser à votre municipalité pour connaître la déchetterie compétente.
Instructions on environment protection
Do not dispose of this product in the usual household garbage at the end of its life cycle ; hand it
over a collection point for the recycling of electrical and electronic appliances.
The symbol on the product, the instructions for use or the packing will inform about the methods
of disposal. The materials are recyclable as mentioned in its marking. By recycling or others
forms of re-utilization of old appliances, you are making an important contribution to protect our
environment. Please inquire at the community administration for the authorized disposal
location.
10/06 - V2
EX_802_notice 25/10/06 10:36 Page 16
Table of contents
Languages:
Other White and Brown Coffee Maker manuals

White and Brown
White and Brown EX 826 MILENA User manual

White and Brown
White and Brown EX 826 MILENA User manual

White and Brown
White and Brown FA 837 WAKE UP User manual

White and Brown
White and Brown EX 827 AREZZO User manual

White and Brown
White and Brown FA 872 KARA User manual

White and Brown
White and Brown CD 853 GIACOMO User manual

White and Brown
White and Brown EX 830 Lazzio User manual

White and Brown
White and Brown FA 822.1 "Roma" User manual

White and Brown
White and Brown FA 873 MARUPA User manual

White and Brown
White and Brown EX 824 Tosca User manual