Wicrypt Lynx User manual

Lynx Instruction Manual
Quick Start Guide
For more information visit www wicrypt com

Items Check List
Before st rting, check th t ll the following items h ve been included
with your device. If nything is missing, cont ct your de ler
Hotspot hub Device is being referred to as in this manual for the purpose of simplicity
Device
5V Ch rger nd C ble
SIM C rd Cover
P ge 2

Nomenclature
Page 3
Hotspot hub Device is being referred to as in this manua for the purpos
of simp icity
Power Switch
(ON/OFF)
Network Indicator
Wifi Indicator
Battery Indicator
USB port
Power Source Port
Ethernet Port
Sim Port
Device Reset

Contents
Page 5
Introduction 2
It ms Ch ck List 2
Nom nclatur 4
Cont nts 5
Quick Start Guide 6
S tting up th D vic 6
Conn ction via Wi-Fi 7
Conn ction via Eth rn t Cabl 8
Device Dashboard Setup 9
How to Conn ct to your Wicrypt D vic 9
How to R gist r a D vic 10
How to S tup D vic Password 11
How to Chang D vic SSID Nam 12
How to Switch from P rsonal to Busin ss Mod 13
Setting Up Explorer 14
S t up mobil account 14
How to Stak and Start Mining Wicrypt N twork Tok ns (WNT) 15
S tup E
x
plor r
A
ccount on your Wicrypt Dashboard 18
How to Sync your Physical D vic to your Mint d D vic 19

Quick Startup Guide
Setting up the Device
1
ake sure the internal battery is charged, if not, connect the device to a
power source
2
Insert your sim card or connect to the internet via your ethernet cable.
3
Turn ON the Device.
Page 6

Quick Startup Guide
4
Wait for 6 minutes for the Wicrypt firmware to finish initialization. Confirm that
the following LEDs are On power wifi and internet.
5
Ensure that the Wi-Fi light is on and blinking. It can take up to 6 minutes for
the devices to be ready
6
Connect your phone or PC via WiFi to the device via SSID.
Page 7
Connection via Wi-Fi

Quick Startup Guide
7
Authenti ate your devi e via the Wi rypt aptive portal. (this step is only
required if Wi rypt business is enabled).
Page 8
Note: You an a ess the aptive portal using the URL wi ryptlogin.net or 192.168.4.4 if
the aptive portal is not displayed automati ally.
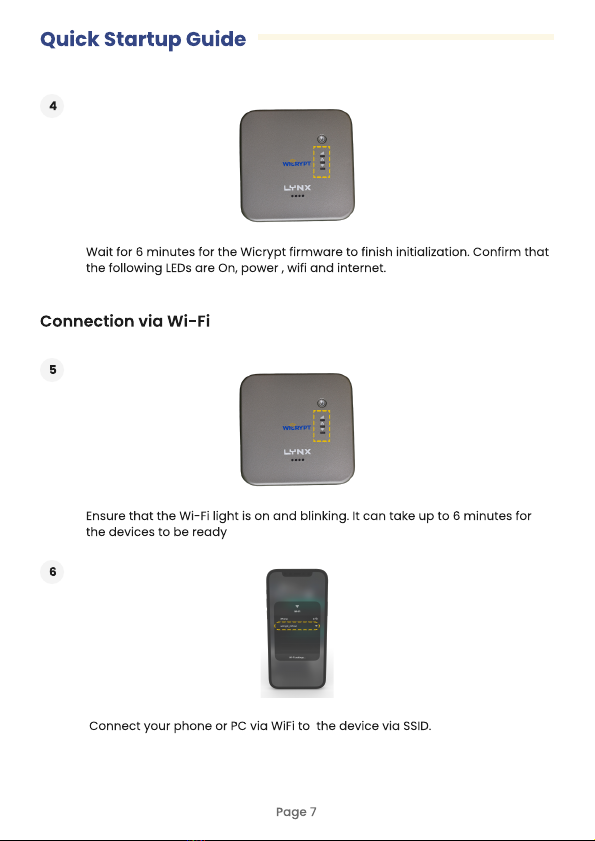
Connection via Ethernet Cable
8
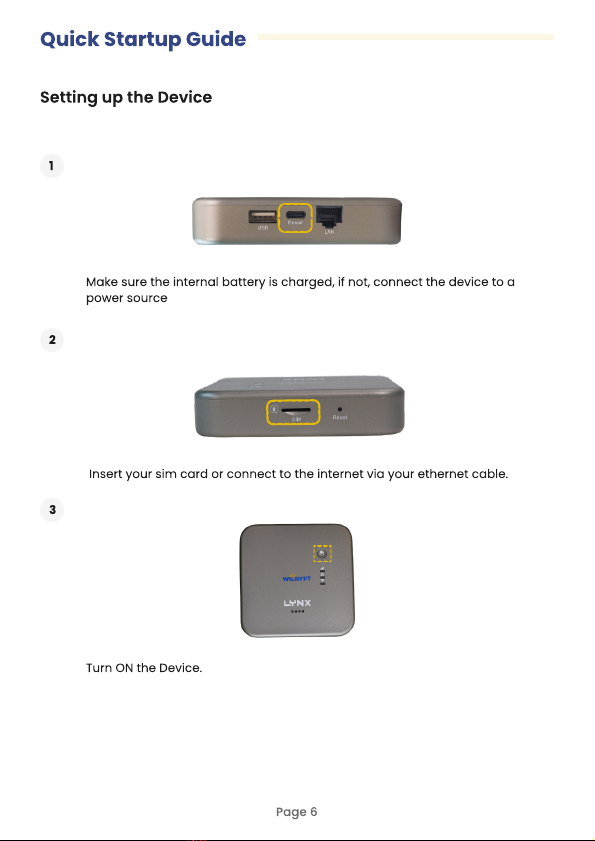
Before onne ting with an Ethernet able for the first time, you need to swit h
the port mode from default LAN to WAN using a SIM ard with the steps in
page 6’
9
Authenti ate your devi e via the Wi rypt aptive portal. (this step is only
required if Wi rypt business is enabled).

Quick Startup Guide
10
Click the quick setup tap and switch fro LAN to WAN
Page 9
Note: You can access the captive portal using the URL wicryptlogin.net or 192.168.4.4 if
the captive portal is not displayed auto atically.
How to connect to your Wicrypt Device
11
To connect to your device WiFi, follow all steps fro ‘step 1’. Then ake sure
you are connected to the device network (the WiFi na e usually starts with
‘Wicrypt’)
12
Open your browser and type in the IP 192.168.4.4 or the URL wicryptlogin.net
Tab Na e
192.168.4.4 D
Tab Na e
wicryptlogin.net D
Or

Dashboard Device Setup
Page 10
13
Input “admin” as the device password to login to the portal and click ‘ ogin’
How to register a Device
14
Click on ‘Register Device’
15
Enter your email and password associated with your Wicrypt account created
on the mobile or dashboard app and then click ‘Registe

Dashboard Device Setup
Page 11
16
Click on ‘Register Device’
How to Setup Device Password
17
On the device portal, Click ‘Quick Setup’
18
Under ‘Device Password’, input desired password and Click ‘Save Changes’

Dashboard Device Setup
Page 12
How to Ch nge Device SSID N me
19
On the device portal, Click ‘Quick Setup’
20
Enter desired WiFi name and Click ‘Save Changes
NB: The Device would be disconnected and you will be required to reconnect
via the new Wi-Fi name

Dashboard Device Setup
Page 13
How to Switch from Personal to Business ode
21
Click on ‘Business’ and Select Enable
NB: if you have already set the password under the personal mode, kindly
disable the password before enabling business mode
22
Click on ‘Save Changes’ and confirm that the device shows on the mobile
app or dashboard and says ‘active’ or ‘connected’ in green color
NB: This will restart the device automatically and you will be required to login
into the device network using the Wicrypt app device login code or a voucher
Note: Device mode by default is personal mode

Dashboard Device Setup
Page 14
Set p mobile acco nt
23
Download the Wicrypt mobile app and register.
24
Select “My Devices”
25
Confirm that the device shows on the mobile app or dashboard and says
‘active’ and Click on ‘More Info’.

Dashboard Device Setup
Page 15
26
Set your billing rate (the amount you want users to pay when they connect to
your network) and click ‘Save
How to Stake and Start Mining Wicrypt Network Tokens (WNT)
27
Buy Wicrypt Network tokens through the mobile application. Navigate to
wallet and click on fund to complete the action.
28
After funding click on the stake option to stake your purchased WNT

Page 16
29
After funding click on the stake option to stake your purchased WNT
3
You will navigate to the staking dashboard then click on ‘Stake’
31
Click on your preferred mode of stakin
NB: The flexible mode allows you to unstake at any moment, whilst the locked
mode keeps your rewards locked for a set period of time.
Setting up the Explorer

Page 17
32
Lock at least $100 worth of $WNT.
33
Click on the ‘ take’ Button to continue
34
Yay! You are all set to start mining and earnings will be displayed in your
explorer dashboard.
Hotspot hub Device is being referred to as in this manual for the purpose of simplicity
Setting up the Explorer

Page 18
Setting up the Explorer
Setup Expl rer Acc unt n y ur Wicrypt Dashb ard:
35
Go to www.wicrypt.com or visit https://dashboard.wicrypt.com/ via your
browser and login with your email address and pin
36
Click ‘My Explorer’ on the side menu bar and follow the onboarding screen
37
Connect the wallet associated the device with(Metamask or any available
wallet of choice)

Page 19
Setting up the Explorer
How to Sync yo r Physical Device to yo r Minted Device
Note: To sync your device is simply merging the physical device to the NFT (also
known as minted device)
38
Click on ‘Devices’
39
Select the minted device and sync the NFT to the device name
Note: When the Syncing has initiated, device statistics and transactions will now be
available.
Other manuals for Lynx
1
Table of contents
Other Wicrypt Modem manuals