WILDLIFE Song Meter Mini 2 User manual

Song Meter Mini 2 User Guide
January 3, 2024

Table of Contents
1. Song Meter Mini 2 Quickstart Guide ................................................................................... 3
2. Introduction ..................................................................................................................... 4
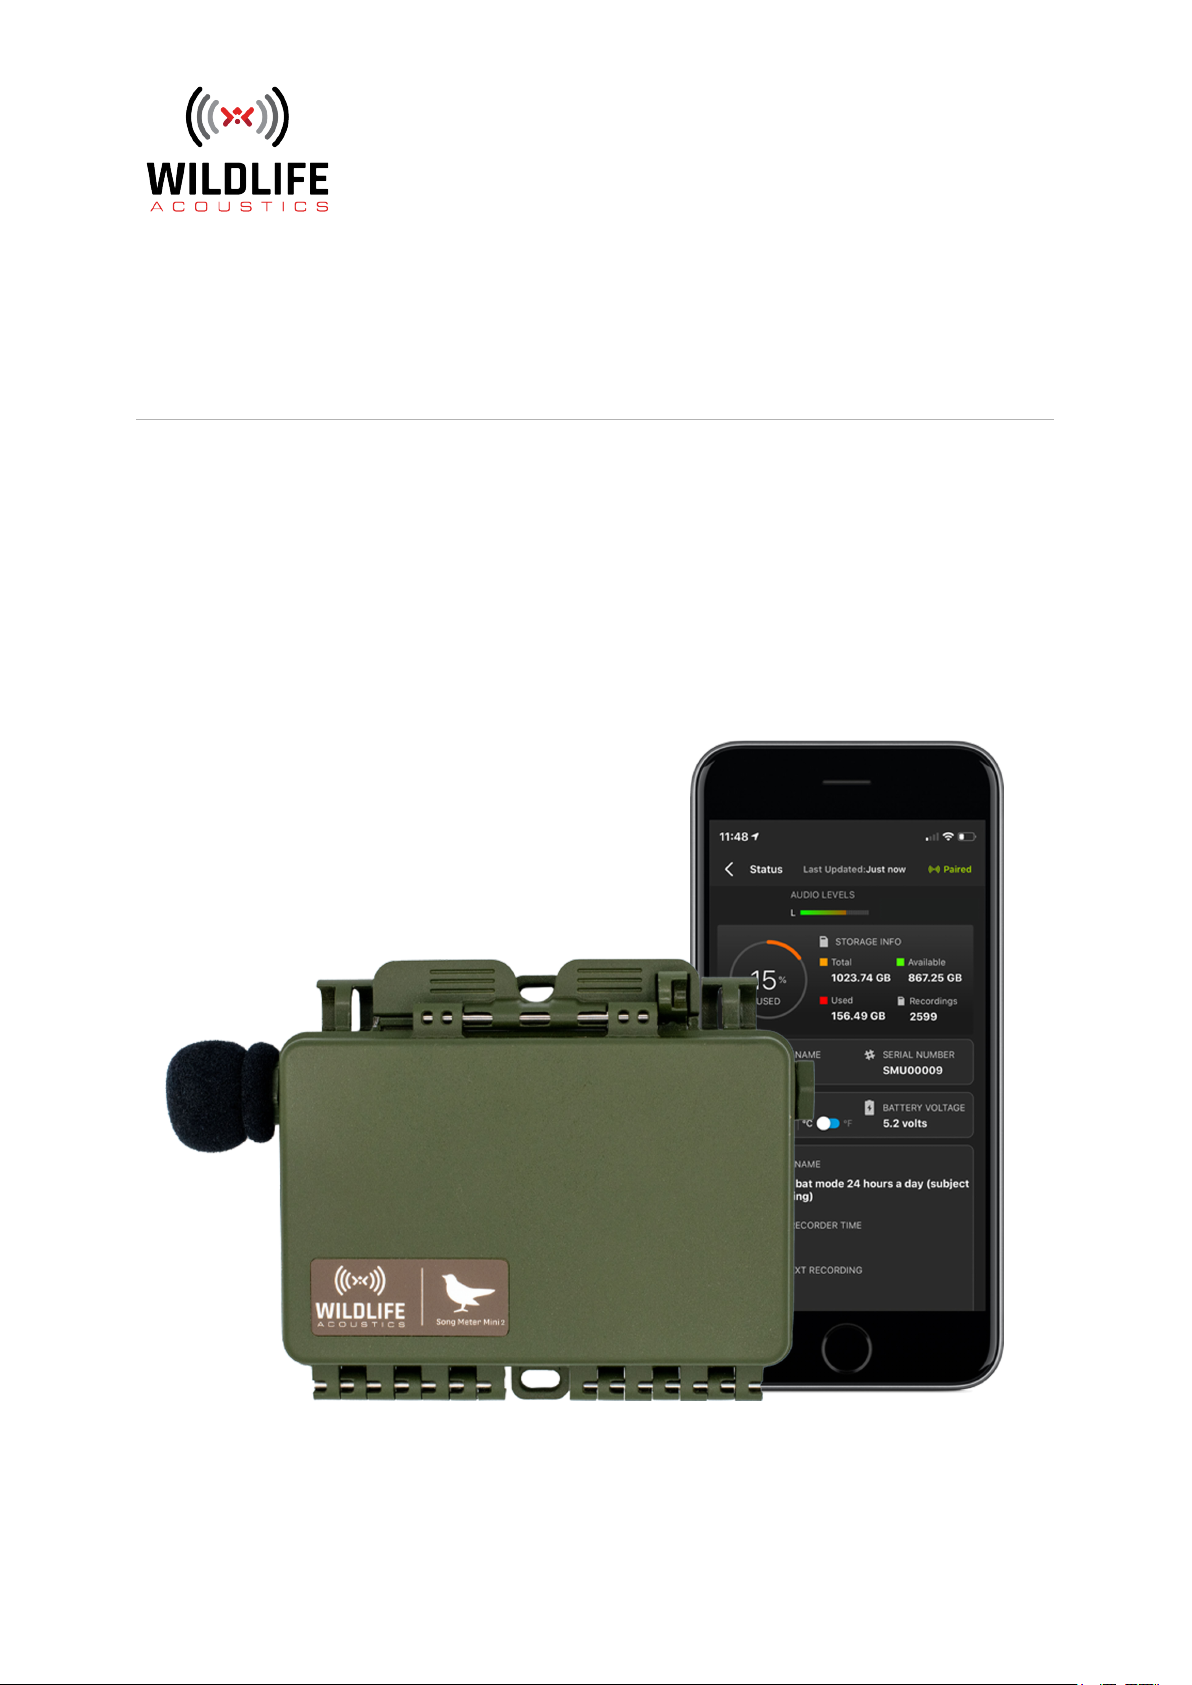
2.1. About the Song Meter Mini 2 ................................................................................... 4
2.2. Baery Configuration Versions .............................................................................. 4
2.3. Useful Resources .................................................................................................... 5
3. Song Meter Mini 2 Hardware ............................................................................................ 6
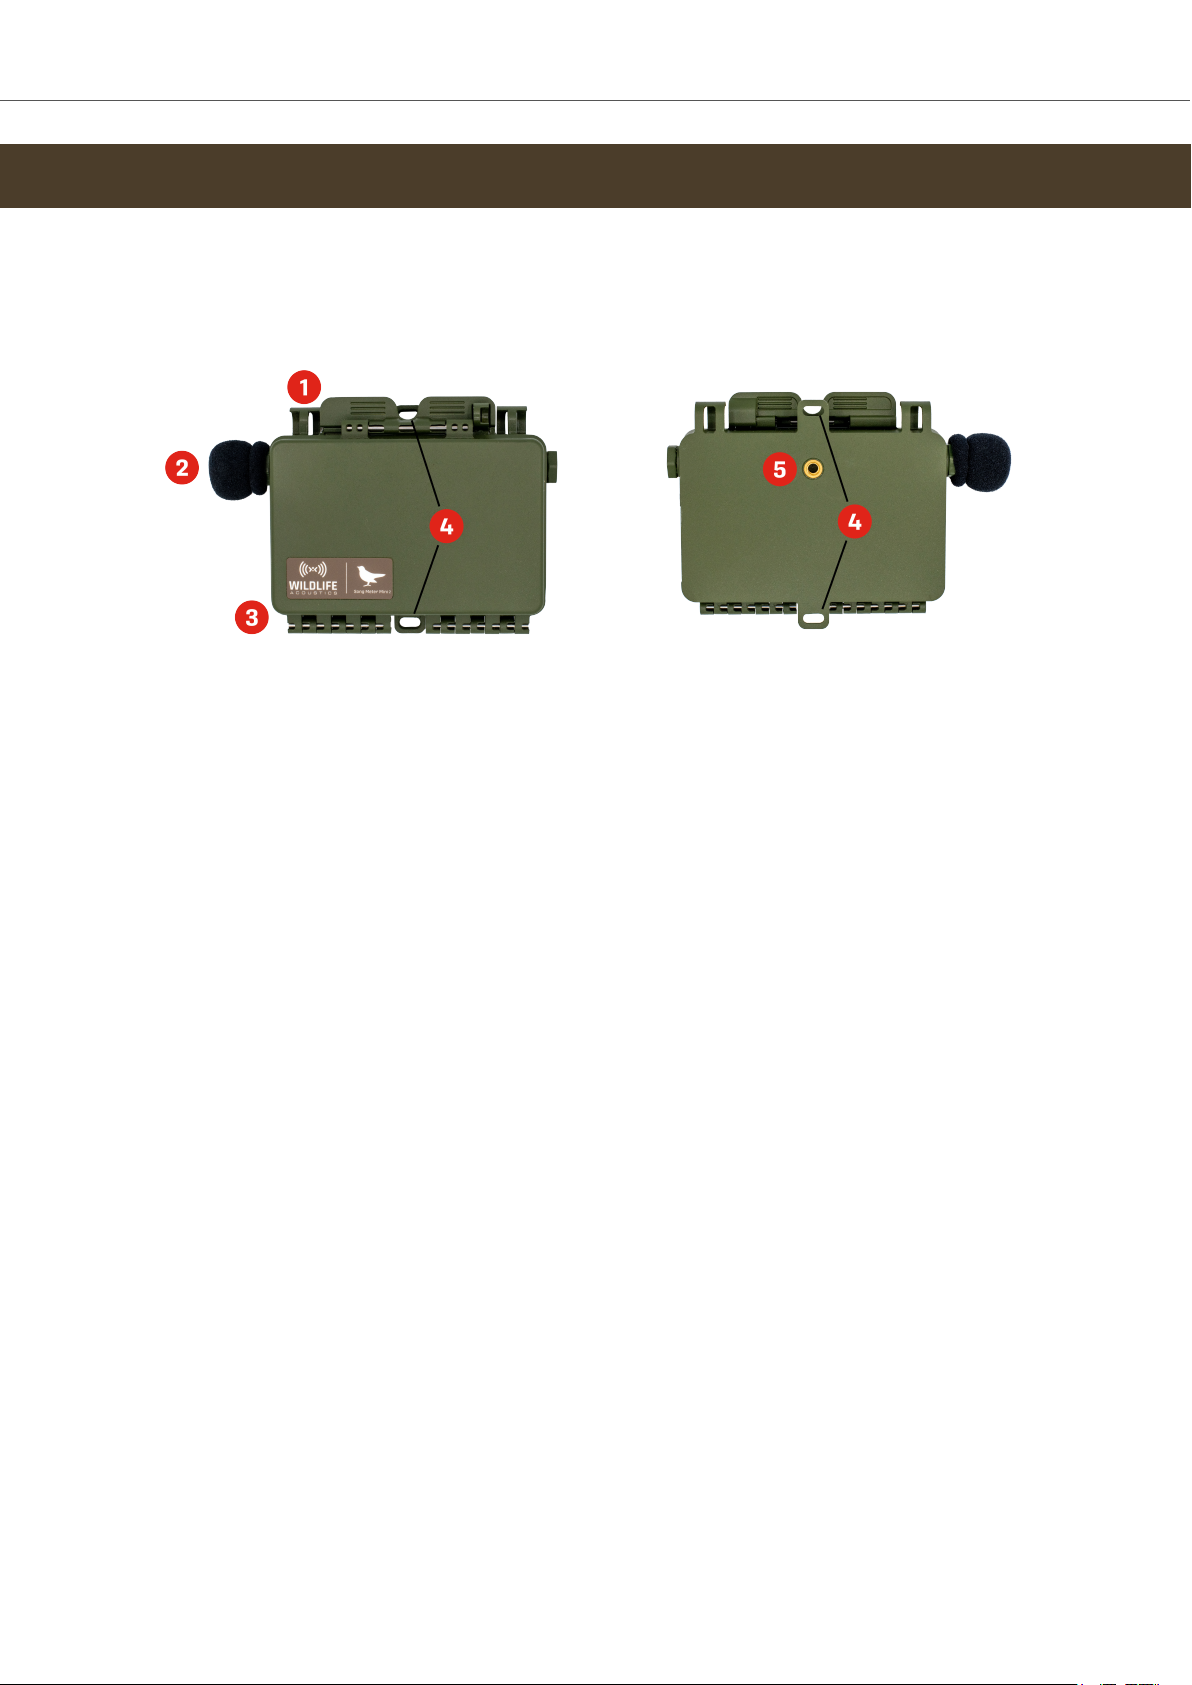
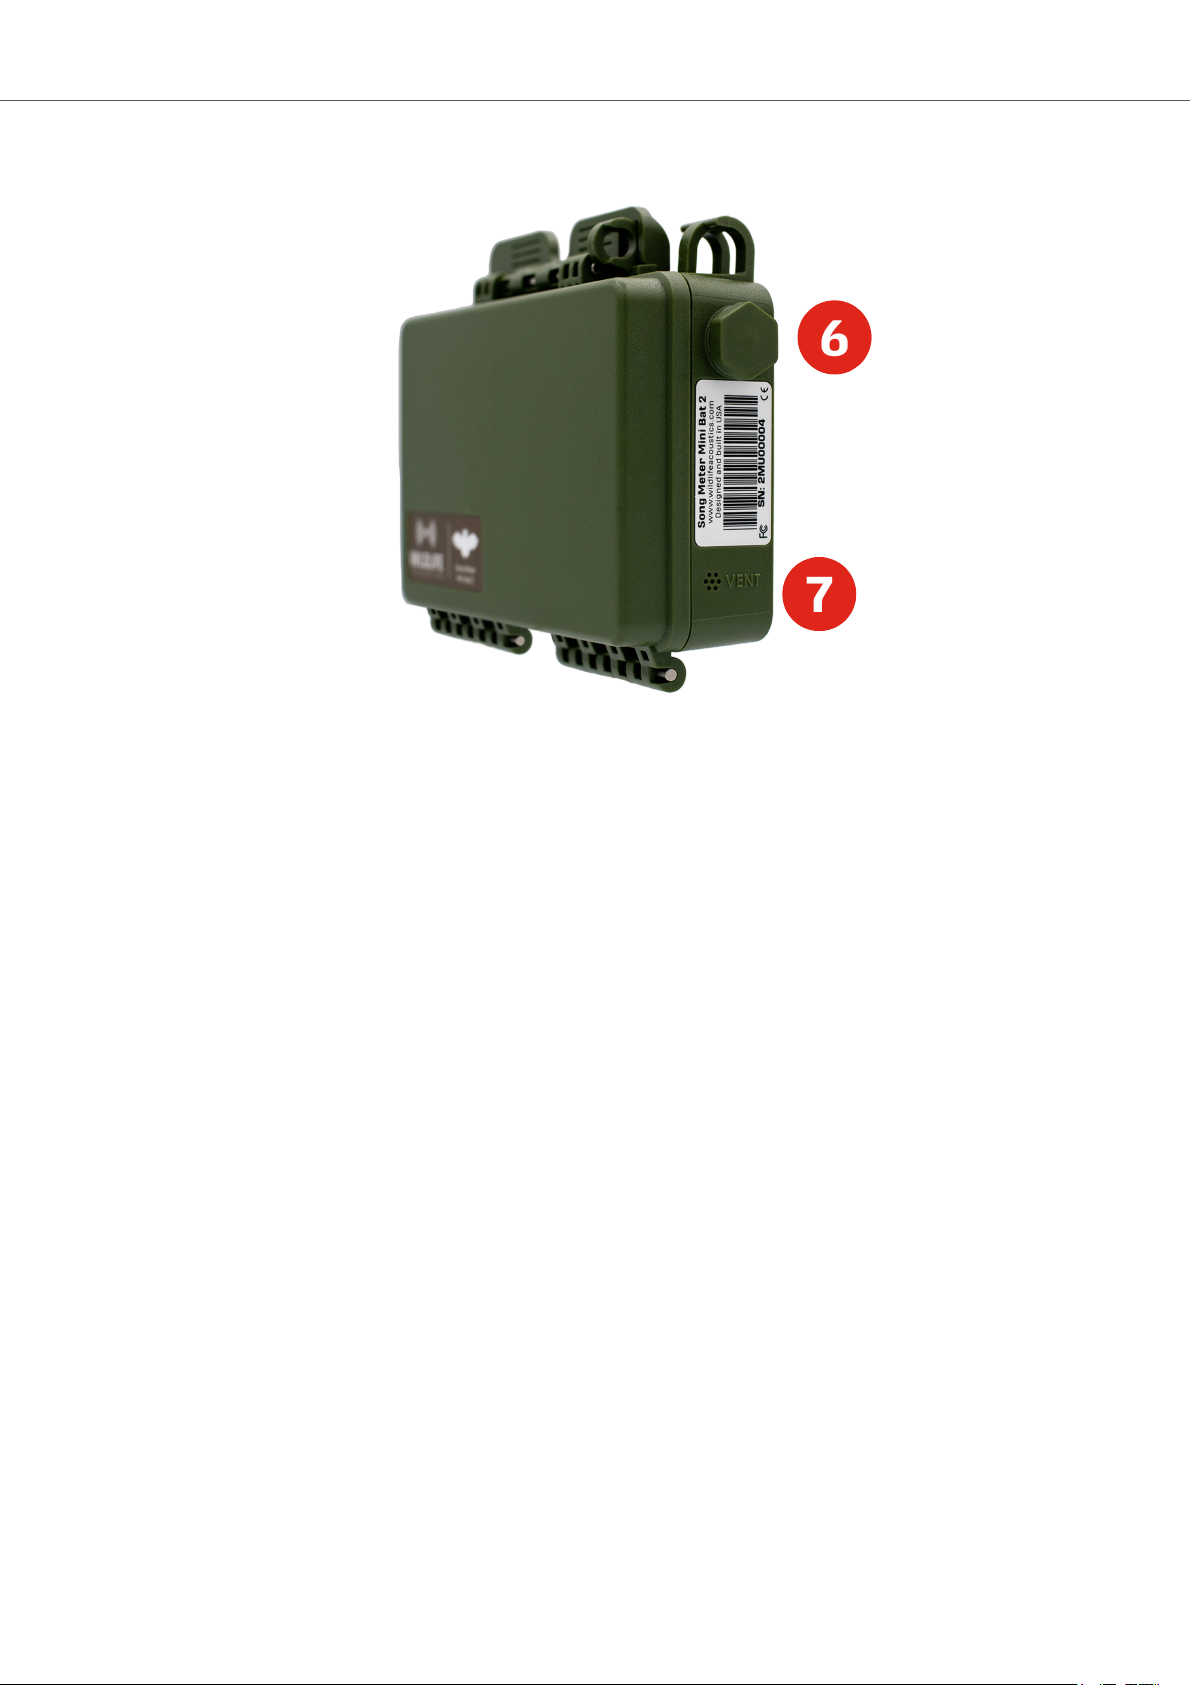
3.1. External Features ................................................................................................... 6
3.2. Internal Features ................................................................................................... 9
3.3. Installing a Second Microphone ............................................................................ 14
3.4. Upgrading the Recorder’s Firmware .................................................................... 15
3.5. Loading a Configuration File from an SD Card ....................................................... 16
3.6. Exporting Diagnostics and Configuration Files to an SD Card ................................ 17
4. Song Meter Configurator App .......................................................................................... 18
4.1. About the App ........................................................................................................ 18
4.2. Recorders Screen ................................................................................................. 19
4.3. Configuration Editor Screen ................................................................................ 26
4.4. Configuration Library Screen .............................................................................. 42
4.5. App Information Screen ...................................................................................... 45
4.6. Understanding Schedules .................................................................................... 47
5. Recording Files ............................................................................................................... 54
5.1. Transferring Recording Files to a Computer ......................................................... 54
5.2. WAV Files .............................................................................................................. 54
5.3. Metadata .............................................................................................................. 54
6. Analysis Software ........................................................................................................... 56
6.1. Kaleidoscope Pro .................................................................................................. 56
6.2. Third-Party Software ........................................................................................... 58
7. Maintanance ................................................................................................................... 59
7.1. Deployment Checklist ........................................................................................... 59
7.2. Waterproofing ..................................................................................................... 59
7.3. Mounting .............................................................................................................. 59
7.4. Security ............................................................................................................... 60
8. Troubleshooting .............................................................................................................. 61
8.1. No LED Activity ....................................................................................................... 61
8.2. SD Cards ............................................................................................................... 61
8.3. Song Meter Configurator App Tips ........................................................................ 61
8.4. No Status or Pairing .............................................................................................. 61
8.5. Recording/Deployment Problems ......................................................................... 61
8.6. Frequently Asked Questions .................................................................................. 61
8.7. Contacting Support ............................................................................................... 61
9. Specifications ................................................................................................................. 63
9.1. Physical Specifications .......................................................................................... 63
9.2. Audio and Microphones ........................................................................................ 63
9.3. Baeries .............................................................................................................. 64
9.4. SD Cards .............................................................................................................. 66
10. Warranty and Disclosures ............................................................................................. 67
Song Meter Mini 2 User Guide
2

1. SONG METER MINI 2 QUICKSTART GUIDE
Out of the box, the Song Meter Mini 2 can be quickly configured to run one of a few preset
schedules that cover common use cases.
1. Unlatch and open the lid on the Song Meter Mini 2.
2. Depending on the version, insert four or eight AA baeries or between one and six Lithium-
ion baeries.
For additional information regarding baeries, see Baeries (page 64).
3. Insert an SD Card into the recorder's SD Card slot.
For additional information regarding SD cards, see SD Cards (page 61).
4. Slide the ON/OFF switch to ON .
If the Bluetooth ® LED flashes red, this indicates that the recorder's internal clock is not set.
It will be set when pairing.
5. Install the Song Meter Configurator app from the Apple App Store or Google Play Store onto
your mobile device.
6. Check that Bluetooth is enabled on your mobile device.
7. Open the Song Meter Configurator app.
The Recorders screen will be displayed. The Song Meter Mini 2 will automatically be detected
by the app and will appear in the Recorders screen.
8. Press and hold the PAIR/STATUS buon on the Song Meter Mini 2 for three seconds.
The Bluetooth LED will blink green, indicating the recorder is ready to pair with the app.
In the Song Meter Configurator app Recorders screen, the Pair icon is displayed next to the
Song Meter Mini 2.
9. Tap the Pair icon.
The icon will turn green, indicating successful pairing.
A pop-up message will appear asking if you want to set the recorder's time zone to your
mobile device's time zone.
10. Tap Yes.
A pop-up message will appear asking if you want to set the recorder's location to your mobile
device's location.
11. Tap Yes.
12. Tap the Configure icon for the paired Song Meter Mini 2 in the Recorders screen.
The Configuration Editor screen is displayed.
13. Select a preset recording schedule from the dropdown menu and make any desired seings
changes.
The Song Meter Mini 2 is now ready to deploy and record using the schedule you selected.
NOTE
Any changes made in the Configuration Editor screen are immediately loaded
and saved into the Song Meter Mini 2. There is no need to manually save changes.
If the Song Meter Mini 2 is unpaired or powered o, it will remember any changes
made from within the Configuration Editor screen.
Song Meter Mini 2 User Guide
3

2. INTRODUCTION
2.1. ABOUT THE SONG METER MINI 2
The Wildlife Acoustics Song Meter Mini 2 acoustic recorder oers simple, yet innovative tools for
recording birds, frogs, and other vocal wildlife.
The Song Meter Mini 2 leverages the processing power of modern smartphones with the Song
Meter Configurator app. This companion app allows you to program the seings and schedules
of multiple recorders and to check essential status info like baery and card usage from within
Bluetooth range of the recorder.
2.2. BATTERY CONFIGURATION VERSIONS
The Song Meter Mini 2 can be purchased with one of two options for baery power:
• The Song Meter Mini 2 AA can run on either four or eight AA baeries.
Alkaline, NiMH, and Energizer® Ultimate Lithium™ baeries can be used. All installed baeries
must match. See Types of AA Baeries (page 64) for more information.
• The Song Meter Mini 2 Li-ion can run on between one and six 18650 Lithium-ion (Li-ion)
baeries.
NOTE
These are two separate versions of the Song Meter Mini 2. Neither version can be
converted or reconfigured to use the other type of baery.
The type of baery used significantly aects deployment time. As a general rule, 18650 Lithium-
ion baeries hold significantly more energy than AA baeries, and they are, by definition,
rechargeable. Using six, high-quality 18650 Lithium-ion baeries will enable the longest possible
deployments with the Song Meter Mini 2.
Other than the dierences in baery compatibility, the AA and Li-ion versions of the Song Meter
Mini 2 are identical in functionality.
IMPORTANT
Lithium-ion baeries are not to be confused with Energizer® Ultimate Lithium™
(Lithium/Iron Disulfide) baeries.
18650 Lithium-ion baeries are larger and put out a much higher voltage than
all types of AA baeries. 18650 Lithium-ion baeries therefore cannot be used
interchangeably with any AA baery.
For specifications regarding baeries and deployment times, see: Baeries (page 64).
Song Meter Mini 2 User Guide
4

2.3. USEFUL RESOURCES
2.3.1. Where to Find This User Guide
This user guide is published in multiple locations:
• View a PDF in your web browser or download to your device at www.wildlifeacoustics.com/
resources/user-guides.
• In the Song Meter Configurator app, open App Info > User Guide.
The Song Meter Configurator app can be installed from the Apple App Store and Google Play
Store.
NOTE
This user guide is updated regularly. If you use a saved copy of the PDF to view
this guide, consider checking our website for an updated version. Whenever you
update the Song Meter Configurator app, the latest version of the user guide is
installed with the app.
2.3.2. Video Tutorials
Visit www.wildlifeacoustics.com/resources/video-tutorials to view tutorial videos for the Song
Meter Mini 2.
2.3.3. Contacting Support
For technical questions, contact the Wildlife Acoustics support team:
•www.wildlifeacoustics.com/contact-us
• North America (toll-free): 1-888-733-0200
• Outside North America (toll charges may apply): +1 978-369-5225
2.3.4. Don’t Miss Out on Important Updates
We continually add features to the Song Meter Mini 2. Stay up to date with the newest features
and receive important technical support bulletins by signing up to our mailing list at:
hp://www.wildlifeacoustics.com/mailinglist
Song Meter Mini 2 User Guide
5

3. SONG METER MINI 2 HARDWARE
3.1. EXTERNAL FEATURES
The Song Meter Mini 2 recorder is designed for long-term, outdoor deployment. Made from
durable polycarbonate plastic, it is UV-resistant and weatherproof.
Notable external features of the Song Meter Mini 2:
1. Lockable Latch (page 7): Located along the top edge of the recorder.
2. Primary Microphone (page 7): Every Song Meter Mini 2 comes with a microphone installed
on the left edge of the recorder, covered by a foam windscreen. An optional second
microphone may be installed on the right edge.
3. Enclosure Hinge (page 7): The lid and body of the recorder are aached by a permanent
hinge along the lower edge.
4. Mounting Points (page 8) (shown in front and back views): At the centers of the upper and
lower edges are mounting holes, suitable for zip ties, bungie cords, compatible cable locks,
or screws.
5. Tripod Mount (page 8): A camera-style tripod threaded socket, located on the back face of
the Song Meter Mini 2 enclosure, provides additional mounting options.
Song Meter Mini 2 User Guide
6

External features, continued:
6. Optional Acoustic Microphone Port (page 8): A second acoustic microphone can be
installed on the right edge of the Song Meter Mini 2. When a second microphone is not
installed, the port is occupied by a plastic hex bolt.
7. Air Vent (page 8): Located on the lower-right edge of the recorder, this vent has an
internal membrane that allows air and moisture regulation without allowing water ingress.
3.1.1. Lockable Latch
A latch is used to close the lid. The latch is easily closed or opened by hand. The latch will snap
closed to provide a tight seal for the lid.
A cable lock can be threaded through the latch to mount and/or secure the Song Meter Mini 2.
Cable locks must be under 0.3 in (7.6 mm) in diameter.
3.1.2. Microphones
By default, the Song Meter Mini 2 utilizes a single built-in acoustic microphone. The microphone
has a replaceable windscreen.
An additional acoustic microphone can be purchased and added to the Song Meter Mini 2. This
enables you to record in stereo (two-channel) or to specify the left or right channel for mono
(one-channel) recording.
When two microphones are used, the built-in microphone is considered channel 0, left. The
optional second microphone is considered channel 1, right.
3.1.3. Hinged Lid
The lid for the Song Meter Mini 2 is permanently connected to the body of the recorder via a
hinge and lockable latch. When the lid is latched close, a silicone gasket creates a watertight seal
between the lid and body.
Song Meter Mini 2 User Guide
7

3.1.4. Mounting Points
Mounting points can be used to secure the recorder to a branch or post (for example). Typical
mounting methods include screws, bungie cords, cable locks, and zip ties.
3.1.5. Tripod Mount
On the rear of the Song Meter Mini 2 recorder is a standard-sized threaded socket. This socket is
typically used for camera tripod mounts or any other type of mount which uses the same thread
size.
Tripod mount thread size specification: 1/4ʺ20 pitch.
3.1.6. Optional Acoustic Microphone Port
The Song Meter Mini 2 has a port for an optional second microphone. This allows for recording
two channels of audio at once and provides redundancy in case one microphone is damaged.
The optional, second microphone can be installed on the right edge of the recorder. When the
optional microphone is not installed, a plastic bolt and rubber gasket are used to seal the port.
For instructions on installing the optional acoustic microphone, see Installing a Second
Microphone (page 14).
3.1.7. Air Vent
An air vent on the side of the enclosure prevents pressure build-up inside the recorder but does
not allow water ingress during normal use.
WARNING
The air vent opening must not be blocked or covered in any way.
A self-regenerating desiccant packet inside the enclosure oers further protection; it will absorb
or release moisture to regulate humidity inside the recorder.
Song Meter Mini 2 User Guide
8

3.2. INTERNAL FEATURES
1. ON/OFF Switch (page 10): Located in the lower left of the main internal panel.
2. PAIR/STATUS Buon (page 10): Located to the immediate right of the ON/OFF switch.
3. Status LEDs (page 10): Four green/red LEDs laid out horizontally to the right of the PAIR/
STATUS buon and to the left of the FUNCTION buon.
4. Baery Compartment (page 11): The baeries are installed in the lid of the enclosure,
opposite from the main control panel.
5. SD Card Slot (page 12): Located in the upper-right of the main internal panel. SD cards can
be inserted into the slot under a protective plastic panel.
Song Meter Mini 2 User Guide
9

6. Right Microphone Connector (page 12): Located to the immediate right of the SD Card slot.
7. FUNCTION Buon (page 13): Located to the right of the four Status LEDs.
3.2.1. ON/OFF Switch
•On (up position): Baery power is enabled. Schedule is started.
•O (down position): Baery power is disabled. Schedule is stopped.
When the Song Meter Mini 2 recorder is first powered on, the Status LEDs show Bluetooth,
Recording, and SD Card status. If the recorder is left alone for one minute, the LEDs will turn o.
NOTE
When the Song Meter Mini 2 recorder is switched o, it goes through a routine to
end and save any current recording. This can take a few seconds.
3.2.2. PAIR/STATUS Buon
This is a dual-function buon.
The Song Meter Mini 2 Status LEDs turn o after one minute without user input. Tap the PAIR/
STATUS buon once to reactivate the Status LEDs.
Press the PAIR/STATUS buon once to check the Status LEDs.
Press and hold the PAIR/STATUS buon for three seconds to enable pairing with the Song Meter
Configurator app. You must the tap the Pair icon in the app to complete the pairing.
To unpair, press and hold the PAIR/STATUS buon on the Song Meter Mini 2 recorder for three
seconds, or tap the Unpair icon in the Song Meter Configurator app.
3.2.3. Status LEDs
The three Status LEDs on the recorder provide Bluetooth, Recording, and SD Card information.
The Status LEDs remain active while the recorder is paired with the Song Meter Configurator
app.
The table of Status LED definitions, below, is also found inside the recorder’s lid for reference.
Table 1. Status LED Key
LED Label LED Activity Status Meaning
Bluetooth: O Not paired
Green Blinking Pairing
Green Solid Paired
Red Blinking Clock needs to be set
Red Solid Pair failed
Recording: Green Blinking Recording
Green Solid Waiting for next recording period
Red Solid Cannot record
SD Card: O No card detected
Green Blinking Card is active: do not eject
Green Solid No activity: safe to eject
Song Meter Mini 2 User Guide
10

LED Label LED Activity Status Meaning
Red Blinking SD Card full
Red Solid SD Card issue
3.2.4. Baery Compartment
The lid of the Song Meter Mini 2 holds the recorder's baeries. Depending on the version of the
recorder, it holds either AA baeries or 18650 Lithium-ion baeries.
AA Baery Compartment
The AA baery compartment holds two plastic baery trays. Each tray holds four AA baeries,
and you can power the recorder with four or eight AA baeries in total. If you use only four AA
baeries, all four must be installed in the same tray.
Each tray is equipped with a ribbon. When installing AA baeries, position the ribbon underneath
the baeries. Pulling on the ribbon will then let you easily remove the baeries.
IMPORTANT
When inserting baeries, start near the aached end of each ribbon at the outer
side of each tray and work towards the free end. This will ensure the ribbon has
enough slack to make room for each baery. Without enough slack, the ribbon
may push baeries out of the tray.
If only using four AA baeries, make sure the ribbon aached to the empty
baery tray does not interfere with the seal between the lid and base of the
recorder enclosure.
For information on the dierent types of AA baeries, including Energizer® Ultimate Lithium™,
see Types of AA Baeries (page 64).
NOTE
Best practices for AA baeries:
• Do not mix multiple types of baeries (e.g. combining alkaline with NiMH).
This applies even when using eight AA baeries. All eight baeries must be of
the same type.
Ideally, all baeries should be of the same brand and model. Mixing baeries
with dierent characteristics can produce unpredictable results.
• Do not mixed new or freshly charged baeries with used or uncharged
baeries. A single dead baery will prevent the entire set from functioning.
• Ensure baeries are oriented with the correct positive/negative polarity.
• Remove baeries before storage.
Lithium-ion Baery Compartment
The Lithium-ion baery holder lid holds between one and six Lithium-ion 18650 baeries. You can
install any number of 18650 baeries in any of the slots, and the recorder will work as intended,
Song Meter Mini 2 User Guide
11

but using more baeries provides longer run time. See Lithium-Ion Baery Requirements (page
65) for more details on choosing appropriate baeries.
NOTE
Best practices for lithium-ion baeries:
• Do not mix freshly charged baeries with drained baeries.
• Unlike many rechargeable AA baeries, lithium-ion baeries are shipped with
no stored charge. You must charge them before initial use.
• Ensure baeries are oriented with the correct positive/negative polarity.
• Remove baeries before storage.
WARNING
There are strict regulations on shipping and traveling with lithium-ion baeries
in many parts of the world. Consult applicable laws before air travel or when
planning to ship lithium-ion baeries.
3.2.5. SD Card Slot
The Song Meter Mini 2 recorder saves recording files and a summary log to an SD card installed in
the memory card slot.
To insert an SD card, slide it into the slot until it clicks into place. To remove, gently press the card
further into the slot until it clicks again, and let the internal spring mechanism eject the card.
• Only remove the SD card after seing the power switch to OFF and waiting until all Status LEDs
have turned o.
• Use the Song Meter Configurator app to check recording space available on the SD card.
NOTE
Wildlife Acoustics recommends the SanDisk® brand of SD cards for their superior
performance.
NOTE
Be sure the card’s write protection switch is “o.” The Song Meter Mini 2
recorder will not record to a write-protected card.
3.2.6. Right Microphone Connector
This is the connection point for the optional acoustic microphone.
Song Meter Mini 2 User Guide
12

3.2.7. Function Buon and Function LEDs
The physical controls on the Song Meter Mini 2 allow you to perform four basic functions without
the Song Meter Configurator app.
Available Functions
There are four Function LEDs:
•Diags : This runs an internal diagnostic check. Two files are then wrien to the SD card:
• A diagnostics file with a file name matching the format:
PREFIX_YYYYMMDD_HHMMSS.minidiags. This may be used by Wildlife Acoustics Support to
diagnose technical issues.
• A configuration file with the file name format PREFIX.miniconfig. This file contains a copy
of the recorder's seings. It can be used to load the same configuration into another Song
Meter Mini 2.
•Load : This loads a configuration file (ending in .miniconfig) and/or firmware file (ending
in .smm), from the SD card to the recorder. If there are both a configuration file and firmware
file on the card, the configuration file will be loaded first, and then the firmware update will be
loaded.
For detailed instructions on installing a firmware file using the recorder's physical buons, see
Loading a Configuration File from an SD Card (page 16).
This function can also be performed using the app. See Load Firmware or a Configuration from
Card (page 31).
NOTE
Once a configuration file or firmware file is successfully loaded from an SD
card, that information is stored on the Song Meter Mini 2's internal memory,
and the file is no longer needed on the SD card.
•Defaults : This restores the default states of all of the recorder's seings except current date
and time.
This function can also be performed using the app. See Restore Recorder To Factory Defaults
(page 31).
Default seings values are shown in Acoustic Seings Screen (page 31).
•Format : This reformats the SD card, reseing it to a "blank slate" and deleting any existing files
from the card.
This function can also be performed using the app. See Format SD Card (page 30).
IMPORTANT
It is important to reformat the SD card prior to each deployment. Reformaing
the card goes beyond just deleting existing data. It resets the structure of the
card and reduces the likelihood of data corruption.
Reformaing can be done using the Song Meter Mini 2 or using the SD Card
Association's ocial, free formaing utility for Windows and Mac.
Performing a Function
To select and perform a function,
1. Tap the FUNCTION buon multiple times.
A green LED will cycle through the four positions to highlight the selected function.
2. When the desired function is highlighted, press and hold the FUNCTION buon for three
seconds.
Song Meter Mini 2 User Guide
13

3. When the highlighted LED starts flashing green, let go of the FUNCTION buon.
If all four LEDs flash green three times, the function ran successfully.
If all four LEDs flash red six times, the function was unsuccessful.
3.3. INSTALLING A SECOND MICROPHONE
The Song Meter Mini 2 has a port available for a second, optional microphone, which you can
install yourself. To do so, you'll need to remove the plastic hex bolt that occupies the right-hand
microphone port and install the microphone according to the steps below.
WARNING
The optional acoustic microphone is designed for a one-time installation. It is not
designed to be repeatedly installed and uninstalled. If the microphone is removed
and re-installed multiple times, that could cause the connection wire to break,
and the microphone will fail. Once the microphone is installed, it should only be
removed if it needs to be replaced.
NOTE
You can view a video demonstration of this installation process on our Video
Tutorials page.
1. Open the lid and place the Song Meter Mini 2 on a flat surface.
In the top right corner of the recorder is a removable, plastic bolt threaded through a plastic
nut.
2. Use a 3/4" or adjustable hex wrench to gently loosen the bolt from the nut, then use your
hand to completely unscrew the bolt.
If the recorder is laid flat on its back, the internal hex nut will stay in place. The nut is
necessary to hold the new microphone in place.
Song Meter Mini 2 User Guide
14

3. Thread the wire connector for the second microphone through the hole. Do not connect the
wire to the circuit board yet.
4. Hand-turn the microphone clockwise to screw it into the internal nut. Make sure the
microphone wires are not caught on anything as you turn the microphone.
Make sure the threads of the microphone align with the threads of the hex nut.
5. When the microphone is finger-tight, tighten the microphone lightly with pliers or a wrench.
Do not over-tighten.
6. Connect the plug at the end of the microphone wires to the jack labeled "Right Mic."
The plug has a key on one face that must align with a slot on the left side of the socket.
7. Route the wires to the right of the SD card to avoid physical interference or electrical noise
from the SD card.
When the microphone is correctly installed, the recorder's Status screen will display RIGHT
MICROPHONE: Aached. For info on how to view the recorder's status screen via the Song Meter
Configurator app, see Status Screen (page 20).
IMPORTANT
The front face of the SD card holder is used to keep the baeries in place when
the lid is closed. The microphone wire must not be loose or in front of the SD card
holder. The wire must be tucked into the space to the right of the SD card holder
so that it does not interfere with the baeries as the lid is closed.
3.4. UPGRADING THE RECORDER’S FIRMWARE
1. Download the current version firmware file from our Downloads page.
The firmware file name is formaed as sys-X.Y.smm.
Song Meter Mini 2 User Guide
15

NOTE
You must have a user account on wildlifeacoustics.com to access our
Downloads page. Only an email address is required to create a user account.
2. Connect an SD card to your computer.
If your computer does not have a built-in SD card slot, use a USB SD card reader or similar
accessory.
3. Copy the sys-X.Y.smm file to the top level of the SD card.
"Top level" means the firmware file must not be inside a folder on the card.
There must be only one firmware file on the card.
4. Eject the card from your computer's operating system before physically removing the card.
5. Insert the SD card into the Song Meter Mini 2's SD card slot.
6. Turn on the recorder.
7. Press the FUNCTION buon twice to highlight the Load function LED.
8. Press and hold the FUNCTION buon, then let go when the Load LED begins blinking.
When the process is complete, all four LEDs will blink green three time, and the recorder will
reboot with the new firmware.
NOTE
If there is some sort of failure and the firmware update operation is not
successful, all four LEDs will blink red six times. If this happens, reformat the
SD card, then repeat the above steps. See Format SD Card (page 30).
3.5. LOADING A CONFIGURATION FILE FROM AN SD CARD
A configuration file can be created in the Song Meter Configurator app or exported from another
Song Meter Mini 2. The Configurator app can share the configuration file (see How To Share A
Saved Configuration File (page 44)). A configuration file can be copied from a computer to an SD
memory card. The configuration file on the SD card can then be loaded into another Song Meter
Mini 2.
.MINICONFIG FILE COMPATIBILITY
The first generation and second generation of a given recorder model can use
the same configuration files. For example, a .miniconfig exported from a Song
Meter Mini 1 can be imported into a Song Meter Mini 2.
.miniconfig files cannot be shared between recorders of dierent models. For
example, a .miniconfig file exported from a Song Meter Mini Bat 2 cannot be
imported into a Song Meter Mini 2.
1. Connect an SD card to your computer.
If your computer does not have a built-in SD card slot, use a USB SD card reader or similar
accessory.
Song Meter Mini 2 User Guide
16

2. Copy the .miniconfig to the top-level directory of the SD card.
"Top-level directory" means the .miniconfig file must not be inside a folder on the SD card.
There must be only one .miniconfig file on the card.
3. Eject the card from your computer's operating system before physically removing the card.
4. Turn on the recorder.
5. Press the FUNCTION buon twice to highlight the Load function LED.
6. Press and hold the FUNCTION buon, then let go when the Load LED begins blinking.
When the process is complete, all four LEDs will blink green three times to indicate the recorder
has loaded the .miniconfig file.
If there is some sort of failure and the configuration load operation is not successful, all four LEDs
will blink red six times. If this happens, check that the .miniconfig file was exported from a
recorder of the same model and that it is saved to the top level of the SD card.
3.6. EXPORTING DIAGNOSTICS AND CONFIGURATION FILES TO
AN SD CARD
It is possible to save both a .minidiags file and a .miniconfig file to the SD card using the
buons on the Song Meter Mini 2's main panel. The .minidiags file is a diagnostic file that
Wildlife Acoustics Support can use to identify some kinds of hardware issues. The .miniconfig
file contains a full copy of the recorder's seings. You can import these seings into another
recorder of the same model (see Loading a Configuration File from an SD Card (page 16)).
1. Tap the FUNCTION buon once.
The Diags LED will be highlighted green, and the three other LEDs will be unlit.
2. Press and hold the FUNCTION buon for three seconds.
3. When the Diags LED starts flashing green, let go of the FUNCTION buon.
All four LEDs will flash green three times to indicate that the .minidiags and .miniconfig files
have been saved to the SD card.
If all four LEDs flash red six times, it means an error prevented the recorder from saving these
two files. If this happens, check that the SD card has available space and displays no error
messages on the recorder's Status screen (see Status Screen (page 20)).
NOTE
Diagnostics files can be generated and emailed to Wildlife Acoustics Support
from within the Song Meter Configurator app. See Email Diagnostics to Wildlife
Acoustics (page 31).
Configurations Files can be saved from a paired recorder to the app's
Configuration library, then imported to other recorders without using an
SD card. See Configuration Editor Screen (page 26) and How to Import a
Configuration File (page 44).
Song Meter Mini 2 User Guide
17

4. SONG METER CONFIGURATOR APP
4.1. ABOUT THE APP
The Song Meter Configurator app provides a simple interface for configuring the schedule and
seings of the Song Meter Mini 2. It runs on phones and tablets running iOS and Android, and,
once it's installed, it does not require an internet connection.
IMPORTANT
While you can configure most seings without using the app by loading
a .miniconfig file from an SD card, you must use the app to set the recorder's
clock. The recorder will not run its recording schedule if its clock has not been
set.
The Song Meter Configurator app communicates with the recorder via Bluetooth connection. By
default, the recorder broadcasts periodic status beacons that can be received by the Song Meter
Configurator app running on nearby devices, even when the app is not paired with the recorder.
The app can also be paired with one recorder at a time for two-way communication. When paired
to a recorder, the Song Meter Configurator app can be used to program the recorder's seings
in real time. You can also transfer configuration files between the paired recorder and the app's
Configuration Library.
4.1.1. Bluetooth Functionality
The Song Meter Mini 2 recorder uses the Bluetooth Low Energy protocol to communicate with
the Song Meter Configurator app.
NOTE
The process for pairing the Song Meter Mini 2 with the Song Meter Configurator
app is not the same as the process you might use for pairing common Bluetooth
accessories, like headphones. See Pair the Recorder with the Song Meter
Configurator app (page 24) for pairing instructions.
By default, when the Song Meter Mini 2 recorder is powered on, it generates a Bluetooth status
beacon once every few seconds. If the recorder is within Bluetooth range of the mobile device,
the Song Meter Configurator app will automatically detect the Bluetooth status beacon and the
recorder will be detected and displayed in the Recorders screen of the app.
It is possible to disable the recorder’s Bluetooth status beacons from the Configuration Editor
screen. If Bluetooth beacons are disabled, the recorder will not be detected by the app unless the
PAIR/STATUS buon on the recorder is pressed and held for three seconds.
Song Meter Mini 2 User Guide
18

NOTE
The usable range of a Bluetooth signal varies from phone to phone and tablet to
tablet, but it is usually under 30 feet, assuming a clear line of sight between the
Song Meter Mini 2 and the phone or tablet.
4.1.2. Supported Operating Systems
The Song Meter Configurator app is available for Android and iOS devices.
For Android devices, download and install the Android version from Google Play. The
Configurator app requires Android version 8.0 or later in order to run.
For iOS devices, download and install the iOS version from the Apple App Store. The Configurator
app requires iOS version ˝12.0 or later.
NOTE
The Song Meter Configurator app cannot be installed if your device is running an
older operating system than the minimum supported version.
4.1.3. Supported Languages
The Song Meter Configurator app is available in the following languages:
• English
• French
• Spanish
• Portuguese
• Chinese
• German
• Japanese
The display language of the Song Meter Configurator app will follow the Android or iOS system
language seing. To manually set the language of the app, see App Information Screen (page 45).
4.2. RECORDERS SCREEN
Song Meter Mini 2 User Guide
19

The Recorders screen is the first screen displayed when the Song Meter Configurator app is
launched. The Recorders screen can be accessed from anywhere in the app by tapping the
Recorders icon in the navigation bar at the boom of the screen.
The Recorders screen lists each recorder within Bluetooth range and detected by the Song
Meter Configurator app. Previously detected recorders that are out of Bluetooth range or
powered o will remain in the list until removed. The Status page for each recorder will show
information from the last beacon the app received from that recorder.
If a recorder is within range and powered on, but it does not show in the Recorders screen
list, check whether the Send Bluetooth Beacons? utility is enabled (see Send Bluetooth Beacons?
(page 36)).
4.2.1. Status Screen
The Status screen for a detected recorder is accessed from the Recorders screen by tapping on
the Status icon.
When a Song Meter Mini 2 is within Bluetooth range and either broadcasting Bluetooth beacons
or paired with the app, its status will update in the app once every few seconds. The last-received
status information for a recorder is retained by the app when the app is closed, the mobile device
or recorder are turned o, or if the recorder moves out of Bluetooth range. Tap the Status icon
in line with a recorder to see the most recently received status information for that recorder.
While a Song Meter Mini 2 is paired with the Song Meter Configurator app on one mobile device, it
will not broadcast Bluetooth beacons for other mobile devices to receive. Only the paired mobile
device will receive real-time status updates.
Song Meter Mini 2 User Guide
20
Table of contents
Other WILDLIFE Measuring Instrument manuals
Popular Measuring Instrument manuals by other brands

Würth
Würth BEEPER PLUS manual

Bresser
Bresser ClimaTemp 7000010CM3000 instruction manual

Hanna Instruments
Hanna Instruments pH 210 instruction manual

Emerson
Emerson Energy Meter Installation and operation manual

Shodex
Shodex Asahipak ODP-50 series manual

sparklike
sparklike Gasglass handheld instruction manual