Wilks USA RX545i User manual

RX545i
Electric Pressure Washer
OPERATION MANUAL
Read this manual carefully before use and keep it for future reference. Failure to do so may
result in injury, property damage and may void the warranty.
Products covered by this manual may vary in appearance, assembly, inclusions,
specications, description or packaging.
V 3.1
English Français Deutsch Italiano Español

RX545i
© Wilks-USA
2© Wilks-USA
English
02 - Contents
03 - Quick start guide
04 - Connecting Washer Parts
05 - Accessory Connections
07 - Safety Symbols and Information
09 - Using your Washer
Angle to the Cleaning Surface
Distance from Cleaning Surface
Avoid Damaging Surfaces
Turbo Nozzle
10 - Using your Washer
Detergent
Operation
Looking After your Product
11 - Troubleshooting & Technical Data
12 - Disposal Regulations
13 - CE Certication
14 - Français
26 - Deutsch
39 - Italiano
52 - Español
Contents Languages

RX545i
© Wilks-USA 3
© Wilks-USA
English
Quick start guide
The following steps describe the quickest method to get your pressure washer up and
running. However, it is essential you fully read this manual to ensure you are familiar with
the general safety features, precautions and functions necessary to operate the product.
Failure to do so may result in injury and damage to your washer or personal items.
Overview
01. Pressure Cleaner
02. On/Off Switch
03. Wheels
04. Water Outlet
05. Water Inlet
06. Gun
07. Hose Reel with Hose
08. Hose Reel Handle
01
03
04
05
06
07
08
02

RX545i
© Wilks-USA
4© Wilks-USA
English
Connecting washer parts
The washer has a side mounted holster which
holds the gun / lance neatly in place for storage.
This is assembled by sliding the top clasp (g. 2)
onto the mounting point (g. 1)
A lower retainer holds the end of the gun / lance
securely. This is attached by sliding the lower
cup (g. 4) onto the mounting point at the base
of the washer (g. 3)
Fig.1 Fig.2
Fig.3 Fig.4
Fig.5 Fig.6
AA
B
B
The front lower handle provides a convenient
point to grip when transporting your washer and
also serves as additional stability when upright.
To attach, insert the handle ‘A’ into the sockets
‘B’ at the lower front of the machine. Fix in place
on the under-side with the two screws provided.
Tips for getting started
Automatic On / Off:
The motor on this pressure washer does not run
continuously. It only runs when the trigger of the
spray gun is squeezed.
Bleeding the gun:
It is very important to bleed the gun before and
after using the pressure washer.
Squeeze the trigger to allow any air that is
trapped inside of the unit and hose to escape.
Continue to squeeze the trigger until a steady
stream of water comes from the nozzle. (This
process may take up to 2 minutes).
This will prevent freezing in cold temperatures
and damage to the machine and the gun.

RX545i
© Wilks-USA 5
© Wilks-USA
English
Accessory connections
The RX545i has a variety of cleaning
attachments designed for specic uses. The
following describes the connection and intended
use of the supplied accessories.
The Patio Cleaner attaches with the extension
into the gun. The patio cleaner is used to clean
at surfaces specically, but not limited to,
patios. The design ensures a contained area of
cleaning with very little over-spray. The rotating
jet nozzles inside should not be touched whilst
connected under any circumstances.
The Rotary Brush screws directly into the gun.
The brush will rotate using the ow of water to
allow for a more thorough clean.
The Straight Brush screws directly into the gun.
It operates similar to the rotary brush but with no
moving parts. This gives a more delicate clean.
The Turbo Wand screws directly into the gun.
It creates a powerful cone of water which has
tremendous cleaning power. The combination of
high pressure, spun by the ceramic bearing will
produce a very high pressure / cleaning area
combination.
The Curved Gutter Lance screws directly into
the gun. It provides a convenient curve to the jet
spray using the supplied nozzles to clean those
hard to reach places.

RX545i
© Wilks-USA
6© Wilks-USA
English
01. A clogged or partially clogged nozzle can
significantly reduce water flow and cause
the unit to pulsate while spraying. To clean
the nozzle:
02. Turn off and unplug the unit from the electric
mains.
03. Turn off the water supply and relieve any
pressure trapped in the hose by squeezing
gun trigger 2-3 times.
04. Separate lance from gun.
05. Rotate the nozzle to the narrow high impact
stream setting. This opens up the fan blades.
06. Using the included tip cleaner, or an unfolded
paper clip, insert the wire into the nozzle hole
and move back and forth until any debris is
dislodged.
07. Remove additional debris by back-flushing
water through the nozzle. To do this, place
end of a garden hose (with water running) to
end of nozzle for 30-60 seconds.
Nozzle Maintenance
The supplied nozzles attach to the lance that
screws into the gun. These provide a variety of
pressures and patterns designed for different
cleaning applications.
Nozzles
Red 0°Nozzle: This nozzle delivers a pinpoint
stream of pressurized water and is extremely
powerful. It should only be directed at surfaces
that can withstand high pressure such as metal
or concrete. (Fig. 7)
Yellow 15° Nozzle: This nozzle delivers a
powerful 15-degree spray pattern for intense
cleaning of small areas. This nozzle should
only be used on areas and materials that can
withstand very high pressure. (Fig. 8)
Green 25° Nozzle: This nozzle delivers a 25
degree spray pattern for intense cleaning of
larger areas. This nozzle should only be used
on areas that can withstand very high pressure.
(Fig. 9)
White 40° Nozzle: This nozzle delivers a 40-degree
spray pattern and a less powerful stream of water.
This nozzle can cover a wide area and can be used
for most general cleaning jobs. (Fig. 10)
Black / Blue Detergent Nozzle: This nozzle is
used to apply detergent and cleaning solutions.
This nozzle produces the weakest pressure of the
three nozzles. Don’t forget that you can adjust the
detergent ow using the dial on the front of the
machine. (Fig. 11)
To avoid damaging your cleaning surface, always
start with the lowest pressure nozzle and work up
through to the higher pressure nozzles.
The nozzles are stored in a panel mounted to the
handle of the washer.
Insert tip cleaner into the nozzle hole and move back and
forth until debris is dislodged
Fig.7 Fig.8 Fig.9 Fig.10 Fig.11

RX545i
© Wilks-USA 7
© Wilks-USA
English
• To reduce the risk of injury, close supervision is necessary when the machine is used near
children.
• Follow all safety codes as well as the Occupational Safety and Health Act (OSHA).
• Ensure safety devices are operating properly before using the machine. Do not remove or
modify any part of the gun or main unit of the machine.
• Stay alert at all times when using the machine and always hold the gun firmly when operating
the machine.
• Do not operate the machine when fatigued, suffering from reduced physical, sensory or mental
capabilities or whilst under the influence of alcohol or drugs.
• Keep the operation area clear of all electrical equipment, persons, animals and pets. Do not
leave the machine unattended when setup for use. Always engage the trigger safety latch after
use.
• Do not point the pressure gun at anyone whilst the unit is connected to a water supply.
• Do not overreach or stand on an unstable support. Keep good footing and balance at all times.
• Use a cleaning agent supplied or recommend by the manufacturer. Always protect your eyes,
skin, and respiratory system from detergent use.
• If your eyes (or any other sensitive part of your body) comes into contact with detergent, rinse
with plenty of clean water.
• In the event of an accident, switch off the machine, pull the plug from the socket outlet and
disconnect the water supply.
• Always wear safety goggles, ear protection and protective clothing even when performing
maintenance.
• Never put hands or fingers over the spray tip while operating the unit.
• Never try to stop or deflect leaks with any body part.
Safety and Warning Information
Safety Symbols
CAUTION: Indicates a
potentially hazardous
situation which, if not
avoided, may result in
minor or moderate injury.
WARNING: Indicates a
potentially hazardous
situation which, if not
avoided, could result in
death or serious injury.
Risk of electrocution
WARNING: When the machine is used, the following precautions should always be
considered:
WARNING: The electrical supply connection must be made by a qualied person and comply
with IEC 60364-1. The electric supply to this machine should include either a residual-current
device / circuit breaker that will interrupt the supply if the current to earth exceeds 30 mA for
30 ms.

RX545i
© Wilks-USA
8© Wilks-USA
English
WARNING: Do not use an inlet pressure that exceeds the operating pressure of any of the parts (hoses,
ttings, etc). Ensure all equipment and accessories are rated to withstand the maximum working pressure
of the unit.
WARNING: Never spray ammable liquids or use the pressure washer in areas containing combustible
dust, liquids or vapours.
WARNING: Do not spray electrical apparatus and wiring.
WARNING: To ensure machine safety, please only use original spare parts (including nozzles) from the
manufacturer or approved by the manufacturer.
WARNING: Make sure the inlet water is maintained between 0.01MPa and 0.4MPa.
WARNING: If the mains cable is damaged it must be replaced by the manufacturer, or its service agent or
similarly qualied person to avoid a hazard or injury.
WARNING: Use only extension cords intended for outdoor use and that have an electrical rating equal to
or more than the rating of the machine. Examine the cord before using and replace it if damaged. Keep
the cord away from heat and sharp edges. It is recommended that you use a cord reel that keeps the
socket at least 60mm above the ground.
CAUTION: Keep the hose away from sharp objects. Bursting hoses may cause injury. Examine the hose
regularly and replace it if damaged. Do not attempt to repair a damaged hose.
• Never disconnect the high pressure outlet hose from the machine while the system is
pressurised. To de-pressurise machine, turn power and water supply off, then press gun trigger
2-3 times.
• Never operate the machine without all of the components properly connected to the machine
(handle, gun / lance assembly, nozzle, etc).
• Never operate the pressure washer with broken or missing parts. Check equipment regularly
and repair or replace worn or damaged parts immediately.
WARNING: To reduce the risk of electrocution, keep all connections dry and off
the ground. Do not touch the plug with wet hands.
WARNING: Do not use the machine if the supply cord or any important parts of
the machine are damaged (e.g. safety devices, high pressure hoses, etc).
WARNING: This is a double-insulated machine so two systems of insulation are provided
instead of grounding. No grounding means are provided for a double-insulated machine, nor
should grounding means be added to the machine. Servicing a double-insulated machine
requires extreme care and knowledge of the system. It should be done only by qualied
service personnel. Replacement parts for a double-insulated machine must be identical to
the original parts.

RX545i
© Wilks-USA 9
© Wilks-USA
English
Using your Washer
Angle to the Cleaning Surface
When spraying water against a surface, maximum
impact is generated when the water strikes the
surface head on. However, this type of impact
tends to cause dirt particles to embed in the
surface, thereby preventing the desired cleaning
action.
The optimum angle for spraying water against a
surface is 45 degrees.
Distance from Cleaning Surface
Another factor that determines the impact force of
the water is the distance from the spray nozzle to
the cleaning surface.
Avoid Damaging Surfaces
Damage to surfaces occurs because the impact
force of the water exceeds the durability of the
surface. Never use a narrow high impact stream
or a turbo / rotary nozzle on a surface that is
susceptible to damage.
The surest way to avoid damaging surfaces:
01. Adjust the nozzle to a wide spray pattern.
02. Place the nozzle approximately 4-5
feet from and 45 degrees to the cleaning
surface.
03. Vary the spray pattern, spray angle and
the distance to the cleaning surface until
optimum cleaning efficiency is achieved
without damaging the surface.
Turbo Nozzle
A turbo nozzle, sometimes referred to as a
rotary nozzle, is a very effective tool that can
signicantly reduce cleaning time. The turbo
nozzle combines the power of a narrow high
impact stream and the efciency of a 25 degree
spray pattern. This swirls the narrow high impact
stream into a cone shape that cleans a larger
area.
A turbo nozzle uses a narrow high impact stream
so only use it in applications where the cleaning
surface cannot be damaged by narrow high
impact spray. The turbo nozzle is not adjustable
and cannot be used to apply detergent.
Detergent
The use of detergents can dramatically reduce
cleaning time and assist in the removal of difcult
stains. Some detergents have been customised for
pressure washer use. The use of thick detergents
such as dish soap, will clog the chemical injection
system and prevent the application of the
detergent. Furthermore, the salt / acid content
can cause irreparable corrosion to the internal
components of the washer and pump.
The cleaning power of detergents comes from
applying them to a surface and giving the
chemicals time to break down the dirt and
grime. Detergents work best when applied at low
pressure.
The combination of chemical action and high
pressure rinsing is very effective. On particularly
tough stains, it may be necessary to use a brush
in combination with detergents and high pressure
rinsing.
Optimum cleaning angle of 45°
Ensure that the unit and hoses are fully drained of water.

RX545i
© Wilks-USA
10 © Wilks-USA
English
Operation
The following cleaning procedure will ensure that
you achieve the most benecial results in the
shortest amount of time.
01. Surface preparation
Clear the working area and make sure that all
windows and doors are closed tightly. Make sure
that all plants and trees adjacent to the cleaning
area are protected by a drop cloth.
02. Initial high pressure rinse
The next step is to spray the cleaning surface
with water to clear off any dirt or grime that may
have collected on the surface. This will allow your
detergent to attack the dirt that has worked its
way into the cleaning surface. Before triggering
the gun, adjust the nozzle to a wide spray pattern
and slowly adjust to the desired spray pattern.
This will help you avoid applying too much
pressure to the surface that could cause damage.
03. Detergent application
Only use detergents formulated for pressure
washers. Test the detergent in an inconspicuous
area before use.
Follow the manufacturer’s directions for mixing
the correct concentrations of detergent to water.
• Apply the detergent so it thoroughly covers
the cleaning surface. Apply from bottom to
top to prevent the detergent from sliding
down and streaking.
• Allow the detergent to remain on the
surface for a few minutes. This is a good
time to use a brush to lightly scrub heavily
soiled areas. Never allow detergent to dry
on the cleaning surface.
• Remove detergent applicator from gun and
replace with the lance.
• Rinse detergent from surface.
• Rinse the detergent applicator with clean
water following each use.
04. Final rinse
Make sure you thoroughly rinse the surface and
that all detergent has been removed.
05. Shut down
• Make sure all detergent is flushed from the
system.
• Turn off the motor.
• Turn off the water supply.
• Trigger the gun to de-pressurise the
system.
• After each use, wipe all surfaces of the
pressure washer with a clean, damp cloth.
Looking After your Product
• This pressure washer is not meant to pump
hot water. Never connect to a hot water
supply.
• Never operate the unit for more than one
minute without spraying water. This will
cause a heat build-up that can damage the
pump.
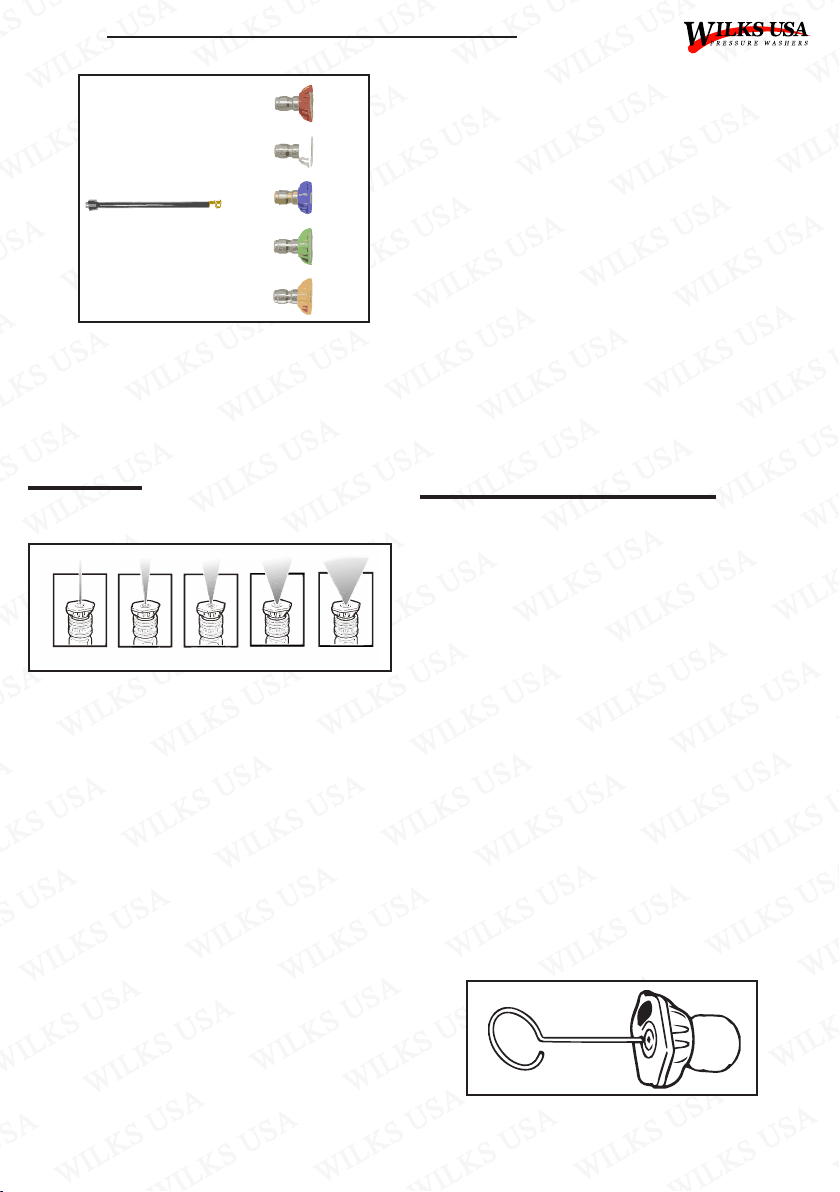
• Only use the nozzles supplied with the
machine.
• Never store the pressure washer outdoors
or where it could freeze. The pump will be
seriously damaged. Any components with
water left inside will also be damaged, e.g.
the pressure gun.
• Release the trigger when changing the
spray pattern. Failure to do so could result
in damage.
• Do not operate the pressure washer with
the inlet water screen removed. Be sure
to keep the screen clear of debris and
sediment.
• Make sure you clean the machine every
three months and inspect the filter and the
nozzle prior to every use, ensuring there is
no debris that may impair use.

RX545i
© Wilks-USA 11
© Wilks-USA
English
Troubleshooting
Symptom Possible Cause(s) Corrective Actions
No detergent suction • Detergent applicator is
clogged
• Clean applicator with warm
water
• Replace applicator
Unit begins to smoke • Overheated, overloaded or
damaged motor • Turn off unit and call the
dealer
Pressure washer does not start
up
• Unit is pressurised
• Plug is not connected
correctly or electrical
supply is damaged / faulty
• Thermal safety switch has
tripped
• Clean water inlet
• Check that connections and
locking ring are properly
tightened
• Switch off unit and allow to
cool down
Pump does not reach necessary
pressure
• Water inlet is clogged
• Pump sucking air from
hose connections
• Nozzle is worn or not
correct size
• Unloader / valves are
clogged / worn
• Clean water inlet filter
• Check that connections and
locking ring are properly
tightened
• Call the dealer
Fluctuating pressure
• Pump is sucking air
• Clogged nozzle
• Valves dirty, worn or
clogged
• Water seals worn
• Check that hoses and
connections are tight
• Clean with tip cleaner
• Call the dealer
Motor stops suddenly • Thermal safety switch has
tripped due to overheating
• Check mains supply
voltage corresponds to
specifications

RX545i
© Wilks-USA
12 © Wilks-USA
English
Disposal Regulations
Do not dispose of electrical machines as unsorted municipal waste, use separate collection facilities.
Contact your local government for information regarding the collection systems available. If electrical
machines are disposed of in landlls or dumps, hazardous substances can leak into the groundwater and
get into the food chain, damaging your health and well-being.
For transportation safety, the machine should comply with ISTA.
Item RX545
Working pressure 2000 PSI (138 BAR)
Allowable pressure 3050 PSI (210 BAR)
Working ow rate 6.4 Litres / min
Maximum ow rate 8.0 Litres / min
Maximum water input pressure 0.4 MPa (4 BAR)
Motor capacity 2400 Watt
Power supply voltage 240V ~ 50HZ
Maximum water temperature 50°C
Technical Data

RX545i
© Wilks-USA 13
© Wilks-USA
English
CE Certicate
We hereby declare that the machine described below complies with the relevant basic safety and health
requirements of the EU Directives, both in its basic design and construction as well as in the version put
into circulation by us. This declaration shall cease to be valid if the machine is modied without our prior
approval.
The undersigned: Michael S McQuaide
As authorised by: Union Mart Ltd
Declares that
Description: Electric Pressure Washer
Identication code: Wilks-USA RX 545
Conforms to the following directives and standards:
• 2006/42/EC Machinery Directive
• 2000/14/EC Noise Emission
• 2004/30/EU EMC Directive
• 2011/65/EU&(EU)2015/863 ROHS Directive
--
• EN 55014-1:2006+A1+A2
• EN 55014-2:2015
• EN 61000-3-2:2014
• EN 61000-3-11:2000
Sound power level dB(A)
Measured: 94dB
Notied body: TÜV Rheinland LGA Products GmbH
The technical documentation is kept by: Union Mart Ltd
Date: 04/05/2018
Signed:
Michael S McQuaide
Chief Executive Ofcer
Name and address of the manufacturer:
Union Mart Ltd, Company No. 8384155. Registered address: Unit 4, Mauretania Road, Nursling Industrial
Estate, Southampton SO16 0YS, United Kingdom.

RX545i
© Wilks-USA
14 © Wilks-USA
Français
Lisez attentivement ce manuel avant la première utilisation et conservez-le à titre de référence pour la
suite. Faute de suivre ces instructions peut entraîner des blessures, des dommages matériels et peut
annuler la garantie. Les produits décrits dans ce manuel peuvent varier en apparence, en assemblage, en
inclusions, en spécications, en description ou en emballage.
Electric Pressure Washer
Nettoyeur Haute Pression Électrique
RX545i
Français

RX545i
© Wilks-USA 15
© Wilks-USA
Français
Sommaire
15 - Sommaire
16 - Guide de démarrage rapide
16 - Raccordement des pièces du nettoyeur
17 - Accessoires
19 - Symboles et consignes de sécurité
21 - Utilisation de votre Nettoyeur
Angle de nettoyage
Distance de la surface à nettoyer
Évitez les surfaces dommageables
Turbo Buse
22 - Utilisation de votre Nettoyeur
Détergent
Fonctionnement
Prendre soin de votre machine
23 - Dépannage et données techniques
24 - Réglementation en matière d’élimination
25 - Certicat de conformité CE

RX545i
© Wilks-USA
16 © Wilks-USA
Français
Guide de Démarrage Rapide
Les étapes suivantes décrivent la méthode la plus rapide pour mettre votre nettoyeur à
pression en marche. Cependant, il est essentiel de lire attentivement ce manuel dans son
intégrité an de vous familiariser avec les caractéristiques de sécurité, les précautions et les
fonctions nécessaires pour faire fonctionner le produit. Dans le cas contraire, vous risquez
de vous blesser et d’endommager votre nettoyeur ou vos objets personnels.
Aperçu
01. Nettoyeur haute
pression
02. Bouton ON/OFF
03. Roues
04. Sortie d’eau
05. Arrivée d’eau
06. Pistolet
07. Enrouleur de tuyau avec
tuyau
08. Poignée de dévidoir
01
03
04
05
06
07
08
02

RX545i
© Wilks-USA 17
© Wilks-USA
Français
Raccordement des pièces
de la laveuse Conseils pour
commencer
Le nettoyeur a un étui monté sur le côté
contenant le pistolet / la lance. Mettez-le en place
en faisant glisser le crochet supérieur (g. 2) sur
le point de montage (g. 1).
Un dispositif de retenue inférieur maintient
fermement l’extrémité du pistolet / lance. Pour
le xer, faites glisser la coupelle inférieure (g.
4) sur le point de montage situé à la base de la
rondelle (g. 3).
La poignée inférieure avant constitue un point de
départ idéal pour transporter votre nettoyeur et
offre une stabilité supplémentaire à la verticale.
Pour l’attacher, insérez la poignée ‘A’ dans les
connecteurs ‘B’ situés dans la partie inférieure
avant de la machine. Mettez en place sur le
dessous avec les deux vis fournies.
On / Off Automatique:
Le moteur de ce nettoyeur pression ne fonctionne
pas en continu. Il ne fonctionne que lorsque la
gâchette du pistolet de pulvérisation est pressée.
Purge du pistolet:
Il est très important de purger le pistolet avant et
après l’utilisation du nettoyeur haute pression.
Appuyez sur la gâchette pour permettre à l’air
emprisonné à l’intérieur de l’appareil et au exible
de s’échapper. Continuez à appuyer sur la
gâchette
jusqu’à ce qu’un jet d’eau constant sorte de
la buse. (Ce processus peut prendre jusqu’à 2
minutes).
Cela empêchera le gel par temps froid
d’endommager la machine ou le pistolet.
Fig.1 Fig.2
Fig.3 Fig.4
Fig.5 Fig.6
AA
B
B

RX545i
© Wilks-USA
18 © Wilks-USA
Français
Accessoires Connexion
Le RX545i dispose d’une variété d’accessoires
de nettoyage conçus pour des utilisations
spéciques. Vous trouverez ci-dessous leur
description et leur usage.
La baguette Turbo se visse directement sur le
pistolet. Il crée un puissant cône d’eau doté d’un
pouvoir nettoyant énorme. La combinaison de
haute pression, entraînée par le roulement en
céramique, produira une combinaison très haute
pression / zone de nettoyage.
La lance courbée pour gouttière se visse
directement sur le pistolet. Il procure une courbe
utile au jet utilisant les buses fournies pour
nettoyer les endroits difciles à atteindre.
La brosse droite se visse directement sur le
pistolet. Son fonctionnement est similaire à celui
de la brosse rotative, mais il ne comporte aucune
pièce mobile. Cela procure un nettoyage plus
délicat.
Le Nettoyeur Patio se xe avec l’extension dans
le pistolet. Le nettoyeur de terrasse est utilisé
pour nettoyer les surfaces plates spéciquement,
sans se limiter aux patios. Le design assure une
zone connée de nettoyage avec très peu de
sur-pulvérisation. Les buses de jet rotatives à
l’intérieur ne doivent en aucun cas être touchées
pendant le raccordement.
La brosse rotative se visse directement sur le
pistolet. La brosse pivote en utilisant le ux d’eau
pour permettre un nettoyage plus en profondeur.

RX545i
© Wilks-USA 19
© Wilks-USA
Français
Les Buses
Entretien des buses
Les buses fournies se xent à la lance qui se visse
sur le pistolet. Elles fournissent une variété de
pressions et de schéma conçus pour différentes
applications de nettoyage.
Buse 0 ° (rouge)
- Cette buse donne un ux précis
d’eau sous pression et est extrêmement puissante.
Elle ne doit être dirigé que sur des surfaces pouvant
supporter des pressions élevées telles que le métal
ou le béton. (g.7)
Buse 15 ° (Jaune)
- Cette buse offre un jet puissant
de 15 degrés pour le nettoyage intense de petites
surfaces. Cette buse ne doit être utilisée que sur
des zones et des matériaux pouvant résister à de
très hautes pressions. (g.8)
Buse 25 ° (verte)
- Cette buse offre une
pulvérisation de 25 degrés pour un nettoyage
intense de grandes surfaces. Cette buse ne doit être
utilisée que sur des zones pouvant supporter des
pressions très élevées. (g.9)
Les buses sont stockées dans un panneau situé
sur la poignée de la machine.
Une buse encrassée ou partiellement encrassée
peut réduire considérablement le débit d’eau et
provoquer des pulsations lors de la pulvérisation.
Pour nettoyer la buse:
01. Éteignez et débranchez l’appareil du secteur.
02. Fermez l’alimentation en eau et relâchez
la pression emprisonnée dans le tuyau en
appuyant sur la gâchette du pistolet 2-3 fois.
03. Séparer la lance du pistolet.
04. Faites pivoter la buse sur le réglage “jet à fort
impact”. Cela ouvre les pales du ventilateur.
05. En utilisant le nettoyant à buse fourni ou un
trombone déplié, insérez le fil dans le trou de
la buse et faites-le défiler jusqu’à ce que tous
les débris soient délogés.
06. Éliminez les débris supplémentaires en
faisant circuler de l’eau dans la buse. Pour
ce faire, placez l’extrémité d’un tuyau
d’arrosage (avec de l’eau courante) au bout
de la buse pendant 30 à 60 secondes.
Insérez le nettoyeur à buse dans le trou de la buse
et déplacez-le d’avant en arrière jusqu’à ce que
les débris soient délogés
Buse à 40 ° (blanche)
- Cette buse offre un jet de
pulvérisation à 40 degrés et un jet d’eau moins
puissant. Cette buse peut couvrir une large zone
et peut être utilisée pour la plupart des travaux de
nettoyage courants. (g.10)
Buse de détergent (bleue / noire)
- Cette buse est
utilisée pour appliquer du détergent et des solutions
de nettoyage. Cette buse produit la pression la plus
faible. (g.11)
Pour éviter d’endommager votre surface de
nettoyage, commencez toujours par la buse avec la
pression la plus basse et augmentez petit à petit.
Fig.7 Fig.8 Fig.9 Fig.10 Fig.11

RX545i
© Wilks-USA
20 © Wilks-USA
Français
Symboles de Sécurité
Consignes de Sécurité
ATTENTION
: Indique une
situation potentiellement
dangereuse qui, si elle
n’est pas évitée, peut
entraîner des blessures
mineures ou modérées.
AVERTISSEMENT
:
Indique une situation
potentiellement dangereuse
qui, si elle n’est pas évitée,
pourrait entraîner la mort
ou des blessures graves.
AVERTISSEMENT
: Le branchement électrique doit être effectué par une personne qualiée
conformément à la norme IEC 60364-1. L’alimentation électrique de cette machine doit inclure
un dispositif différentiel / un disjoncteur qui interrompra l’alimentation si le courant à la terre
dépasse 30 mA pendant 30 ms.
Risque
d’électrocution
AVERTISSEMENT:
Lorsque la machine est en marche, les précautions suivantes doivent
toujours être prises en compte:
• Pour réduire les risques de blessures, une surveillance étroite est nécessaire lorsque la machine
fonctionne à proximité d’enfants.
• Respectez tous les codes de sécurité ainsi que la loi relative à la sécurité et la santé au travail
(OSHA).
• Assurez-vous que les dispositifs de sécurité fonctionnent correctement avant d’utiliser la
machine. Ne retirez ou ne modifiez aucune partie du pistolet ou de l’unité principale de la
machine.
• Restez vigilant en permanence lors de l’utilisation de la machine et tenez toujours fermement le
pistolet lorsque vous utilisez la machine.
• N’utilisez pas la machine lorsque vous êtes fatigué, que vous avez des capacités physiques,
sensorielles ou mentales réduites ou sous l’influence de l’alcool ou de drogues.
• Gardez la zone d’opération à l’écart de tout équipement électrique, de personnes et d’animaux.
Ne laissez pas la machine sans surveillance lors de la mise en route. Enclenchez toujours le
loquet de sécurité de la gâchette après chaque utilisation.
• Ne dirigez pas le pistolet à pression vers une personne alors que l’appareil est branché à un
point d’eau.
• Ne vous penchez pas et ne vous tenez pas sur un support instable. Gardez toujours une
position stable et sûre.
• Utilisez un agent nettoyant fourni ou recommandé par le fabricant. Protégez toujours vos yeux,
votre peau et votre système respiratoire contre l’utilisation de détergent.
• Si vos yeux (ou toute autre partie sensible du corps) entrent en contact avec le détergent, rincez
abondamment à l’eau claire.
• En cas d’accident, éteignez la machine, débranchez-la à la prise de courant, et débranchez
l’alimentation en eau.
• Portez toujours des lunettes de protection, des protections auditives et des vêtements de
protection, même lors de petits travaux d’entretien.
• Ne mettez jamais vos mains ou vos doigts devant la buse lorsque la machine est en marche.
• N’essayez jamais d’arrêter ou de dévier les fuites avec une partie de votre corps.
This manual suits for next models
1
Table of contents
Languages:
Other Wilks USA Pressure Washer manuals

Wilks USA
Wilks USA TX650 User manual

Wilks USA
Wilks USA TX625i User manual

Wilks USA
Wilks USA RX510 User manual

Wilks USA
Wilks USA TX750 User manual

Wilks USA
Wilks USA TX850 User manual

Wilks USA
Wilks USA RX525i User manual

Wilks USA
Wilks USA RX525i User manual

Wilks USA
Wilks USA TX850 User manual

Wilks USA
Wilks USA TX460 User manual

Wilks USA
Wilks USA RX550i User manual