William Kent 1733 ORION X1 User manual

Guide d’utilisation
User guide
ORION
i-Size
40-80cm | 13kg max.
X1 / X1-PLUS
ECE R129/03

2
1 2
12
11
10
8
7
6
5
4
3
3
2
1
(1)
9a
9a
(2)
9b
13
Siège auto
Infant car seat
1 2
12
11
10
8
7
6
5
4
3
3
2
1
(1)
9a
9a
(2)
9b
13

3
Ce siège auto peut être installé dos à la route sur sa base
i-Size ou peut être installé dos à la route avec une cein-
ture de sécurité à 3 points, homologuée selon le règle-
ment UN/ECE n° 16 ou d’autres normes équivalentes.
This car seat can be installed rear facing on its i-Size base
or can be installed rear facing with a 3-point car belt, ap-
proved according to UN/ECE Regulation No.16 or other
equivalent standards.
Siège auto
Infant car seat

4
14
15
16
20
17
19
22
23
18 21
(13)
Infant carrier installation with base
7 8
(11)
(12)
Base i-Size
(peut être vendue séparément)
i-Size Base
(can be sold separately)

5
La Base i-Size peut être utilisée sur les sièges des
véhicules homologués i-Size (consultez la notice d’utilisa-
tion du véhicule) et sur les sièges des véhicules indiqués
dans la «LISTE DES VÉHICULES COMPATIBLES» fournie
avec la base i-Size.
The i-Size base can be used on i-Size approved vehicle
seats (check the vehicle’s instruction manual) and on
seats of vehicles included in the “LIST OF COMPATIBLE
VEHICLE” given with the i-Size base.
Base i-Size
(peut être vendue séparément)
i-Size Base
(can be sold separately)

6
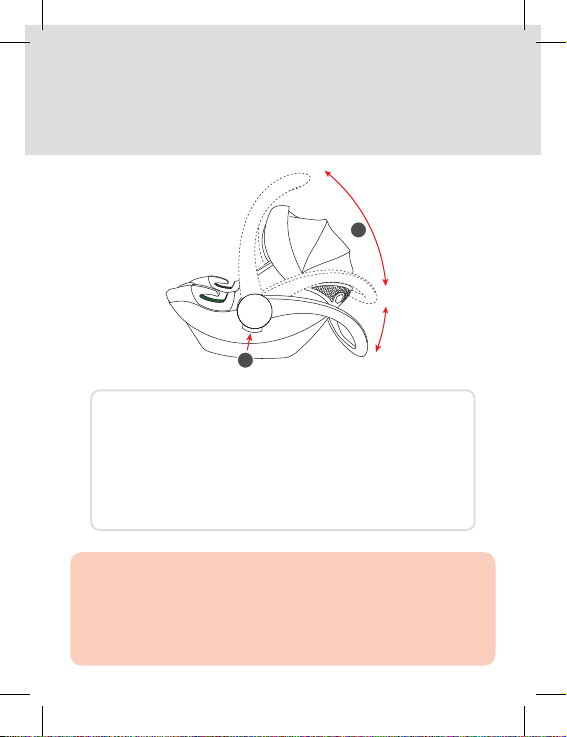
A : utilisation en voiture, en balancelle et pour le transport
B : utilisation en balancelle ou en poussette
C : utilisation en transat en position fixe
A: use in the car, for rocking and for carrying
B: use for rocking or stroller transportation
C: use as a recliner in the fixed position
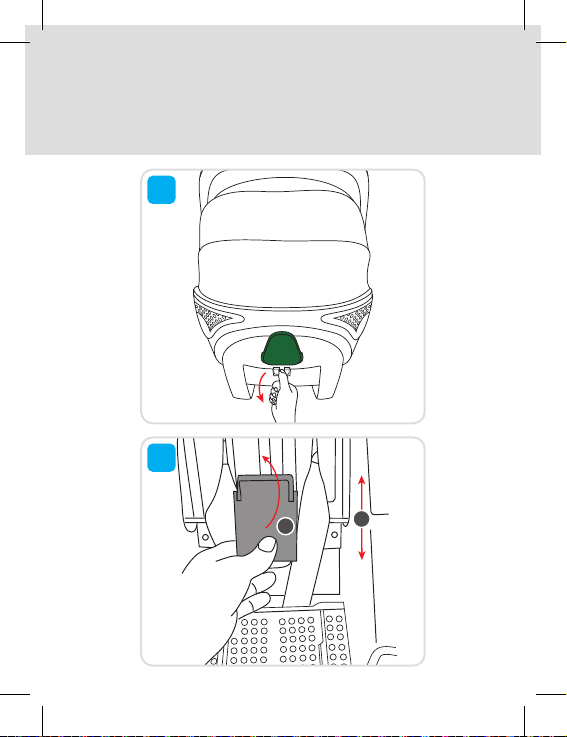
Ajustement de la poignée
Handle adjustment
!Pour éviter tout risque de chute, assurez-vous que la poignée de
votre siège auto est correctement verrouillée et que votre enfant
est constamment attaché avec le harnais de sécurité.
!To avoid any risk of falling, ensure that the handle of your car seat
is correctly locked and that your child’s safety harness is always
fastened.
Function Adjustment 4
(4)
3 4
(3)
2
A
B
C
1
1
22
(5)
(6)
1

7
Function Adjustment 4
(4)
3 4
(3)
2
A
B
C
1
1
22
(5)
(6)
1
Réglage des harnais
Adjusting the harness
1

8
Function Adjustment 4
(4)
3 4
(3)
2
A
B
C
1
1
22
(5)
(6)
1
2
3
Réglage des harnais
Adjusting the harness
Function Adjustment 4
(4)
3 4
(3)
2
A
B
C
1
1
22
(5)
(6)
1

9
5
(8)
(7)
(9)
(10)
≥75cm
40-75cm
!Assurez-vous que la hauteur des harnais est adaptée à la taille de
votre enfant avant d’installer le siège auto dans le véhicule.
!Make sure that the harness of your car seat is adapted to the
height of your child before starting to install the seat in your car.
4
Réglage des harnais
Adjusting the harness

10
Installation de l’enfant
Child installation
5
(8)
(7)
(9)
(10)
≥75cm
40-75cm

11
5
(8)
(7)
(9)
(10)
≥75cm
40-75cm
1
2
Installation de l’enfant
Child installation

12
3
Réunissez les deux extrémités des harnais d’épaules et fermez la bou-
cle du harnais.
Bring together the two ends of the shoulder harnesses and close the
harness buckle.
Installation de l’enfant
Child installation
14
15
16
20
17
19
22
23
18 21
(13)
Infant carrier installation with base
7 8
(11)
(12)

13
Tirez sur la sangle de réglage du harnais afin que les harnais d’épaules
soient correctement tendus contre votre enfant.
Pull on the harness adjustment strap so that the shoulder harnesses
are tightened correctly against your child.
4
!Un harnais bien ajusté contribue activement à protéger au mieux
votre bébé. Vous ne devez pas pouvoir passer plus que l’épais-
seur d’un doigt entre le harnais et l’enfant. De plus les sangles ne
doivent pas être vrillées.
!A properly adjusted harness actively contributes to the best pos-
sible protection for your baby. You must not be able to pass more
than the thickness of a finger between the harness and the child. It
is also important that the the straps are not twisted.
Installation de l’enfant
Child installation
14
15
16
20
17
19
22
23
18 21
(13)
Infant carrier installation with base
7 8
(11)
(12)

14
N’UTILISEZ PAS CE SIÈGE ENFANT SUR UN SIÈGE PAS-
SAGER ÉQUIPÉ D’UN AIRBAG. EN CAS D’UTILISATION
SUR LE SIÈGE PASSAGER AVANT, DÉSACTIVEZ L’AIR-
BAG EN QUESTION !
DO NOT USE THIS CHILD SEAT ON A PASSENGER SEAT
FITTED WITH AN AIRBAG. IF YOU NEED TO INSTALL
THE SEAT IN THE FRONT PASSENGER SEAT, PLEASE
ENSURE THAT ANY AIRBAG IS DEACTIVATED!

15
9 10
(14)
1
2
(15)
(16)
9 10
(14)
1
2
(15)
(16)
Installation avec la base
Installation with base
1
2

16
11 12
(17)
(18)
1
2
(19)
(20)
11 12
(17)
(18)
1
2
(19)
(20)
3
4
Installation avec la base
Installation with base

17
11 12
(17)
(18)
1
2
(19)
(20)
!La jambe de force doit toujours être en contact direct avec le plancher
du véhicule. Si des compartiments de stockage sont intégrés dans le
plancher de la voiture, vous devez contacter le constructeur du véhi-
cule.
!The support leg must always be in direct contact with the vehicle floor.
If there are storage compartments in the floor of the vehicle you must
contact the vehicle manufacturer.
5
Installation avec la base
Installation with base

18
11 12
(17)
(18)
1
2
(19)
(20)
6
Installation avec la base
Installation with base

19
13 14
(21)
(22)
1
2
(23)
(24)
a
b
!Vérifiez que le siège-auto est correctement fixé à la base en
essayant de le soulever par l’avant et par l’arrière.
!Check that the infant seat is correctly fitted on the base by lifting
the front and rear sections.
Installation avec la base
Installation with base
7

20
Désinstallation
Removal
13 14
(21)
(22)
1
2
(23)
(24)
a
b
1
This manual suits for next models
1
Table of contents