Wincor Nixdorf BA66-1 User manual

BA66-1 RS232
Cashier Display
Product Manual
Edition April 2006

Copyright© Wincor Nixdorf International GmbH, 2006
The reproduction, transmission or use of this document or its contents is not
permitted without express authority.
Offenders will be liable for damages.
All rights, including rights created by patent grant or registration of a utility model or de-
sign, are reserved.
Delivery subject to availability; technical modifications possible.
Linux™ is a registered trademark of Linus Torvalds
Pentium™ is a registered trademark of the Intel Corporation
MS-DOS™, Windows 95™, Windows 98™, Windows NT™, Windows ME™,
Windows2000™and Windows XP™ are registered trademarks of the Microsoft
Corporation
BEETLE™ is a registered trademark of Wincor Nixdorf International GmbH

Contents
Manufacturer’s Declaration and Approval ........................1
FCC-Class A Declaration............................................................................1
Notes on Care.............................................................................................1
Warranty .....................................................................................................2
Recycling the BA66.....................................................................................3
General Notes ......................................................................4
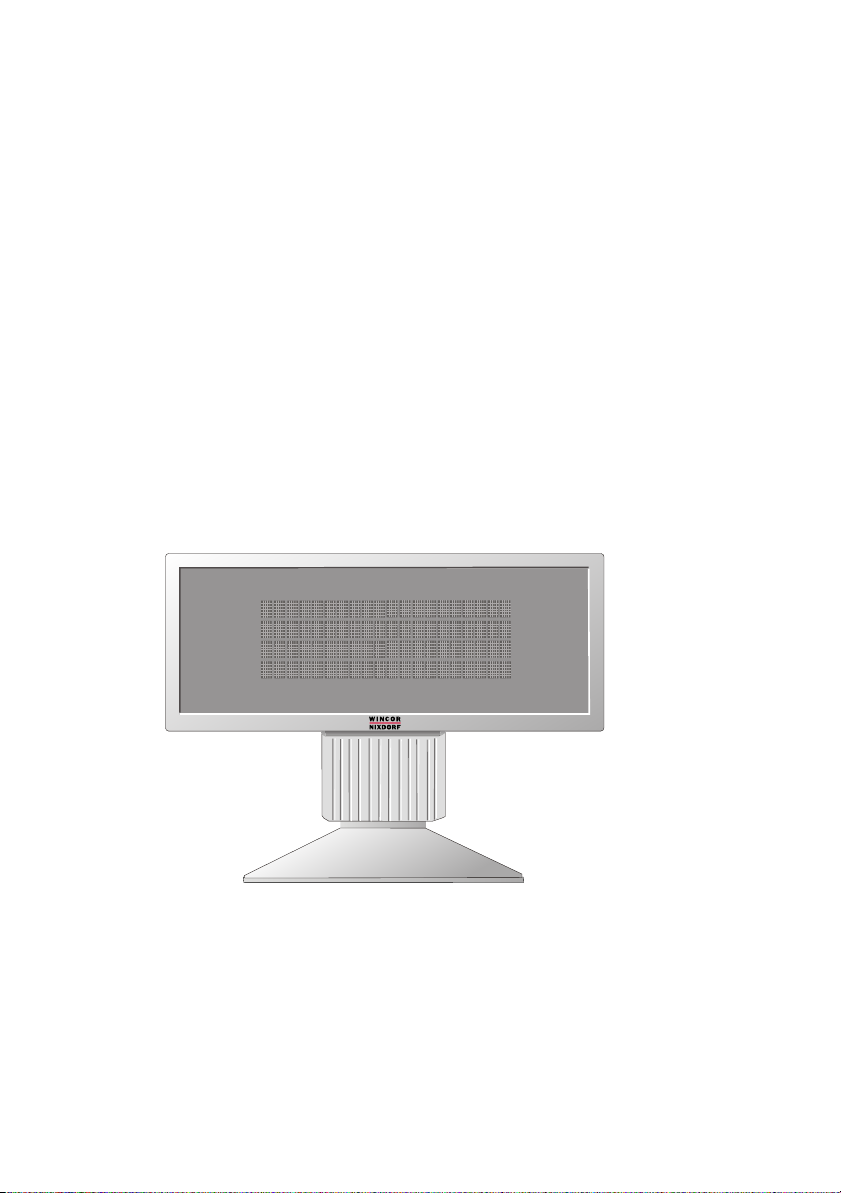
Installation of BA66 to TA61/TA64 keyboard ..............................................6
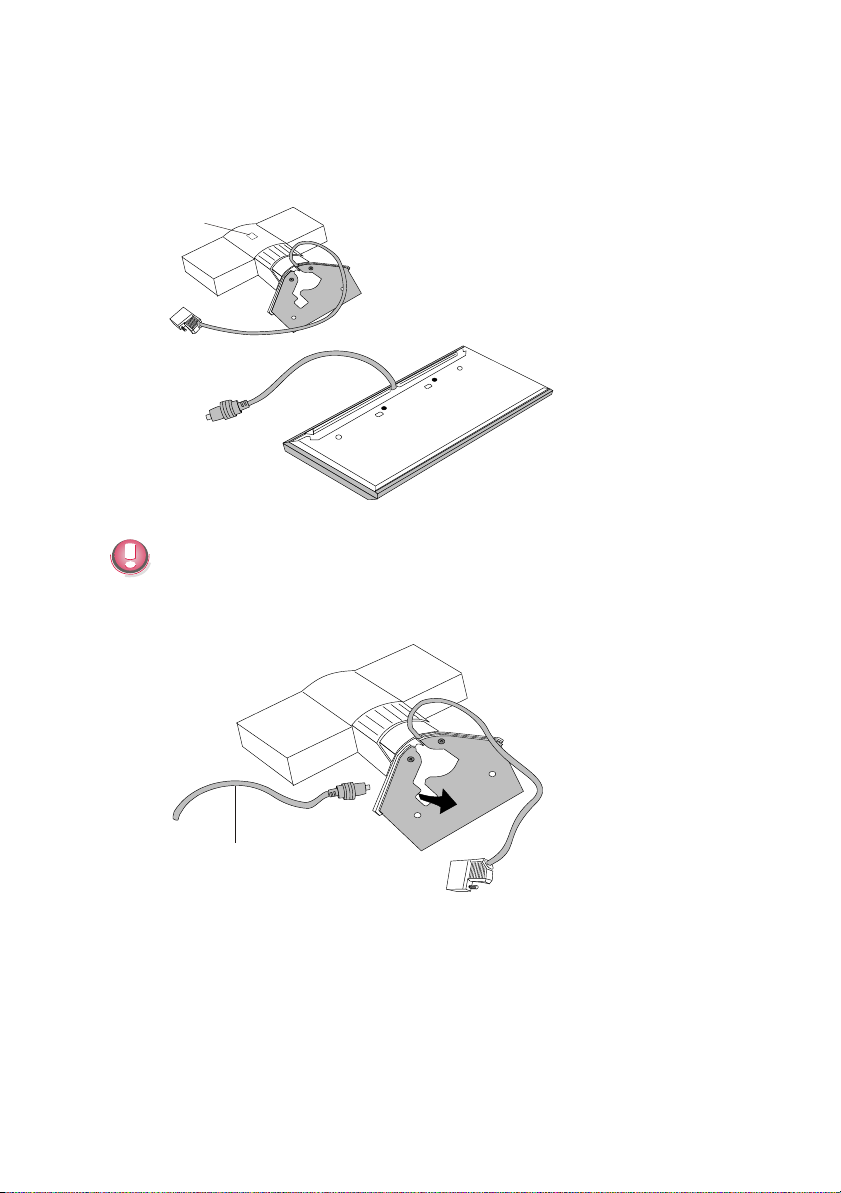
Installation of the Connector..............................................8
Tube-based ................................................................................................8
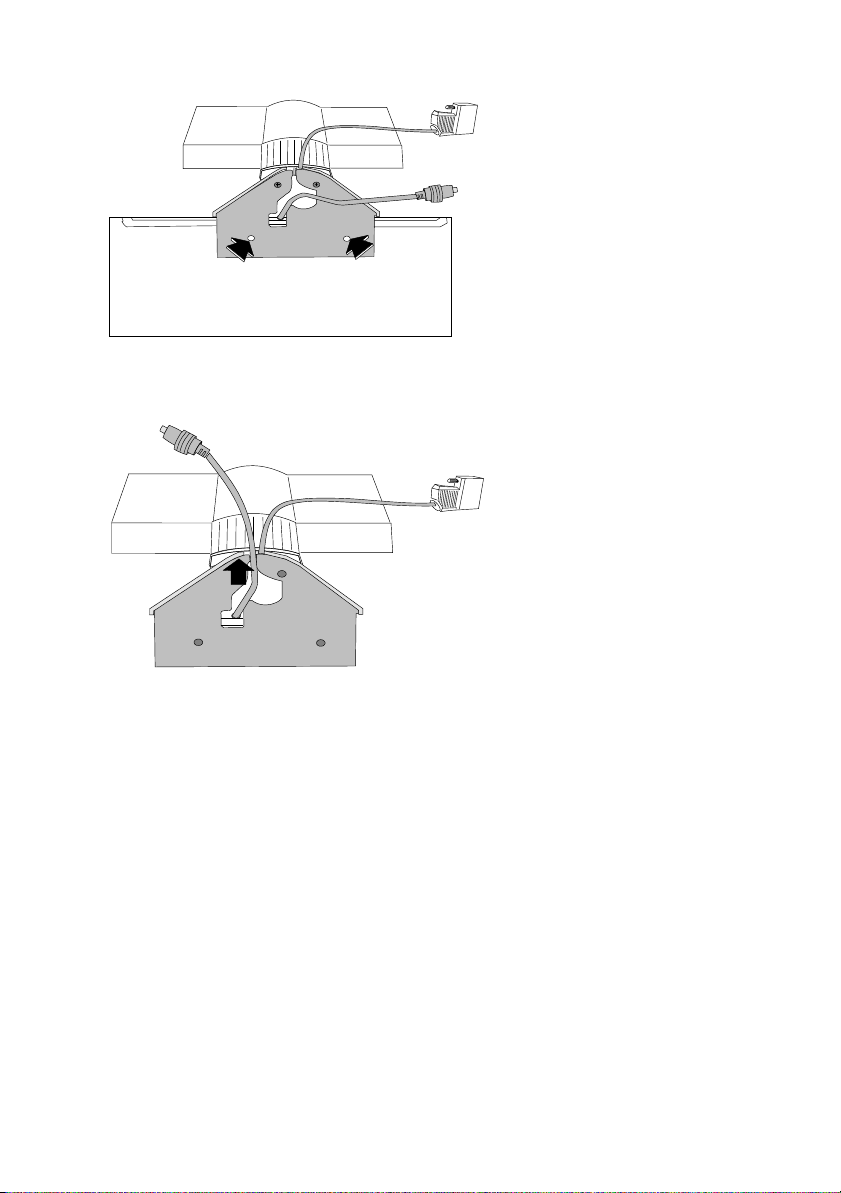
Base/ Rotating Plate .................................................................................10
Cashier Display Control....................................................13
Control Sequences............................................................14
Backspace (without deleting) ....................................................................14
Line feed ...................................................................................................14
Carriage return..........................................................................................15
Delete display ...........................................................................................15
Position cursor ..........................................................................................15
Delete to end of line ..................................................................................16
Set country code .......................................................................................16
Call display identification...........................................................................18
System Connection ...........................................................19
Cable Connection ..............................................................21
Test Functions ...................................................................22
Starting the test by entering a code ..........................................................22
Technical Data ...................................................................23

Manufacturer’s Declaration and Approval
This device fulfills the requirements of the EEC directives
2004/108/EC “Electromagnetic Compatibility”.
Therefore, you will find the CE mark on the back of the device or packaging.
FCC-Class A Declaration
This equipment has been tested and found to comply with the limits for a
Class A digital device, pursuant to part 15 of the FCC Rules. These limits
are designed to provide reasonable protection against harmful inter-ference
when the equipment is operated in a commercial environment. This
equipment generates, uses, and can radiate radio frequency energy and, if
not installed and used in accordance with the instruction manual, may cause
harmful interference to radio communications.
Operation of this equipment in a residential area is likely to cause harmful
interference in which case the user will be required to correct the
interference at his own expense. Modifications not authorized by the
manufacturer may void users authority to operate this device. This class A
digital apparatus complies with Canadian ICES-003.
Cet appareil numerique de la classe A est conforme à la norme NMB-003
du Canada.
Notes on Care
Wipe the cashier display with a damp cloth as required. Solvents must not
be used under any circumstances as they may damage the plastic.
1
FCC-CLASS A DECLARATION

Warranty
Wincor Nixdorf guarantees generally a warranty engagement for 12 months
beginning with the date of delivery. This warranty engagement covers all
damages which occur despite a normal use of the product.
Damages because of
nimproper or insufficient maintenance,
nimproper use of the product or unauthorized modifications of the product,
ninadequate location or surroundings
will not be covered by the warranty.
For further information of the stipulation look at your contract.
All parts of the product which are subject to wear and tear are not included
in the warranty engagement.
Please order spare parts at the Wincor Nixdorf customer service.
WARRANTY
2

Recycling the BA66
Environmental protection does not begin when
the time has come to dispose of the BA66; it
begins with the manufacturer. This product was
designed according to our internal norm
“Environmental conscious product design and
development”.
The BA66 is manufactured without the use of CFCs and CCHS and is
produced mainly from reusable components and materials.
The processed plastics can, for the most part, be recycled. Even the
precious metals can be recovered, thus saving energy and costly raw
materials.
Please do not stick labels onto plastic case parts. This would help us to
re-use components and material.
You can protect our environment by only switching on your equipment when
it is actually needed. If possible, even avoid the stand-by-mode as this
wastes energy, too. Also switch your equipment off when you take a longer
break or finish your work.
At this time, there are still some parts that are not reusable. Wincor Nixdorf
International GmbH guarantees the environmentally safe disposal of these
parts in a Recycling Center, which is certified pursuant to ISO 9001 and ISO
14001.
So don’t discard your display on the garbage when it has served its time, but
take advantage of the environmentally smart, up-to-date recycling methods!
Please contact your competent branch or the Recycling Center Paderborn
(for European countries) for information on how to return and re-use devices
and disposable materials under the following mail address:
Email: [email protected]
or on the internet.
We look forward to your mail.
3
RECYCLING THE BA66

General Notes
The BA66 cashier display is mainly used in POS installations which are
designed in modular form. It is either securely screwed to the POS keyboard
or installed near it so that it is ideally positioned in the cashier’s field of
vision.
The display is a vacuum florescent display (VFD) with two lines, each with
20 alphanumeric characters. The standard character set and corresponding
country code are implemented. Implementation of VFD technology ensures
that the cashier display is ergonomically designed to achieve a high degree
of readability, irrespective of the cashier’s angle of vision.
The display is connection to the point of sale system via a RS232C
interface. The voltage (12 V DC) is also supplied via this interface.
The following two BA66 cashier displays are available to meet individual
installation requirements:
BA66 cashier display with base/ rotating plate
Connector cables are available in different lengths. The cables are ordered
and delivered separately.
GENERAL NOTES
4

Cashier display with adapter for tube-based installation
Cashier display to TA61 or TA64
5
RECYCLING THE BA66
20°
35°

Installation of BA66 to TA61/TA64 keyboard
Attach the cashier display to the TA61 or TA64 keyboard as follows:
Turn both devices upsi-
de-down (remove key
from the keyboard!).
Important! The cashier display must not be disconnected from the base by
means of the release button (X) as the internal plug connection may
otherwise become disconnected!
Pull the keyboard cable
out through the metal
opening (see arrow).
INSTALLATION OF BA66 TO TA61/TA64 KEYBOARD
6
Keyboard cable
X

Screw the assembly plate
of the cashier display to
the rear side of the
keyboard with the
selftapping,
recessed-head screws
provided.
Then press the keyboard
cable downwards and
draw it through the metal
opening into the cable run
of the plastic base.
7
TUBE-BASED

Installation of the Connector
Tube-based
Press the release knob marked with
the arrow in the drawing (1) and
disconnect the hinge from the
customer display (2).
Thread the cable through the
adapter (3) and then through the
hinge (4).
TUBE-BASED
8

Connect the hinge and adapter.
Secure the connector cable in the
strain relief.
The distance between the strain
relief and the tip of the connector
must be 66 mm (±4 mm).
9
TUBE-BASED
66 mm +/- 4 mm

Plug the cable connector into the
appropriate socket of the customer
display and plug the adapter/hinge
into the customer display again until
it locks into place.
Base/ Rotating Plate
Press the release knob marked with
the arrow in the drawing (1) and
disconnect the hinge from the
customer display (2).
BASE/ ROTATING PLATE
10

Thread the cable through the base
(3) and then through the hinge (4).
Connect the base and the hinge.
11
BASE/ ROTATING PLATE

Plug the cable connector into the
appropriate socket of the customer
display and plug the base/hinge into
the customer display again until it
locks into place.
A metal bracket of the strain relief is
situated on the bottom side of the
base. Loosen one of the screws (see
arrow), push the bracket aside and
guide the connector cable from
inward to outward under the bracket
through the recess. Tighten the
screw.
BASE/ ROTATING PLATE
12

Cashier Display Control
The cashier display is controlled via software. The commands are entered
with the appropriate ESC sequences. The following functions are available:
nThe cursor can be moved to the desired position;
nThe cashier display can be deleted;
nThe characters from the cursor to the end of the line can be deleted;
nAn identification code can be requested;
nCountry-specific character sets can be selected;
nA self-test can be performed.
13
CASHIER DISPLAY CONTROL

Control Sequences
The cashier display operates in VT100 mode, i.e. it emulates a subset of the
VT100 ESC sequences and control bytes. These are illustrated in the
following:
Backspace (without deleting) BS
Line feed LF
Carriage return CR
Delete display ESC [2J
Position cursor ESC [Py;PxH
Delete to end of line ESC [0K
Set country code ESC Rn
Call display identification ESC [0c
Backspace (without deleting)
The BS command (hexadecimal 08) moves the cursor one space to the left.
If there is a character in the position to which the cursor moves, it is not
deleted. This command is ignored if the cursor is already at the very start of
the line.
Line feed
The LF command (hexadecimal 0A) moves the invisible cursor down a line
if it is positioned in one of the first three lines of the display. The column
position remains unchanged.
The position of the cursor remains unchanged if it is already in the last line.
The contents of the last line are copied to the first line and the last line is
deleted.
CONTROL SEQUENCES
14

Carriage return
The cursor is moved to the start of the line in which it is currently positioned
when the CR command (hexadecimal 0D) is entered. The command is
ignored if the cursor is already at the start of the line.
Delete display
The display can be deleted with this ESC sequence. The cursor position
remains unchanged. The ESC sequence is as follows:
Code Hexadezimal
ESC ‘[‘ ‘2’ ‘J’ 1B 5B 32 4A
Position cursor
The cursor position can be defined with this ESC sequence. The cursor is
not visible on the display whilst this is being carried out. The following ESC
sequence (for example) can be implemented:
Code Hexadezimal
ESC ‘[‘ ‘Py’ ; ‘Px’ ‘H’ 1B 5B 31 3B 31 48
The parameters are transferred as ASCII characters and have the following
meaning:
Parameter Meaning
Py This parameter defines the line.
Px This parameter defines the column.
Example
The parameters are to replaced with the following values if you wish to
position the cursor at the very start of the first line:
15
CONTROL SEQUENCES

ESC ‘[‘ ‘1’; ‘1’ ‘H’
If you select 0 for the parameter value, this is interpreted as 1 by the
display. If, on the other hand, you select a value which is greater than the
maximum line and column value, the display will interpret this value as the
maximum value permissible.
The cursor is positioned in the first column of the first line if no parameter
values are entered.
Delete to end of line
This command deletes the characters from the cursor, cursor position
included, to the end of the line. The position of the cursor remains
unchanged.
The ESC sequence is as follows:
Code Hexadezimal
ESC ‘[‘ ‘0’ ‘K’ 1B 5B 30 4B
Set country code
The following ESC sequence is implemented in order to select a
countryspecific character set:
Code Hexadezimal
ESC ‘R’ ‘n’ 1B 52 02
The hexadecimal value n corresponds to the country code and defines the
country-specific character set. The German character set corresponds to
the default setting.
CONTROL SEQUENCES
16

Country code Character set
00 USA
01 France
02 Germany
03 Great Britain
04 Denmark 1
05 Sweden
06 Italy
07 Spain 1
08 Japan
09 Norway
0A Denmark 2
0B Spain 2
0C Latin-America
Furthermore PC code pages which contain additional country-specific
display codes can be selected by ESC R n with the following codes:
Country
code Code page Character set Country
30 437 Standard Latin-America
31 850 Latin 1
International,
Scandinavia,
Latin-America
32 852 Latin 2
Hungary, Poland,
Czechia,
Slowakia
17
CONTROL SEQUENCES
Table of contents
Other Wincor Nixdorf Cash Register manuals

Wincor Nixdorf
Wincor Nixdorf CINEO C4080 User manual

Wincor Nixdorf
Wincor Nixdorf KA21 User manual

Wincor Nixdorf
Wincor Nixdorf BA63G User manual

Wincor Nixdorf
Wincor Nixdorf CMD-V4 User manual

Wincor Nixdorf
Wincor Nixdorf BEETLE/20 User manual

Wincor Nixdorf
Wincor Nixdorf BEETLE /Express 15 User manual

Wincor Nixdorf
Wincor Nixdorf KA19 User manual