WINDMAX A4 User manual

Page 1 of 9
WINDMAX Green Energy
WindMax-A4 350W Wind Turbine System
User Manual

Page 2 of 9
1. Packaging Content
Name, Quantity and Function of Each Component
Generator 1 set (generate electricity and connect poles)
Blades 3 pieces (utilize wind power to drive generator)
Flange for blades 1 (connect generator and blades)
Nose Cone 1
Controller 1 (convert AC to DC)
Other Parts
6 Hexagonal bolts
(
M8×40) 4(connect generator and tower)
6 Hexagonal bolts (M8×25), nuts (M8) 9 set (assemble the blades)
Bolts (M6×40) 1(assemble the nose cone)
Bolts (M16),spacer (A17),cushion
(
A17
)
1set(assemble blades and flange)
Pivots (φ12×168
)
, hatch 1 set (connect tailor and generator)
Bolts
(
M6×35
)
,nuts
(
M6
)
3 set (connect tail board and tailor)
If user purchases the tower, following accessories will be included in packaging.
Tower Base 1
Guy wire 4
Tower Clamp 2

Page 3 of 9
Bolts for tower clamp 4
Guy wire Clamps 16
Pivot Bolt and Nut 1 set
Turnbuckles 4 sets
Ground Anchor 4
Ground Nail 2
Poles (diameter: 48mm, length: 2m; not fully displaying) 3 pieces
Poles linking slipcover 2
1
2. Technical standard and power curve
Model: Windmax-A4
Rated power: 350W
Maximum power: 500W
Rotor diameter: 1.5m
Start up wind speed:.2.5m/s
Rated wind speed: 13m/s
Rated voltage: 12v

Page 4 of 9
Power curve
3. Siting
Siting is an important but complicated issue for wind power installation. Consulting a wind energy specialist is
recommended if the user is not familiar with wind systems.
Four general rules are listed as below for consideration:
1There are two basic requirements for a good site: high average wind speed and low wind turbulence.
The higher the average wind speed, the more the power will WINDMAX wind turbine generate. The
power available in the wind goes up with the cube of the wind speed. For example, the power available
in the wind of 5mps speed is nearly twice as of 4mps. The lower the wind turbulence, the lower the
stress the wind turbine will have to endure. Lower turbulence also results in more power .The zone with
high wind speed but high turbulence is not a desirable site.
2Install the wind turbine as high as you can. The higher the tower, the higher the wind speed and the
lower the turbulence .The recommended tower height for the WINDMAX is 8 m above ground level
without barriers.
3Barriers (trees, buildings, etc.) to the flow of wind will produce wakes that may extend far downwind of
the barrier and to a height considerably above the barrier. These wakes are areas decreased wind speed
and potentially damaging turbulence.
Two rules of thumb:
a. A tower immediately downwind of a building should be at least twice of the height of the
building.
b. A tower should be at least 6 m higher than the highest barrier within 150m radius.
1.The local and national codes and requirements should be complied with.

Page 5 of 9
4. Installation
Please choose a day for installation and wire connection without wind.
Step one. Choose space to lay the base and anchor as showed in following map.

Page 6 of 9
Cautions:
①
The hatch of basement should face to one anchor when place the basement.
②
If the distance is rather far from the batteries, we suggest use much thicker standard cable
wires.
Step two. Use the bolts and nuts for base to fix base on ground. And the anchor inserted in the earth or
fixed on the concrete basement. (Depth=500mm, diameter=400mm)
Note: If it is loose ground or sandy place, we strongly suggest build a concrete basement.
Step three. Connect three poles together to become a tower. Put the foot of tower into the pipe of tower
base, and the other head on a sawbuck or other wood stuff (height=700mm). Install the tower clamp onto
tower (About 1.5m from the top), Tightening bolts. Pull the cable from the hole in tower base into the
tower and elicit it on the top, then connect it with generator's output wire, attention to the anode, cathode
and ground wire respectively. Cover the junction of wire with insulating tape in case of short circuit.
Step four. Put the flange on the generator face to the hole of the upper pole, linked them with bolts and
nuts.
Step five. Install the blades on the flange with the windward side upward, also keep the blades’ balance
according to the graph below. When tighten the pivots, please using the wrench with the stated force
15±
1Nm.

Page 7 of 9
Step six. Install the board on the tail girdle, then pull out the pivot axis of the generator, make the pivot
hole of tail face to the one of generator body, next insert the pivot axis, get the pivot hatch through pivot
axis and open it.
Step seven. Set the assembled blades and flange on the generator shaft, make sure the installation is
proper and correct, or the flange may be slip when rotate. Then install the flange of blades and fix the
spacer, cushion and nuts. Also, install the dome to the generator axis and tighten the pivots.
Step eight .Put four tight wires' ends into the waist holes of tower clamps and lock them by tightwire
clamps respectively. Connect three of tightwires' other ends to anchors, except the one to the opposite
anchor of generator. One person pulls the tower up, another one pull the free tightwire back, till ereck the
tower. Then connect the free tightwire to the anchor. The below photo show you how to lock tightwire.
Step nine. Adjust turnbuckles. A little loose tightwire is safer than a tight one.
5. Laying the batteries and inverter
The battery must be placed in a drying and ventilated room where temperature is constant. Calculate
the battery's total number of parallel and serial, and then design the wooden stand for battery and inverter.
6. Electrical Wiring
Please choose a day for installation and cable wire connection without wind.
1. Choose wire

Page 8 of 9
Distance from
WINDMAX to
battery (meter)
< 50
50-100
100-150
Cable Size
(mm
2
)
4
6
10
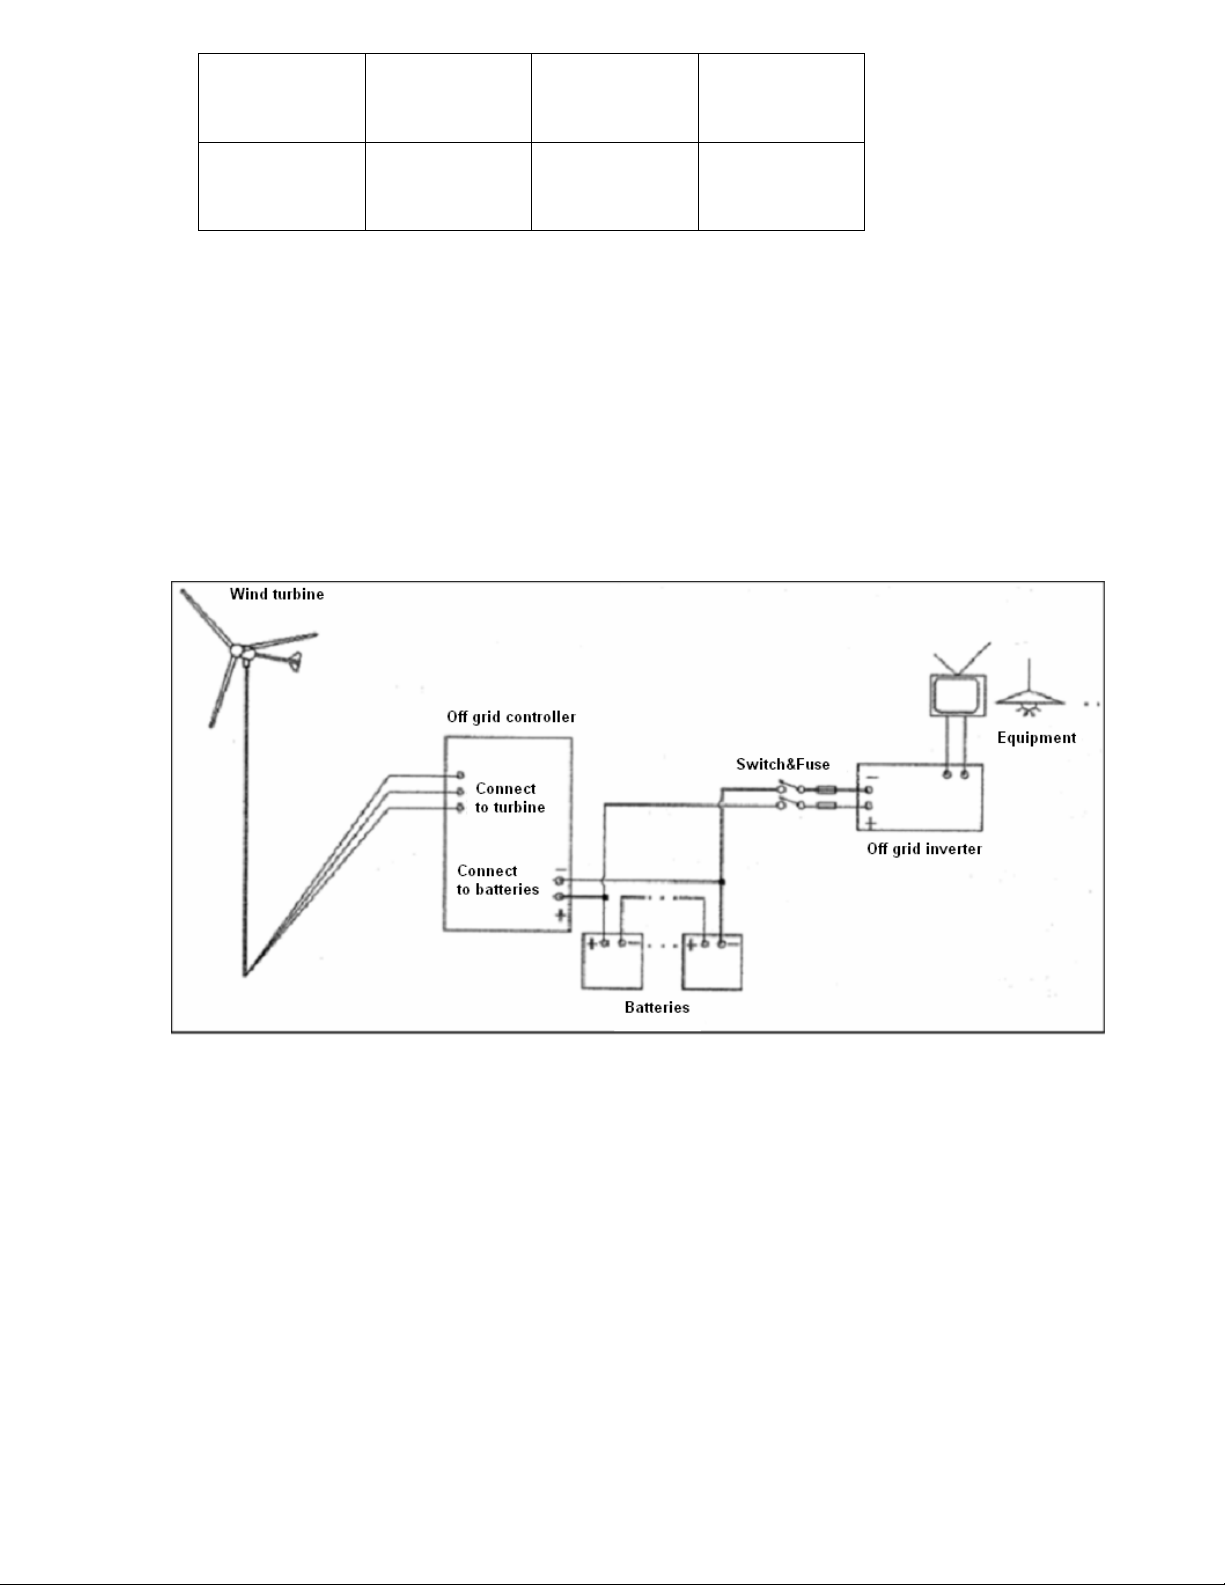
2. Electrical wiring of off-grid systems
The ground wire from generator must be connected to ground. The anode wire from generator must
connect to batteries’ anode and inverter’s anode. The cathode wire from generator must connect to
batteries’ cathode and inverter’s cathode. Must make sure that the generator’s output voltage and
batteries’ voltage and inverter’s input voltage is equal, and do not connect an anode to a cathode. A
wrong wiring maybe burn the generator or batteries or inverter.
When connect with wires, firstly link battery with controller, then link battery with inverter (notice to
put down the switch of inverter), next, connect the output of generator to input end of the controller.
7. Maintenance
Wind turbine may be operated under extremely harsh environment, or meet various complicated weather.
Therefore, examination and maintenance are necessary in order to keep the system operate rightly.
Do the following check every three month.
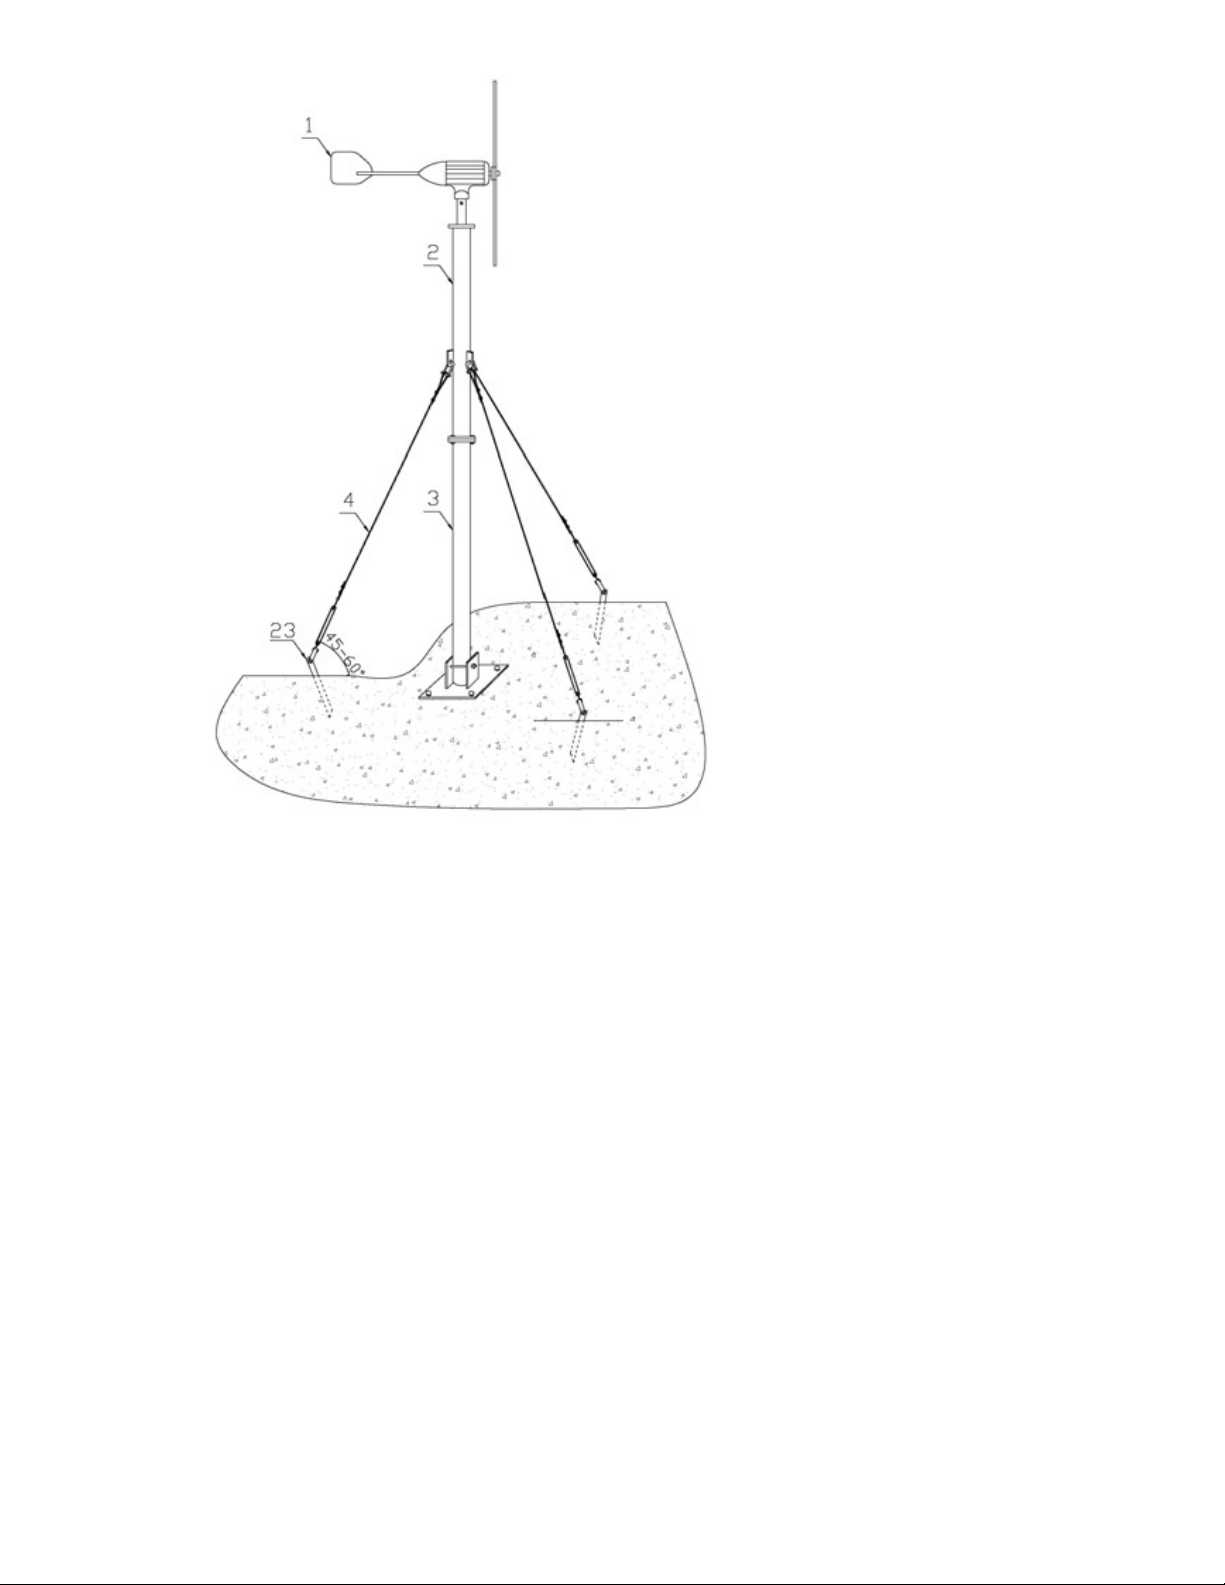
1. Check the guy wire is too loose or too tight, and adjust them, in particular in initial stage of installation
and post-gale.
2. Check whether or not the wire is damaged or loose. The joints are loose and rusted or not in order to
secure electrical safety.
3. Maintain the batteries following the battery manual.
4. Before storm, it is better to lay down the tower for escaping from unpredictable loss

Page 9 of 9
* The actual wind turbine may be different from pictures shown.
Table of contents
Popular Wind Turbine manuals by other brands

my!WIND
my!WIND 10 kW wind turbine installation manual

Nature's Generator
Nature's Generator Powerhouse Wind Turbine user manual

Tesup
Tesup MAGNUM 5 user manual

Marlec
Marlec Rutland FM1803-2 Furlmatic Installation & owner's manual

Primus Wind Power
Primus Wind Power EZ Tower owner's manual

Tesup
Tesup ZEUS3.0 user manual