Wine Corner WINE IN50+ User manual

U S E R G U I D E
D E F Y I N G
C O N V E N T I O N
WINE IN50+

USER MANUAL WINE IN50+ Page 2
User manual
Table of contents
1. CELLAR EQUIPMENT ............................................................................ 5
1.1. Evacuation room .......................................................................... 5
1.2. Cellar insulation ........................................................................... 6
1.2.1. Insulation of walls, ceiling and floor ......................................
1.2.2. The door ........................................................................... 8
1.2.3. Insulation of other elements ................................................ 8
2. INSTALLATION OF WINE CONDITIONNING UNIT WINEMASTER® ...... 9
2.1. Installation of ducting connection ................................................... 10
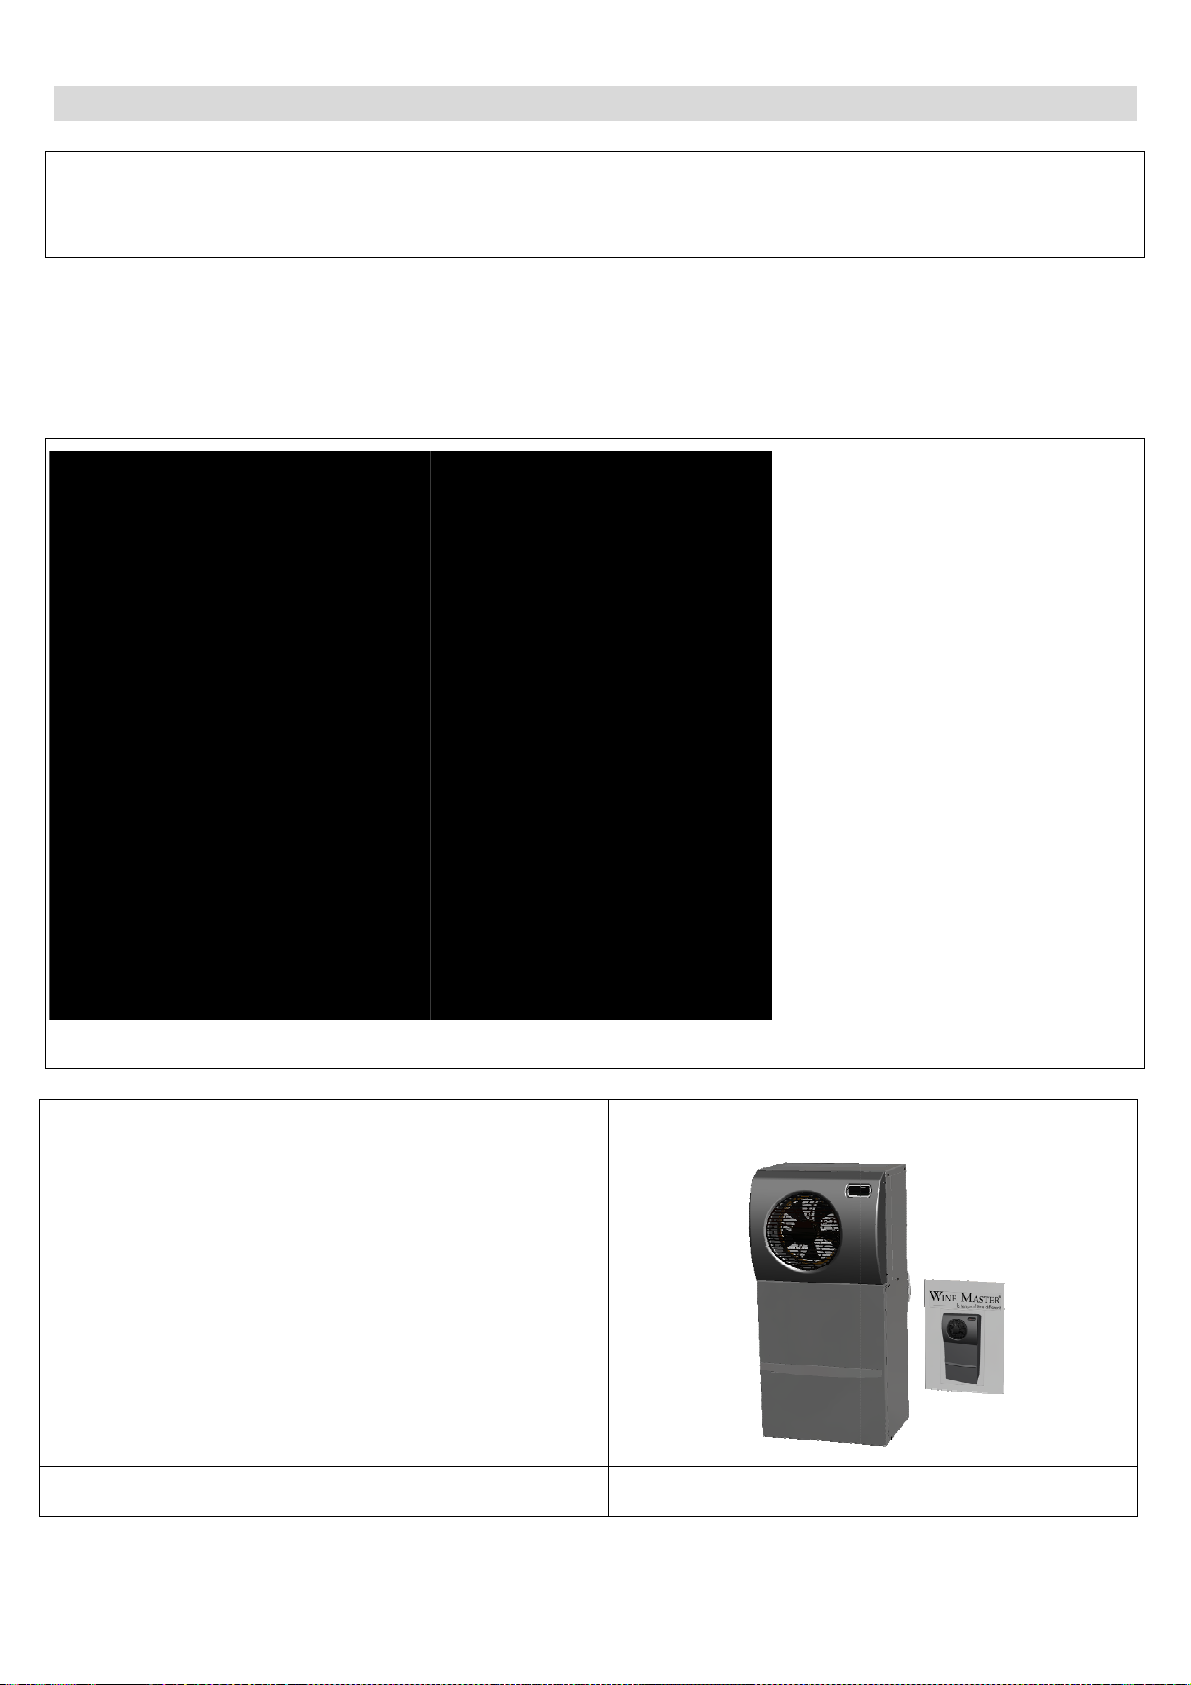
2.1.1. Ducting Kit composition....................................................... 10
2.1.2. Examples .......................................................................... 11
2.1.3. Preparation ........................................................................ 11
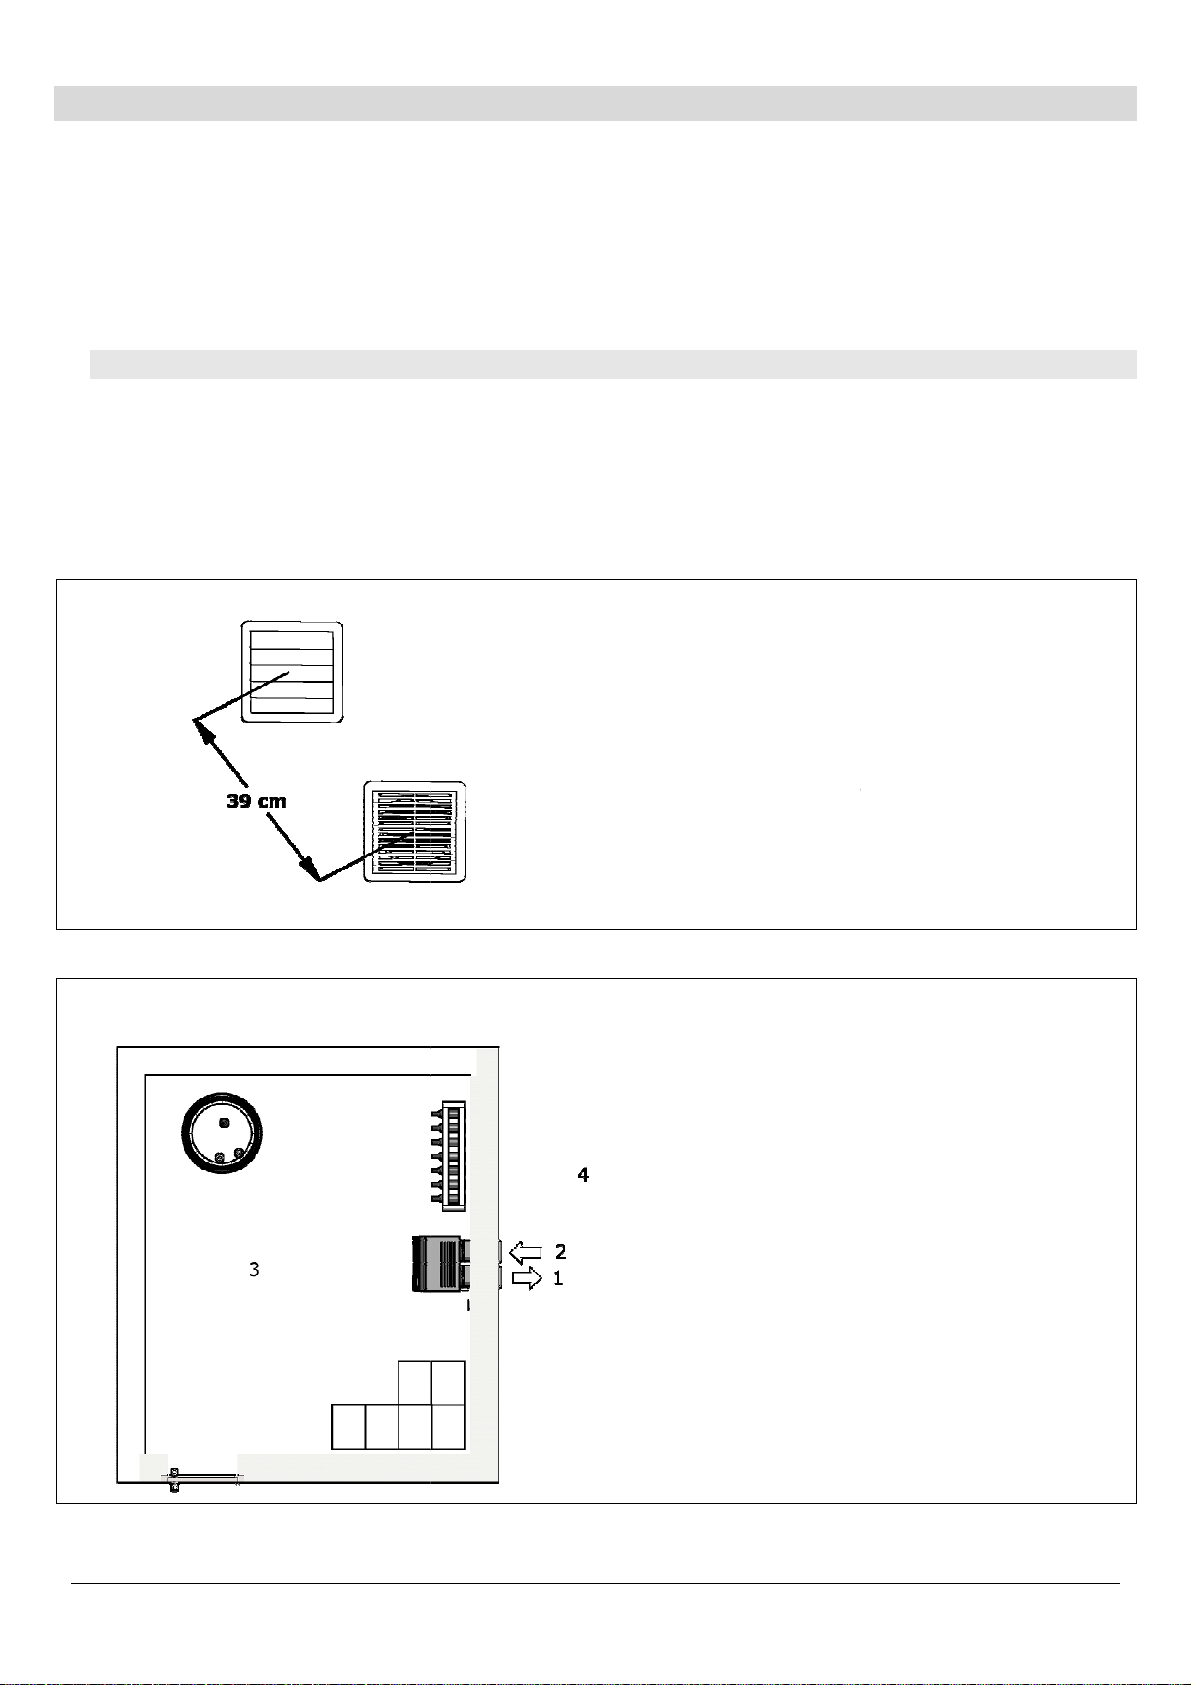
2.1.4. Wall drilling ....................................................................... 12
2.1.5. Air conditioner’s installation ................................................. 12
2.1.6. Grids installation ................................................................ 13
2.2. Installing the water drainage system .............................................. 14
3. USING THE WINE CONDITIONNING UNIT WINEMASTER® .................. 15
3.1. Connecting the air conditioner WINE IN50+ ..................................... 15
3.2. Plugging in the wine conditioning unit WINE IN50+ .......................... 16
3.2.1. Temperature setting of the air conditioner unit WINE IN50+ .... 16
3.3. Standby mode ............................................................................. 16
3.4. Automatic defrost ......................................................................... 16
4. MAINTENANCE OF THE AIR CONDITIONNER WINEMASTER® .............. 17
4.1. Replacing the filter ....................................................................... 1
4.2. Thermostat wiring ........................................................................ 1
5. WARRANT ......................................................................................... 18
5.1. Legal Warranty ............................................................................ 18
5.2. 2 years contractual warranty ......................................................... 18
5.3. Warranty conditions ..................................................................... 18
5.4. Exclusions and limitations of warranty ............................................ 18
GB

USER MANUAL WINE IN50+ Page 3
Introduction
You purchased an air conditioner WINEMASTER® and we thank you for your confidence.
From conception to commercialisation, everything has been implemented to offer an
exclusive and high quality product. Brainchild of a team who find in this a motivation to
ever give satisfy you, we hope that your wine conditioning unit WINEMASTER® will bring
you great storage and best wines aging for an incomparable pleasure.
Because the customer is at the heart of all our thoughts, we want to support you in your
first steps and lead you towards the best use of your air conditioner every day. Thus,
you will find in this manual technical information and practical advice to help you to deal
with the essential steps to installation and use.
In order that your wine tasting remains moments to share, FONDIS guarantees you a
sincere engagement, dedicated expertise and ongoing follow-up at your service!
FONDIS.

USER MANUAL WINE IN50+ Page 4
Technicals Datas
WINE IN50+
Weight 52.6 kg
Dimensions H.1044 X L.500 X P.428
Temperature setting Preset to 12°C, adjustable between 4 et 15°C *
Maximum outside temperature 35°C **
Cooling power 1200 W à 15°C **
Electric supply 230/240V-50 Hz + 3 m cable
Electric power 550 W
Heating power 500 W
Pression 900-1100hPa
The circuit breaker must be at least 16 Amps.
* The insulation quality and thickness has to be in accordance with the volume of the cellar and the set
temperature.
** The cooling performance is dependant from the outside temperature. Therefore, the set temperature
of 12°C for the cellar cannot be maintained if the outside temperature reaches the 35°C.
If the thermal safety functions to often, there is a risk for the compressor to be damaged. In all cases, it
must be avoid that the outside temperature remains at 35°C, this high temperature should be limited
to the summer period.
Technical Drawings

USER MANUAL WINE IN50+
1. CELLAR EQUIPMENT
The air conditioner has to be installed in the wine cellar on the su
weight of the unit.
For a
correct functioning, the unit expels air at the outside to
aspiration. This
air must be cooled in a well vent
This operation will be done
thanks to the insulated ducts in the inside of the cellar
1.1. Evacuation room
If WINEMASTER® evacuates
hot air in
-Maximum temperature
and non
-Ideal temperature ≈ 20°C.
It is recommended to evacuate the hot air to the outside with ducts
View
LE FROID VENTILE OU «
NO FROST
The air conditioner has to be installed in the wine cellar on the su
pplied horizontal supports adapted to the
correct functioning, the unit expels air at the outside to
15°C above the temperature of t
air must be cooled in a well vent
ilated room or be evacuated
outside
thanks to the insulated ducts in the inside of the cellar
hot air in
side the room you have to
ventilate the room
and non
permanent ≤ 35°C
It is recommended to evacuate the hot air to the outside with ducts
if possible
-
Separate the 2 entries of at least
cm
-
Do not block the ducts (risk of
overheating)
-
Maximum length of the 2 ducts in
totality
: 14 m in straight line
-
Reduce depending on the number of
elbow : 1 m per elbow
-Radius elbow ≥
-
Do not reduced the duct size
(180cm² mini)
1. EVACUATED AIR
2. AIR INLET
3. WINE CELLAR
4.
EVACUATION ROOM OR HAUSE OUTSIDE
NO FROST
»
20°C OK
35°C NO
Page 5
pplied horizontal supports adapted to the
15°C above the temperature of t
he air inlet
outside
.
thanks to the insulated ducts in the inside of the cellar
ventilate the room
:
if possible
.
Separate the 2 entries of at least
39
Do not block the ducts (risk of
Maximum length of the 2 ducts in
: 14 m in straight line
Reduce depending on the number of
elbow : 1 m per elbow
1 5 mm
Do not reduced the duct size
EVACUATION ROOM OR HAUSE OUTSIDE

USER MANUAL WINE IN50+ Page 6
The advantages of « ventilated cold »:
-No frost other than on the evaporator.
-Automatic defrosting and maximized refrigeration efficiency.
-Cold distribution improved by a permanent air circulation (without air stratification).
-The circulation of air allows maintaining the pre-selected temperature throughout the
cellar.
1.2. Cellar insulation
Insulation is essential for efficient functioning of the WINEMASTER®. A good insulation enables to
maintain a stable temperature and humidity level. The chart on the next page will allow you to
determine the type and thickness of insulation needed in relation to the exterior volume of the cellar and
model of the WINEMASTER®, for an inside temperature of 12°C.
Complete insulation
The insulating elements should be preferably :
-By « tongue and groove » panels or
-By panels fused together
IMPORTANT: Avoid the intrusion of heat and humidity which can alter the functioning of
the WINEMASTER®.
View
1. WALL
2. INSULATION MATERIAL
3. GROUND LEVEL
4. FLOOR
5. CEILING
6. INSULATED DOOR
2

USER MANUAL WINE IN50+ Page
IMPORTANT
The WINEMASTER® warranty is only valid if the insulation is in compliance with the board « Insulation
selection » requirements for the whole cellar (walls, floor, door and ceiling) with perfect continuity of
insulation.
Insulation selection
MINIMAL THICKNESS OF INSULATION (mm)
VOLUME OF
THE CELLAR
(m3)
MINIMAL
THERMAL
RESISTANCE
R : m². °C/W
Polystyrene
expanded
λ= 0.044W/m °C
PPolystyrene
extruded
λ= 0.030W/m °C
Polyurethane
foam
λ= 0.025W/m °C
14
16
18
20
22
24
26
28
30
32
34
36
38
40
42
46
50
0,94
1,08
1,21
1,35
1,48
1,62
1, 5
1,88
2,02
2,15
2,29
2,42
2,56
2,69
2,82
2,96
3,23
50
50
60
60
0
80
80
90
90
100
110
110
120
120
130
130
150
30
40
40
40
50
50
60
60
60
0
0
80
80
90
90
90
100
30
30
40
40
40
50
50
50
60
60
60
0
0
0
80
80
80
1.2.1. Insulation of walls, ceiling and floor
Type of insulation panels
You can select among the following type of panels :
-Usual panels,
-« Complex panels »: insulation is covered with a with a cover material (plaster, mineral …..)
-« Sandwich panels »: insulation is covered on each side with a wooden panel or plaster board.
Important : The covering of the panels protects the insulation against damage and guarantees its
longevity. Avoid using mineral fibres insulation (glass wool, rock woo, etc…) as they may
accumulate moisture and lose their insulation power and avoid also thin film insulation
that are not
effective for cold.
DO OU KNOW THAT ?
Some insulating materials are damaged by rodents. If necessary, cover the insulation with a protective
lining on the inside of the cellar to avoid presence of mouse or rats.
Polyurethane is an insulator that
, due to its chemical composition, is not attacked by
the rodents

USER MANUAL WINE IN50+ Page 8
Floor insulation
The floor of the cellar must be able to support the shelves and the stored wine. Thus, it’s necessary to
choose insulation with adequate compression strength.
Improve the load capacity of the insulation (particularly under the shelve legs) by using :
-« Complex » insulation panels covered by panels of higher load capacity.
-Cover the insulation panel with a wooden panel (at least 15 mm thickness), or every other
appropriated material.
1.2.2. The door
Door improves the insulation. Two solutions are possible :
-Insulate an existing door with the same insulation materials used for the walls of the
cellar. Provide a tight seal between the door frame and all sides of the door with a strip of foam
rubber for example.
-Use a specially design FONDIS isothermal door with polyurethane and a sealing foam rubber.
View
1. INSULATED DOOR
2. INSULATION
3. SEALING TAPE
1.2.3. Insulation of other elements
Avoid placing a wine cabinet or freezer who generates heat in the cellar. The central heating pipes
should be re-isolated during their passage through the cellar.

USER MANUAL WINE IN50+
2.
INSTALLATION OF WINE CONDITIONING UNIT
THE UNIT HAS TO BE INSTALLED RESPECTING THE NATIONAL R
Make sure to choose the correct
location
-Choose the perfect location
: length of duct as short as poss
-
No obstacle in front of ventilation
-Level the support
s in order to avoid vibrations
Necessary material (not delivered) in order to fix the
grids
INSTALLATION OF WINE CONDITIONING UNIT
WINEMASTER
THE UNIT HAS TO BE INSTALLED RESPECTING THE NATIONAL R
OF ELECTRIC INTALLATIONS.
location
for the air conditioner :
: length of duct as short as poss
ible,
No obstacle in front of ventilation
(helps flow of cold air moving),
s in order to avoid vibrations
,
Necessary material (not delivered) in order to fix the
Material included in the box
Page 9
WINEMASTER
®
THE UNIT HAS TO BE INSTALLED RESPECTING THE NATIONAL R
ULES
1. OUTSIDE WALL
2. INSULATED WALL
3. GRID
4. INSULATED DUCT
5. WINECONDITIONIN
UNIT
6. INSULATED DOOR
Material included in the box

USER MANUAL WINE IN50+
2.1. Duc
ting Kit installation
2.1.1.
Composition of the ducting kit
ting Kit installation
Composition of the ducting kit
Composition of the basic kit
-
2 grids kit with telescopic sleeve
-(re
duction Ø125
-
1 meter isolated straight pipe
Possibility of ordering additional parts
•2
meter isolated strai
with muff
•Elbow 90°
with muff
•Elbow 45°
with muff
•Collars
Page 10
Composition of the basic kit
2 grids kit with telescopic sleeve
duction Ø125
non used)
1 meter isolated straight pipe
Ø 160
Possibility of ordering additional parts
meter isolated strai
ght pipe Ø 160
with muff
with muff

USER MANUAL WINE IN50+ Page 11
2.1.2. Examples
- Guidance in all elbow directions
NB : The elbows are in option
2.1.3. Preparation
- Cut the pipe according to the type of
installation.
- Assembly the various elements with the muff
Pipe
Elbow
(Option)
Muff

USER MANUAL WINE IN50+ Page 12
-Fix the air-conditioner on to the isolated
pipes.
-There is no collar, the pipes are equipped
with lip seals
-put the reduction with the gasket at the
other end of pipe
2.1.4. Wall drilling
-Drill 2 holes diam 165 through the
wall to pass the telescopic
sleeves.
-Increase the diameter to 195mm
in the insulation material to
integrate the reduction
2.1.5. Air conditionner installation
-place the air-conditioner at the
site wanted while making pass
the sheath through the hole in the
insulation

USER MANUAL WINE IN50+ Page 13
2.1.6. Installation of the grids
ATTENTION ! each case is composed of 2 grids (blowing and aspiration). it is necessary to adapt the type
of grid
1. Grids
2. Frame
3. Telescopic sleeve
4. Reduction
5. Insulated pipe
-Connect the 2 pipes on the
reduction
- fill the vacuum between the
telescopic sleeve and the hole of
the wall thanks to insulating
material. (Polyuréthane foam)
1. Sleeve small part
2. Sleeve great part
ASSEMBL DETAILS
ASPIRATION
BLOWING

USER MANUAL WINE IN50+
2.2
Installing the water drainage system and ali
-
The condensation drain is done through flexible tube integrated into the air
-
The flow is done by gravity and must be connected to an evacuation of waste water or in
a bucket which wi
ll have to be emptied regularly.
-
THE LEVEL ADJUSTMENT OF THE AIR CONDITIONNER IS
FLOW: THIS ONE CAN BE ADJUSTS BY UNSCREWING THE FEET UNDER
If the electric cable is damaged, it must be replaced by manufacturer,
his
after sales service or similar qualified person
-
place the frame
telescopi
-
trace the clamp holes
-
Remove the frames, drill and
put the ankles
-
Put again the frames and screw
-
Put the grids and the
1
. Screw diam 4
2. Ankles nylon
3. Plates
4. Grids
5. Frame (x2)
Installing the water drainage system and ali
mentation cable
1. ALIMENTATION CABLE
2.
DRAIN PIPE Ø12mm X 1.5 meter
3. AJUSTMENT FEET
THE PIPE IS
ENOUGH LONG TO CROSS THE
WALL, REFLECT
BEFORE CUTTING IT
The condensation drain is done through flexible tube integrated into the air
The flow is done by gravity and must be connected to an evacuation of waste water or in
ll have to be emptied regularly.
THE LEVEL ADJUSTMENT OF THE AIR CONDITIONNER IS
VERY IMPORTANT FOR
FLOW: THIS ONE CAN BE ADJUSTS BY UNSCREWING THE FEET UNDER
If the electric cable is damaged, it must be replaced by manufacturer,
after sales service or similar qualified person
in order to avoid a danger.
Page 14
place the frame
on the
telescopi
c sleeves
trace the clamp holes
Remove the frames, drill and
put the ankles
Put again the frames and screw
Put the grids and the
plates
. Screw diam 4
2. Ankles nylon
5. Frame (x2)
mentation cable
DRAIN PIPE Ø12mm X 1.5 meter
.
ENOUGH LONG TO CROSS THE
BEFORE CUTTING IT
The condensation drain is done through flexible tube integrated into the air
-conditioner.
The flow is done by gravity and must be connected to an evacuation of waste water or in
VERY IMPORTANT FOR
THE
FLOW: THIS ONE CAN BE ADJUSTS BY UNSCREWING THE FEET UNDER
THE UNIT.
If the electric cable is damaged, it must be replaced by manufacturer,
by
in order to avoid a danger.

USER MANUAL WINE IN50+
After transport or maintenance, wait for
on
3.
USING THE WINE CONDITIONNING UNIT
The thermostat indicates
the temperature in the wine cellar with a precision of 2°C. A temperature change
of the air doesn’t mean the same change of temperature of the liquid due to the thermal capacity of the
liquid.
The temperature is set at 12°C in the factory.
controlled and adjusted as shown in next paragraph if necessary.
3.1.
Connecting the air conditioner
When you plug the unit to the electrical socket, the display indicates the temperature of the
cellar :
-If the cellar temperature ≥
to the thermostat setting
-If the cellar temperature
≤ to the thermostat setting
works.
The power outlet must be accessible after installation
The DRAINAGE PIPE SHOULD NOT BE WEDGES OR
MAKE a LOOP Upwards!
The col
lecting tray is likely to overflow if the pipe
is not directed downwards
Important :
After transport or maintenance, wait for
24 hours before switching
on
the air conditioner.
USING THE WINE CONDITIONNING UNIT
WINEMASTER
the temperature in the wine cellar with a precision of 2°C. A temperature change
of the air doesn’t mean the same change of temperature of the liquid due to the thermal capacity of the
The temperature is set at 12°C in the factory.
During installa
tion the set temperature must be
controlled and adjusted as shown in next paragraph if necessary.
Connecting the air conditioner
WINE IN50+
When you plug the unit to the electrical socket, the display indicates the temperature of the
to the thermostat setting
: the fan starts up immediately
≤ to the thermostat setting
: the fan doesn’t start.
The power outlet must be accessible after installation
Page 15
The DRAINAGE PIPE SHOULD NOT BE WEDGES OR
lecting tray is likely to overflow if the pipe
is not directed downwards
24 hours before switching
WINEMASTER
®
the temperature in the wine cellar with a precision of 2°C. A temperature change
of the air doesn’t mean the same change of temperature of the liquid due to the thermal capacity of the
tion the set temperature must be
When you plug the unit to the electrical socket, the display indicates the temperature of the
: the fan starts up immediately
: the fan doesn’t start.
Only the ventilator
The power outlet must be accessible after installation
.

USER MANUAL WINE IN50+ Page 16
3.2. Plugging in the wine conditionning unit WINE IN50+
3.2.1. Temperature setting of the air conditioner WINE IN50+
The setting of the targeted temperature is made on the thermostat :
-Press button one second until the targeted temperature is blinking.
-Use button to increase the temperature or
-Use button to lower the temperature.
-When the right temperature is set, press again on button to confirm it.
Explanation of the main display symbols :
Red light = cold mode engaged (compressor working)
Red light = cooling fan high speed
Red light = defrost
Red light = heat mode engaged (resistance)
3.3. Stanby mode
- Stanby mode : maintain a 3 seconds pressure on button 1. The compressor
stops and the fan turn at low speed.
-The thermostat indicates « OFF » and also the cellar temperature.
-To come back, maintain again a 3 seconds pressure on button 1.
-The thermostat indicates « ON » during 1 second.
3.4. Automatic defrost
4. The program of the IN50+ thermostat will run an automatic defrost time several times a day. During
this operation, the compressor is stopped, only the fan is functioning at low speed. The condensate
water producing during this period will be evacuated through the tube drain.

USER MANUAL WINE IN50+
5.
MAINTENANCE OF THE AIRCONDI
5.1.
Replacing the filter
IMPORTANT :
-
Regular filter cleaning (vacuum cleaner)
- Control : Ever
y 3 month
- Replacement
: Once a year
SPOILED FILTER = DAMAGED WINE CONDITIONING UNIT
TO DO FOR OUTSIDE
-
egular cleaning of outside grids (foliage…)
TO DO FOR THE DRAINAGE PIPE
-check
if it is not blocked,
5.2.
Câblage du thermostat
1.
purple
2. red (
heating resistance
3.
Brown
4.
Black (compressor
5.
brown
6.
blue (neutral
. red (
probe
8.
white
If you dismounted the sheet cover, tighten the grou
screwdrivers with a tightening torque of 1,5 N.m
Filt
er drawer
MAINTENANCE OF THE AIRCONDI
TIONER
WINEMASTER
Replacing the filter
Remove the filter
Replace with a
FONDIS filter
exclusively
Close the filtre drawer
Regular filter cleaning (vacuum cleaner)
y 3 month
: Once a year
SPOILED FILTER = DAMAGED WINE CONDITIONING UNIT
GRIDS :
egular cleaning of outside grids (foliage…)
. Regarding the use
TO DO FOR THE DRAINAGE PIPE
if it is not blocked,
clean if necessary.
Câblage du thermostat
purple
(Fan Speed)
heating resistance
)
Brown
(power phase)
Black (compressor
)
brown
(alimentation phase)
blue (neutral
)
probe
)
white
(probe)
If you dismounted the sheet cover, tighten the grou
nd screw (marked
screwdrivers with a tightening torque of 1,5 N.m
er drawer
Dust Filter
Page 1
WINEMASTER
®
Remove the filter
(2) from the drawer
FONDIS filter
Close the filtre drawer
(1)
SPOILED FILTER = DAMAGED WINE CONDITIONING UNIT
. Regarding the use
) with a

USER MANUAL WINE IN50+ Page 18
6. WARRANT
6.1. Legal warranty
The contractual warranty is not exclusive, the fundraiser for the purchaser profit of the legal warranty
against latent defects that appliers in terms of articles 1641 and following from the Civil Code.
6.2. 2 years contractual warranty
As a supplement to the legal warranty provided under the laws of the purchaser’s country, FONDIS offers
an additional 2 years contractual warranty against any manufacturing defect.
During this period of contractual warranty, FONDIS will replace any parts that have a manufacturer’s
defect.
In case of electric failure, FONDIS reserves the right to send an expert technician to inspect the appliance
before replacing any defective parts.
In case of refrigeration failure, FONDIS may require that the appliance is returned to the factory for
repair. Any interventions will take place according to the guidelines set in the “after sale
service
“document.
Interventions and returns can only be done after written agreement from FONDIS after sale
Service.
6.3. Warranty conditions
The contractual warranty applies to all appliances installed and used in conformity with this « User
Manual". His application is conditioned by the presentation of the purchase invoice or for lack of its copy.
6.4. Exclusions and limitations of warranty
The warranty can refused in following cases:
-Insulation of the cellar or installation of the appliance not in compliance with the instructions of this
guide.
-Damage due to negligence, lack of maintenance or incorrect use of the WINEMASTER® (particularly
dirty filters).
-Exchange or repair of parts under warranty will not extend the 2 years warranty period
FONDIS SA cannot, in any case, be held liable for any direct or indirect damages resulting from the failure
of the air conditioner. The warranty is exclusively limited to the product itself provided by
FONDIS S.A.
The European Community attaching a great importance to the environment and the
waste processing, set up Directive 2002/96/CE relating to the Electric and Electronic
Component waste.
In accordance with this standard, the logo “barred dust bin” is obligatory.
This logo means that this product cannot be thrown in the household shelter.
It must be given to a suitable collection point for the treatment, valorisation,
recycling of Electric and Electronic components.
Acting like that you make a gesture for the environment and you contribute to the
safeguarding of the natural resources as well as to the protection of human health.

Unit 4 Brunel Close,
Harworth, Doncaster DN11 8QA
Tel: 01302 744916 Fax: 01302 751233
E-mail: info@winecorner.co.uk
www.winecorner.co.uk
© Wine Corner Limited 2012. We reserve the right to change product specifications and prices without prior notice.
Wine Corner Limited does not accept any responsibility for any loss, which may arise as a consequence of reliance on information contained in this price list.
Table of contents
Other Wine Corner Wine Cooler manuals

Wine Corner
Wine Corner JG32 User manual

Wine Corner
Wine Corner Wine C25 User manual

Wine Corner
Wine Corner Wine PC15 User manual

Wine Corner
Wine Corner SP40DUPRO Operation manual

Wine Corner
Wine Corner WINEMASTER WINE ARM 15 Operation manual

Wine Corner
Wine Corner CI140CF User manual

Wine Corner
Wine Corner Winemaster C50 IN User manual

Wine Corner
Wine Corner WINE SP100 User manual