Wintec LP-MINI 46 User manual

LP-MINI 46
User’s Manual

Thank you for purchasing Wintec products. Based on the innovative
technology in this ever-changing environment, we have been
developed many wireless products that have attract more consumers’
attentions. We sincerely appreciate your interest for our products, and
we suggest you read the instruction carefully. Your comment will be
highly valued. Please read through the manual in order to get familiar
with the device and learn the features of this model.
The following safety precautions shall always be observed during
operation.
Do not modify the radio for any reason.
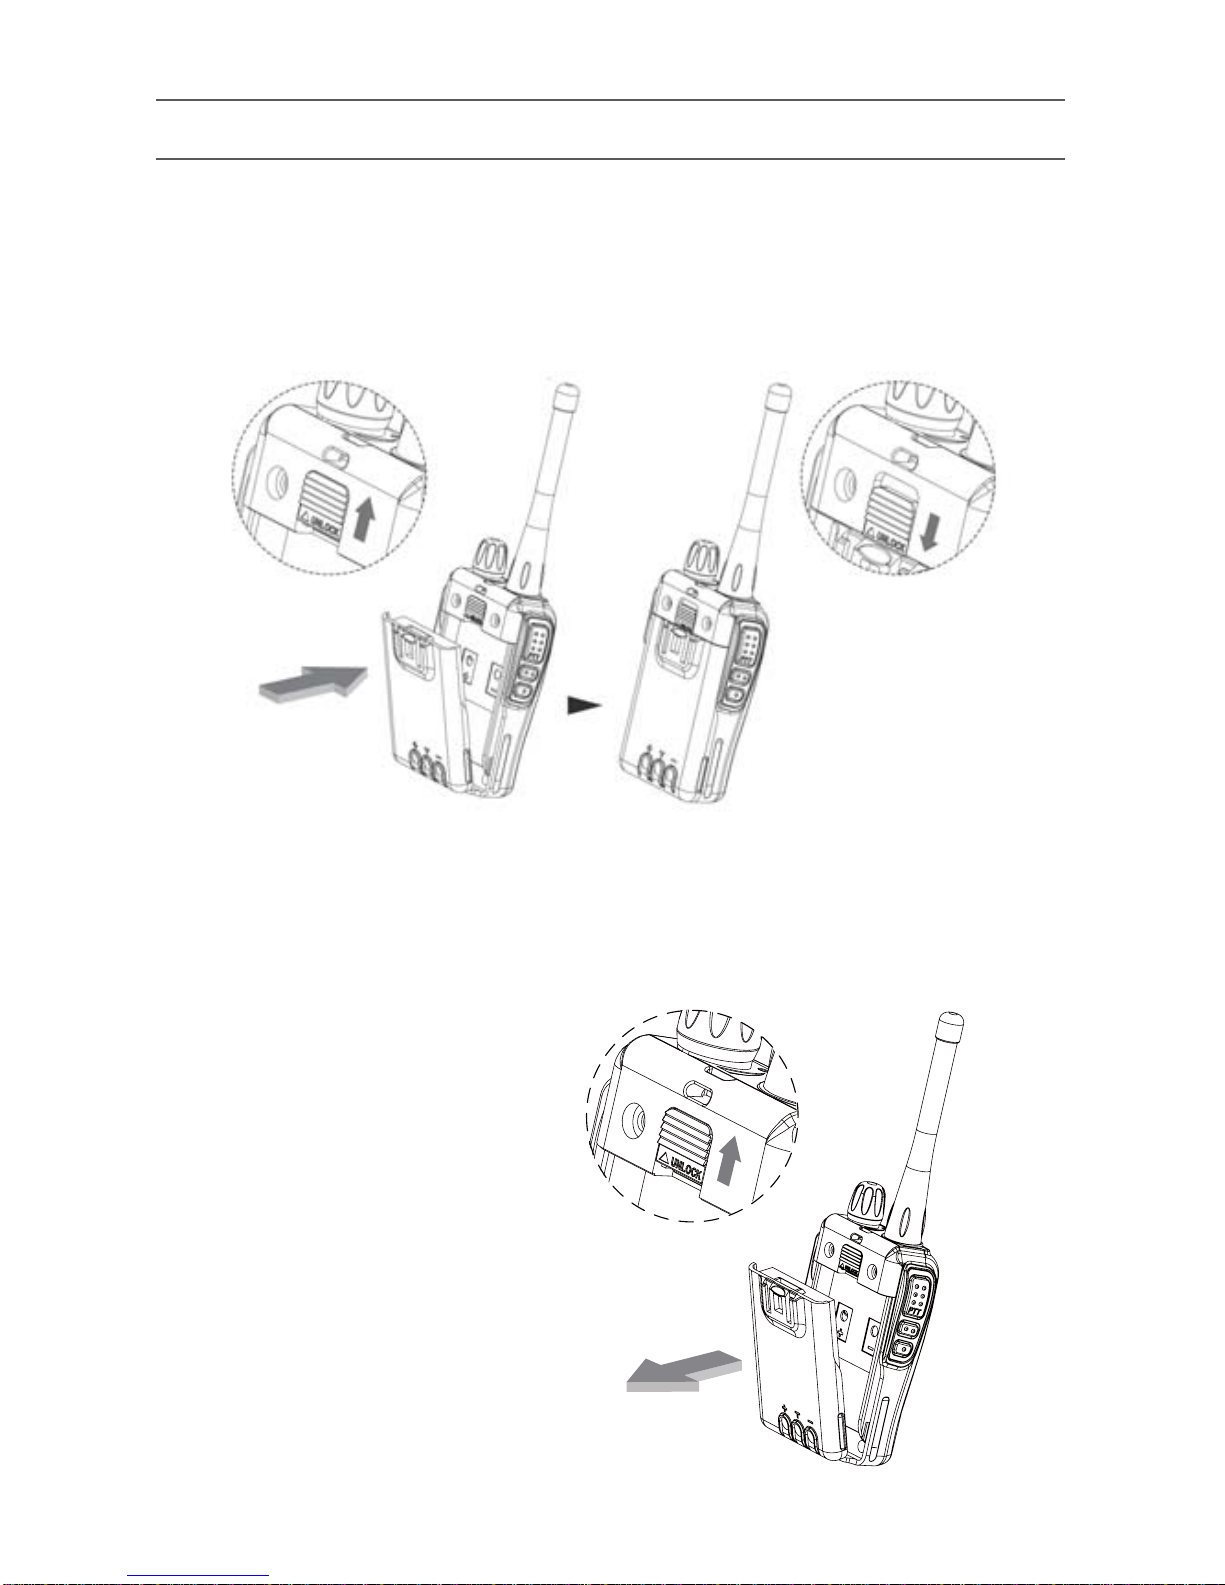
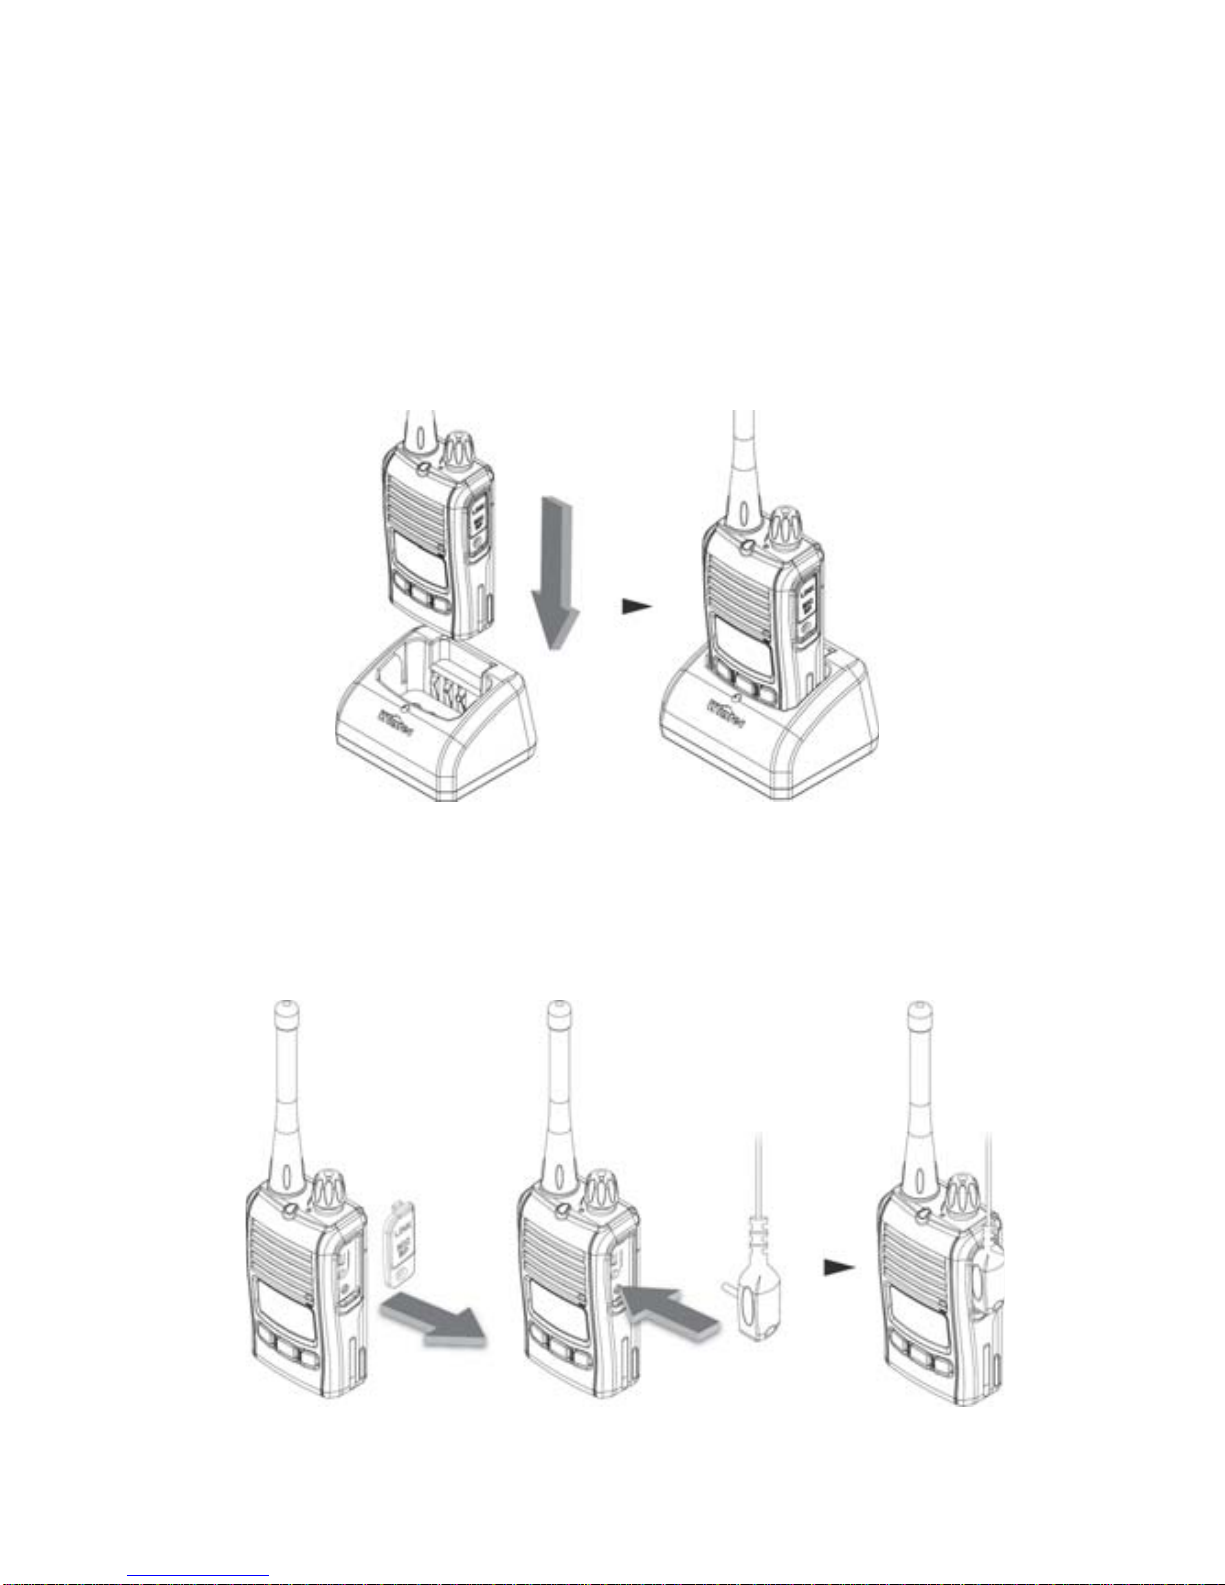
Use only Wintec supplied or approved batteries and chargers.
To avoid electromagnetic interference and/or compatibility
conflicts, turn off your radio in any area where posted notices
instruct you to do so.Turn off your radio before boarding an aircraft.
Any use of a radio must be in accordance with airline regulations or
crew instructions.
Turn off your radio prior to entering any area with explosive and
flammable materials.
Do not use any portable radio that has a damaged antenna. If a
damaged antenna comes into contact with your skin, a minor burn
can result.
Do not expose the radio to direct sunlight over a long time, nor
place it close to heating source.
When transmitting with a portable radio, hold the radio in a vertical
position with the microphone 3 to 4 centimeters away from your
lips. Keep antenna at least 2.5 centimeters away from your body
when transmitting.
Certificate Approval
Safety Warning
.
.
.
.
.
.
.

Contents
Radio Overview.....................
LCD Icons........................
Installation of Accessories.................
Operation Guide.....................
Function Menu.....................
Optional Accessories...................
1
4
5
8
10
12
When you receive your radio package, inspect the shipping carton for
any signs of damage. Next, remove and check the contents of the
packing case to be sure that all items ordered have been included.
Contents of the packing case may be different from those listed if
optional accessories were ordered.
Packaged Model Contents
1. Radio Unit
2. SMA rubber flex antenna
3. Battery
4. Belt Clip
5. Rapid Charger and Transformer
6. User’s manual

Antenna (SMA socket)
LED Indicator
Power Switch / Volume Control
Data socket (mini USB)
External Mic. Jack
LCD display
Up button
Set button
Down button
PTT button (Push to talk)
P2 function button
P1 backlight button
Speaker
Mic.
Lanyard hole
Battery Latch
Radio Overview
1
12
3
4
5
6
7 8 9
10
11
12
13
14
15
16
1
2
3
4
5
6
7
8
9
10
11
12
13
14
15
16

2
1. Antenna
(SMA socket)
Provide attached SMA rubber ex antenna or
other 50Ω impedance antenna.
Note: It may cause the damage to your radio if
the antenna is connected inappropriately.
2. LED Indicator LED Indicator turns on red when transmitting.
LED Indicator turns on green when receiving
signal.
3. Power Switch /
Volume Control
Rotate the power switch / volume control knob
clockwise to switch power ON. When the click
sound of switch and the melody is heard, the
transceiver is powered. Adjust volume
appropriately.
Note: Please be aware that the hearing may be
harmed by outburst of sound. Rotate the power
switch / volume control knob counterclockwise
to switch power OFF. When the click sound of
switch is heard, transceiver’s power is turned o.
4. Data socket
(mini USB)
Connect optional accessories and computer
interface.
5. External Mic. Jack Connect an optional speaker-microphone or
headset, if needed.
The internal microphone and speaker will not
function when either is connected.
Note: Turn to the lowest volume if external
Mic./speaker is used, then adjust the volume
appropriately.
Avoid outburst of sound harmful to ears.
6. LCD display Shows transceiver’s status.

3
7.Up button [▲] ◆Press [▲] to select the channel / CTCSS
upward.
◆Press and hold [▲] to enable the scanning
function and perform the channels upward.
◆In function menu, press [▲] to switch the
selections upward.
8. Set button [SET] ◆Press [SET] to enter CTCSS adjustment.
◆Long press [SET] to enable / disable the keypad
lock function.
◆In the status of scanning, press [SET] to delete
the scanning.
9. Down button [▼] ◆Press [▼] to select the channel / CTCSS
downward.
◆Press and hold [▼] to enable the scanning
function and perform the channels downward.
◆In function menu, press [▼] to switch the
selections downward.
10. PTT button
(Push to talk)
Press and hold this button to talk; release it to
listen.
11. P2 function button Press and hold this button to enter the function
menu.
12. P1 function button ◆Short press to turn on / o Backlight.
◆Long press to turn o SQL temporarily for
monitoring and the radio would receive weak
signals.
16. Battery Latch Push up battery latch to release battery pack.

4
LCD Icons
Symbol Item Description
Signal Strength
Shows the signal strength. Four bars indicate
the strongest signal.
CTCSS Tone
Indicator
Speaker
ON/OFF
◆The icon appears and stays on when the
CTCSS tone is not set with; the icon
disappears on the screen if the channel is set
with CTCSS tone.
◆The icon blinks when the radio speaker is
on and receive signals.
Tx Power Level
The icon is lit up when the radio is congured
to transmit in Low Power, and disappeared
when the radio is congured to transmit in
High Power.
Power Saving Indicates that the power saving function is on.
Headset The icon is lit up when the
speaker-microphone or headset is connected.
Keypad Lock
Indicates that all buttons are locked expect
PTT button.
Battery Level
Shows the remaining charge of the battery
capacity.

5
Installation of Accessories
To Attach the Battery
Fit the extensions at the bottom of the battery into the slots at the
bottom of the radio’s body.
Press the top part of the battery towards the radio until a click is
heard.
1.
2.
To Remove the Battery
Turn off the radio.
Push up the battery latch.
Pull the top part of the battery away from the radio’s body and lift the
battery from the radio’s body.
1.
2.
3.

6
To Attach the Belt Clip
Align the grooves of the belt clip with the battery.
Slide the belt clip downwards until a click is heard.
1.
2.
To Remove the Belt Clip
Lift belt clip tab up.
Slide the belt clip upwards to remove it.
1.
2.

7
Battery Charging
Steady Green: Charger has successfully powered up.
Steady Red: Battery is in rapid charge mode.
Blinking Green: Battery has completed rapid charge.
Blinking Red: Battery is unchargeable or not making proper contact.
Place the radio with battery attached or the spare battery alone in the
rapid charger for charging. Following is LED instruction.
1.
2.
3.
4.
Use of external MIC / Speaker
Remove accessory jack cover
Insert accessory jack
Fix accessory with the screws
1.
2.
3.
Note: Rotate the Power Switch / Volume knob slowly to avoid outburst
of sound harmful to ears.

8
Operation Guide
Before operating the radio, make sure the attached battery is fully
charged. When the battery level is very low, you need to recharge it
before you can continue to use your radio (The radio has a battery
voltage icon to show the battery status on LCD screen).
Rotate the power switch / volume control knob clockwise to switch
power ON. When the click sound of switch and the melody is heard,
the radio is powered on.
Rotate the Power switch / volume control knob counterclockwise to
switch power OFF. When the click sound of switch is heard,
transceiver’s power is turned off.
Power On / Off
.
.
.
.
.
.
.
.
.
Before press and hold the PTT button, please check if the LED
indicator turns on green or not (Green stands for channel busy).
Press PTT button and speak clearly with your mouth about 5-10cm
away from the microphone. The LED indicator turns on red during
transmission.
Release PTT button when you finish speaking and receive signals.
During receiving, LED indicator turns on green.
Receiving / Transmitting
Rotate the Power / Volume control knob clockwise to increase
volume.
Rotate the Power / Volume knob counterclockwise to decreases
volume.
Rotate the power switch/volume knob slowly to avoid outburst of
sound harmful to ears.
Adjusting Volume
Press [▲] [▼] to select the assigned channel.
Channel Adjustment
Note: avoid outburst of sound harmful to ears.

9
Press and hold [▲] [▼] to start scanning for the channel.When scanning
is in operation, press [SET] to end the scanning.
Press [SET] to switch the function of channel adjustment and CTCSS
Tone adjustment.
Press [▲] [▼] to select the assigned tone on channel.
There are 51 standard codes of CTCSS as below table.(Factory default
is OFF)
CTCSS Tone Adjustment
Channel Scan
.
.
.
1 67.0 11 97.4 21 136.5 31 192.8 41 159.8
2 71.9 12 100.0 22 141.3 32 203.5 42 165.5
3 74.4 13 103.5 23 146.2 33 210.7 43 171.3
4 77.0 14 107.2 24 151.4 34 218.1 44 177.3
5 79.7 15 110.9 25 156.7 35 225.7 45 183.5
6 82.5 16 114.8 26 162.2 36 233.6 46 189.9
7 85.4 17 118.8 27 167.9 37 241.8 47 196.6
8 88.5 18 123.0 28 173.8 38 250.3 48 199.5
9 91.5 19 127.3 29 179.9 39 69.3 49 206.5
10 94.8 20 131.8 30 186.2 40 62.5 50 229.1
51 254.1

10
Function Menu
Press and hold P2 button to enter the function menu. Press [▲] [▼] to
select the function settings.
Adjust radio’s squelch level between Level 0 ~ Level 7.
SQL: Squelch Level
Turn on / off all sound effect (including power-on melody, key beep,
warning beep...etc.).
SOUND: Sound Effect
There are OFF / 30 / 60 / 120 mins for selection. While one of them is
selected, the radio will automatically turn the power off when times out
if none of the button is operated.
The radio will send out a reminder melody and LCD screen shows“APO”
from the last 5 mins before turning off.
APO: Automatically Power Off
Menu
Items Description Factory
Default Option
SQL RF Squelch Level 3 Level 0~ Level 7
SOUND Sound Eect ON ON / OFF
APO Auto-power-o OFF OFF / 30 / 60 / 120 mins
TOT Transmission Timeout OFF
OFF / 30 / 60 / 90 / 180 /
360sec
PSAVE Power Saving mode 1:2 OFF / 1:1 / 1:2 / 1:3 / 1:4
MIC-G Mic. Gain L VL / L / H
VOX Voice-Activate System OFF OFF / Level1~ Level 9
RESET
Restore to factory
setting
NO NO / YES

11
There are OFF / 30 / 60 / 90 / 180 / 360 secs in selection. While one of
them is selected, push and hold PTT if continuous talk before the time
out 10 sec. and radio will send out a beep warning sound. At the same
time, LCD screen shows “TOT”, the radio will stop transmission at
time-out and there are beeps sounds continuously until PTT is released.
TOT:Transmission Timeout
Turn on power saving mode could extend radio operation time.
Power saving mode can be selected in OFF/1:1/1:2/1:3/1:4 level.
(1:4 is the one saving most power)
PSAVE: Power Saving
There are Very Low / Low / High gains in selection.
Please choose “High” when you need to speak softly and set as “Very
Low” when the environment with loud noise (such as riding a
motorcycle).
MIC-G: Microphone Gain
VOX is a speech control giving the possibility to transmit without using
the radio PTT.The VOX sensitivity can be set in OFF and 9 different sound
levels.
1 stands for the highest sensitivity; 9 stands for the lowest. That means,
the smaller of the setting value means the better ability to transmit the
signals.
(Factory setting is OFF)
VOX: Voice-Activate System
Press [▲] [▼] button to select “YES” and then press the set button to
return to default factory setting.The radio will automatically turn off and
restart again, at that time; all the functions set on the radio will be
restored to the default setting.
RESET: Restore to default setting

LP-46C
Air-tube Earphone
with PTT
Li-ion Battery
2000mAh / 3.7V
1150mAh / 7.2V
LP-46A
Earpiece with PTT
LP-46B
Earhook Earphone
with PTT
WI CR01
USB Programmable Cable
Optional Accessories
12
Note: Pictures are for reference only and may vary from actual product.
Product function shall remain the same. The above listed items are the
common optional accessories for your radio. To order other accessories,
please contact your local dealer.
Wintec endeavors to achieve the accuracy and completeness of this
manual, but no warranty of accuracy or reliability is given. All the
above specifications and design are subject to change without
notice due to continuous development. No part of this manual may
be copied, reproduced, translated, stored in a retrievable system,
distributed, or transmitted in any form or by any means, electronic
or mechanical, for any purpose without the express written
permission of Wintec.

PK MINI47-E VER.1
www.wintec.com.tw
Table of contents
Other Wintec Two-way Radio manuals