Installation Instruction
For One Piece Toilet
Model:WZ5081
IMPORTANT!
PRODUCT IS FRAGILE. TO AVOID BREAKAGE AND POSSIBLE INJURY HANDLE WITH CARE
The toilet must be installed by a fully insured and licenced plumber only.
Also be sure the installation conforms to local plumbing and building codes.
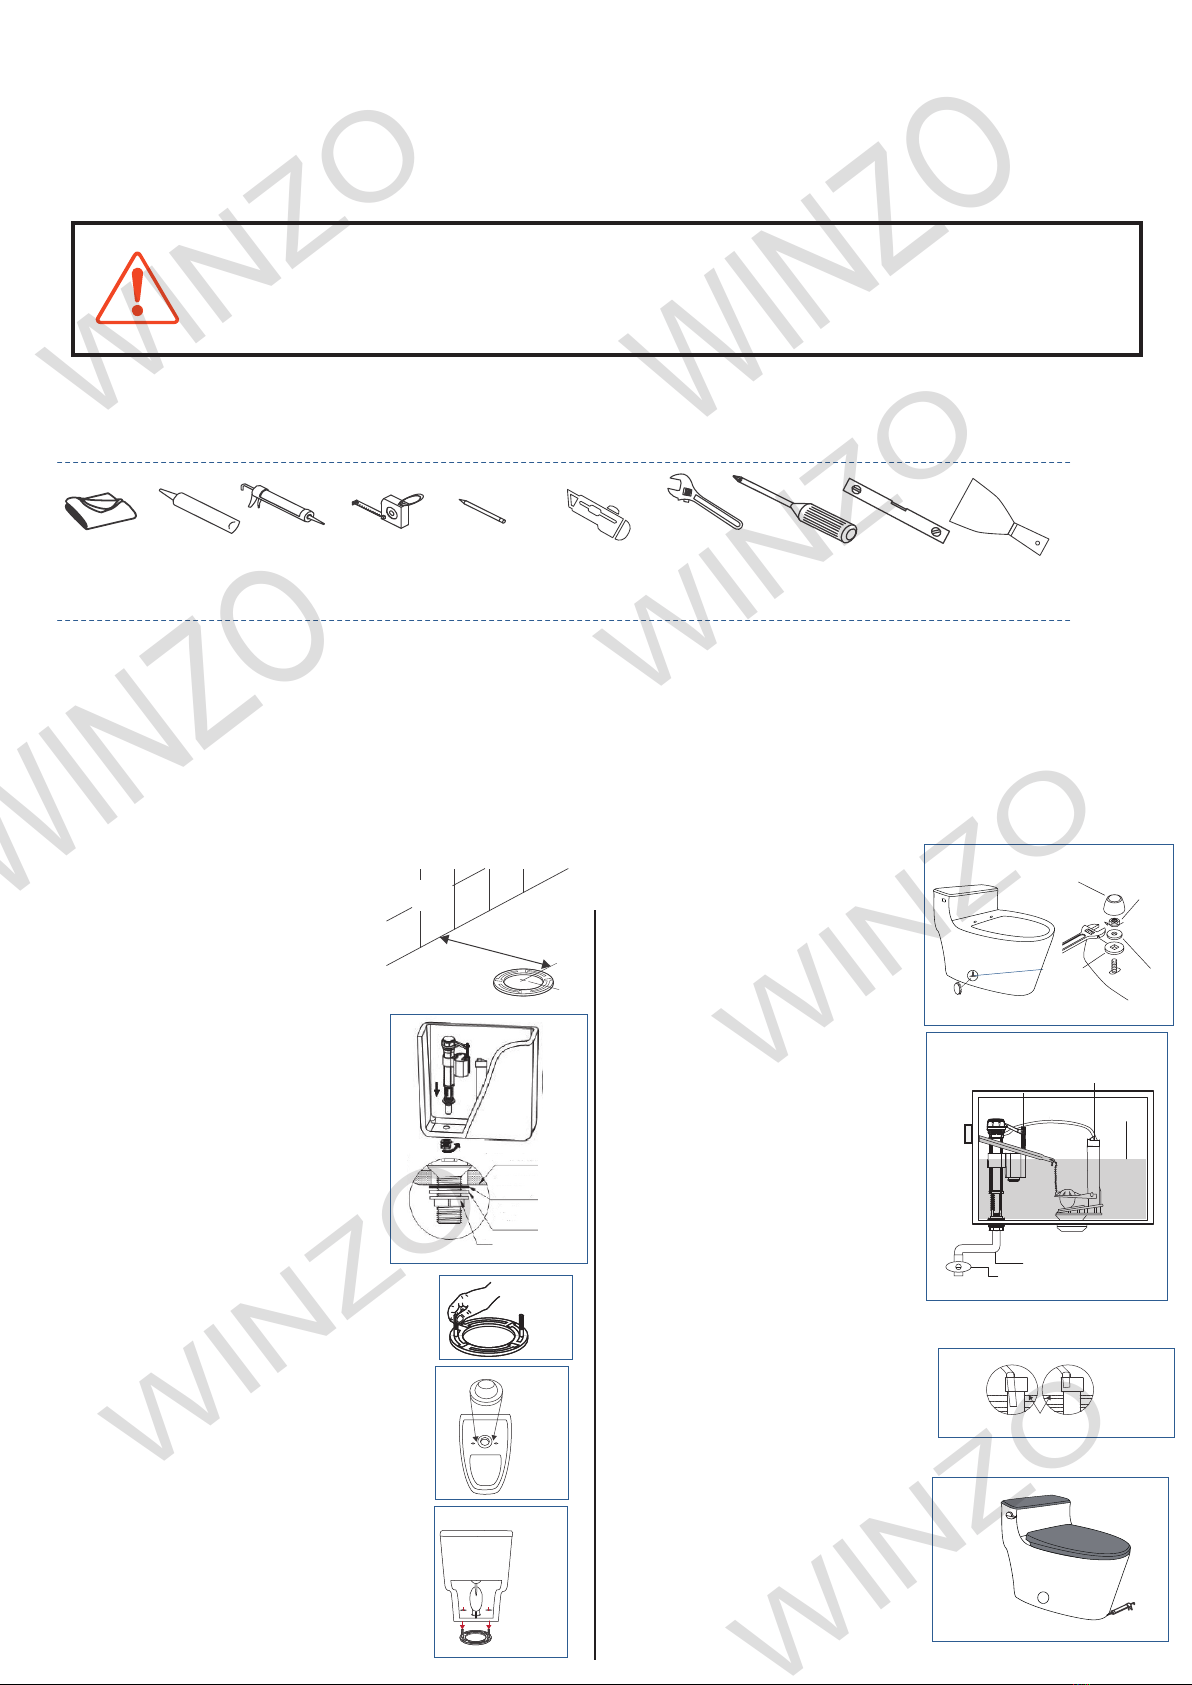
TOOLS REQUIRED FOR INSTALLATION
Soft Cloth
or Blanket
Silicone Silicone/
Caulk Gun
Tape
Measure
Pencil/Marker Knife
Adjustable
Wrench Screwdriver Level
Putty Knife
INSTALL NEW TOILET
REMOVE OLD TOILET Shut off main water supply prior to installation!
1. Shut off water supply line. If you do not have shut-off valve near the toilet shut off main water supply line.
2. Remove remaining water from tank and bowl with a sponge or towel..
3. Disconnect and remove water supply line connected to the toilet's tank.
4. Remove old mounting hardware and old toilet. Be sure to plug floor waste opening to prevent escaping sewer gases
5. Remove closet bolts from flange and clean away old wax, putty, etc. from base area.
NOTE: Mounting surface must be clean and level before new toilet is installed!
Thanks for your selecting WinZo toilets. To ensure this product is installed properly, please read these instructions carefully before you begin.
1. In order for your new toilet to fit correctly,
check the rough-in dimensions (Distance
from finished wall to center of mounting bolt
holes must be 12”. (see Figure 1)
Bathroom
Wall
Bathroom
Floor
Closet Flange
12"
Rough-in
4. Carefully turn the toilet upside down on
some padding. Firmly press a new wax
ring onto the circular recess around the outlet
opening. (See Figure 4)
Figure 4
5.Turn the toilet upright and gently lower it into
position over closet flange & bolts. With the toilet
properly aligned, press down firmly on both sides of
toilet rim to seat wax seal (CAUTION: Do not move
toilet after the wax ring is set) (Figure 5)
6.Install bolt cap bases, Washers,nut and
bolt cap over the closet bolts via the
opening holes on both side of bowl. Do not
tighten the nuts. It may and will cause
damage to the toilet's ceramic base. Then
cover the opening holes with supplied
plastic cover. (Figure 6)
7. Install the lever trip, connect the water
supply line,and turn on the water. Flush
several times, check for leaks. (see Figure 7)
8. If necessary, adjust the water level in the
water tank. Turn the adjusting screw
clockwise to raise the water or Turn the
screw counter-clockwise to reduce water.
(see Figure 7)
9. Make sure the refill tube is properly inserted
into the overflow pipe of the flush valve. Refill
tube should be positioned higher than water
level. (see Figure 8)
3. Inser 2 floor bolts inside of the toilet
flange and slide the bolts through the
holes and align bolts horizontaly. (see
Figure 3)
RIGHTWRONG
Water
Level
WinZo
10. Put the tank lid on the tank.
Install the toilet seat in accordance with
detailed seat installation manual on next
page) (see Figure 9)
1/2
Figure 2
Figure 1
Figure 5
Figure 8
Bolt cap
Nut
Bolt Cap Base Washer
Plastic cover
Figure 6
Figure 9
11. Apply the silicone around the base of
the toilet. When the silicone is dry, check
for leaks for the next several days (see
Figure 9)
2.The fill valve was disassembled before
package due to the short tank. So please
assemble the fill valve to the toilet before
install the toilet. Inser the fill valve into the
installation hole at the bottom of the tank.
Then install the rubber and plastic washer
(optional)and tighten the nut. (see Figure 2)
Tank base
Rubber
(optional)
Plastic washer
(optional)
Nut
Figure 3
Refill Tube
Adjusting Screw
Water Line
Supply Line
Shut-off Valve
Overflow Pipe
Figure 7
Note: Toilet seat could be assembled before
step 3,seat installation as per page 2)
Check if all the fittings are complete and make sure the toilet is no crack before installation


