Wirie Pro User manual

Upgrade Kit Instructions
(For WirieAP+ purchased after September 2017)
How to upgrade The WirieAP+ to The Wiriepro

©2017 Island Consulting, Inc. All Rights Reserved. (Rev 2.1) 2
Contents
Introduction................................................................................3
What’s Included ........................................................................................................................................4
Hardware Upgrade .....................................................................4
Before You Begin:......................................................................................................................................4
Step 1 –Prepare for the Upgrade.............................................................................................................4
Step 2 –Remove The WirieAP+ Router....................................................................................................... 5
Step 3 –Orient the Ethernet Cable........................................................................................................... 7
Step 4 –Install The Wiriepro Router........................................................................................................... 8
Step 5 –Install The Wiriepro xG Antenna.................................................................................................13
Step 6 –You Now Have The Wiriepro! Irie, Mon!....................................................................................15

©2017 Island Consulting, Inc. All Rights Reserved. (Rev 2.1) 3
Introduction
Congratulations on your purchase of The Wiriepro Upgrade Kit!
We truly believe that The Wiriepro is the best equipment you can install on your boat or RV to increase
your ability to connect to WiFi and xG networks, and share that internet connection wirelessly in your
boat or RV.
With The Wiriepro you have the choice of connecting to remote WiFi networks or 2/3/4G (xG) networks.
This allows you the ultimate flexibility for getting online. When in range of WiFi networks, these
connections are often free or inexpensive. In many locations however, WiFi is either not available or the
connections are poor. With The Wiriepro, and a local SIM card, you can also connect to xG networks.
The Wiriepro will work with all worldwide xG frequencies up to speeds of 21Mbps (HSPA+). If the
optional LTE support was purchased, The Wiriepro will also work on LTE networks in the Americas and
Europe providing speeds up to 100Mbps. The Wiriepro requires a SIM card from the data provider to
work with their network.
Below is all the information you need to install The Wiriepro Upgrade Kit.
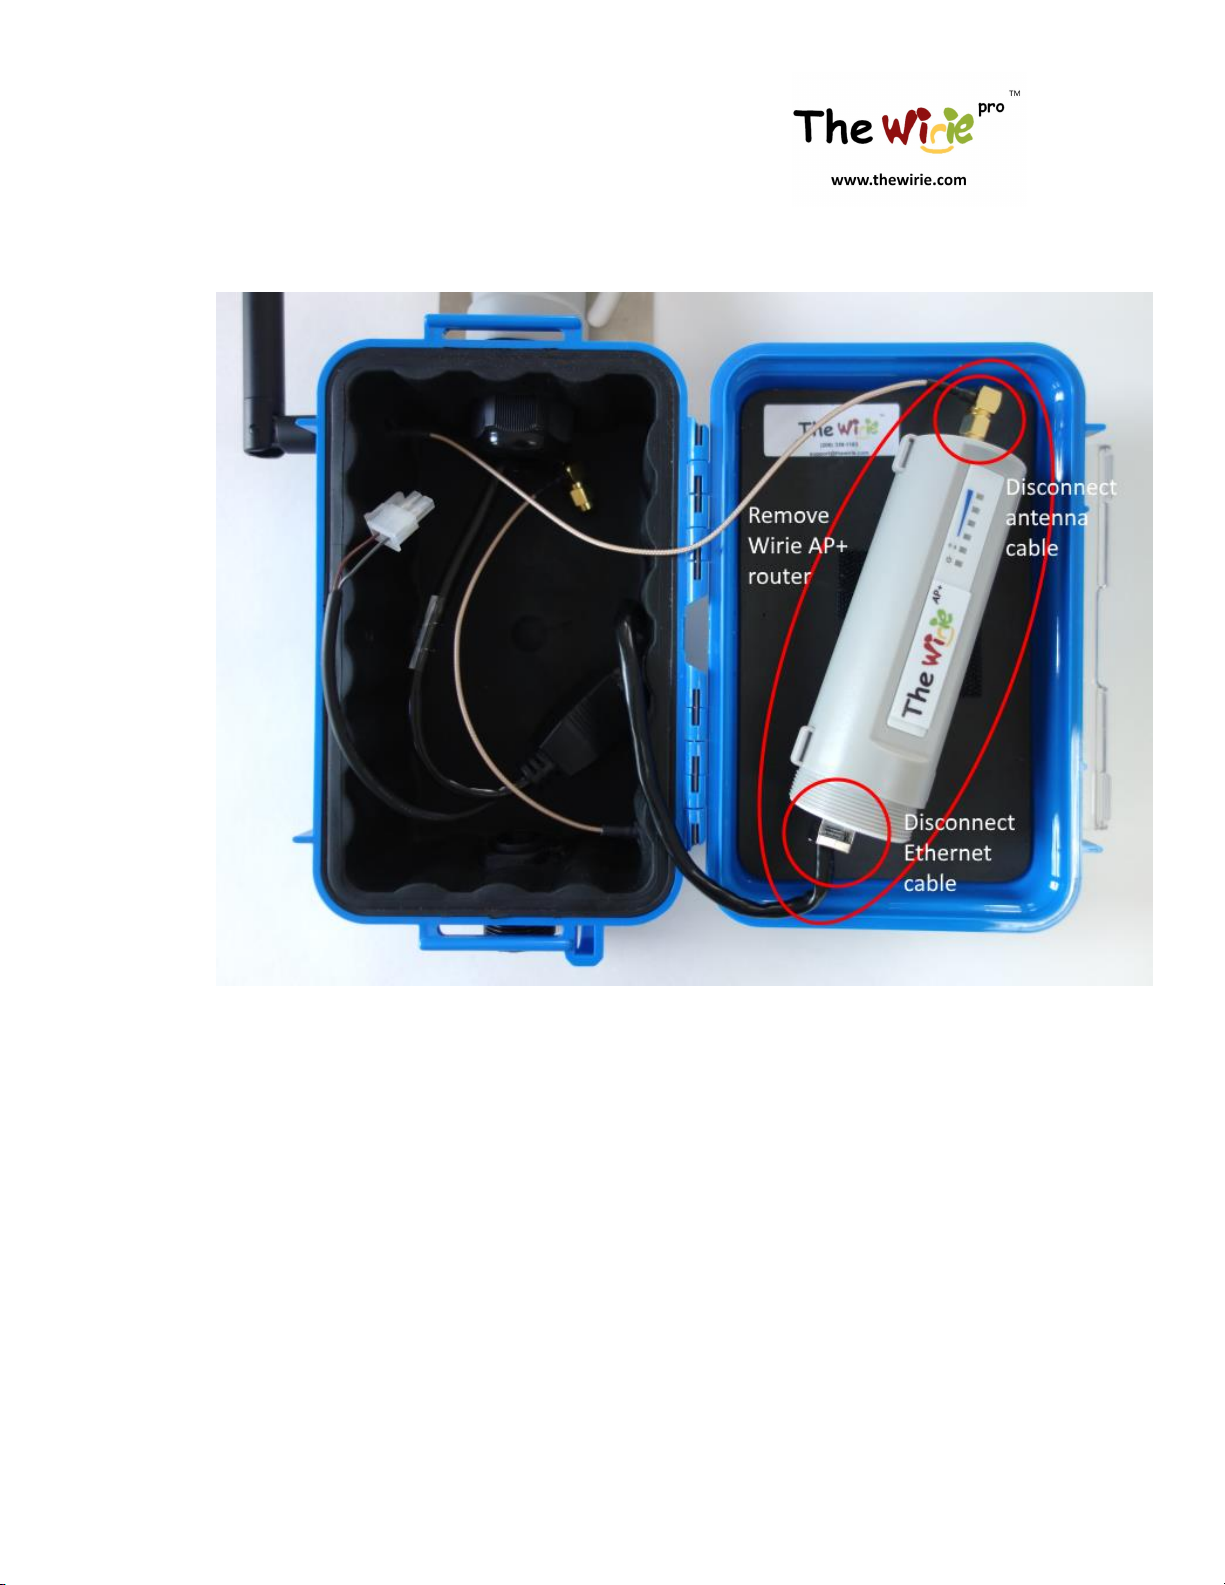
The Wiriepro Upgrade Kit will allow you to upgrade your existing WirieAP+ to all the functionality included
in The Wiriepro. This manual will walk you step by step through the hardware installation. Once
installed, please refer to The Wiriepro User Manual for information on how to operate The Wiriepro (see
www.thewirie.com/wirie-manuals-firmware.html for the User Manual).
If you have any questions, please contact us via our support page at www.thewirie.com/support.html or

©2017 Island Consulting, Inc. All Rights Reserved. (Rev 2.1) 4
What’s Included
The following items should be included in your Upgrade Kit:
•The Wiriepro 3G/4G router
•2dBi xG/LTE external antenna
•The Wiriepro Quickstart Guide
Hardware Upgrade
Before You Begin:
Open The Wiriepro Upgrade Kit and be sure that your kit includes the two upgrade parts that are listed
above.
Read through the procedure below before you begin the step-by-step upgrade.
Step 1 –Prepare for the Upgrade
Gather all the needed items to perform your upgrade:
•Your existing WirieAP+
•Your Wiriepro Upgrade Kit (router and 2dBi xG antenna)
•8mm wrench/spanner
Note: If permanently mounted, remove The WirieAP+ and place it on a flat surface to perform the
upgrade. Attempting the upgrade on a mounted unit may put excess force/stress on the antenna
connection and cause damage not covered by warranty.
Disconnect power to The WirieAP+.

©2017 Island Consulting, Inc. All Rights Reserved. (Rev 2.1) 5
Step 2 –Remove The WirieAP+ Router
a. Open the waterproof enclosure.
b. Pull The WirieAP+ router off the enclosure door. It is attached with strong Velcro.
c. Disconnect the Ethernet cable from the bottom of the router. There is a small tab on the top of
the plug that must be pressed while disconnecting the cable.

©2017 Island Consulting, Inc. All Rights Reserved. (Rev 2.1) 6
d. Disconnect the local WiFi coax cable from The WirieAP+ router. You can use an 8mm wrench to
loosen the connector and disconnect it from the router.
e. The WirieAP+ router is not needed, but we recommend keeping it.

©2017 Island Consulting, Inc. All Rights Reserved. (Rev 2.1) 7
Step 3 –Orient the Ethernet Cable
a. Orient the Ethernet cable so that the plug is located at the top of the door.
b. Note the two coax cables that will be attached to the new Wiriepro router.

©2017 Island Consulting, Inc. All Rights Reserved. (Rev 2.1) 8
Step 4 –Install The Wiriepro Router
After the removal of The WirieAP+ router, you should have the following:

©2017 Island Consulting, Inc. All Rights Reserved. (Rev 2.1) 9
a. Connect the xG coax cable to the “Cell Main” antenna port at the bottom of The Wiriepro router.
Use the 8mm wrench so that it is securely oriented as shown below.
b. Connect the local WiFi coax cable to the “WiFi Main” antenna port at the bottom of The Wiriepro
router. Use the 8mm wrench so that it is securely oriented as shown below.
c. Insert the disconnected Ethernet cable into the right-most port on the router. It is labelled
“LAN” and is located at the top of the router.

©2017 Island Consulting, Inc. All Rights Reserved. (Rev 2.1) 10

©2017 Island Consulting, Inc. All Rights Reserved. (Rev 2.1) 11
d. Attach The Wiriepro router to the enclosure door. The SIM card holder should be located in the
upper left corner.
e. You may need to adjust the positioning of The Wiriepro router to make sure the enclosure door
closes smoothly and no wires are pinched. The door should close easily. If not, reposition the
router until the door closes smoothly.

©2017 Island Consulting, Inc. All Rights Reserved. (Rev 2.1) 12
f. The Wiriepro requires a “Standard” size SIM card. Insert the SIM card into The Wiriepro: Open the
waterproof enclosure, and flip out the SIM holder by pulling outward on the top edge of the
holder. Insert the SIM card into the flip-out holder with the cut corner top-left. Close the SIM
holder by pressing the silver holder at the top, back into position. The SIM holder should click
and lock into position indicating the holder is closed and secured. The SIM card only fits one
way, do not force the SIM holder to close.
Note: Please power off The Wiriepro whenever you need to insert or change the SIM card.
Note: You can perform this step at a later time if you do not have a SIM card available.

©2017 Island Consulting, Inc. All Rights Reserved. (Rev 2.1) 13
Step 5 –Install The Wiriepro xG Antenna
a. Close the waterproof enclosure door and confirm it is closed securely.
b. Remove the red plastic antenna port protector and discard.

©2017 Island Consulting, Inc. All Rights Reserved. (Rev 2.1) 14
c. Connect the antenna to the antenna port on the side of The Wiriepro. Tighten enough so the
antenna stays in a vertical orientation. You can use a pair of pliers (carefully) to tighten the
thumb screw.

©2017 Island Consulting, Inc. All Rights Reserved. (Rev 2.1) 15
Step 6 –You Now Have The Wiriepro! Irie, Mon!
Well done. Now refer to the Wiriepro Quick Start Guide and/or The Wiriepro User and Installation
manual on our website (www.thewirie.com/wirie-manuals-firmware.html) for further instructions
on how to use The Wiriepro and start surfing the web again!
Other manuals for Pro
1
Table of contents
Popular Boating Equipment manuals by other brands

Sea Eagle Boats
Sea Eagle Boats 435PS Instruction & owner's manual

CoverCraft
CoverCraft Bimini Assembly and installation instructions

POWERWINCH
POWERWINCH RC23 owner's manual

ZF Marine
ZF Marine ZF 305 Series operating manual

TEMO
TEMO 450 user manual

Texas Power Paddle
Texas Power Paddle Remora Quick installation guide