1
KayaArm Assembly/Operating Instructions B6 (2020-06-04) © Wirsig Enterprises Inc.
While the assembly and operation of the KayaArm is largely intuitive this manual provides detailed instructions to ensure
optimum and safe operation. KayaArm: Can patent 2,706,497; US patent 8,381,673.
IMPORTANT:
•BEFORE USING YOUR KayaArm, READ AND UNDERSTAND THIS OWNER’S MANUAL.
•SAVE THESE INSTRUCTIONS---THIS OWNERS MANUAL CONTAINS IMPORTANT SAFETY INSTRUCTIONS
•WIRSIG ENTERPRISES INC. AND THE RETAILER CANNOT BE HELD RESPONSIBLE FOR DAMAGES OR INJURY
SUFFERED AS THE RESULT OF FAILURE TO FOLLOW THE INSTRUCTIONS AS SET OUT HERE-IN.
Warranty:
This product carries a one-(1)-year warranty from date of purchase against defects in workmanship and materials. This product
is not guaranteed against wear, breakage or misuse. Should this product become defective within the stated warranty period,
contact Wirsig Enterprises Inc. at www.wirsigenterprises.comfor an evaluation of the situation to figure out what needs to be
done to take care of things including free shipment of replacement parts. This warranty does not cover labour costs for any
repairs and generally does not cover product return shipping costs. Exchanges or repairs made under this warranty do not extend
its limit.
1. Assembly Instructions for KayaArm:
•Tools required:
◦Two ½”wrenches
◦Two 7/16” wrenches
◦#2 or #3 Phillips screw driver
◦Screw driver for driving deck screws.
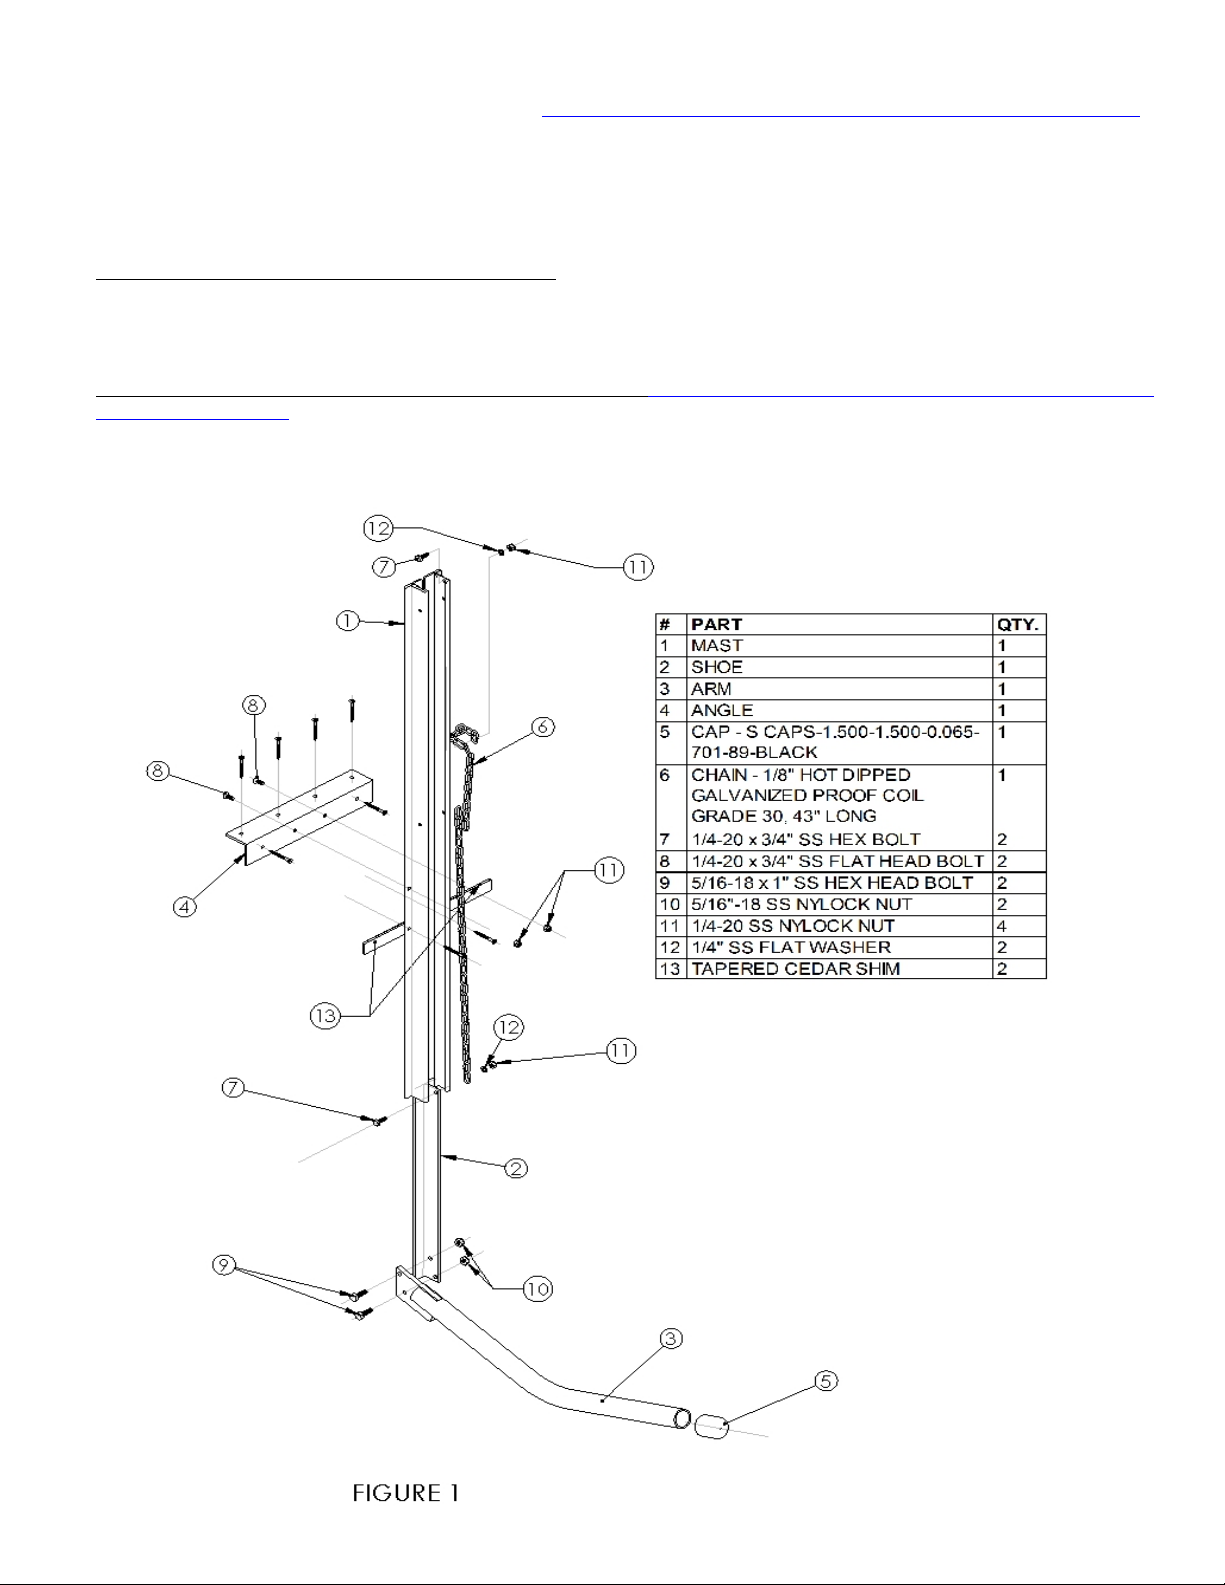
•Parts List (Refer to Figure 1):
◦One of each of the following: mast (1), shoe (2), arm (3), angle (4), cap (5), and chain (6)
◦Two of each of the following: ¼”-20 x 3/4” SS hex head bolt (7), ¼”-20 x 3/4” SS flat head bolt (8), 5/16”-18 x 1” SS
hex head bolt (9), 5/16”-18 SS Nylock nut (10), ¼” SS flat washer (12) and tapered cedar shims (13)
◦Four of the following: ¼”-20 SS Nylock nut (11)
Note that for orientation purposes the chain slots identify the top end of the mast.
•Completing the assembly (Refer to Figure 1):
◦Using 2 flat head bolts (8) and 2 Nylock nuts (11) fasten the angle (4) onto the mast (1) through the upper set of
holes in the mast flanges.
◦If not already there, install the end cap (5) onto the end of the bent arm (3).
◦Using 2 hex head bolts (9) and 2 Nylock nuts (10) fasten the bent arm (3) onto the bottom of the shoe (2). Note that
the bolts pass through the arm plate first and then the shoe.
◦Slide the shoe/arm assembly into the track provided in the mast.
◦Using hex head bolts (7) washers (12) and Nylock nuts (11) fasten one end of the chain (6) to the top of the mast and
the other end of the chain to top of the shoe.
◦Be sure to tighten all nuts securely.
2. Mounting the KayaArm onto a fixed or floating dock: to watch installation video search HOW TO INSTALL KAYAARM
ONTO A DOCK - Youtube
•While the water space beside the dock needs to be large enough for the kayak, the actual dock space required for the
KayaArm and for entry/exit maneuvers can be as little as 3 to 5 ft (1 to 1 ½meters).
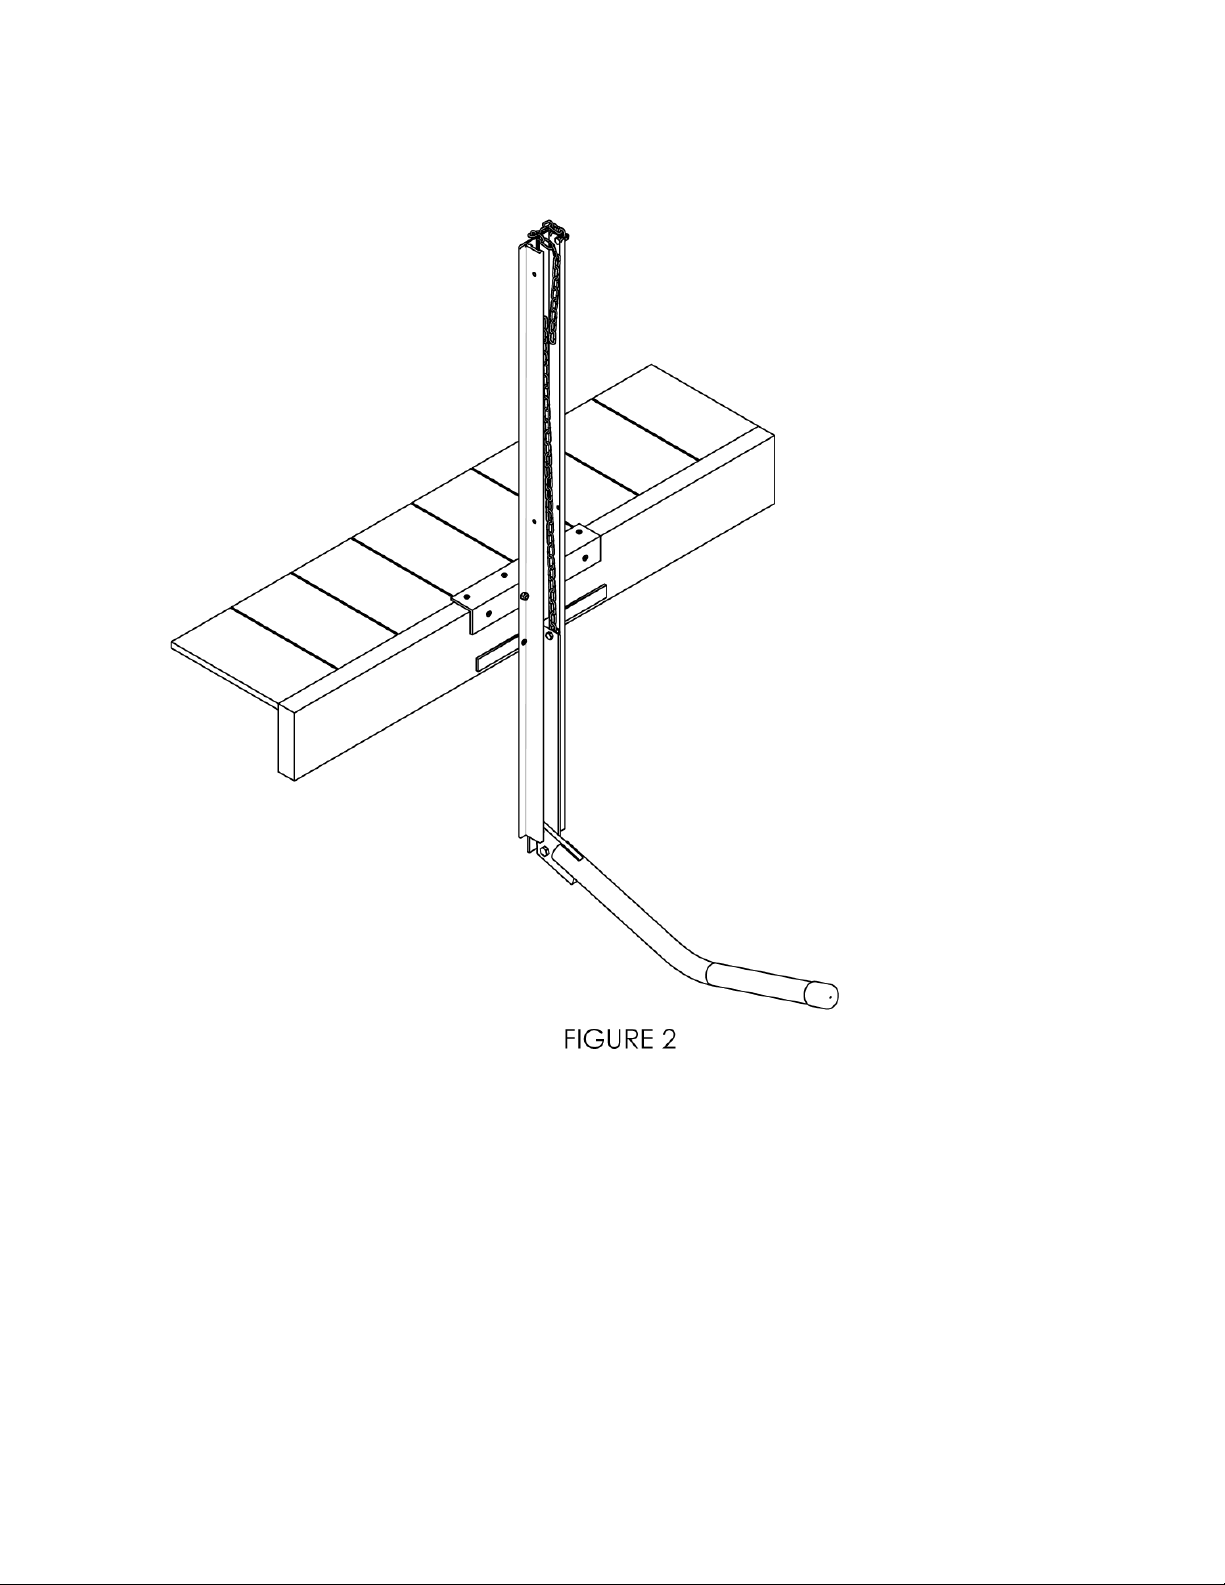
•Mounting details will vary depending on dock construction. The following is one example for mounting on a straight sided
wooden dock (Refer to Figures 1 & 2):
◦Place the assembled KayaArm onto the edge of dock and fasten it to the dock using at least 2 deck screws (not
provided) into the top surface of the angle (4). Fit the cedar shims into the approximately ¼” space between the back
of the mast and the vertical surface of the dock (see Figure 2) at a location directly behind the lower holes in the mast
flanges. HINT: Push the tapered shims simultaneously one from each side of the mast and one in front of the other,
into the space behind the mast to a distance where this space is filled when the mast is vertical. Install 2 deck screws
(not provided) into the lower flange holes. Optionally install more deck screws through additional holes provided in
angle (4).
3. Mounting the KayaArm to a ladder on a fixed or floating dock:
•The KayaArm mounted as above on a dock is functional to a water level about 30” below the top of the dock. For water
levels below that you may attach the KayaArm to the side of a ladder with two bolts (not provided) through holes provided
in the mast (1). See photo at http://www.kayaarm.ca/manuals/KayaArmInstructions.pdf and “ladder demo” at
http://www.kayaarm.ca/demovideos.php
•As an alternative to mounting the KayaArm to the side of a ladder I recently made a block about 18” long out of two 2x4s
and two 2x6s for mounting the KayaArm onto the dock beside a ladder. The inner 2x6, which may need to be longer than
18”, must be fastened (with the 5.5” side of the 2x6 against the side of the dock) firmly onto the side of the dock. Using
2.5” to 3” deck screws, then mount the two 2x4s spaced apart and perpendicular to the flat surface of the inner 2x6 so as
to provide the sides of the box. It would be easier to fasten these 2x4s to the 2x6 before fastening that 2x6 to the dock.