Wise WSSP-730U User manual

WSSP-730U Display Steamer
Operation Manual
Feature:
● Dry-heating function will keep food fresh more longer and delicious.
● Specially designed heating device to enable the heating time to be adjusted
between 1 to 60 minutes according to user's choice.
● Specially designed warning light to prevent the heating elements from working
without water compensation.
1

Thank you for your support for WISE WSSP-630UA Display Steamer, please read all
introductions before use and save it for future reference. Before use, the warnings and cautions
are intended to protect the user or other people from injuries and damages, please follow them carefully.
1.1 Notices on installation
WARNINGS
1.Installing the steamer (both for the counter-top and floor types), in a location free from rain and
snow.
2.A wet steamer can be a source of electrical shock and the steamer can be damaged.
3.Be sure to install complying with industry standards. Incomplete installation can cause
stumbling accidents, electrical shock, fire or water leakage.
4.The power plug must be connected to a special receptacle with the Phase and Current
Capacity of the requirement on the Rating Label.
Violating this standard can cause electrical shock or fire. If you cannot identify the specification
of the power receptacle used, consult our local service station.
5.Be sure to connect a grounded wire to the steamer.
Operating the steamer without grounded wire it can cause electrical shock or fire by a short circuit.
6.Do not extend the power cord by connecting more than one power cord, or connect the power
cord to a receptacle by branching inappropriately. The connection can cause excessive heating
and lead to a fire. (See figure 1)
7.Do not bundle the power wire; otherwise a fire can be caused. Do not step on, squeeze, or
forcedly twist the power wire; otherwise the power wire can be damaged, causing electrical
shock or fire. If your power wire has been damaged, consult our local service station for
replacement.(See figure 2)
Figure 1
10cm
10cm
Figure 2 Figure 3Figure 4 Figure 5
CAUTIONS
1.Do not carry the steamer , please ask for another's help. The steamer should not
be carried by one person; otherwise it may be dropped and cause injury.(See figure 3)
alone
2

2.Be sure to install the steamer on a flat and solid surface. Otherwise the unit may topple over,
causing injury or burns, or water in the unit may overflow.(See figure 4)
3.Be sure to the top and around of the steamer separates to wall or other things at least 4 inches
(10cm). Insufficient clearance may cause generated heat or steam.(See figure 5)
1.2 Notices on operation
WARNINGS
1.Do not touch the power plug with a wet hand; otherwise, you may get an electrical shock.
(See figure 6)
2.Do not operate any switch with a wet hand; otherwise, you may get an electrical shock.
Plug off. Pulling the power cord can damage it and lead to electrical shock or fire.If the power
cord has been damaged, consult our local service
station for replacement.(See figure 7)
3.Do not use combustibles (e.g., thinner), combustible gases, or volatile matters near the
steamer; otherwise explosion or fire can be caused.
4.Do not warm up canned or bottled drinks; otherwise the containers may explode,
Even causing injuries.
5.Never store solvents or chemicals (e.g., alcohol, thinner) in the steamer;
otherwise they can explode when being warmed up.(See figure 8)
6.Be careful not to spill water around the steam when filling it; otherwise electrical shock can be
caused. If you have spilled water, wipe it away immediately.
7.Do not pour hot water directly; otherwise the steam can cause burns.
8.When opening the door during heating or keeping the steamer hot, keep your face away from
the steamer; otherwise the steam can cause burns. Before opening the door fully, open the door
only by about 2 inches (5 cm) to release the steam.When opening the door, also keep your face
at least 20 inches (50 cm) away from the steamer.(See figure 9)
9.Do not put your hand into the cobinet during heating or keeping the steamer hot, otherwise the
steam can cause burns. Be sure to use the special tongs for taking steamed buns in and out.
10min
alcohol
thinner
Figure 6 Figure 7 Figure 8 Figure 9Figure 10
10.Do not touch any place except for the handle and switch during heating and ing the ,
otherwise you can suffer burns since the body is very hot.(See figure 10)
11.Before cleaning the inside cabinet, open the door and leave it for at least 10 minutes;
otherwise the steam can cause burns.
12.Before draining water out, turn off the power and wait for at least 40 minutes; otherwise you
may suffer from burning when draining.
warm
3

13.Do not sp water over or wash the body; otherwise you
electrical shock, or the machine will be damaged.
14.Keep the electric parts in the steamer away from rainwater and cleaning water.
The wet steamer can cause electrical shock.
15 .When inspecting, cleaning, or maintaining the body, be sure to
turn off the power and unplug the power cord; otherwise
it can resnlt from electrical shock or short circuit.(See figure 11)
16.In any of the following cases, turn off the power and unplag the
power cord from the receptacle, and consult our local service station.
a.When the functional part of the body has been flooded.
b.When the body has toppled over or damaged.
C.When the body smokes or produces a bad odor.
Using the steamer under the above condition can cause electrical shocks or fires.
17.If the steamer has been submerged due to a disaster or other problems, replace all electric
parts and wire. Otherwise, electrical shock or fire can be caused.
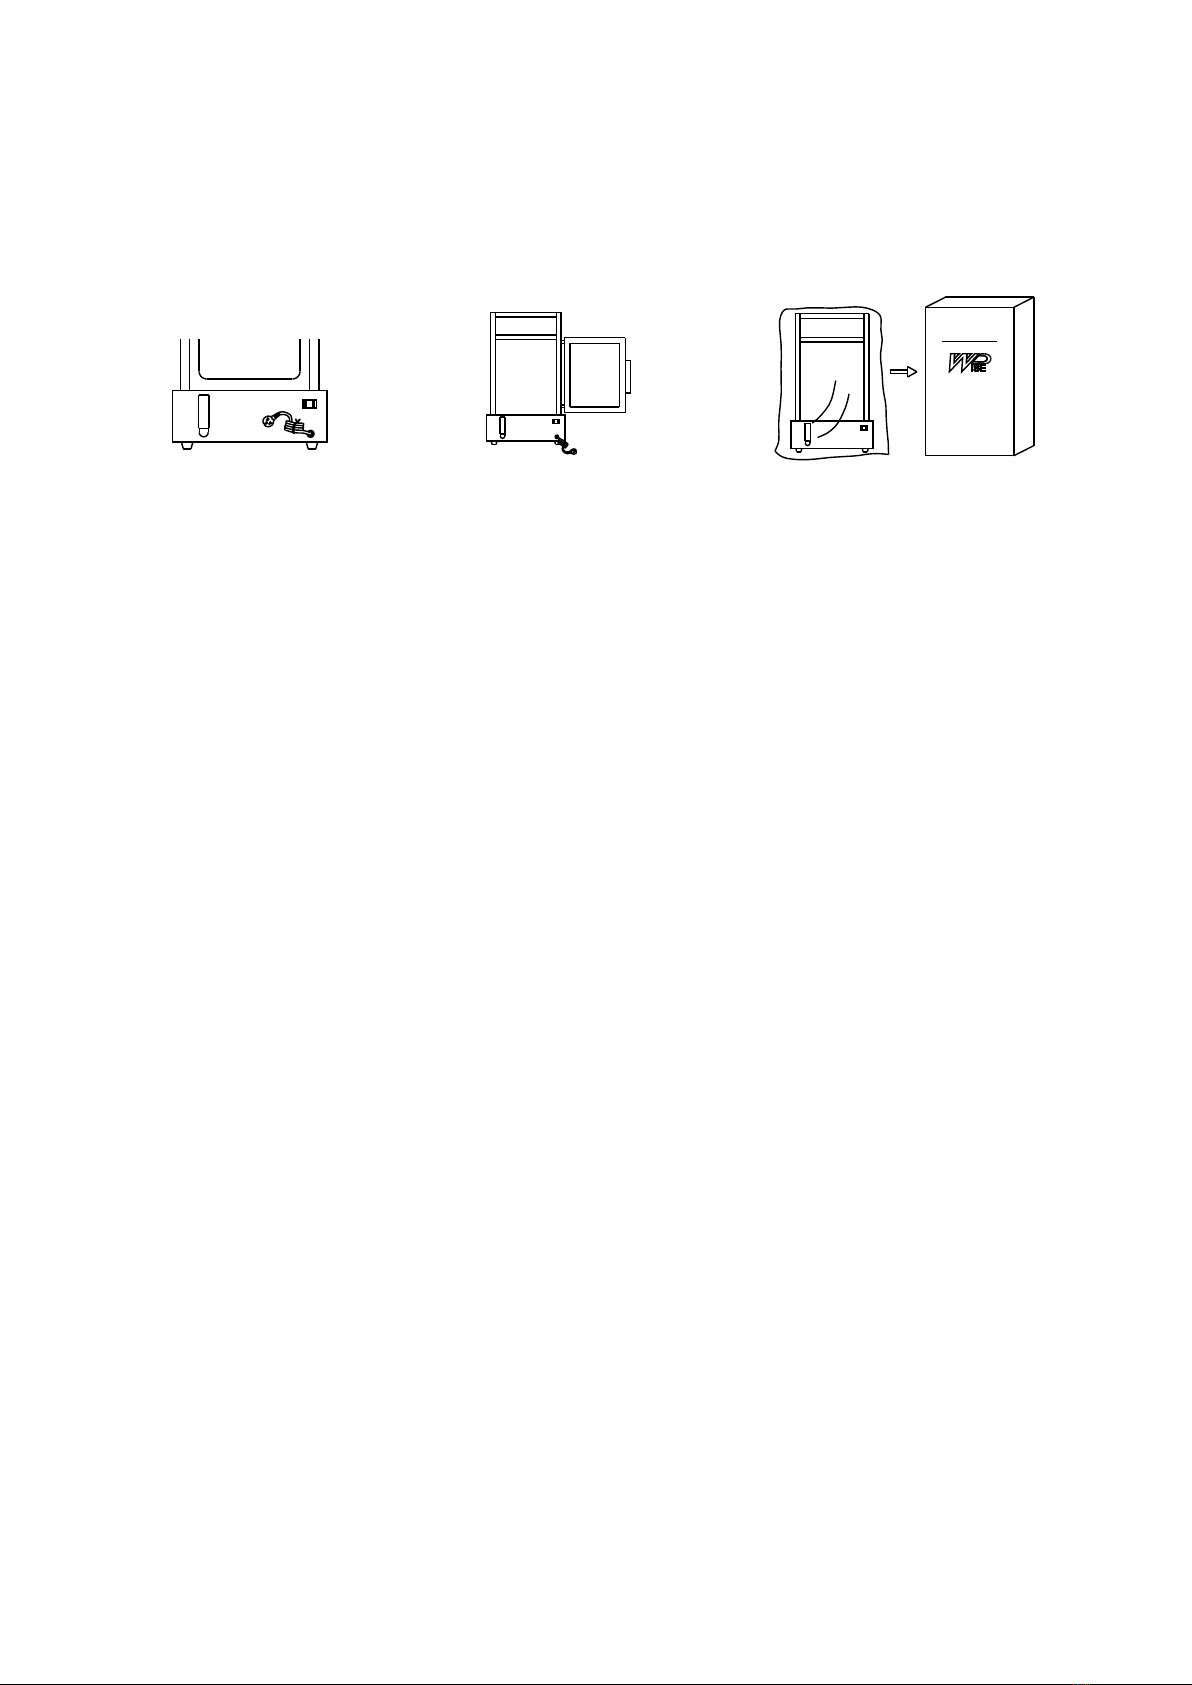
18.Store the steamer under the conditions described in this operation manual. Storing the
steamer in nonconforming conditions can cause accidents.
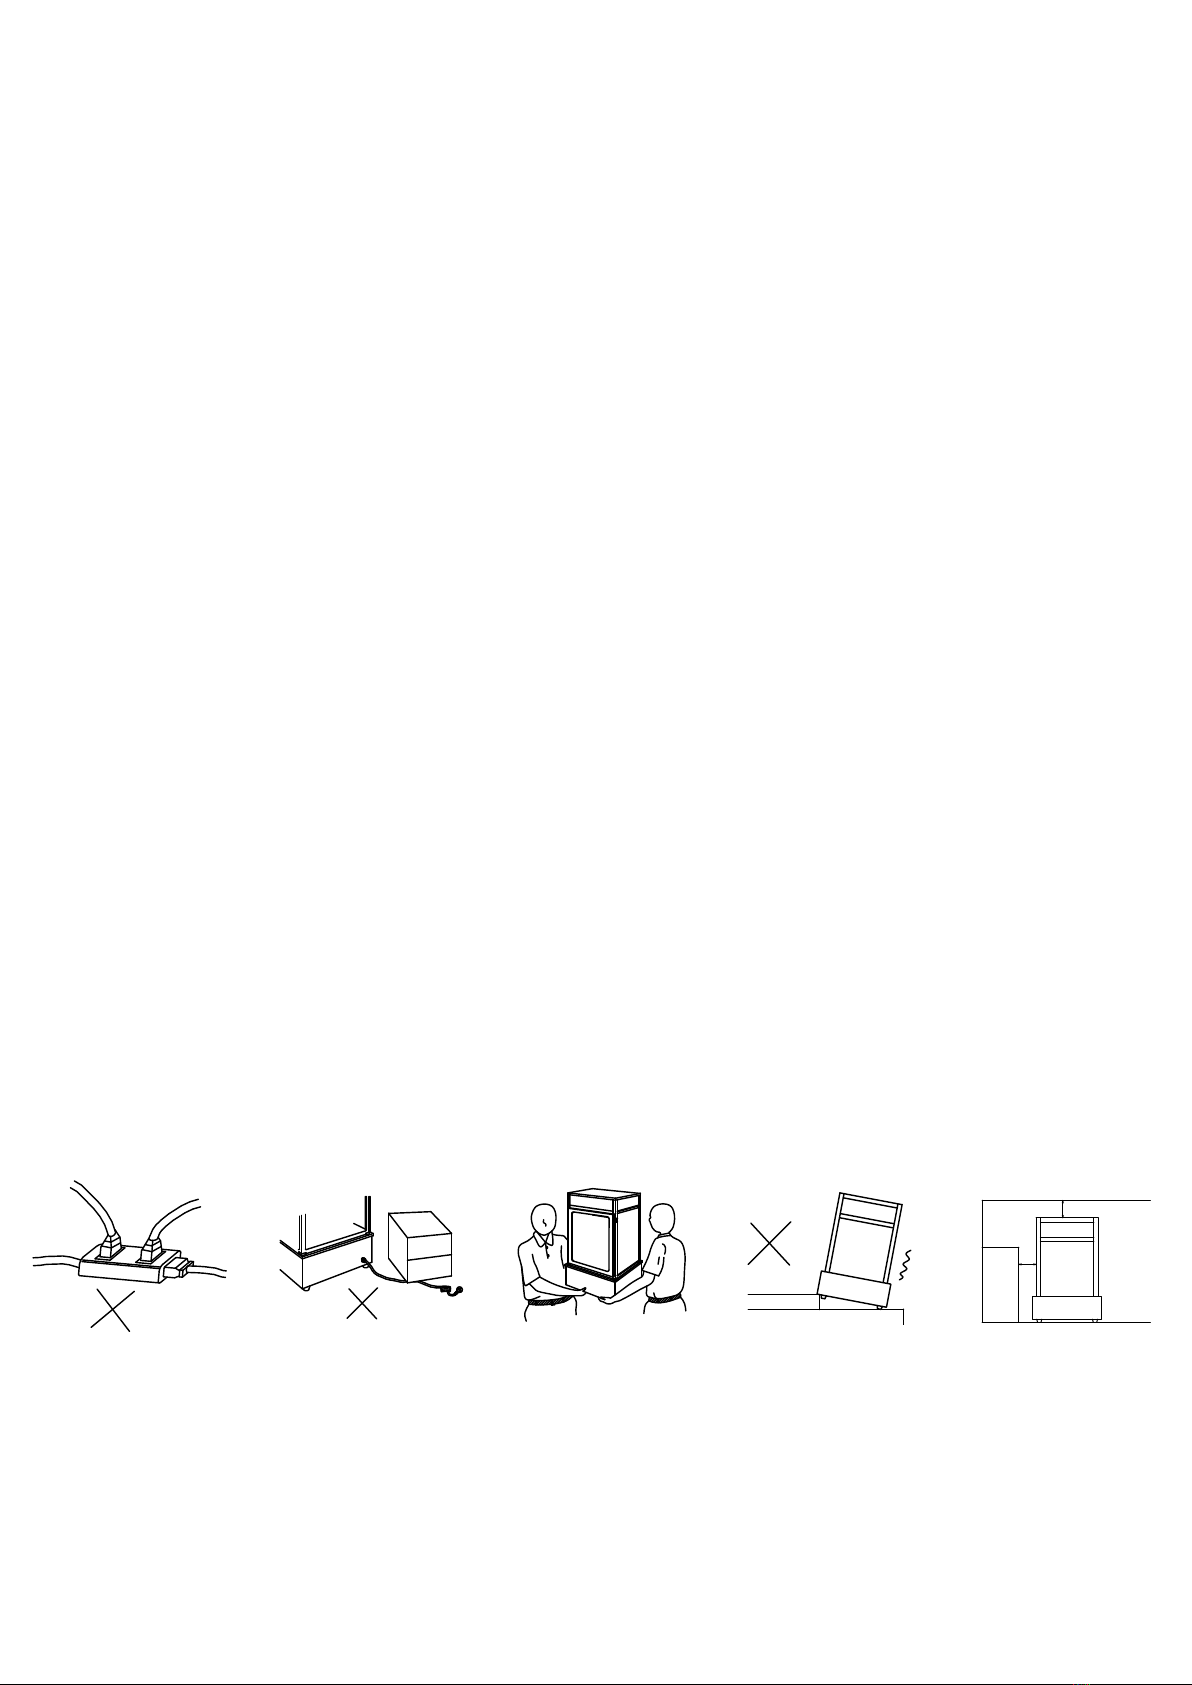
19.Do not stack the steamer by three or more; otherwise stumbling accidents or injuries can be
caused.
urt out the will suffer from the
OK!!
Figure 11
2.Safety Cautions
This section describes the notices we recommend for safe operation of the “Display
Steamer”. Be sure to read through this section before using the steamer and comply with
the notices.
1.Do not place anything on the steamer; otherwise damage can be caused.
2.Do not pour water into the steamer except watering to the hose.
3.When cleaning the inside cabinet, do not use any detergents, such as neutral detergent
or cleansers; otherwise the parts can be degraded or hot water can overflow from the vapor cap.
Note that overflowing hot water is not a defect. If it happens,please change the water.
4.Clean the inside cabinet; otherwise defects or peculiar smell can be caused.
5.Changing the water in the steamer at least three times a day (i.e., once per eight hours);
otherwise defects or peculiar smell can be caused or hot water can overflow from the vapor cap
3. Application of the Steamer
WARNINGS
1.Do not warm up any canned or bottled drinks; Otherwise the containers can burst causing
injuries.
2.Never store solvents or chemicals (e.g., alcohol, thinner) in the steamer; otherwise they can
explode when being warmed up.
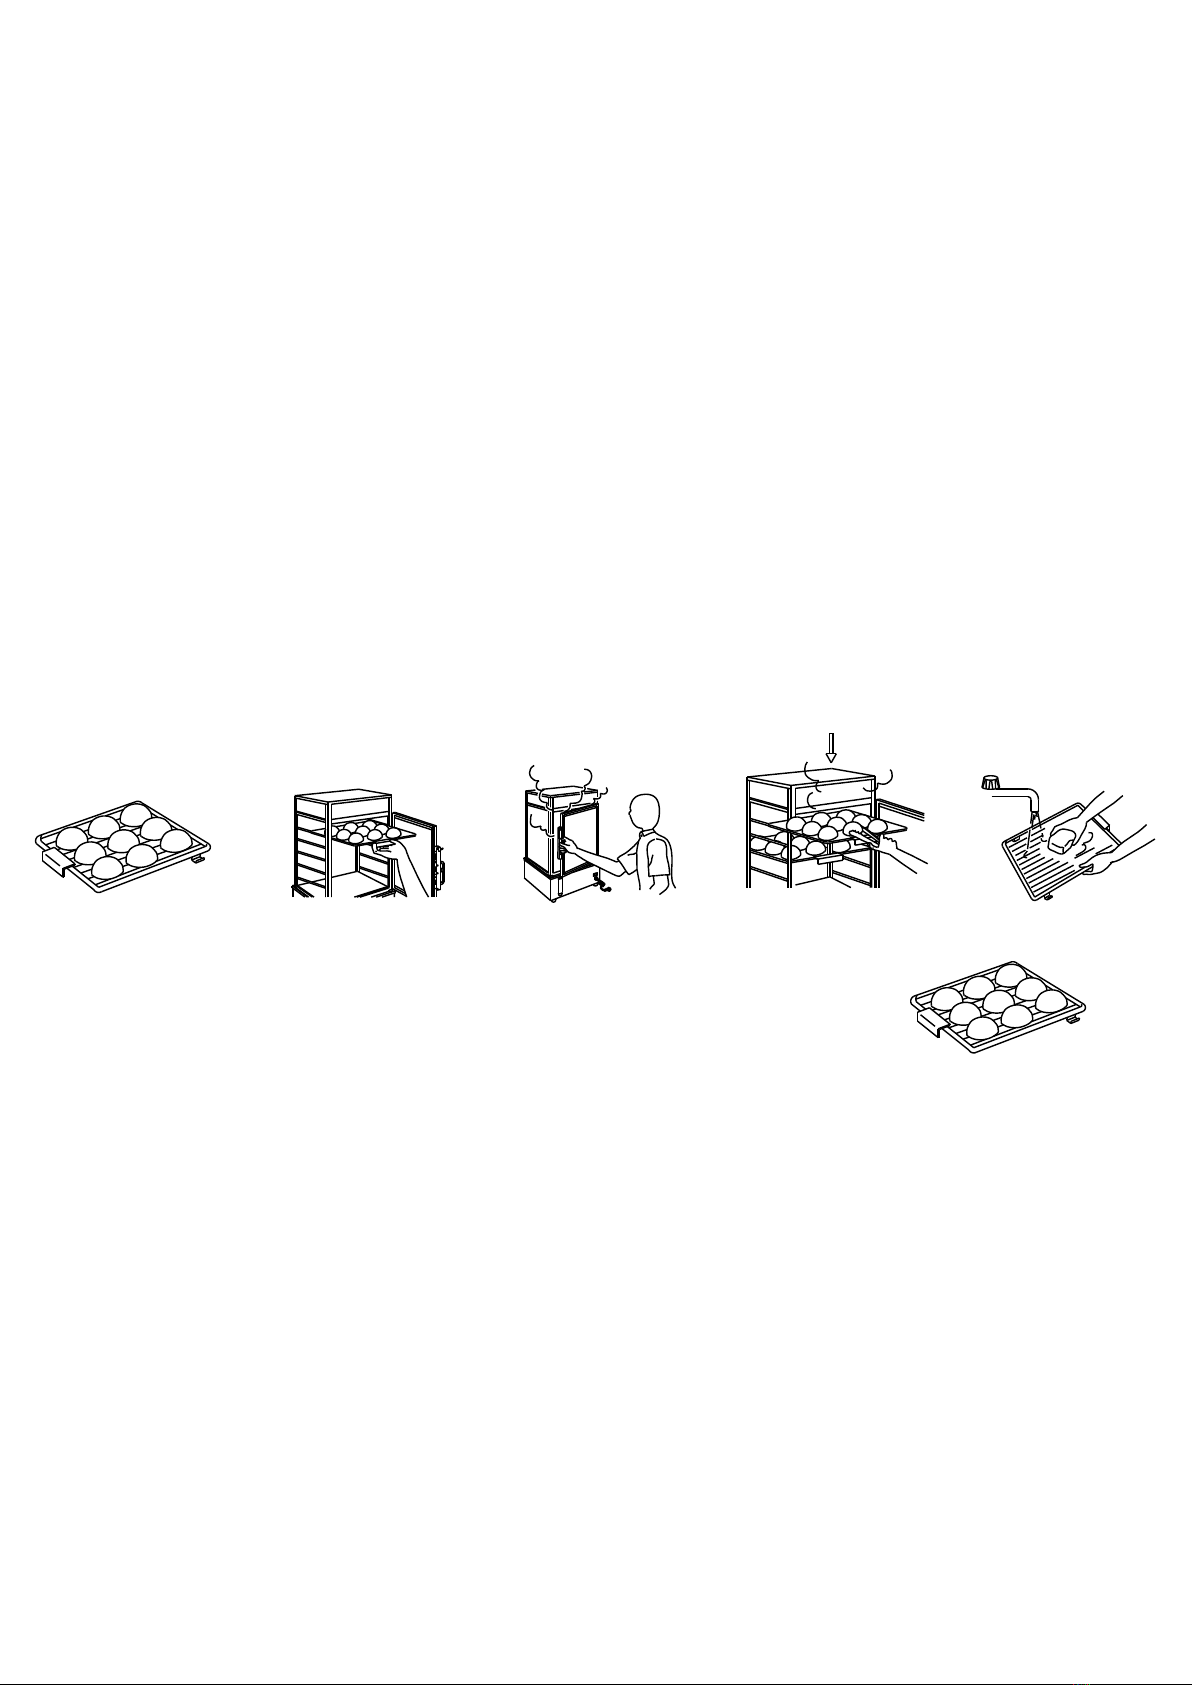
3.The steamer is designed only to be used for Chinese buns. Do not use for other purposes.
4

4. Names of Parts
Figure 12 Figure 13
5. Operation of the Steamer
5.1Preparations before using
1.Take out the bracket from the body and wash it. When cleaning the inside cabinet, do not use
any detergents, such as neutral detergent or cleansers.(See figure 14)
2. Wipe the inside and outside of the steamer with a wet cloth. Then, wipe with dry cloth.
(See figure 15)
3.Connect the plug to the Lamp Socket.(See figure 16)
4.Pour water (approximately four liters) through the water level pipe until the specified level is
reached. When adding water, the water do not be overflowed, otherwise it
may cause electrical shock, please wipe the overflowed water away.(See figure 17)
5.Connect the power plug to a special socket.(See figure 18)
Figure 14 Figure 15 Figure 16 Figure 17 Figure 18
5.2 Steaming the Steamed Buns
WARNINGS
●When opening the steamer during heating or warming , keep your face away from the steamer;
Otherwise the steam can scald the user.
●Before opening the door fully, open the door only by about 2 inches (5cm) to free the vapor.
When opening the door, also keep your face at least 20 inches (50cm) away from the steamer.
●Do not put your hand into the steamer during heating or when the steamer is hot; Otherwise the
steam can cause burns. Be sure to use the special tongs for taking steamed buns in and out.
5
Water fill tube
with level
Heating Indicator Water scarcity Indicator
Lamp Socket
ON/OFF Switch Timer Thermostat
Top corer
glass
handle
Power plug
Drainage hose
body
Vapor cap
Grid
track
Control pannel

1.Turn on the power switch.
a.The power switch indicator and water level lamp lights up.
b.Make sure that the door of the steamer is closed.
2.Put Steamed buns on a clean bracket.(One bracket can store mozre than nine Steamed buns.)
(See figure 19)
a.Make sure the top of the bracket is face up.
b.When arranging Steamed buns, do not stack them or have them stick beyond of the edge the
bracket.
3.Put the bracket into the cabinet when the thermostat indicates 158°F(70℃).
(See figure 20)
158°F(70℃) will be reached approximately 20 to 30 minutes after turning on the power. Insert the
claws of the tray into the rails securely.
4.When the temperature reach the setting time, the heating indicator is not on, and the
temperature will be kept constantly.(See figure 21)
5.Take out the Steamed buns to steam up.(See figure 22)
a.Before opening the door fully, open the door only by about 2 inches (5cm) to free the vapor.
b.Take out the bracket by 2/3 of its length, and use a tong to
clamp the steamed buns.
Figure 19 Figure 20 Figure 21 Figure 22 Figure 23
5.3 Supplying Steamed Buns
1.o take out the from the .
2. Wash the bracket while soaking.(See figure 23)
3.Put Chinese buns on the washed bracket.(One bracket can store more than nine Chinese
buns.)(See figure 24)
a.Make sure that the top of the bracket is facing upward.
b.When arranging Chinese buns, do not stack them or have them stick beyond of the edges of
the tray.
c.Place the tray of new Chinese buns on the upper level in the steamer.
D.When taking out the stored Chinese steamed dumpling, first take out the older Chinese
steamed dumpling.
T bracket steamer by using cloth or towel
Figure 24
5.4 Supplying water
When the level shown by the water level indicator reaches the “Requiring water supply” or water
level lamp goes off, pour additional water through the water level indicator inlet until the
“Appropriate water level” is reached.
a.If the water in the steamer runs out of the water, the water level lamp automatically goes off.
6

b.After pouring water, Fe-press the additional burning switch. (When the
temperature in the cabinet reaches 185℉(85℃), the additional burning
switch is automatically turned off and the steamer maintains the specified
temperature.)(See figure 25) Figure 25
6. Maintenance of steamer
6.1 change water
change the water inside the steamer in every eight hours, since the fat from the Steamed Buns
can get mixed with the steam and enter the tank of the steamer, thus contaminating
the water in it. Prepare a plastic bucket (with capacity of 4 liters or more)
WARNINGS
When inspecting, cleaning, or maintaining the machine, be sure to turn off the power switch
and unplug the power cord; Otherwise you can get electrical shock caused by a short circuit.
● Before draining water, turn off the power and wait for at least 40 minutes or more; Otherwise,
you can suffer for burns when draining.
● Do not touch the power plug with a wet hand; Otherwise you will get electrical shock.
●
1.Turn off the power switch and disconnect the power plug from the receptacle. 6
2.Point the drainage hose upward and bend it at about 4 inches (10cm) away from its end.
7
3.Take off the drainage cap. 8
4.Hold the drainage hose to keep it bent and put it in the plastic bucket. 9
5.Release the hose to let the water being drained. 30
6.When all hot water has been drained, belock the drainage cap. 31
7.Pour water( approximately four liters) through the water level pipe until the specified level is
reached. 32
8.Connect the power plug to the socket and turn on the power switch. 33
(See figure 2 )
(See figure 2 )
(See figure 2 )
(See figure 2 )
(See figure )
(See figure )
(See figure )
(See figure )
Figure 26
10 cm
Figure 27 Figure 28 Figure 29
Figure 30 Figure 31 Figure 32 Figure 33
6.2 Cleaning storage
Clean the inside cabinet daily to keep it clean.
7

WARNINGS
●
●
●
●When inspecting, cleaning, or maintaining the body, be sure to turn off the power switch and
disconnect the power plug; otherwise you can get electrical shock caused by a short circuit.
To maintain the inside cabinet, open the door and leave it for at least 10 minutes;
otherwise the steam can cause burns. If someone suffers from burns, cool the affected part with
cold water and sent them to see the doctor immediately.
Do not touch the power plug with a wet hand; otherwise you can get electrical shock.
When cleaning the inside cabinet, do not use any detergents, such as neutral detergent
or cleansers.
1.Turn off the power switch and disconnect the power plug from the receptacle. 34
2.Open the door and take out all brackets by using the dedicated tongs. 35
Use a cloth such as a dish towel or the likes to take out the bracket.
3.Open the door and leave it for at least 10 minutes to let it cool down slowly.
36
4.Wipe the cabinet by using a wet cloth. 37
5.Put back all the brackets that . 38
(See figure )
(See figure )
(See figure )
(See figure )
(See figure )
Figure 34 Figure 35 Figure 36 Figure 37 Figure 38
10MIN
7. When Not in Use
To stop the steamer operation, follow the procedures below.
WARNINGS
●When inspecting, cleaning, or maintaining the body, be sure to turn off the power switch and
disconnect the power plug; Otherwise you can get electrical shock caused by a short circuit.
●To maintain the inside cabinet, open the door and leave it for at least 10 minutes;
Otherwise the steam can cause burns.
●Do not touch the power plug with a wet hand; otherwise you can get electrical shock.
●When removing dirt on the steamer, do not use chemicals, such as thinner or benzene;
Otherwise accidents can be caused.
1.Turn off the power switch and disconnect the power plug from the receptacle. 34
2.Open the door and take out all brackets by using the special tongs. 35
Use a cloth such as a dish towel or the likes to take out the trays.
3.Open the door and leave it for at least 10 minutes to let it cool dowm. 36
.Lift the drainage hose upward and bend it at about 4 inches(10cm) away from its end.
39
5.Take off the drainage cap. 40
6.Hold the drainage hose to keep it bent and put it in the plastic bucket. 41
(See figure )
(See figure )
(See figure )
4
(See figure )
(See figure )
(See figure )
8

7.Release the hose to let the water drain. 42
8.When all hot water has been drained, the drainage cap. 43
9. . 44
10.Take out the Steamed buns, then wash the and wipe it with a dry cloth.
45
11. the to the . 46
(See figure )
belock (See figure )
By using a wet cloth to wipe the insid cabinet (See figure )
bracket
(See figure )
Put back bracket cabinet (See figure )
10 cm
Figure 39 Figure 40 Figure 41 Figure 42
Figure 43 Figure 44 Figure 45 Figure 46
8. The Special Statements of Vapor Cap:
(1) Function:
The inside vapor cap can extend the warming time, its working principle is combined the steam and dry air to
keep the food warm during warming, according to the using condition, the fresh holding period can more than
12 hours.
(2) Be Careful of the High Temperature
Don't touch the vapor cap as you may be scalded by the high temperature while the machine works.
(3) Methods of Installation
When you install the vapor cap, please carefully put it into the hole in the right direction, and insert it to
the bottom as deep as you can, then, adjust the vapor cap, in order not to close to other parts around it very
well. When uninstall the vapor cap, please turn it lightly firstly before plucking it out.
(4) Cleaning
When the vapor cap was gathered too much food draffs, it must be cleaned, otherwise, that may affect the
running; if necessary to take out the vapor cap to clean, please cut off the power first, and wait until the parts of
the machine cooling off, then take out the vapor cap upwardly.
(5) Attentions of Installation Location
In order to prevent the front temperature sensor of the vapor cap at the base from impacting by the high
temperature, please move the vapor cap forward and backward after insert it, the edge of the vapor cap must
be away from the sensor over 1cm, and not touch the front glass frame.
9
Figure 47 Figure 48

9. Storing the Steamer
1.Follow the procedure of Section 7. ”When Not In Use”.
2.Bundle up the power cord and put the bundle on the body. 49
3.Leave the door of the steamer open for one day to let the steamer dry completely. 50
4.Pack the body with a plastic bag and put it in a carton. Store it with low humidity place.
51
(See figure )
(See figure )
(See figure )
1DAY
佛山市南海振智厨房设备制造有限公司
Figure 49 Figure 50 Figure 51
Table of contents