WMF LONO User manual

nl
da
sv
fi
no
de
en
fr
it
es
Family Grill
Gebrauchsanweisung 4
Operating Manual 10
Mode d’emploi 16
Istruzioni per l’uso 22
Instrucciones de uso 28
Gebruiksaanwijzing 34
Brugsanvisning 40
Användarguide 46
Käyttöohje 52
Bruksanvisning 58
LONO

1
2
3
4
5
6
A
7
A
E
E
1
2
33
332
B C
DF
E

Lieferumfang
1 Grillplatten
2 Basis
3 Auffangschale
4 Entriegelungsknopf
5 Temperaturregler
6 Windschutz
7 Grillzange
Scope of delivery
1 Grill plates
2 Base
3 Drip tray
4 Release button
5 Temperature controller
6 Wind guard
7 Barbecue tongs
Contenu
1 Plateaux de barbecue
2 Base
3 Récipient collecteur
4 Bouton de déverrouillage
5 Régleur de température
6 Paravent
7 Pince pour gril
Contenuto della confezione
1 Piastre grill
2 Base
3 Recipiente di raccolta
4 Pulsante di sgancio
5 Manopola di regolazione della temperatura
6 Protezione contro il vento
7 Pinza per grill
Alcance del envío
1 Parrillas
2 Base
3 Bandeja receptora
4 Botón de desbloqueo
5 Regulador de temperatura
6 Paraviento
7 Pinza de barbacoa
Meegeleverd
1 Grillplaten
2 Basis
3 Opvangschaal
4 Ontgrendelingsknop
5 Temperatuurregelaar
6 Windbescherming
7 Grilltang
Leveringsomfang
1 Grillplader
2 Grunddel
3 Drypskål
4 Låseknap
5 Temperaturregulator
6 Vindbeskyttelse
7 Grilltang
Leveransinnehåll
1 Grillplattor
2 Underdel
3 Upptagningsbehållare
4 Upplåsningsknapp
5 Temperaturreglage
6 Vindskydd
7 Grilltång
Toimituslaajuus
1 Parilalevyt
2 Runko
3 Keräysastia
4 Kiertosäädin
5 Lämpötilansäädin
6 Tuulisuojus
7 Koko grilli
Leveringsomfang
1 Grillplater
2 Fundament
3 Oppsamlingsbeholder
4 Utløserknapp
5 Temperaturbryter
6 Vindskjerm
7 Grilltang

4
Gebrauchsanweisung
Wichtige Sicherheitshinweise
▪ Das Gerät kann von Kindern ab 8 Jahren sowie von Personen mit
reduzierten physischen, sensorischen oder mentalen Fähigkeiten
oder Mangel an Erfahrung und/oder Wissen benutzt werden, wenn
sie beaufsichtigt oder bezüglich des sicheren Gebrauchs des Gerätes
unterwiesen wurden und die daraus resultierenden Gefahren verstan-
den haben.
▪ Kinder dürfen nicht mit dem Gerät spielen.
▪ Reinigung und Benutzerwartung dürfen nicht durch Kinder durchge-
führt werden, es sei denn, sie sind älter als 8 Jahre und beaufsichtigt.
▪ Kinder jünger als 8 Jahre sind vom Gerät und der Anschlussleitung
fernzuhalten.
▪Wenn die Netzanschlussleitung dieses Gerätes beschädigt wird, muss
sie durch den Hersteller oder seinen Kundendienst oder eine ähnlich
qualifizierte Person ersetzt werden, um Gefährdungen zu vermeiden.
▪ Das Gerät darf nicht über eine externe Zeitschaltuhr oder Fernbedie-
nung betrieben werden.
▪ Das Gerät ist bei nicht vorhandener Aufsicht und vor dem Zusam-
menbau, dem Auseinandernehmen oder Reinigen stets vom Netz zu
trennen.
▪ Reinigen Sie alle Teile unmittelbar nach der Benutzung und entfernen
Sie eventuell vorhandene Speisereste sofort.
Beachten Sie die Hinweise im Kapitel „Reinigung und Pflege“.
▪ Entnehmen Sie die Grillplatten vor der Reinigung.
Die Grillplatten müssen vollkommen trocken sein, bevor diese wieder
eingesetzt werden.
▪ Das Gerät ist zur Verwendung im Freien geeignet.
▪ Die Netzanschlussleitung muss regelmäßig auf Zeichen von Beschä-
digungen untersucht werden, und falls die Netzanschlussleitung
beschädigt ist, darf das Gerät nicht mehr benutzt werden.
▪ Das Gerät muss über eine Fehlerstrom-Schutzeinrichtung (RCD) mit
einem Bemessungsauslösestrom von nicht mehr als 30 mA gespeist
werden.
▪ Das Gerät muss an eine Steckdose mit Schutzleiter angeschlossen
werden.

5
dede
▪ Dieses Gerät ist dafür bestimmt, im Haushalt und
ähnlichen Anwendungen verwendet zu werden, wie
beispielsweise:
⋅in Küchen für Mitarbeiter in Läden, Büros und
anderen gewerblichen Bereichen;
⋅in landwirtschaftlichen Anwesen;
⋅von Kunden in Hotels, Motels und anderen Wohn-
einrichtungen;
⋅in Frühstückspensionen.
Das Gerät ist nicht für den rein gewerblichen
Gebrauch bestimmt.
▪WARNUNG: Holzkohle oder ähnliche Brennstoffe dür-
fen für dieses Gerät nicht verwendet werden.
Vor dem Benutzen
Die Gebrauchsanweisung aufmerksam lesen. Sie enthält wichtige Hinweise für
den Gebrauch, die Sicherheit und die Wartung des Gerätes. Sie soll sorgfältig
aufbewahrt und gegebenenfalls an Nachbenutzer weitergegeben werden.
Das Gerät darf nur für den vorgesehenen Zweck, gemäß dieser Gebrauchsanwei-
sung, verwendet werden. Beim Gebrauch die Sicherheitshinweise beachten.
Technische Daten
Netzspannung: 220-240 V~, 50-60 Hz
Leistungsaufnahme: 2000 – 2400 Watt
Schutzklasse: I
Weitere Sicherheitshinweise
⋅Bewahren Sie das Gerät nicht in der prallen Sonne auf. Lassen Sie das
Gerät im Winter nicht im Freien.
⋅Stellen Sie das Gerät auf eine ebene und feste Oberfläche.
⋅Halten Sie rund um das Gerät ausreichend Platz frei.
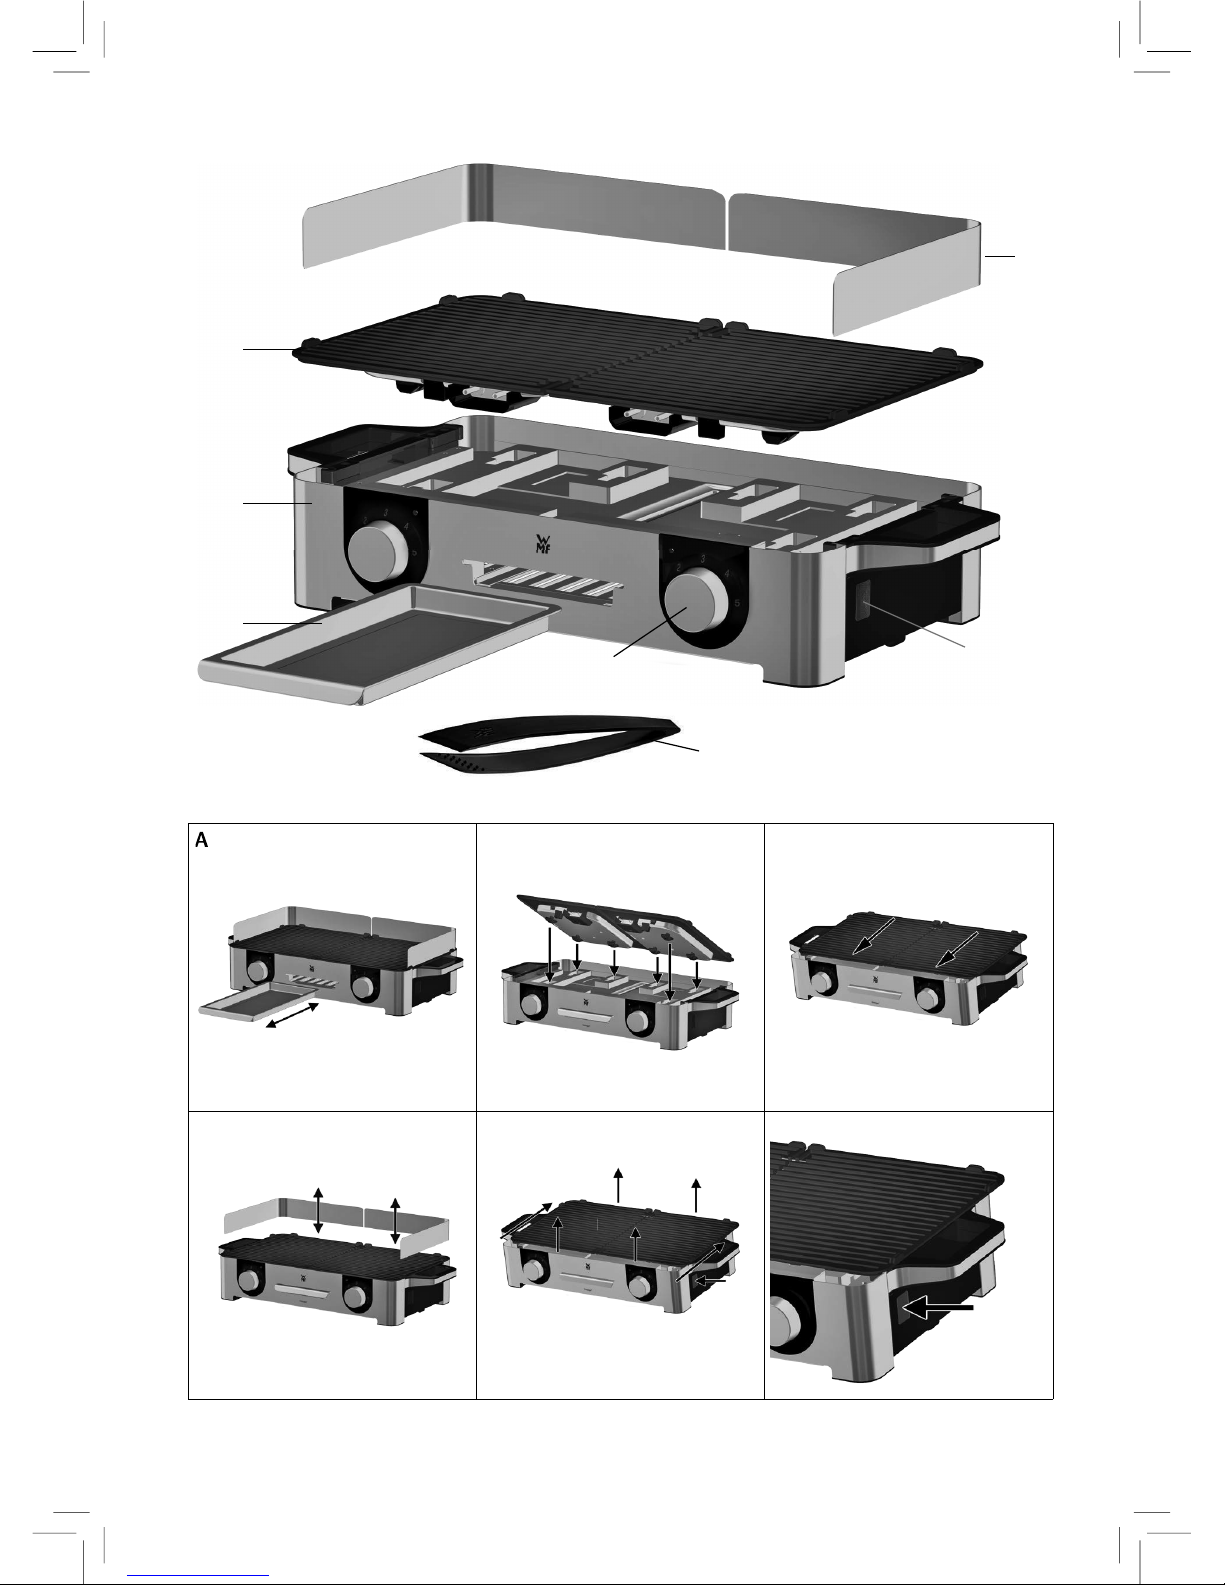
⋅Stellen Sie sicher, dass die Auffangschale während des Grillens immer
korrekt eingeschoben ist.
⋅Heizen Sie die Grillplatte immer vor, bevor Sie Grillgut auflegen.
⋅Achtung: Die berührbaren Oberflächen können bei eingeschaltetem Gerät
heiß werden und bleiben auch nach dem Ausschalten heiß!
⋅Beim Grillen kann zwangsläufig Fett spritzen. Deshalb den Tisch entspre-
chend schützen.
⋅Schalten Sie das Gerät nach Gebrauch immer aus und ziehen Sie den
Netzstecker aus der Steckdose.
⋅Lassen Sie das Gerät vollständig abkühlen, bevor Sie die Platten entfer-
nen, das Gerät reinigen und wegstellen.
⋅Stellen Sie sicher, dass Sie die Grillplatten wieder korrekt einsetzen,
nachdem Sie sie abgenommen haben.

6
Verwendung
Mit dem LONO Family Grill können Sie viele schmackhafte Speisen zubereiten.
Er eignet sich ausschließlich zum Grillen von Lebensmitteln wie z. B. Fleisch,
Gemüse oder Fisch.
Sicherheitsfunktion
Der Grill hat eine eingebaute Sicherheitsfunktion. Das Gerät funktioniert nur,
wenn die Grillplatten (1) korrekt eingesetzt sind.
Aufstellen und anschließen
▪ Alle Verpackungsteile vom Gerät entfernen.
▪ Das Gerät reinigen (siehe Kapitel „Reinigung und Pflege“).
▪ Gerät, in der Nähe einer Steckdose, auf eine stabile und ebene Fläche aufstel-
len.
Grillplatten
Die Temperatur der beiden Grillplatten (1) sind unabhängig voneinander regelbar.
So können Sie gleichzeitig Speisen mit unterschiedlicher Gartemperatur zuberei-
ten oder fertige Speisen auf einer Grillplatte (1) warmhalten.
Einsetzen
Legen Sie die Grillplatten (1) zum Einsetzen in die Einführungen (Abb. B) der Basis
(2).
Schieben Sie dann die Grillplatten (1) nach vorne, in Richtung der Temperaturreg-
ler (5) (Abb. C), die Grillplatten (1) rasten hörbar ein.
Hinweis: Durch die Aussparungen an der Basis (2) können Sie die Grillplatte
(1) nur auf jeweils einer Seite einlegen. Die Halterungen des Windschutzes (6)
müssen an den Außenseiten sowie an der Rückseite der Basis (2) sein.
Abnehmen
Lassen Sie das Gerät abkühlen.
Nehmen Sie als Erstes den Windschutz (6) aus den Halterungen heraus (Abb. D).
Drücken Sie den Entriegelungsknopf (4) der Grillplatte (1). Dieser ist jeweils
seitlich unterhalb des Tragegriffes angebracht (Abb. F).
Schieben Sie nun die Grillplatte (1) etwas nach hinten und nehmen Sie diese nach
oben ab. (Abb. E)
Antihaftbeschichtung
Die kratzempfindliche Antihaftbeschichtung keinesfalls mit scharfen oder spitzen
Gegenständen bearbeiten. Verwenden Sie Grillbesteck aus Holz oder Kunststoff.
Wir empfehlen die Verwendung der beiliegenden Grillzange (7).
Bei der ersten Inbetriebnahme des neuen Gerätes kann es zu einer geringen
Geruchs- und Rauchentwicklung kommen. Dies ist technisch bedingt und kein
Grund zur Beunruhigung.
Achtung: An den Temperaturreglern (5) kann das Gerät nicht ausgeschaltet
werden! Deshalb nach dem Gebrauch den Netzstecker ziehen.

7
de
Inbetriebnahme
▪ Schieben Sie die Auffangschale (3) in die Basis (2) (Abb. A).
In der Auffangschale (3) sammeln sich abtropfendes Fett und Bratensaft.
▪ Setzen Sie beide Grillplatten (1) auf den Rahmen (2) (Abb. B).
Beachten Sie, dass die Grillplatten (1) immer nur in eine der beiden Seiten der
Basis (2) passen.
▪ Befestigen Sie nun den Windschutz (6) in dem Sie diesen in die Halterungen
der Grillplatten (1) einstecken (Abb. D).
Der Windschutz schützt das Grillgut bei Wind vor zu schnellem Abkühlen und
die Arbeitsumgebung vor Fettspritzern.
▪ Sobald der Netzstecker angeschlossen ist, zeigen die Kontrollleuchten an, dass
das Gerät mit dem Stromnetz verbunden ist.
▪ Stellen Sie den Drehknopf (5) zum Vorheizen für fünf Minuten auf die höchste
Stufe. Wählen Sie danach je nach Grillgut ggfs. eine niedrigere Einstellung
(siehe Kapitel „Grillzeiten“).
Grillzeiten
Das Grillgut sollte in maximal 3 cm dicke Scheiben geteilt werden. Fleisch vor
dem Grillen würzen, jedoch erst danach salzen, so verliert es weniger Saft.
Würstchen vor dem Grillen anstechen, um Fettspritzer zu vermeiden. Die Garzeit
richtet sich nach Art und Dicke des Grillgutes. Fleisch oder andere Speisen niemals
auf der Grillplatte schneiden.
Nach Möglichkeit sollte das Grillgut schon 30 Minuten vorher aus dem Kühl-
schrank genommen werden und Raumtemperatur haben.
Grillzeiten und Temperatureinstellungen sind vom jeweiligen Grillgut und dem
eigenen Geschmack abhängig, die folgenden Werte sind daher nur Richtwerte.
Hinweis: Die angegebenen Zeiten beziehen sich auf die reine Grill-/Garzeit ohne
Aufheizzeit.
Grillzeit (Minuten) Grillstufe
Rindersteak 8-10 4-5
Schweineschnitzel 6-8 4-5
Hacksteak 6-8 4-5
Schweinekotelett 8-10 4-5
Lammkotelett 8-10 4-5
Hähnchenschnitzel 4-6 4-5
Fischfilet 4-6 4-5
Gemüse 4-5 5
warmhalten 1-3

8
Reinigung und Pflege
▪ Ziehen Sie den Netzstecker und lassen Sie das Gerät abkühlen.
▪ Entfernen Sie am Besten auf der noch handwarmen Grillplatte (1) Fett- oder
sonstige Rückstände mit einem Küchentuch.
▪ Entnehmen Sie die Grillplatten (1) aus der Basis (2) (Abb. E).
▪ Reinigen Sie die Grillplatten (1) in lauwarmen Wasser unter Zugabe eines
Spülmittels mit einer Spülbürste.
Hinweis: Kein Scheuermittel, Metallschwamm oder Backofenreiniger verwen-
den.
▪ Ziehen Sie die Auffangschale (3) aus dem Rahmen (2) (Abb. A).
▪ Reinigen Sie die Auffangschale (3) in lauwarmen Wasser unter Zugabe eines
Spülmittels mit einer Spülbürste.
Hinweis: Kein Scheuermittel, Metallschwamm oder Backofenreiniger verwen-
den.
Hinweis: Zur leichten Reinigung können Sie die Grillplatten (1), die Auffang-
schale (3) und den Windschutz (6) in die Spülmaschine geben.
▪ Die Basis (2) nie in Wasser tauchen oder mit Wasser behandeln. Nur mit einem
feuchten Tuch und etwas Spülmittel abwischen und trockenreiben.
Achtung: Die elektrischen Kontakte an den Grillplatten (1) und dem Rahmen
(2) müssen vollkommen trocken sein, bevor das Gerät wieder zusammen
gebaut wird.
▪ Setzen Sie das Gerät, nachdem es vollständig getrocknet ist, zur Aufbe-
wahrung wieder zusammen. Bewahren Sie das Gerät auf einer ebenen und
trockenen Umgebung auf.
spülmaschinen-
geeignet
unter fließendem
Wasser abspülbar
feucht abwischen
Grillplattten (1)
Rahmen (2)
Auffangschale (3)
Windschutz (6)
Grillzange (7)

9
de
Sonderzubehör
Separat erhältlich ist ein passender Standfuß (Art.Nr. 0415990011) für den LONO
Family Grill. Der Standfuß sorgt für einen sicheren Stand des Grills, sowie für eine
angenehme Höhe beim Grillen.
Das Gerät entspricht den Europäischen Richtlinien 2006/95/EG, 2004/108/EG und
2009/125/EG.
Dieses Produkt darf am Ende seiner Lebensdauer nicht über den normalen
Haushaltsabfall entsorgt werden, sondern muss an einem Sammelpunkt für das
Recycling von elektrischen und elektronischen Geräten abgegeben werden.
Die Werkstoffe sind gemäß ihrer Kennzeichnung wiederverwertbar. Mit der Wie-
derverwendung, der stofflichen Verwertung oder anderen Formen der Verwertung
von Altgeräten leisten Sie einen wichtigen Beitrag zum Schutze unserer Umwelt.
Bitte erfragen Sie bei der Gemeindeverwaltung die zuständige Entsorgungsstelle.
Änderungen vorbehalten

10
Operating Manual
Important safety information
▪ The appliance can be used by children older than eight years of age as
well as by people with limited physical, sensory or mental capabilities
and persons lacking experience and/or lacking knowledge, if they are
supervised or have received instructions on how to use the appliance
safely and have understood the resulting risks.
▪ Children must not play with the appliance.
▪ Children must not clean or maintain the appliance unless they are
older than eight years of age and are supervised.
▪Keep the appliance and its cord out of reach of children under eight
years of age.
▪ If the supply cord is damaged, it must be replaced by the manufac-
turer, its service agent or a similarly qualified person in order to avoid
hazards.
▪ The device must not be operated via an external timer or remote
control.
▪ Always disconnect the appliance from the supply if it is left unat-
tended and before assembling, disassembling or cleaning.
▪ Clean all parts immediately after use and remove any food residue
straight away.
Follow the instructions in the “Cleaning and care” section.
▪ Remove the grill plates before cleaning.
The grill plates must be completely dry before you reinsert them.
▪ The appliance is suitable for outdoor use.
▪ The supply cord should be regularly examined for signs of damage,
and if the cord is damaged, the appliance must not be used.
▪ The appliance must be supplied through a residual current device
(RCD) with a rated residual operating current not exceeding 30 mA.
▪ The appliance must be connected to a socket with an earth wire.
▪ This appliance is designed for use in households and similar environ-
ments such as:
⋅in kitchens for employees in shops, offices and other commercial
areas;
⋅on agricultural property;
⋅by customers in hotels, motels and other residential facilities;

11
enen
⋅in bed-and-breakfast establishments.
The appliance is not intended for purely commercial
use.
▪WARNING: Charcoal or similar combustible fuels must
not be used with this appliance.
Before use
Read the instructions for use carefully. They contains important information
about the use, safety and care of the appliance. They should be kept in a safe
place and passed on to subsequent users if necessary.
The appliance may only be used for the intended purpose according to these
instructions for use. Observe the safety information when using the appliance.
Technical data
Mains voltage: 220–240 V~, 50–60 Hz
Power consumption: 2000–2400 watts
Protection class: I
Additional safety instructions
⋅Do not store the appliance in direct sunlight. Do not leave the appliance
outside in winter.
⋅Place the appliance on a flat, water-resistant surface.
⋅Make sure sufficient space is left around the appliance.
⋅Make sure that the drip tray is always correctly inserted during grilling.
⋅Always pre-heat the grill plate before you place food on it.
⋅Attention: When the appliance is switched on, its touchable surfaces
can get very hot and they remain hot even after the appliance has been
switched off!
⋅Fat can spray out randomly when grilling. Therefore protect the table
surface accordingly.
⋅Always switch the appliance off after use and pull the mains plug out of
the socket.
⋅Allow the appliance to cool down fully before you remove the plates,
clean the appliance and put it away.
⋅Make sure that the grill plates are always repositioned correctly after
they have been removed.
Use
You can prepare lots of delicious food on the LONO Family Grill. It is designed
solely for grilling food such as meat, vegetables and fish.
Safety function
The grill has a built-in safety function. The appliance will only function if the grill
plates (1) have been correctly inserted.

12
Setting up and connecting
▪ Remove all packaging from the appliance.
▪ Clean the appliance (see chapter “Cleaning and care”).
▪ Place the appliance on a stable and level surface near a socket.
Grill plates
You can regulate the temperature of each grill plate (1) individually. Therefore
you can prepare foods simultaneously at different cooking temperatures or keep
cooked food warm on one of the grill plates (1).
Inserting
Place the grill plates (1) on the base (2); make sure that the protruding parts on
the grill plates sit in the designated recesses on the base (fig. B).
Then push the grill plates (1) forwards towards the temperature controller (5) (fig.
C); you will hear a click when the grill plates lock into place (1).
Note: You can only insert the grill plates (1) on one side because of the recesses
on the base (2). The holders on the wind guard (6) must be positioned on the
outside as well as on the rear of the base (2).
Removing
Allow the appliance to cool down.
First of all remove the wind guard (6) from the holders (fig. D).
Press the release button (4) on the grill plate (1). This is positioned below each of
the carry handles (fig. F).
Now push the grill plate (1) backwards and remove it by lifting it upwards. (fig. E)
Non-stick coating
Never touch the scratch-sensitive non-stick coating with sharp or pointed
objects. Use a barbecue fork and tongs made of wood or synthetic material. We
recommend using the barbecue tongs provided (7).
When using your new appliance for the first time there may be a little smoke or
odour. This is for technical reasons and is perfectly normal.
Attention: You cannot switch the appliance off at the temperature controller (5)!
Therefore pull out the mains plug after use.
Starting up the appliance
▪ Insert the drip tray (3) into the base (2) (fig. A).
The fat and meat juice collect in the drip tray (3).
▪Position both grill plates (1) on the base (2) (fig. B).
Note that the grill plates (1) will only fit on one side of the base (2).
▪ Secure the wind guard (6) by inserted it into the holders for the grill plates (1)
(fig. D).
The wind guard prevents the food on the grill from cooling down too quickly
when it is windy and it also protects the work area against fat splashes.
▪ Once the mains plug is connected, the indicator lights are lit to indicate that
the appliance is connected to the mains.
▪Turn the control knob (5) to the highest level for five minutes in order to
preheat the grill plate. Depending on the food you are grilling, you may then
need to select a lower setting (see chapter “Grilling times”).

13
en
Grilling times
Cut up the food you wish to grill into slices that are no thicker than 3 cm. Season
meat before grilling, but add salt after grilling to help retain the juice.
Pierce sausages before you grill them to prevent fat splashes. The cooking time
depends on the type and thickness of the food. Never cut meat or other foods on
the grill plate.
Where possible you should take the food out of the refrigerator 30 minutes
before you need it so that it reaches room temperature.
Grilling times and temperature settings depend on the food being grilled and
your own particular taste; the following values are therefore only guide values.
Note: The specified times relate to the pure grilling/cooking times and do not
include the time for pre-heating the grill plate.
Grilling time (minutes) Grilling level
Beef steak 8-10 4-5
Pork escalope 6-8 4-5
Hamburger steak 6-8 4-5
Pork chop 8-10 4-5
Lamb chop 8-10 4-5
Chicken escalope 4-6 4-5
Fish fillet 4-6 4-5
Vegetables 4-5 5
Keeping warm 1-3
Cleaning and care
▪ Unplug the mains plug and allow the appliance to cool down.
▪ Once the grill plate (1) is warm to the touch, use a piece of kitchen towel to
remove fat and other residue from it.
▪ Remove the grill plates (1) from the base (2) (fig. E).
▪ Clean the grill plates (1) in lukewarm water using washing-up liquid and a
washing-up brush.
Note: Do not use abrasives, metal scourers or oven cleaner.
▪ Pull the drip tray (3) out of the grill base (2) (fig. A).
▪ Clean the drip tray (3) in lukewarm water using washing-up liquid and a
washing-up brush.
Note: Do not use abrasives, metal scourers or oven cleaner.
Note: For simple cleaning, you can also wash the grill plates (1), drip tray (3)
and wind guard (6) in a dishwasher.
▪ Never immerse the base (2) in water or use water to clean it. Simply put a
little washing-up liquid on a damp cloth to wipe and dry it.
Attention: The electric contacts on the grill plates (1) and the base (2) must be
completely dry before the appliance can be reassembled.
▪ Once the appliance is completely dry you can reassemble it for storage. Store
the appliance on a level and dry surface.

14
Dishwasher safe Can be rinsed
under running
water
Wipe with a
damp cloth
Grill plates (1)
Base (2)
Drip tray (3)
Wind guard (6)
Barbecue tongs
(7)
Special accessories
A coordinating stand (item no. 0415990011) for the LONO Family Grill is also
available separately. The stand ensures that the appliance remains in a stable
position and also creates a convenient height for grilling.

15
en
For UK use only
▪ This product is supplied with a 13 A plug conforming to BS 1363 fitted to the
mains lead. If the plug is unsuitable for your socket outlets or needs to be
replaced, please note the following. If the plug is a non-rewireable one, cut
it from the mains lead and immediately dispose of it. Never insert it into a
socket outlet as there is a very great risk of an electric shock.
▪ The replacement of the plug at the mains lead has to be done according to the
following instructions:
Warning - This appliance must be earthed
Important: The wires in this mains lead are coloured in accordance with the
following code:
green/yellow Earth
blue Neutral
brown Live
As the colours of the wires in the mains lead of this appliance may not corres-
pond with the coloured markings identifying the terminals in your plug, proceed
as follows:As the colours of the wires in the mains lead of this appliance may not
correspond with the coloured markings identifying the terminals in your plug,
proceed as follows:
⋅the wire which is coloured green and yellow must be connected to the
terminal which is marked with the letter E or by the earth symbol or
coloured green or green and yellow,
⋅the wire which is coloured blue must be connected to the terminal which
is marked the letter N or coloured black,
⋅the wire which is coloured brown must be connected to the terminal
which is marked with the letter L or coloured red.
▪ If a 13 A (BS 1363) plug is used it must be fitted with a 13 A fuse conforming
to BS 1362 and be ASTA approved. If any other type of plug is used, the
appliance must be protected by a 10 A fuse either in the plug or adapter or at
the distribution board.
If in doubt - consult a qualified electrician.
▪ Never use the plug without closing the fuse cover.
The appliance complies with European directives 2006/95/EC, 2004/108/EC and
2009/125/EC.
At the end of its life, this product must not be disposed of in normal household
waste but must instead be delivered to a collection point for recycling electric
and electronic appliances.
The materials are recyclable in accordance with their labelling. The reuse,
recycling or other use of old appliances makes an important contribution to
protecting our environment.
Please ask your local administration for the appropriate disposal point.
Subject to alterations

16
Mode d’emploi
Consignes de sécurité importantes
▪ Les enfants à partir de 8 ans ainsi que les personnes ayant des capa-
cités physiques, sensorielles ou mentales restreintes ou ayant un
manque d’expérience et/ou de connaissance peuvent utiliser cet appa-
reil sous surveillance ou s’ils ont été formés pour utiliser cet appareil
en toute sécurité et ont compris les dangers pouvant résulter de son
utilisation.
▪ Ne pas laisser les enfants jouer avec cet appareil.
▪ Ne pas laisser les enfants effectuer le nettoyage et la maintenance
sauf s’ils sont âgés de plus de 8 ans et sous surveillance.
▪ Les enfants de moins de 8 ans doivent être maintenus à l’écart de
l’appareil et de son câble de raccordement.
▪ Si le câble d’alimentation de l’appareil est endommagé, il doit être
remplacé par le SAV ou par le fabricant ou par une personne qualifiée,
afin d’éviter toute mise en danger.
▪ L’appareil ne doit pas être mis en service à l’aide d’une minuterie
externe ou d’une commande à distance.
▪ L’appareil doit toujours être débranché en cas d’absence de surveil-
lance et avant le montage, le démontage ou le nettoyage.
▪ Nettoyez immédiatement toutes les pièces après utilisations et retirez
les éventuels restes d’aliments.
Veuillez suivre les instructions du chapitre «Nettoyage et entretien».
▪ Retirez les plateaux de barbecue avant le nettoyage.
Les plateaux de barbecue doivent être complètement secs avant d’être
remis en place.
▪ L’appareil convient à une utilisation en plein air.
▪ Il convient de contrôler régulièrement la présence de dégâts au niveau
du câble d’alimentation, et si ce dernier est endommagé, l’appareil ne
peut plus être utilisé.
▪ L’appareil doit être alimenté via un dispositif de protection contre
le courant de fuite et avec un courant nominal de déclenchement
n’excédant pas 30mA.
▪ L’appareil doit être raccordé à une prise et à un conducteur de protec-
tion.

17
frfr
▪ L’appareil est conçu pour un usage domestique ou pour
des applications similaires telles que:
⋅dans des cuisines pour le personnel dans des bou-
tiques, des bureaux ou d’autres secteurs profession-
nels;
⋅dans des exploitations agricoles;
⋅par des clients dans des hôtels, des motels et autres
établissements résidentiels;
⋅dans des chambres d’hôtes.
L’appareil n’est pas conçu pour un usage purement
commercial.
▪ATTENTION: Le charbon de bois ou des combustibles
similaires ne peuvent être utilisés avec cet appareil.
Avant l‘utilisation
Lire attentivement le mode d’emploi. Il contient des consignes importantes pour
l’utilisation, la sécurité et l’entretien de l’appareil. Il doit être conservé soigneuse-
ment et transmis en cas de remise à une tierce personne.
L’appareil ne doit être utilisé que pour l’usage prévu conformément à ce mode
d’emploi. Respectez les consignes de sécurité lors de l’utilisation.
Caractéristiques techniques
Tension du secteur: 220-240 V~, 50-60 Hz
Puissance : 2000 - 2400 Watts
Catégorie de protection : I
Consignes de sécurité supplémentaires
⋅N’exposez pas de manière prolongée l’appareil aux rayons du soleil. Ne
laissez pas l’appareil à l’extérieur en hiver.
⋅Poser l’appareil sur une surface plate et stable.
⋅Faites assez de place autour de l’appareil.
⋅Veillez à ce que le récipient collecteur soit toujours correctement inséré
pendant la cuisson.
⋅Préchauffez toujours le plateau de barbecue avant d’y déposer les
aliments à cuire.
⋅Attention: les surfaces accessibles peuvent devenir très chaudes lorsque
l’appareil fonctionne et gardent leur chaleur lorsque l’appareil est éteint.
⋅Des éclaboussures de graisse peuvent survenir lors de la cuisson. Protégez
donc la table en conséquence.
⋅Éteignez toujours l’appareil après l’utilisation et débranchez la fiche de la
prise.
⋅Laissez l’appareil refroidir complètement avant de retirer les plateaux, de
nettoyer et de ranger l’appareil.
⋅Veillez à remettre correctement les plateaux de barbecue après les avoir
retirés.

18
Utilisation
Préparez de nombreux repas délicieux grâce au barbecue familial LONO. Il con-
vient exclusivement à la cuisson d‘aliments comme la viande, les légumes ou le
poisson.
Fonction de sécurité
Le barbecue possède une sécurité intégrée. L’appareil ne fonctionne que lorsque
les plateaux de barbecue (1) sont correctement insérés.
Mise en place et en service
▪ Retirer toutes les parties d’emballage de l’appareil.
▪ Nettoyer l’appareil (voir le chapitre «Nettoyage et entretien»).
▪ Installer l’appareil à proximité d’une prise, sur une surface stable et plate.
Plateaux de barbecue
Les températures des deux plateaux de barbecue (1) peuvent être réglées séparé-
ment. Vous pouvez préparer en même temps des aliments dont les températures
de cuisson sont différentes ou maintenir au chaud des plats prêts sur un plateau
(1).
Insertion
Pour insérer les plateaux (1), les poser dans les supports (ill. B) de la base (2).
Poussez ensuite les plateaux (1) vers l’avant, vers le régulateur de température (5)
(ill. C), vous pouvez entendre les plateaux (1) s’insérer.
Remarque : vous ne pouvez poser les plateaux (1) que sur un seul côté chacun
en raison des logements de la base (2). Les supports du paravent (6) doivent se
trouver sur les côtés extérieurs et à l’arrière de la base (2).
Démontage
Laissez l’appareil refroidir.
Retirez d’abord le paravent (6) des supports (ill. D).
Appuyez sur le bouton de déverrouillage (4) du plateau (1). Il se trouve sur le côté,
en dessous de la poignée de transport (ill. F).
Poussez maintenant le plateau (1) légèrement vers l’arrière et retirez-le en le
soulevant (ill. E).
Revêtement antiadhésif
Ne jamais utiliser d’objets pointus ou tranchants avec le revêtement antiadhésif,
car ce dernier se raye facilement. Utilisez des ustensiles de barbecue en bois ou en
plastique. Nous vous recommandons d’utiliser la fourchette de barbecue livrée (7).
Lors de la première mise en service d’un nouvel appareil, de légères odeurs et
fumées peuvent apparaître. Celles-ci sont d’origine technique, vous ne devez pas
vous en soucier.
Attention: les boutons de réglage de la température (5) ne permettent pas
d’éteindre l’appareil. C’est pourquoi nous vous demandons de débrancher la fiche
après l’utilisation.

19
fr
Mise en service
▪ Insérez le récipient collecteur (3) dans la base (2) (ill. A).
Le récipient collecteur (3) récupère la graisse et le jus de cuisson.
▪Posez les deux plateaux de barbecue (1) sur la base (2) (ill. B).
Veillez à ce que les plateaux (1) soient toujours installés sur l’un des deux
côtés de la base (2).
▪ Fixez le paravent (6) en l’insérant dans les supports des plateaux de barbecue
(1) (ill. D).
Le paravent empêche les aliments de refroidir rapidement et les éclaboussures
de graisse de salir les alentours du barbecue.
▪ Dès que la fiche est branchée, les témoins de contrôle indiquent que l’appareil
est raccordé au réseau électrique.
▪Positionnez le bouton rotatif (5) pendant cinq minutes sur le niveau le plus
élevé pour préchauffer l’appareil. Choisissez ensuite un réglage plus bas qui
convient à l’aliment (voir chapitre «Durées de cuisson»).
Durées de cuisson
Les aliments à cuire doivent être répartis en morceaux d’une épaisseur de 3cm
maximum. Épicez la viande avant de la cuire, mais n’ajoutez le sel qu’après, afin
que la viande perde moins de jus.
Piquez les petites saucisses avant de les cuire afin d’éviter les éclaboussures de
graisse. La durée de la cuisson dépend de la nature et de l’épaisseur de l’aliment.
Ne jamais couper la viande ou d’autres aliments sur le plateau de barbecue.
Si possible, les aliments à cuire doivent être retirés du réfrigérateur 30 minutes
avant la cuisson pour être à température ambiante.
Les durées de cuisson et les réglages de température dépendent de l’aliment à
cuire et du goût de chacun. C’est pourquoi les valeurs suivantes ne sont données
qu’à titre indicatif: Remarque : les durées indiquées se rapportent uniquement au
temps de cuisson et ne prennent pas en compte la durée du préchauffage.
Durée de cuisson (en
minutes)
Niveau de cuisson
Bifsteck 8-10 4-5
Escalope de porc 6-8 4-5
Steak haché 6-8 4-5
Côtelette de porc 8-10 4-5
Côtelette d'agneau 8-10 4-5
Escalope de poulet 4-6 4-5
Filet de poisson 4-6 4-5
Légumes 4-5 5
maintien au chaud 1-3

20
Nettoyage et Entretien
▪ Débranchez l’appareil et laissez-le refroidir durant 1 heure.
▪ Il est plus facile d’enlever les restes de graisses et autres avec un torchon
lorsque le plateau de barbecue (1) est encore tiède.
▪ Retirez les plateaux de barbecue (1) de la base (2) (ill. E).
▪ Nettoyez les plateaux de barbecue (1) avec une brosse à l’eau tiède en ajou-
tant un peu de liquide vaisselle.
Remarque : Ne pas utiliser de produits abrasifs, d’éponge métallique ou de
produit nettoyant pour four.
▪ Retirez le récipient collecteur (3) de la base (2) (ill. A).
▪ Nettoyez le récipient collecteur (3) avec une brosse à l’eau tiède en ajoutant
un peu de liquide vaisselle.
Remarque : ne pas utiliser de produits abrasifs, d’éponge métallique ou de
produit nettoyant pour four.
Remarque : pour un nettoyage facile, vous pouvez mettre les plateaux de
barbecue (1), le récipient collecteur (3) et le paravent (6) dans le lave-vaisselle.
▪ Ne jamais plonger la base (2) dans l’eau ou la nettoyer à l’eau. Essuyez-la
simplement avec un chiffon humide et séchez-la.
Attention: les contacts électriques des plateaux de barbecue (1) et de la base
(2) doivent être complètement secs avant que l’appareil soit remonté.
▪ Lorsque l’appareil est complètement sec, remontez-le pour le ranger. Rangez
l’appareil sur une surface plane et sèche.
lavable au lave-
vaisselle
rinçage pos-
sible sous l'eau
courante.
essuyer avec un
chiffon humide
Plateaux de
barbecue (1)
Base (2)
Récipient collec-
teur (3)
Paravent (6)
Fourchette de
barbecue (7)
Accessoires spéciaux
Un pied d’adaptation (noart. 0415990011) est disponible en option pour le
barbecue familial LONO. Avec le pied, votre barbecue sera correctement posé et à
la bonne hauteur pour cuire vos aliments.
Other manuals for LONO
21
Table of contents
Languages:
Other WMF Grill manuals
Popular Grill manuals by other brands

Saber Compact
Saber Compact R50CC0617 Assembly instructions

DeLonghi
DeLonghi CONTACT-GRILL Instructions for use

Weber
Weber Summit 670 Assembly instruction

Bartscher
Bartscher 70 Series Installation, use and maintenance

Hamilton Beach
Hamilton Beach 31605 user manual

bechtold
bechtold Qookingtable MO-61 quick start guide