Wolf Garten UL 33 E User manual

UL 33 E

32
3
- Montage - Assembly - Montage - Montaggio - Montage -
- Montering - Asennus - Montering - Montering - Montáž -
- Szerelés - Montaž - Montaža - Montáž - Montaža -
- Ìîíòàæ - Συναρμολόγηση - Montare - Ñáîðêà - Montaj -
M2
M1
M3 2
3P
M4

33
A
1
21
2
3
D2
1
F
B
C
1
2
E
1
2
6
3
4
5

4
5
UL 33 E
1 Ein- Ausschalter
2 Kabelzugentlastung
3 Klammer
4 Kabel-Knickschutz
5 Schutzklappe
6 Griffbefestigung
7 Arbeitstiefeneinstellung
1 On-/off switch
2 Cable-kink protection
3 Clamp
4 Cable anti-king protection
5 Deector plate
6 Fitting of handle
7 Adjustment of working depth
1 Interrupteur
2 Fixe-câble
3 Crampon
4 Protection antipliage du câble
5 Clapet de sécurité
6 Fixation du guidon
7 Reglage de profondeur de travail
1 Interrutore per avviare
2 Portacavo
3 Staffa
4 Regolazione profondità di lavoro
5 Deettore
6 Fissare I‘impugnatura
7 Regolazione di lavoro
1 In- en uitschakelaar
2 Kabelhouder
3 Klem
4 Knikbescherming
5 Achterklep
6 Duwboombefestigung
7 Werkdiepte handknop
1 Afbryder
2 Kabeltrækaflastning
3 Klemme
4 Kabelknækbeskyttelse
5 Baklucken
6 Fastkruvning av handtaget
7 Indstilling af arbejdsdybde
1
2
3
5
3
6
7
6
4
6
7

4
5
UL 33 E
1 Âêëþ÷âàíå - Èçêëþ÷âàíå
2 Àâòîìàòè÷íî èçêëþ÷âàíå íà êàáåëà
3 Ñêîáà
4 Ïðåäïàçèòåë íà êàáåëà îò ïðåãúâàíå
5 Ïðåäïàçíà êëàïà
6 Óêðåïâàíå íà ðúêîõâàòêèòå
7 Íàñòðîéêà çà äúëáî÷èíà íà ðàáîòà
1 Întrerupător pornit - oprit
2 Dispozitiv de slăbire a cablului
3 Clamă
4 Protecţie contra îndoirii cablului
5 Clapetă de protecţie
6 Dispozitiv de fixare a mânerului
7 Dispozitiv de reglare a înălţimii de
operare
RO
1 Âûêëþ÷àòåëü
2 Ïðåäîõðàíèòåëü êàáåëÿ
3 Çàæèì
4 Çàùèòà îò ïåðåãèáà êàáåëÿ
5 Çàùèòíàÿ êðûøêà
6 Ôèêñàòîð ðó÷êè
7 Óñòàíîâêà ãëóáèíû îáðàáîòêè
1 Bir- Kapatıcı
2 Kablo çekiş yükü
3 Mandalr
4 Kablo kırılma koruması
5 Koruma kapağı
6 Tutamak kıskacı
7 Çalışma derinliği ayarı
1 Διακόπτης on/off
2 Προστασία έλξης καλωδίου
3 Σφιγκτήρας
4 Προστατευτικό κάμψης καλωδίου
5 Προστατευτικό κάλυμμα
6 Στερέωση λαβής
7 Ρύθμιση βάθους εργασίας
1 Uključna –isključna sklopka
2 Rasterećenje kabela na vlak
3 Kopča
4 Zaštita kabela od prijeloma
5 Zaštitna zaklopka
6 Pričvršćivač ručke
7 Namještanje radne dubine
1 Zapnutie - vypnutie
2 Odľahčenie ťahu kábla
3 Svorka
4 Kábel - zlomová ochrana
5 Ochranný kryt
6 Upevnenie držadiel
7 Nastavenie pracovnej hĺbky
1 Stikalo za vklop/izklop
2 Razbremenitvena sponka kabla
3 Sponka
4 Varovalo kabla proti zlomu
5 Zaščitna zaklopka
6 Pritrditev ročaja
7 Nastavitev delovne globine
1 Spínač
2 Omezovač tahu kabelu
3 Svorka
4 Ochrana kabelu
5 Ochranný kryt
6 Upevnění rukojeti
7 Nastavení pracovní hloubky
1 be- / kikapcsoló
2 kábelkihúzás gátló
3 szorító
4 kábeltörés gátló
5 védőfedél
6 fogantyú rögzítő
7 munkamélység beállító
1 Włącznik / Wyłącznik
2 Zabezpieczenie przed splątaniem kabla
3 Klips mocowania kabla
4 Ochrona przeciwzgięciowa kabla
5 Klapa ochronna
6 Mocowanie ramy uchwytu
7 Regulacja głębokości pracy
1 Virtakytkin
2 Vedonpoistin
3 Pinne
4 Kaapelin taittosuoja
5 Aisan kiinnittäminen
6 Kahvan Kiinnike
7 Työsyvyyden säätäminen
1 På-/av bryter
2 Kabelstrekkavlastning
3 Klammer
4 Knekkebeskyttelse for kabel
5 Bakplate
6 Styreskruer
7 Arbeidsdybdeinnstilling
1 Omkopplare TILL / FRÅN
2 Kabeldragavlastning
3 Klammer
4 Kabel-knäckskydd
5 Backplaten
6 Grebs fastgørelse
7 Inställning av arbetsdjup

6
H - Tartalom
47
47
48
48
49
49
50
50
89
Gratuláció
Műszaki adatok
Biztonsági előírások
Szerelés
Összeszerelés
Karbantartás
A zavorak elhárítása
Garanciális feltételek
Megfeleloségi nyilatkozat
63
63
64
64
65
65
66
66
89
Čestitamo
Tehnični podatki
Varnostna navodila
Montaža
Obratovanje
Servisiranje
Odpravljanje napak
Garancijski pogoji
EG Izjava o skladnosti
SLO - VsebinaHR - Sadržaj
55
55
56
56
57
57
58
58
89
Čestitanje
Tehnički podatci
Sigurnosne upute
Montaža
Pogon
Održavanje
Otklanjanje smetnji
Uvjeti garancije
Izjava o konformitetu
59
59
60
60
61
61
62
62
89
Gratulácia
Technické údaje
Bezpečnostné predpisy
Montážny návod
Prevádzka
Údržba
Odstránnnenie porúch
Podmienky záruky
Vyhlásenie o zhode
s predpismi Európskej únie
SK - Obsah
67
67
68
68
69
69
70
70
89
Ïîçäðàâëåíèÿ
Òåõíè÷åñêè äàííè
Èíñòðóêöèè çà òåõíèêà íà
áåçîïàñíîñò
Ìîíòàæ
Åêñïëîàòàöèÿ
Ïîääðúæêà
Îòñòðàíÿâàíå íà ïîâðåäè
Óñëîâèÿ íà ãàðàíöèÿòà
Äåêëàðàöèÿ çà
ñúîòâåòñòâèå
BG -
Ñúäúðæàíèå
S - Innehåll
39
39
40
40
41
41
42
42
88
Lyckönskan
Tekniska data
Säkerhetsanvisningar
Montering
Drift
Underhåll
Åtgärder vid störning
Garantivillkor
Konformitetsintyg
CZ - Obsah
43
43
44
44
45
45
46
46
89
Blahopřání
Technické údaje
Bezpečnostní pokyny
Montáž
Provoz
Údržba
Odstranění závad
Záruční podmínky
Prohlášení o shodě
PL - Treść
51
51
52
52
53
53
54
54
89
Gratulacje
Parametry techniczne
Wskazówki bezpieczeństwa
Montaž
Eksploatacja
Ostrezeżenie
Usunięcie zakłóceń
Warunki gwarancji
Oswiadczenie zgodnosci
FIN - Sisällys
31
31
32
32
33
33
34
34
88
Onnentoivotus
Tekniset tiedot
Turvallisuusohjeet
Asennus
Käyttö
Huolto
Häiriöiden poistaminen
Takuuehdot
Vastaavuustodistus
NL - Inhoud
23
23
24
24
25
25
26
26
88
Gelukwens
Technische gegevens
Veiligheidsvoorschriften
Montage
Gebruik
De verzorging
Opheffen van storingen
Garantievoorwaarden
Conformiteitsverklaring
27
27
28
28
29
29
30
30
88
DK - Inhold
Tillykke
Tekniske data
Sikkerhedshenvisninger
Montering
Drift
Vedligeholdelse
Afhjælpning af fejl
Garantibetingelser
Overensstemmelses-
erklæring
N - Innhold
35
35
36
36
37
37
38
38
88
Gratulasjon
Tekniske data
Sikkerhetsmerknader
Montering
Drift
Vedlikehold
Feilretting
Garantibetingelser
Konformitetserklæring
GB - Contents
11
11
12
12
13
13
14
14
88
Congratulation
Technical data
Safety instruction
Assembly
Operation
Maintenance
Faults and how to remedy
Guarantee terms
Declaration of Conformity
7
7
8
8
9
9
10
10
88
Gratulation
Technische Daten
Sicherheitshinweise
Montage
Betrieb
Wartung
Beseitigung von Störungen
Garantiebedingungen
Konformitätserklärung
D - Inhalt
F - Sommaire
15
15
16
16
17
17
18
18
88
Congratulation
Données Techniques
Consignes de sécurité
Montage
Fonctionnement
Entretien
Comment remédier
aux pannes
Conditions de la garantie
Déclaration de conformité
I - Contenuto
19
19
20
20
21
21
22
22
88
Congratulatzione
Dati tecnici
Indicazioni di sicurezza
Montaggio
Messa in opera
Manutenzione
Interventi di riparazione
Condizioni di garanzia
Dichiarazione di
Conformità
79
79
80
80
81
81
82
82
89
Tebrikler
Teknik Bilgiler
Güvenlik talimatları
Montaj
Kullanim
Bakım
Arızaların giderilmesi
Garanti şartları
Uygunluk Beyannamesi
TR - İçindekiler
71
71
72
72
73
73
74
74
89
Ïîçäðàâëåíèå
Òåõíè÷åñêèå äàííûå
Ïðàâèëà òåõíèêè
áåçîïàñíîñòè
Ñáîðêà
Ýêñïëóàòàöèÿ
Òåõîáñëóæèâàíèå
Óñòðàíåíèå íåïîëàäîê
Ãàðàíòèéíûå óñëîâèÿ
Çàÿâëåíèå î ñîîòâåòñòâèè
RUS - Ñîäåðæàíèå
75
75
76
76
77
77
78
78
89
Felicitări
Date tehnice
Indicaţii de siguranţă
Montare
Funcţionare
Întreţinere
Înlăturarea defecţiunilor
Condiţiile garanţiei
Declaraţie de conformitate
RO - Cuprins
83
83
84
84
85
85
86
86
89
Συγχαρητήρια
Τεχνικά στοιχεία
Οδηγίες ασφαλείας
Συναρμολόγηση
Λειτουργία
Συντήρηση
Αντιμετώπιση προβλημάτων
Όροι εγγύησης
Δήλωση Συμμόρφωσης
GR - Περιεχόμενα

7
Herzlichen Glückwunsch zum Kauf Ihres WOLF-Produkts
Lesen Sie die Gebrauchsanweisung sorgfältig, und
machen Sie sich mit den Bedienungselementen und
dem richtigen Gebrauch des Gerätes vertraut. Der
Benutzer ist verantwortlich für Unfälle mit anderen
Personen oder deren Eigentum. Beachten Sie die
Hinweise, Erläuterungen und Vorschriften.
Lassen Sie nie Kinder oder andere Personen,
die die Gebrauchsanweisung nicht kennen, den
Rasenlüfter benutzen. Jugendliche unter 16
Jahre dürfen das Gerät nicht benutzen. Örtliche
Bestimmungen können das Mindestalter des
Benutzers festlegen.
UL 33 E
Typ 3620 ...
A112 cm
B84 cm
C50 cm
D
LP 80 dB (A)
E
ahw 2,5 m/s²
Nennleistung 500 W
Netzspannung 230 VAC
Arbeitshöhe -3 / 4 / 8 mm
Arbeitsbreite 33 cm
Gewicht 10 kg
Technische Daten
D Lärmmessung am Ohr der Bedienungsperson in Anlehnung
an EN 836
E Schwingungen gemessen am Führungsholm, mit Bedienperson
nach EN 1033 und EN 836. Die bewertete Beschleunigung
beträgt typischerweise:
Änderungen aus technischen Gründen vorbehalten.
A
B
C

8
9
Sicherheitshinweise
Sie dürfen das Gerät nicht in Betrieb nehmen, bevor Sie diese Gebrauchsanweisung gelesen, alle angegebenen Hinweise
beachtet und das Gerät wie beschrieben montiert haben. Gebrauchsanweisung für künftige Verwendungen aufbewahren.
Bedeutung der Symbole
Dritte aus dem
Gefahrenbereich
fernhalten!
Warnung!
Vor Inbetriebnahme
die
Gebrauchsanweisung
lesen!
Vorsicht! - Scharfe
Schneidmesser - vor
Wartungsarbeiten und bei
Beschädigung der Leitung
den Stecker aus dem Netz
entfernen.
Anschlusskabel vom Schneid-
werkzeug fernhalten!
Benutzung/Bedienung
• Benutzen Sie das Gerät nur bei Tageslicht oder guter künstlicher
Beleuchtung.
• Das Gerät darf bei Regenwetter nicht benutzt werden. Wenn
möglich, vermeiden Sie das Gerät bei nassem Gras zu benutzen.
Das Gerät darf nicht mit Wasser gewaschen oder abgespült
werden.
• Achten Sie darauf, dass Sie an Abhängen fest und sicher stehen.
Das Gerät immer quer zum Gefälle führen, niemals mit dem und
gegen das Gefälle und nie an sehr steilen Hängen benutzen.
• Besondere Vorsicht ist geboten bei Fahrtrichtungswechsel oder
wenn Sie das Gerät zu sich her ziehen.
• Beim Transport auf anderen Unterlagen als Gras den Motor
abstellen.
• Benutzen Sie niemals ein Gerät mit schadhaftem Gehäuse oder
fehlenden Schutzeinrichtungen.
• Motor ausschalten, Stillstand der Lüfterwalze abwarten und
Netzstecker ziehen, bevor Sie das Gerät verlassen, überprüfen,
reinigen oder sonstige Arbeiten (z. B. Einstellen der Arbeitstiefe)
durchführen.
• Hände und Füße von der rotierenden Lüfterwalze fernhalten.
• Blockiert die Lüfterwalze, den Motor abstellen und Netzstecker
ziehen. Entfernen Sie evtl. Gegenstände und kontrollieren Sie, ob
das Gerät beschädigt ist. Eventuelle Schäden müssen repariert
werden, bevor das Gerät wieder in Betrieb genommen wird.
• Vor Benutzung das Verlängerungskabel auf Beschädigung und
Altern untersuchen. Bei Bedarf das Kabel auswechseln. Benutzen
Sie das Gerät nicht bei beschädigtem Kabel.
• Das Verlängerungskabel muss frei liegen. Legen Sie das Kabel so,
dass das Gerät nicht darüber fahren kann. Das Verlängerungskabel
darf nicht in die Nähe der Lüfterwalze kommen.
Allgemeine Hinweise
• Jugendliche unter 16 Jahren oder Personen, welche die
Bedienungsanleitung nicht kennen, dürfen das Gerät nicht
benutzen.
• Wenn sich Personen, besonders Kinder oder Tiere, im Arbeitsbereich
aufhalten, darf mit dem Gerät nicht gearbeitet werden.
Vorbereitung
• Bei Benutzung des Gerätes immer feste Schuhe und lange Hosen
tragen. Bedienen Sie das Gerät nie, wenn Sie barfuß sind oder
offene Sandalen tragen.
• Untersuchen Sie zuerst den Rasen gründlich auf Fremdkörper, die
von dem Gerät ausgeworfen werden können, und entfernen Sie
diese.
• Kontrollieren Sie, ob das Gerät und die Lüfterwalze in einwandfreiem
Zustand sind.
Kabel
• Bitte arbeiten Sie mit Sicherheitskabeln. Als Anschlussleitung
dürfen nur Leitungen verwendet werden, die nicht leichter sind
als Gummischlauchleitungen HO 7 RN-F mit einem Mindest-
Querschnitt von 3 x 1,5 mm2.
• Die Kupplungen der Anschlusskabel müssen aus Gummi oder
gummiüberzogen sein und der Norm DIN/VDE 0620 entsprechen.
• Kupplungen müssen spritzwassergeschützt sein (gilt nur für
Österreich).
• Benutzen Sie eine Fehlerstromschutzeinrichtung (RCD) mit einem
Fehlerstrom von nicht mehr als 30 mA.
• Anschlusskabel an der Zugentlastung befestigen. Nicht an Kanten,
spitzen oder scharfen Gegenständen scheuern lassen. Kabel nicht
durch Türritze oder Fensterspalten quetschen. Schalteinrichtungen
dürfen nicht entfernt oder überbrückt werden (z. B. Anbinden des
Schalthebels am Führungsholm).
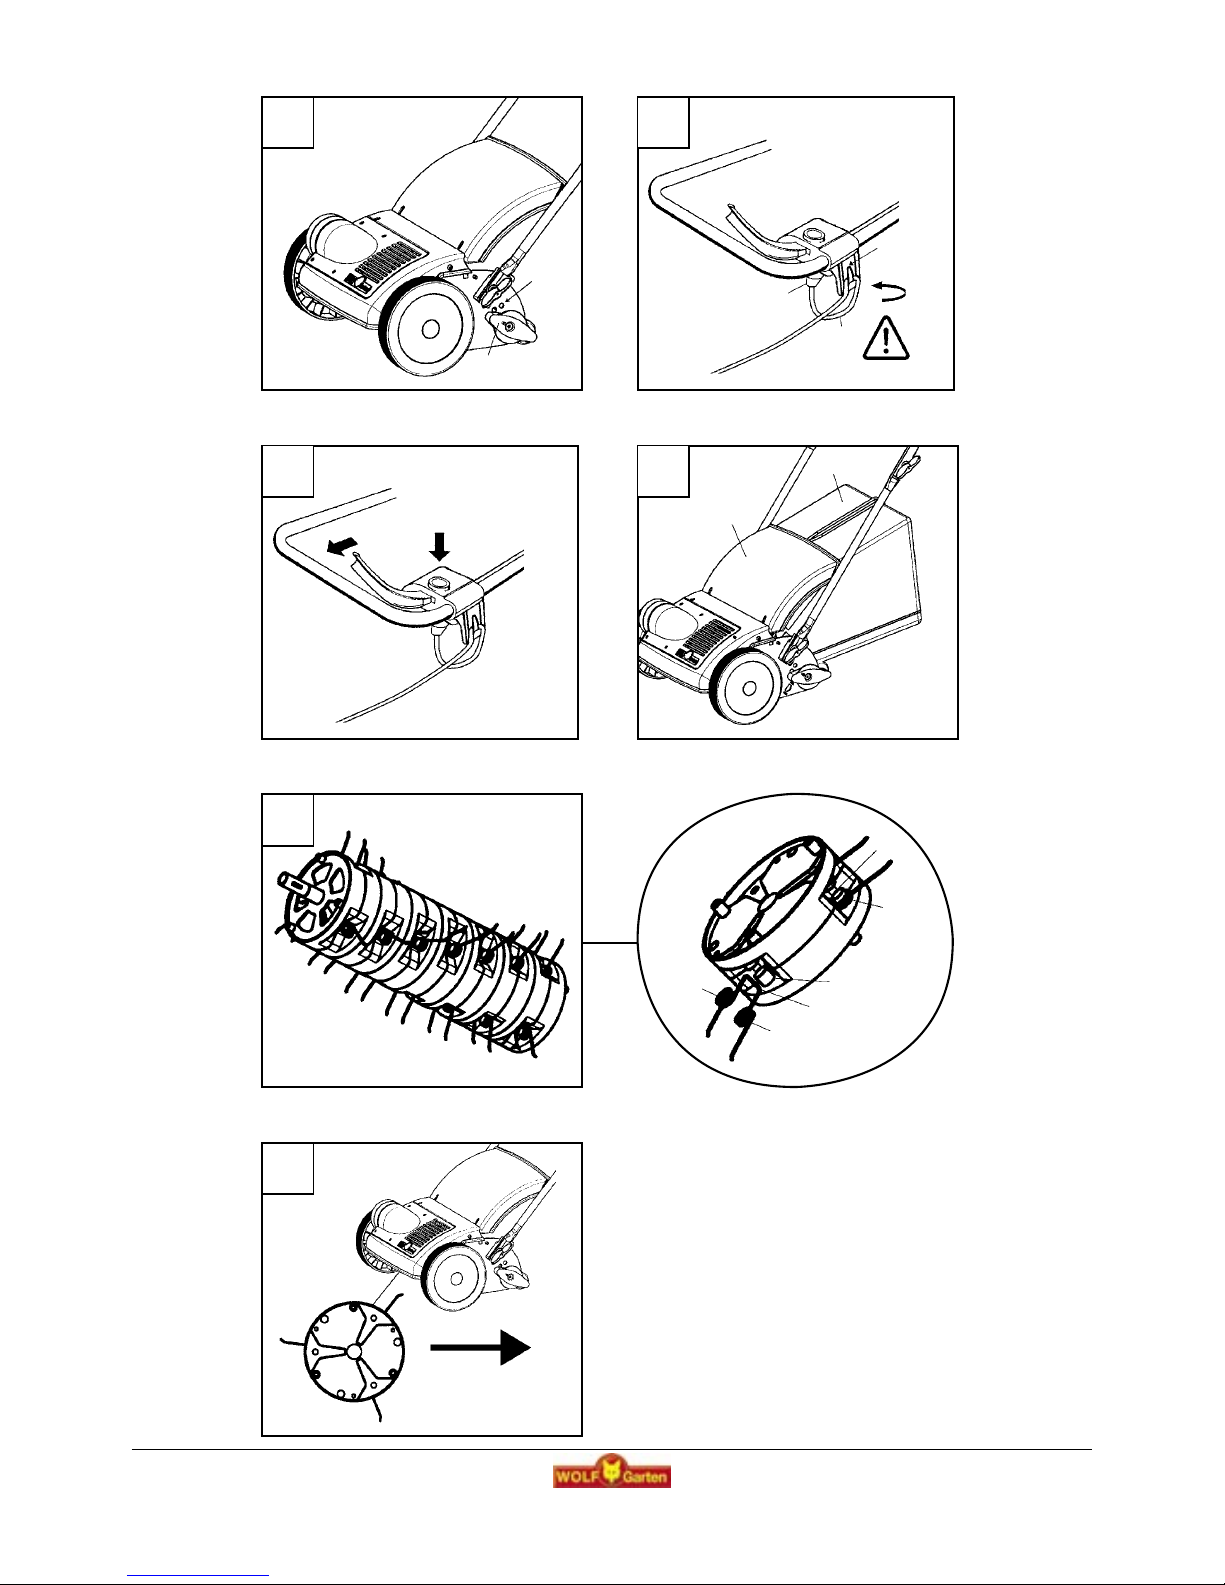
Montage
Untere Griffteile montieren (Abb. M1)
Sicherungsschraube (A) so von innen durch das
linke Seitenteil führen, dass die beiden Nasen in den
Aussparungen einrasten (1). Isolierstück (B) von außen
aufsetzen, die beiden Noppen müssen in den Bohrungen des
Seitenteiles einrasten (2). Griffteil (N) in dem Isolierstück (B)
positionieren. Isolierscheibe (C) so aufsetzen, dass die große
Öffnung nach außen zeigt. Anschließend Scheibe (D) in die
Öffnung der Isolierscheibe (C) drücken und Flügelmutter (H)
fest anziehen.
Montage des rechten Griffteiles in gleicher Reihenfolge.
Griffoberteil montieren (Abb. M2)
Schalter, Zugentlastung und Klammern befestigen (Abb. M3)
Schalterlasche (1) aufklappen und Schalter (J) am
Griffoberteil so positionieren, dass die beiden Noppen in
die Bohrungen (2) einrasten. Schalterlasche (1) zuklappen
und Kabelzugentlastung (K) einstecken. Schalter (J) und
Kabelzugentlastung (K) anschließend mit den beiden
Schrauben (L) befestigen. Schalterkabel (J2) mit den
Klammern (M) am Griffgestänge befestigen.
Schutzklappe befestigen (Abb. M4)
Schutzklappe (P) an der Abdeckhaube (1) anlegen.
Anschließend Aufnahmeschlitze (2) in die Befestigungslaschen
(3
) an der Abdeckhaube (1) eindrücken.

8
9
Betrieb
Betriebszeiten
Bitte regionale Vorschriften beachten.
Erfragen Sie die Betriebszeiten bei Ihrer örtlichen
Ordnungsbehörde.
Generell
Vor Einsatz des Gerätes muss der Rasen auf eine Schnitthöhe
von ca. 2,5-3,5 cm gemäht werden. Den Grasschnitt vom
Rasen entfernen. Die Rasenflächen mehrmals jährlich
bearbeiten. Das herausgearbeitete Material mit einem Rechen
oder Fangsack* sauber entfernen. Anschließend den Rasen
düngen. * Zubehör gegen Aufpreis.
Einstellung der Arbeitstiefe (Abb. A)
Die Arbeitstiefe ist 3-fach einstellbar. Einstellarme (1) vom
Seitenblech wegziehen und in gewünschter Höhenposition (2)
wieder einrasten lassen. Abwechselnd rechts und links jeweils
nur um 1 Position verstellen. Die Einstellarme müssen immer
auf gleicher Höhenposition sein.
Untere und mittlere Stellung der Lüfterwalze:
Reinigen des Rasens von Moos und Unkraut.
Obere Stellung der Lüfterwalze:
Reinigen des Rasens von Grasresten.
Anschlusskabel in die Zugentlastung führen (Abb. B)
Kupplung des Anschlusskabels (1) in den Stecker des
Schalters stecken. Anschließend Kabel (2) von außen in einer
leichten Schlaufe über den Zapfen (3) der Zugentlastung
führen.
Anschluss an die Steckdose
(Wechselstrom 230 Volt, 50 Hz). Das Gerät kann an jede
Steckdose angeschlossen werden, die mit einer 10-Amp.
Sicherung träge (oder LS-Schalter Typ B) abgesichert ist.
Hinweis:
Benutzen Sie eine Fehlerstromschutzeinrichtung (RCD) mit
einem Fehlerstrom von nicht mehr als 30 mA.
Motor ein (Abb. C)
Knopf (1) drücken und halten.
Hebel (2) anziehen, Knopf (1) loslassen.
Motor aus (Abb. C)
Hebel (2) freigeben
Fangsack* einhängen (Abb. D)
Schutzklappe (1) anheben. Fangsack (2) mit den Haken an
den beiden Bolzen** der Seitenteile einhängen.
(* TK 33, Zubehör gegen Aufpreis, ** Bolzen liegen dem
Fangsack bei)
Arbeitstiefenempfehlung
height
(mm) Moss
Weeds Grass-
remnants
-3X ---
4X ---
8--- X
Höhe (mm) Moos / Unkraut Grasreste
-3 X ---
4 X ---
8 --- X
Wartung
Vor allen Wartungs- und Reinigungsarbeiten
Netzstecker ziehen.
Das Gerät nach jeder Benutzung trocken reinigen. Bitte
beachten: Die Lufteinlass-Schlitze des Elektromotors unbedingt
von Gras- und Moosrückständen reinigen!
Gerät nicht mit Wasser abspritzen.
Das Gerät in einem trockenen Raum lagern.
Austausch der Federn (Abb. E/F)
Vor allen Wartungs- und Reinigungsarbeiten
Netzstecker ziehen.
Der Lüfter UL 33 E ist mit 21 Doppelfedern ausgerüstet, die
problemlos zu wechseln sind.
Ausbau
Federwindungen (1) mittels Kombizange aushängen und
soweit nach oben ziehen, das sie über dem Haltezapfen (2)
liegen. Gegenüberliegende Federwindungen aushängen und
kpl. Feder abnehmen.
Einbau
Feder mit dem Bügel nach unten in die Aufnahme legen (3).
Nacheinander die rechten und linken Federwindungen (4 und 5)
nach innen drücken und über die Haltezapfen (6) schieben.
Hinweis
Die Federn so einbauen, dass die abgewinkelten Schenkel
nach hinten zeigen (zur Bedienperson, Abb. F).
Ersatzfedern: Best.-Nr. 3620 095 (UV-EFF, 21 Stck.)

10
Die Garantieleistungen werden erfüllt durch unsere autori-
sierten Kundendienstwerkstätten oder bei:
Garantiebedingungen
- Beachtung der vorgeschriebenen Wartungsintervalle.
- Keine eigenmächtige Änderung der Konstruktion.
- Einbau von Original WOLF Ersatzteilen/Zubehör.
-
Vorlage der ausgefüllten Garantiekarte und/oder des Kaufnachweises.
Die Garantie erstreckt sich nicht auf den normalen Verschleiß von Messern,
Messerbefestigungsteilen wie Reibscheiben, Keil-/Zahnriemen, Laufräder/
Reifen, Luftfilter, Zündkerzen und Zündkerzenstecker. Bei eigenmächtiger
Reparatur erlischt automatisch sofort jeglicher Garantieanspruch.
Auftretende Fehler und Mängel, deren Ursachen auf Material- oder
Fertigungsfehler zurückzuführen sind, werden ausschließlich durch unsere
Vertragswerkstätten (der Verkäufer hat das Recht zur Nachbesserung) in
Ihrer Nähe oder, falls er näher liegt, durch den Hersteller beseitigt. Über
die Garantieleistung hinausgehende Ansprüche sind ausgeschlossen. Ein
Anspruch auf Ersatzlieferung besteht nicht. Etwaige Transportschäden
sind nicht uns, sondern dem zuständigen Transportträger zu melden, da
sonst die Ersatzansprüche an diese Unternehmen verloren gehen.
WOLF-Geräte Vertriebs AG
Nordringstraße 16
4702 Oensingen
Tel.: ++ 41 (62) - 3 88 04 50
Fax: ++ 41 (62) - 3 88 04 60
WOLF-Garten Austria Ges.m.b.H
Businesspark Wien Süd, Campus 21
Liebermannstraße F02-402
2345 Brunn am Gebirge
Tel.: ++ 43 (1) - 8 66 70 - 2 25 30
Fax: ++ 43 (1) - 8 66 70 - 2 25 40
E-mail: [email protected]
WOLF-Garten GmbH & Co KG
Industriestraße 83-85
57518 Betzdorf
Tel.: ++ 49 (27 41) - 28 15 00
Fax: ++ 49 (27 41) - 28 12 99
E-mail: [email protected]
Die vom Verkäufer ausgefüllte Garantiekarte bzw. den Kaufbeleg
bitte sorgfältig aufbewahren.
Für die Dauer von 24 Monaten vom Kaufdatum an leistet die Firma
WOLF-Garten eine dem jeweiligen Stand der Technik und dem
Verwendungszweck/Anwendungsgebiet entsprechende Garantie.
Die gesetzlichen Rechte des Endverbrauchers werden durch die
nachstehenden Garantierichtlinien nicht beeinträchtigt.
Voraussetzungen für den 24monatigen Garantieanspruch:
- Einsatz des Gerätes für den ausschließlichen privaten Gebrauch.
Im gewerblichen Bereich oder Verleihgeschäft reduziert sich die
Garantie auf 12 Monate.
- Sachgemäße Behandlung und Beachtung aller Hinweise
in der Gebrauchsanweisung, die Bestandteil unserer
Garantiebedingungen ist.
Beseitigung von Störungen
Abhilfe (X) durch:
Problem Mögliche Ursache WOLF
Service-
Werkstatt Selbst
Unruhiger Lauf, starkes vibrieren des
Gerätes • Federn beschädigt --- X
Motor läuft nicht
• Sicherung schadhaft
• Kabelschaden
Achtung! Bei Durchschneiden des Kabels löst selbst bei richti-
ger Absicherung (10 Amp.) nicht immer die Sicherung aus. Bitte
deshalb vorsichtshalber an- oder durchgeschnittenes Kabel nie-
mals berühren, ehe der Stecker aus der Steckdose gezogen ist.
Es ist verboten, das Kabel mit Isolierband zu flicken.
---
XX
---
Schlechte Lüfterleistung
• Federn verschlissen
• Gras zu nass
• nicht angepasste Arbeitstiefe
• Arbeitswalze stark verschmutzt
---
---
---
---
X
X
X
X
Im Zweifelsfall immer eine WOLF Service-Werkstatt aufsuchen. Achtung! Gerät vor jeder Prüfung, Reinigung oder Arbeiten
am Messer abstellen, und Netzstecker ziehen.

11
UL 33 E
Type 3620 ...
A112 cm
B84 cm
C50 cm
D
LP 80 dB (A)
E
ahw 2,5 m/s²
Performanche 500 W
Amperage 230 VAC
Voltage -3 / 4 / 8 mm
Working width 33 cm
Weight 10 kg
Technical data
D Measurement of noise at the operator's ear according to EN
836.
E
Measurement of vibrations at the handlebar held by the
operator according to EN 1033, EN 836. The typical weighted
acceleration is:
We reserve the right of technical changes
A
B
C
Congratulations on your purchase of a WOLF lawn aerator
It is important that you read, fully understand
and observe the following safety precautions and
warnings. Careless or improper use of the machine
may cause serious or fatal injury. The user is
responsible for any accidents involving other people
or other people‘s property.
Never let children or other persons who are not
familiar with the operating instructions use the
lawn aerator. Juveniles under l6 years may not
use the equipment. Local regulations may specify
the minimum age of the operator.

12
13
Safety instructions
Do not operate machine before having read the operating instructions, understood all the notes and assembly the machine
as described here. Keep the instructions in a safe place for future use.
Meaning of the symbols
Keep bystanders away!Attention!
Read Instruction manual
before use!
Attention!
- Sharp knives - before
performing a maintenance
work or if the cable is da-
maged pull out the plug.
Keep the supply flexible
cord away from the cutting
blade!
General Advice
• Young people under 16 years or persons who are unfamiliar with
the operating instructions must not use this machine.
• Never use the machine while persons, especially children or
animals, are in the operating area.
Preparation for use
• Always wear sturdy footwear and long trousers when using the
machine. Never operate the machine when you are barefoot or
wearing open sandals.
• First inspect the lawn thoroughly and remove all foreign bodies
that may be thrown out of the machine.
• Check that the machine and its aerator roller are in good
condition.
Cable
• Please work with safety cables. For the connection only lines which
are not lighter than rubber hose lines H0 7 RN-F with a minimum
diameter of 3 x 1,5 mm2 must be used.
• The attachments of the connection cables must be rubber or
covered with rubber and comply with Standard DIN/VDE 0620.
• Attachments must be splashproof (applicable in Austria only).
• Use a leakage-protective system (RCD) with a leakage current of
no more than 30 mA.
• Attach connection cable to traction relief. Make sure that in does
not rub against edges, pointed or sharp objects. Do not squeeze
cable through door or window gaps.
• Switching devices must not be removed or bridged (e. g. tying of
switching lever to guide spar).
Use/operation
• Only use the machine in daylight or under good artificial lighting.
• The machine must not be used when it is raining. If possible, avoid
using the machine in wet grass. The machine must not be washed
or rinsed with water.
• Make sure that you have a firm and solid foothold on slopes.
Always work across the slope, never up and down the slope, and
never work on very steep inclines.
• Take special care when changing direction or when pulling the
machine towards you.
• Switch off the motor if the machine is to be transported over
surfaces other than grass.
• Never operate the machine with a defective guard or with missing
safety devices.
• Switch off the motor, wait for the aerator roller to come to a halt, and
pull the plug out of the mains socket before leaving the machine
unattended, or inspecting, cleaning or performing other operations
on the machine (e. g. setting the working height).
• Keep your hands and feet away from the rotating aerator roller.
• Switch off the motor and pull out the plug from the mains socket if
the aerator roller becomes blocked.
• Remove any obstructions, and check for damage to the machine.
Any damage must be repaired before
• the machine is taken back into service.
•
Inspect the extension lead for damage and ageing before use. Replace
the lead if necessary. Do not use the machine if the lead is damaged.
• The extension lead must lie free. Position the extension lead so that
the machine cannot run over it. The extension lead must not come
close to the aerator roller.
Assembling bottom handle part (fig. M1)
Insert securing screw (A) from inside through the left side
element, so that both projections catch in the recesses (1).
Position insulation element (B) from outside; the two nubs
must catch in the holes of the side element (2). Position
handle element (M) in the insulating element (B). Place
insulating element (C) so that the large opening points to
the outside. Then press washer (D) into the opening of the
insulating element (C) and tighten wing nut (G).
Assemble the right handle element in the same order.
Assembling top of handle (fig. M2)
Assembly
Attaching switch, strain relief and clips (fig. M3)
Fold up switch bracket (1) and position switch (H) on the
upper handle element so that the two nubs catch in the holes
(2). Close switch bracket (1) and insert cable strain relief (I).
Then fasten switch (H) and cable strain relief (I) with the two
screws (K). Fasten switch cable (3) with the clips (L) on the
handle rod.
Attaching protective flap (fig. M4)
Place protective flap (O) on the cover (1). Then press retainer
slots (2) into the fastening flaps (3) on the cover (1).

12
13
Operation
Operating times
Please check noise abatement regulations prevailing in your
country.
General
Before using the machine, the lawn must be mowed to a
height of about 2.5-3.5 cm. Remove the cut grass from the
lawn. The lawn should be aerated several times each year.
The loosened material can be removed with a rake or catch
bag*. Afterwards, the lawn should be fertilized.
* Accessories at additional cost.
Setting the working depth (Fig. A)
The working depth is adjustable to 3 heights. Pull adjustment
arm (1) away from side cover and allow to catch in desired
position (2). Adjust the height alternately left and right by only
1 position. The adjustment arms must always be in the same
height position.
Lower and middle position of aerator cylinder:
Removes moss and weeds from the lawn.
Top position of aerator cylinder:
Removes grass remnants from the lawn.
Insert connection cable in the strain relief (fig. B)
Insert coupling of connection cable (1) in the socket of the
switch. Then guide the cable (2) from outside in a slight loop
over the peg (3) of the strain relief assembly.
Connection to the power outlet
(230 Volt AC, 50 Hz). The machine can be connected to
any power outlet that is protected by a 10 amp fuse (or line
protecting switch type B).
Note:
Use a residual current protection device with a residual
current of no more than 30 mA.
Motor on (fig. C)
Press button (1) and hold.
Lift lever (2) and release button (1).
Motor off (fig. C)
Release lever (2).
Attaching catch bag* (fig. D)
Lift protective flap (1). Hang catch bag (2) with the hooks on
both bolts** of the side elements.
(* TK 33, accessory at additional cost, ** bolts included
with catch bag)
Recommended working depths
height
(mm) Moss
Weeds Grass-
remnants
-3X ---
4X ---
8--- X
height (mm) Moss Weeds Grassremnants
-3 X ---
4 X ---
8 --- X
Maintenance
Disconnect from power supply before performing
maintenance and cleaning.
Clean the machine without water after each use. Please note:
the air intake slots of the electric motor must be freed from
grass and moss accumulations!
Do not spray machine with water.
Store machine in a dry room.
Replacing the springs (fig. E/F)
Disconnect from power supply before performing
maintenance and cleaning.
The aerator UL 33 E is equipped with 21 double springs,
which can be easily replaced.
Removal
Unhook spring coils (1) using universal pliers and raise them
until they are above the holding peg (2). Unhook opposing
spring coils and remove complete spring.
Replacement
Place spring into the recess (3) with the shackle facing down.
Press first the left and then the right spring coils (4 and 5)
inward and push them above the holding peg (6).
Note
Insert the springs in such a way that the angular shackles
point to the back (toward the operator, fig. F).
Replacement springs:
Order no. 3620 095 (UV-EFF, Quantity: 21)

14
The guarantee services will be performed by our authorized
repair shops or:
Guarantee terms
Please carefully retain the guarantee card completed by the seller,
or the proof of purchase.
The company WOLF-Garten provides a guarantee for 24 months from
the date of purchase. This guarantee is in accordance with the rel-
evant state of technology and the utilisation purpose / area of applica-
tion. The consumer‘s statutory rights are not affected by the following
guarantee guidelines.
Pre-conditions for the 24-month guarantee entitlement:
- Deployment of the device solely for private use.
The guarantee is reduced to 12 months in the commercial sector
or leasing business.
- Proper handling and observance of all information given in the oper-
ating manual, which forms part of our guarantee terms.
- Observance of the prescribed maintenance intervals.
- No unauthorised alteration of the design.
- Installation of original WOLF replacement parts / accessories.
- Presentation of the completed guarantee card and/or proof of pur-
chase.
This guarantee does not extend to normal wear-and-tear on blades,
blade mounting components or friction disks, V-belts/toothed belts,
running wheels/tyres, air filters, spark plugs and spark plug connec-
tors. Any guarantee claim shall be immediately void in the event of un-
authorised repairs. Faults and defects which can be traced to material
or manufacturing faults will be rectified exclusively by our contracted
workshops (the seller has the right to remedy a defect) in your vicinity,
or by the manufacturer if the latter is closer. Any claims going beyond
the provision of a guarantee are ruled out. There is no entitlement to a
replacement. Any transport damage should be reported not to us but
to the shipper in question since, otherwise, any compensation claims
vis-à-vis the shipper would be voided.
WOLFGarden Ltd.
Crown BusinessPark
Tredegar
Gwent, NP22 4EF
Tel.: ++ 44 / 14 95 30 66 00
Fax: ++ 44 / 14 95 30 33 44
E-mail: [email protected]
www.WOLF-Garten.com
Remedy (X) by:
Problem Possible Cause WOLF
Service-
Worshop
Your-
self
Machine runs unevenly, with heavy
vibrations • Springs are damaged --- X
Motor will not run
• Fuse blown
• Cable damaged
Important! If you inadvertently cut through the cable, the fuse (10 Amp.)
will not always blow. In the interest of safety, never touch damaged or
servered cables before disconnecting the mains plug. Repairing the cable
with insulating tape is prohibited.
---
XX
---
Poor aerating
• Springs are worn
• Grass is to wet
• Working depth is incorrect
• Cylinder is extremely dirty
---
---
---
---
X
X
X
X
When in doubt, always consult a WOLF service workshop.
Important: switch off the mower and disconnect the mains plug before inspecting, cleaning or working on the blades.
Faults and how to remedy

15
UL 33 E
Type 3620 ...
A112 cm
B84 cm
C50 cm
D
LP 80 dB (A)
E
ahw 2,5 m/s²
Puissance 500 W
Courant nominal 230 VAC
Tension -3 / 4 / 8 mm
Largeur de travail 33 cm
Poids 10 kg
Données Techniques
D Mesurage du bruit au niveau de l'oreille de l'opérateur selon
EN 836.
E
Mesurage des vibrations au guidon tenu par un opérateur selon
EN 1033, EN 836. L’accélération pondérée normale est de:
Droit de modifications techniques réservés.
A
B
C
Nous vous remercions d‘avoir acheté une scarificateur WOLF
Lisez soigneusement la notice d‘utilisation
et familiarisez-vous avec les commandes et
l‘utilisation correcte de la tondeuse. L‘utilisateur est
responsabledes accidents causés aux tiers ou à
leur propriété. Observez les indications, explications
et prescriptions.
Ne jamais laisser des enfants ou autres personnes
n'ayant pas lu la notice d'utilisation utiliser la
scarificateur. L'utilisation de cet appareil est interdit
à tout adolescent de moins de 16 ans. Respecter
la réglementation locale concernant l'âge minimum
d'utilisation de cet appareil.

16
17
Consignes de sécurité
Vous ne devez pas mettre la machine en route avant d’avoir lu attentivement ce mode d’emploi, d’avoir observé toutes les informations
indiquées et d’avoir monté la machine comme décrit. Conserver ces notice d’utilisation pour tout utilisateur future.
Signification des symboles
Tenir les tiers à l‘ecart
de la zone dangereuse!
Attention!
Avant utilisation lire la
notice d‘emploi!
Attention !
- Couteaux tranchants -
Avant d‘entreprendre des
travaux de maintenance
et si le câble est endom-
magé, retirer la prise de
courant.
Tenir le câble de
raccord éloigné de l‘outil de
coupe!
Remarques générales
• Il est interdit aux jeunes de moins de 16 ans et aux personnes
ignorant le mode d’emploi d’utiliser l’appareil.
• I
l est interdit d’utiliser l’appareil si des personnes, en particulier des
enfants, et des animaux, se trouvent dans la zone de travail.
Préparation
• Pour utiliser l’appareil, toujours porter des chaussures solides et
des pantalons longs. Ne jamais utiliser l’appareil avec les pieds nus
ou avec des sandales.
• Contrôler le terrain et retirer tout objet susceptible d’être projeté par
l’appareil.
• S’assurer que l’appareil et le rouleau aérateur ne sont pas
endommagés.
Câbles électriques
• Utiliser les câbles de sécurité. N‘utiliser que des câbles électriques
plus lourds que des câbles en caoutchouc HO 7 RN-F et de
diamètre 3 x 1,5 mm2 minimum.
•
Les raccords des câbles électriques doivent être en caoutchouc ou
recouverts de caoutchouc et respecter la norme DIN/DVE 0620.
• Les connexions doivent être protégées contre les jets d‘eau
(valable pour l‘Autriche).
• Utiliser un disjoncteur (RCD) dont le courant de défaut ne dépasse
pas les 30 mA.
• Attacher les câbles électriques du détendeur. Éviter les frottements
avec des arêtes, des corps pointus ou aiguisés. Ne pas écraser les
câbles à des encoignures de portes ou de fenêtres.
• Il est interdit de supprimer ou de ponter les interrupteurs (par ex. en
attachant le levier de commande au guidon).
Utilisation
• Utiliser l’appareil à la lumière du jour ou lorsque l’éclairage est
suffisant.
• L’appareil ne doit pas être utilisé par temps pluvieux. Si possible,
éviter d’utiliser l’appareil lorsque l’herbe est mouillée. L’appareil ne
doit pas être nettoyé ou rincé à l’eau.
• Veiller à ce que la stabilité soit suffisante sur les pentes.
Passer en biais sur les pentes; ne jamais monter ou descendre
perpendiculairement à la pente. Ne pas passer sur les pentes
particulièrement abruptes.
• Se montrer particulièrement vigilant en cas de changement de
direction ou en tirant l’appareil vers soi.
• Eteindre le moteur pour traverser des surfaces non recouvertes
d’herbes.
• Ne jamais utiliser l’appareil si le chassis ou l’équipement de
protection sont endommagés.
• Éteindre le moteur, attendre l’arrêt complet du rouleau aérateur et
débrancher l’appareil, avant de quitter, de contrôler, de nettoyer
l’appareil, ou avant díeffectuer toute autre opération (par ex.:
réglage de la hauteur de travail).
• Ne jamais approcher les mains ou les pieds du rouleau aérateur en
rotation.
• En cas de blocage du rouleau aérateur, éteindre le moteur et
débrancher l’appareil. Retirer les objets éventuels et contrôler si
l’appareil est endommagé. Des dommages éventuels doivent Ítre
réparés avant toute nouvelle utilisation de l’appareil.
• Avant chaque utilisation, s’assurer que le câble de rallonge n’est
ni endommagé ni usé. Si nécessaire, remplacer le câble. Ne pas
utiliser l’appareil avec un câble endommagé.
• Rien ne doit gêner l’utilisation du câble de rallonge. Poser le câble
de sorte que l’appareil ne puisse pas passer dessus. Le câble ne
doit pas se trouver à proximité du rouleau aérateur.
Montage des parties inférieures du guidon (fig. M1)
Insérer la vis d‘arrêt (A) depuis l‘intérieur dans la partie
latérale gauche de façon à enclencher les deux ergots dans
les encoches (1). Mettre en place l‘élément isolant (B) de
l‘extérieur, les deux ergots doivent s‘enclencher dans les
alésages de la partie latérale (2). Mettre en place la partie
du guidon (M) dans l‘élément isolant (B). Monter l‘élément
isolant de façon à ce que la grande ouverture soit dirigée vers
l‘extérieur. Ensuite presser la rondelle (D) dans l‘ouverture de
l‘élément isolant (C) et serrer l‘écrou papillon (G). Le montage
de la partie droite du guidon s‘effectue de la même manière.
Montage de la partie supérieure du guidon (fig. M2)
Montage
Montage de l‘interrupteur, du détendeur et des
attaches (fig. M3)
Déplier la patte de l‘interrupteur (1) et positionner l‘interrupteur
(H) sur la partie supérieure du guidon de façon à enclencher
les deux ergots dans les alésages (2). Replier la patte de
l‘interrupteur (1) et insérer le détendeur (l). Ensuite, fixer
l‘interrupteur (H) et le détendeur de câble (l) à l‘aide des
deux vis (K). Fixer le câble de l‘interrupteur (3) au guidon au
moyen d‘attaches (L).
Fixation de la trappe de protection (fig. M4)
Poser la trappe de protection (O) contre le capot (1). Ensuite
presser les fentes de logement (2) dans les pattes de fixation
(3) disposées sur le capot (1) .

16
17
Entretien
Débrancher l‘appareil avant toute intervention
d‘entretien et de nettoyage.
Nettoyer l‘appareil à sec après chaque utilisation. Veuillez
observer que les fentes de ventilation du moteur électrique
doivent toujours être nettoyées de résidus d‘herbe et de
mousse! Ne jamais nettoyer l‘appareil au jet d‘eau.
Conserver l‘appareil dans un local sec.
Changement des ressorts (fig. E/F)
Débrancher l‘appareil avant toute intervention
d‘entretien et de nettoyage.
Le scarificateur UL 33 E est muni de 21 ressorts elliptiques
qui sont faciles à changer.
Démontage
Décrocher les spires des ressorts (1) au moyen d‘une pince
universelle et les tirer vers le haut jusqu‘à ce qu‘ils se trouvent
au-dessus de l‘axe (2). Décrocher les spires opposées et
ressortir le ressort entier.
Montage
Poser le ressort dans le logement, la bride vers le bas (3).
Presser les spires droites et gauches l‘une après l‘autre vers
l‘intérieur (4 et 5) et les glisser par dessus les axes (6).
Conseil
Monter les ressorts de façon à ce que les branches coudées
soient dirigées vers l‘arrière (vers l‘opérateur, fig. F).
Ressorts de rechange :
Réf. 3620 095 (UV-EFF, 21 pièces)
Fonctionnement
Tranches horaires
Observez les dispositions spécifiques de la lloi nationale.
Généralités
Avant d‘utiliser l‘appareil, tondre la pelouse afin d‘obtenir
une hauteur de coupe d‘environ 2,5 à 3,5 cm. Nettoyer
la pelouse de l‘herbe coupée. Travailler les surfaces
couvertes de pelouse plusieurs fois par an. Eliminer
proprement les débris à l‘aide d‘un rateau ou en utilisant
le sac de ramassage* . * Ensuite, répandre de l‘engrais
sur la pelouse.
* Accessoire non compris dans le prix.
Réglage de la profondeur de scarification (fig. A)
La profondeur de scarification se règle en trois différentes
positions. Ressortir les bras de réglage (1) de la tôle latérale
du carter et les réenclencher à la hauteur souhaitée (2). Lors
du réglage, ne changer que de respectivement une position
alternativement à gauche et à droite. Les bras de réglage
doivent toujours se trouver à la même hauteur.
Position inférieure et moyenne du rotor :
pour extirper de la pelouse la mousse et les mauvaises herbes.
Et le chaume.
Position supérieure du rotor : pour nettoyer la pelouse
de chaume.
Passer le cordon dans le détendeur (fig. B)
Insérer la prise femelle du cordon (1) dans la prise mâle de
l‘interrupteur. Ensuite passer le cordon (2) depuis l‘extérieur
par dessus l‘axe (3) du détendeur en une légère boucle.
Branchement sur secteur
(Courant alternatif 230 Volt, 50 Hz). L‘appareil peut être
branché sur toute prise protégée par un fusible 10 ampère à
action retardée (ou par un disjoncteur divisionnaire de type B).
Conseil:
Utiliser un disjoncteur différentiel (DDR) offrant une protection
différentielle de 30 mA au maximum.
Moteur marche (fig. C)
Appuyer sur le bouton (1) et le maintenir enfoncé.
Actionner le levier (2), relâcher le bouton (1).
Moteur arrêt (fig. C)
Relâcher le levier (2).
Monter le sac de ramassage* (fig. D)
Soulever la trappe de protection (1). Accrocher le sac de
ramassage (2) par les crochets aux deux axes** des parties
latérales.
(* TK 33, accessoire non compris dans le prix, ** axes
fournis avec le sac de ramassage)
Recommandation de la profondeur de scarification
height
(mm) Moss
Weeds Grass-
remnants
-3X ---
4X ---
8--- X
Hauteur (mm)
Mousse
Mauvaises
herbes
Chaume
-3 X ---
4 X ---
8 --- X

18
Conditions de la garantie
Les prestations de garantie seront exécutées par nos ate-
liers agréés ou chez:
La carte de garantie remplie par les vendeurs ou le justificatif
d‘achat doivent être conservés avec soin.
La société Wolf-Garten fournit une garantie selon l‘état actuel de la technique
et l‘objectif d‘utilisation / le domaine d‘application pour une durée de 24 mois
à partir de la date d‘achat. Les droits légaux du consommateur final ne sont
pas entravés par les directives suivantes en matière de garantie.
Conditions préalables à l‘application de la garantie de 24 mois:
- Utilisation de l‘appareil exclusivement à usage privé.
Dans le secteur professionnel ou pour les sociétés de location,
la garantie est de 12 mois.
- Manipulation réglementaire et respect de toutes les consignes figurant
dans le mode d‘emploi, qui fait partie de nos conditions de garantie.
- Respect de la périodicité prescrite pour la maintenance.
- Pas de modification arbitraire de la construction.
- Montage de pièces détachées / accessoires WOLF originaux.
- Présentation de la carte de garantie remplie et/ou de la preuve d‘achat.
La garantie ne s‘applique pas à l‘usure normale des dents ni aux pièces
de fixation de ces dents telles que les disques de friction, les courroies
trapézoïdales / dentées, les roues/pneus, le(s) filtre(s) à air, les bougies
/cosses d‘allumage. En cas de réparation arbitraire, tout droit à la garan-
tie est automatiquement supprimé. Les défauts et les imperfections dont
les causes sont attribuées à un défaut de matériau ou de fabrication sont
réparés exclusivement par nos ateliers partenaires (le vendeur a droit
aux améliorations) situés près de chez vous ou le fabricant s‘il est plus
proche. Les droits dépassant les limites de la garantie sont exclus. Un
droit à une livraison compensatrice n‘existe pas. Les dommages éven-
tuels survenus pendant le transport ne doivent pas être communiqués à
notre société mais au transporteur concerné pour conserver les droits à
indemnité envers cette entreprise.
Gilberts-à-r-l. & Cie
Industriezone, Z.A.R.E.
4385 Ehlerange/Esch
Tel.: ++ 35 / 2 40 17 01 - 1
Fax: ++ 35 / 2 40 17 09
WOLF-Geräte Vertriebs AG
Nordringstraße 16
4702 Oensingen
Tel.: ++ 41 (62) - 3 88 04 50
Fax: ++ 41 (62) - 3 88 04 60
Graham NV-SA
Zoning Industriel21
1440 Wauthier-Braine
Tel.: ++ 32 (2) - 3 67 16 11
Fax: ++ 32 (2) - 3 67 16 12
E-mail: [email protected]
Comment remédier aux pannes
Mesures à prendre (X) par:
Dysfonctionnements Causes possibles
L‘atelier
deservice
aprèsvente
WOLF
L‘utilisateur
Marche irrégulière, fortes
vibrations de I‘appareil • Ressorts endommagés --- X
Moteur ne tourne pas
• Fusible défectueux
• Câble endommagé
Attention! En cas de coupure accidentelle du câble, le fusible ne fond pas
toujours, même si le bon fusible (10 ampère) est utilisé. Par précaution, ne
touchez donc jamais à un câble endommagé ou sectionné avant d‘avoir dé-
branché I‘appareil. Il est interdit de réparer le câble avec du ruban isolant.
---
XX
---
Performances insuffisantes
du scarificateur
• Ressorts usés
• Pelouse trop humide
• Profondeur de scarification mal adaptée
• Rotor très sale
---
---
---
---
X
X
X
X
En cas de doute, il est toujours conseillé de s‘adresser à un centre d‘entretien agrée WOLF.
Attention: Avant tout contrôle ou intervention sur les lames, arrêter et débrancher le scarificateur!

19
UL 33 E
Tipo 3620 ...
A112 cm
B84 cm
C50 cm
D
LP 80 dB (A)
E
ahw 2,5 m/s²
Potenza 500 W
Corrente normale 230 VAC
Tensione -3 / 4 / 8 mm
Larghezza di lavovo 33 cm
Peso 10 kg
Dati tecnici
D Misuratione della rumorositá all'altezza dell'orecchio
dell'utente eseguita in confomotà alla norma EN 836.
E
Vibrazioni misurate sul manubrio di guida, con utente, in
conformitá a EN 1033, EN 836. L’accelerazione ponderata
tipica è di:
Ci riserviamo pertanto eventuali modifiche tecnici dovute
all'ulteriore sviluppo dei nostri prodotti
A
B
C
Complimenti per aver scelto un arieggiatore WOLF
Leggere attentamente le istruzioni per l‘uso e
familiarizzare con gli elementi di comando e con
il coretto utilizzo dell‘apparecchio. L‘utente è
responsabile degli incidenti causati ad altre persone
o alla loro proprietà. Osservare le idicazioni, le
spiegazioni e le prescrizioni.
Non fate lavorare con lo scaricatore bambini o
altre persone che non conoscono il funzionamento
della macchina. Le disposizioni locali possono
eventualmente limitare l’età minima per l’operatore.

20
21
Indicazioni di sicurezza
Perciò evitate di metterlo in funzione senza aver letto attentamente le seguenti istruzioni ed informazioni ed montato l’apparecchio
comre descritto. Conservare le istruzioni per usi futuri.
Leggenda simboli
Allontanare le persone
dalla zona di pericolo!
Attenzione!
Prima dell‘uso leggere
istruzioni!
Attenzione!
- Lame da taglio affilate
- staccare la spina prima
di qualsiasi intervento di
manutenzione ed in presenza
di danni alla linea.
Tenere
lontani i cavi collegamento
dall‘utensile da taglio!
Consigli generali
•
E’ vietato l’utilizzo dell’apparecchio da parte di persone di età
inferiore a 16 anni oppure che non conoscono le istruzioni per l’uso.
• L’apparecchio non deve essere impiegato in presenza di persone,
in particolare bambini, ed animali nell’area di lavoro.
Preparazione
• Quando si utilizza l’apparecchio, indossare sempre scarpe robuste
e pantaloni lunghi. Non utilizzare mai l’apparecchio a piedi nudi
oppure indossando sandali aperti.
• Prima di procedere, controllare accuratamente il prato ed
eliminare eventuali corpi estranei che potrebbero essere scagliati
dall’apparecchio.
• Accertarsi che l’apparecchio ed il rullo arieggiatore siano in ottimo
stato.
Cavo
• Lavorare con cavi di sicurezza. Per il collegamento si devono usare
solo cavi non più leggeri die cavi flessibili in gomma HO 7 RN-F con
un diametro minimo di 3 x 1,5 mm2.
• Gli accoppiamenti devono avere usufruire di una protezione
antispruzzo (valida solo per l‘Austria).
• Utilizzare un dispostivo di sicurezza per correnti di guasto (RCD)
con una corrente di guasto di non oltre 30 mA.
• Fissare il cavo di collegamento allo sgravio di tiraggio. Non far
sfregare oggetti appuntiti o taglienti agli spigoli. Non schiacciare
il cavo attraverso fessure della porta o spalti delle finestre. I
dispositivi di commutazione non devono essere rimossi o superati
(ad es. Attaccando la leva di comando al manico di guida).
Utilizzo
• Utilizzare l’apparecchio soltanto alla luce diurna oppure con
sufficiente illuminazione artificiale.
• Non utilizzare l’apparecchio quando piove. Se possibile, evitare di
utilizzare l’apparecchio su erba bagnata. Non lavare né spruzzare
acqua sull’apparecchio.
• In sede di sgancio, accertarsi di assumere una posizione stabile
e sicura. Procedere sempre trasversalmente su pendii, mai
direttamente in salita o discesa. Inoltre, evitare di utilizzare
l’apparecchio su pendenze molto elevate.
• Prestare particolare attenzione quando si cambia senso di marcia
oppure si tira l’apparecchio verso di sé.
• Spegnere il motore prima di trasportare l’apparecchio su superfici
diverse da prati.
• Non utilizzare mai l’apparecchio se la scocca è difettosa oppure
mancano i dispositivi di sicurezza.
• Prima di lasciare incustodito, controllare, pulire o effettuare altri
interventi sull’apparecchio (ad es. Impostazione della profondità di
lavoro), spegnere il motore, attendere che il rullo arieggiatore si sia
fermato completamente e disinserire la spina.
• Tenere lontane maní e braccia dal rullo arieggiatore in rotazione.
• Se il rullo arieggiatore si blocca, spegnere il motore e disinserire
la spina. Eliminare eventuali corpi estranei, quindi controllare se
l’apparecchio ha subito danni. Eventuali danni devono essere
riparati prima di riutilizzare l’apparecchio.
• Prima di utilizzare una prolunga, controllare che non presenti segni
di invecchiamento o danni. Se necessario, cambiare il cavo. Non
utilizzare mai l’apparecchio se il cavo è danneggiato.
• La rolunga deve essere libera e posata in modo che non sia
necessario passarvi sopra con l’apparecchio. La prolunga non deva
mai avvicinarsi all’area del rullo arieggiatore.
Montaggio delle parti inferiori del manico (fig. M1)
Far passare la vite di sicurezza (A) dall‘interno attraverso la
parte laterale sinistra, di modo che le due sporgenze scattino
nelle cavità (1). Applicare l‘elemento isolante (B) dall‘esterno, i
due ingrossamenti devono entrare in presa nei fori della parte
laterale (2). Posizionare l‘elemento a manico (M) nell‘elemento
isolante (B). Applicare l‘elemento isolante (C) in modo tale
che l‘apertura grande sia orientata all‘esterno. Premere
successivamente lo spessore (D) nell‘apertura dell‘elemento
isolante (C) e stringere a fondo il dado ad alette (G).
Il montaggio della parte destra del manico deve avvenire nella
stessa sequenza.
Montaggio della parte superiore del manico (fig. M2)
Montaggio
Fissaggio dell‘interruttore, del dispositivo per lo
scarico dalla trazione e dei morsetti (fig. M3)
Aprire il ponticello dell‘interruttore (1) ribaltandolo e
posizionare l‘interruttore (H) sulla parte superiore del manico
in modo tale che i due ingrossamenti entrino in presa nei fori
(2). Chiudere il ponticello dell‘interruttore (1) ribaltandolo ed
innestare il dispositivo per lo scarico dalla trazione del cavo
(I). Fissare successivamente l‘interruttore (H) e il dispositivo
per lo scarico dalla trazione del cavo (I) con le due viti (K).
Fissare il cavo dell‘interruttore (3) con i morsetti (L) sulla
tiranteria del manico.
Fissare la copertura ribaltabile di protezione (fig. M4)
Applicare la copertura ribaltabile di protezione (O) sulla
calotta (1). Premere poi le fessure di presa (2) nelle linguette
di fissaggio (3) sulla calotta (1).
Other manuals for UL 33 E
1
Table of contents
Other Wolf Garten Tiller manuals