manuals.online logo
Brands
  1. Home
  2. •
  3. Brands
  4. •
  5. Wolf
  6. •
  7. Fryer
  8. •
  9. Wolf IF15/S User manual

Wolf IF15/S User manual

Other manuals for IF15/S

6

Other Wolf Fryer manuals

Wolf IF15/S User manual

Wolf

Wolf IF15/S User manual

Wolf ICBIF15/S User manual

Wolf

Wolf ICBIF15/S User manual

Wolf IF15 User manual

Wolf

Wolf IF15 User manual

Wolf IF15/S Instructions for use

Wolf

Wolf IF15/S Instructions for use

Wolf ICBIF15/S User manual

Wolf

Wolf ICBIF15/S User manual

Wolf IF15/S User manual

Wolf

Wolf IF15/S User manual

Wolf IF15 User manual

Wolf

Wolf IF15 User manual

Wolf WOLF FRYER MODULE Owner's manual

Wolf

Wolf WOLF FRYER MODULE Owner's manual

Wolf ICBIF15/S User manual

Wolf

Wolf ICBIF15/S User manual

Wolf IF15/S User manual

Wolf

Wolf IF15/S User manual

Wolf IF15/S Instructions for use

Wolf

Wolf IF15/S Instructions for use

Wolf WTF42 User manual

Wolf

Wolf WTF42 User manual

Wolf IF15/S User manual

Wolf

Wolf IF15/S User manual

Wolf FWTF-42 User manual

Wolf

Wolf FWTF-42 User manual

Popular Fryer manuals by other brands

GILES EOF-BIB/FFLT/24/24 manual

GILES

GILES EOF-BIB/FFLT/24/24 manual

GE 168997 manual

GE

GE 168997 manual

Falcon G350/11 Installation and servicing instructions

Falcon

Falcon G350/11 Installation and servicing instructions

GoWISE USA GW22612 instruction manual

GoWISE USA

GoWISE USA GW22612 instruction manual

Electrolux Thermetic 9CHG583284 Operating and safety instructions

Electrolux

Electrolux Thermetic 9CHG583284 Operating and safety instructions

DeLonghi D677UX Instructions for use

DeLonghi

DeLonghi D677UX Instructions for use

SEVERIN DEEP FRYER - Dimensions

SEVERIN

SEVERIN DEEP FRYER - Dimensions

Toastmaster TMFG18-NAT Installation and operation instructions

Toastmaster

Toastmaster TMFG18-NAT Installation and operation instructions

Domo DO465FR Instruction booklet

Domo

Domo DO465FR Instruction booklet

Russell Hobbs RDF300 Instructions and warranty

Russell Hobbs

Russell Hobbs RDF300 Instructions and warranty

Henny Penny PFG-691 Technical manual

Henny Penny

Henny Penny PFG-691 Technical manual

Farberware FBW FT 43721 B manual

Farberware

Farberware FBW FT 43721 B manual

GERMANICA GEAF5L3LD instruction manual

GERMANICA

GERMANICA GEAF5L3LD instruction manual

Wells F-85 Features and specifications

Wells

Wells F-85 Features and specifications

Philips HD9211 user manual

Philips

Philips HD9211 user manual

Lakeland 31796 Instruction booklet

Lakeland

Lakeland 31796 Instruction booklet

Dash Tasti-Crisp DFAF755 user manual

Dash

Dash Tasti-Crisp DFAF755 user manual

Keating Of Chicago 18 BB GAS Specification sheet

Keating Of Chicago

Keating Of Chicago 18 BB GAS Specification sheet

manuals.online logo
manuals.online logoBrands
  • About & Mission
  • Contact us
  • Privacy Policy
  • Terms and Conditions

Copyright 2025 Manuals.Online. All Rights Reserved.

USE & CARE GUIDE
Fryer Module
mportant Note
To ensure the safe and efficient use of Wolf equipment,
please take note of the following types of highlighted
information throughout this guide:
IMPORTANT NOTE highlights information that is especially
important.
CAUTION signals a situation where minor injury or product
damage may occur if instructions are not followed.
WARNING states a hazard that may cause serious injury or
death if precautions are not followed.
Contents
WolfFryerModule.............................3
SafetyInstructions ............................4
FryerModuleFeatures .........................6
FryerModuleOperation.........................8
FryerModuleCare............................14
Wolf Deep-Frying Guide . . . . . . . . . . . . . . . . . . . . . . . 15
FryerModuleRecipes.........................16
Troubleshooting Guide . . . . . . . . . . . . . . . . . . . . . . . . 21
ServiceInformation...........................22
WolfWarranty ...............................23
Features and specifications are subject to change at any time
without notice. Visit our website, wolfappliance.com for the
most up-to-date information.
IMPORTANT NOTE: Throughout this guide, dimensions in
parentheses are millimeters unless otherwise specified.
Wolf Fryer Module 3
wolfappliance.com
Thank You
Your purchase of a Wolf electric fryer module attests to the
importance you place upon the quality and performance of
your cooking equipment. We understand this importance
and have designed and built your fryer module with quality
materials and workmanship to give you years of depend-
able service.
We know you are eager to start cooking, but before you
do, please take some time to read this use & care guide.
Whether you are a beginning cook or an expert chef, it will
be to your benefit to familiarize yourself with the safety
practices, features, operation and care recommendations
of the Wolf electric fryer module.
Your Wolf fryer module is protected by a warranty that is
one of the finest in the industry. Take a moment to read
the warranty statement at the end of this guide and refer
to it should service become necessary.
f service should become necessary, you will need the
model and serial numbers of the fryer module. Both
numbers are listed on the product rating plate, located on
the underside of the module. Refer to the illustration
below.
IMPORTANT NOTE: Performance may be compromised if
the electrical supply is less than 240 volts.
ocation of rating plate.
RAT NG PLATE
Safety nstructions 4
To eliminate the risk of burns or fire when reaching
over heated surface units, cabinet storage space
located above the surface units should be avoided.
If cabinet storage is to be provided, the risk can be
reduced by installing a ventilation hood that
projects horizontally a minimum of 5" (127) beyond
the bottom cabinets.
The fryer module must be installed at least 15" (381)
from any open-flame cooking device or a Wolf
steamer module. The open flame may cause ignition
of oil, and contact between water and hot oil may
cause burns.
Fats and oils can ignite easily if they get over-
heated. Keep all flames away from the appliance.
MPORTANT NSTRUCT ONS
IMPORTANT NOTE: Read all safety instructions before
using this appliance.
•
Read this use & care guide carefully before using
your new fryer module to reduce the risk of fire,
electric shock or injury to persons.
•
Ensure proper installation and servicing. This appli-
ance must be properly installed and grounded by a
qualified technician. Have the installer show you the
location of the circuit breaker or fuse so that you
know where to turn off power.
•
Warranty service must be performed by a Wolf
authorized service center.
•
Before performing any service, disconnect the power
supply to the module by switching off the circuit
breaker or removing the fuse.
•
Clothing fires are potential hazards. Do not wear
long flowing sleeves around the fryer module. They
are easily caught on pan handles or ignited by flare-
ups. Highly flammable clothing, especially synthetic
fabrics, should not be worn while cooking.
•
Do not repair or replace any part of the fryer module
unless specifically recommended in literature
included with this appliance. All service is to be
referred to a Wolf authorized service center.
•
Do not line the fryer module with aluminum foil.
•
Never operate the fryer module while it is empty. Add
more oil as needed to keep the oil level at the oil
level line on the fryer basin.
•
This appliance is for household use only and must
not be put to any other use.
•
Do not use the fryer module for warming a room.
•
Do not store combustible, flammable or explosive
materials near the fryer module or adjacent cabinets.
•
Do not heat unopened glass or metal containers of
food in the fryer module. Pressure may build up and
cause the container to burst, resulting in serious
personal harm or damage to the module.
Safety nstructions 5
wolfappliance.com
MPORTANT NSTRUCT ONS
GENERA SAFETY REQUIREMENTS
•
Use sturdy, properly insulated gloves or pot holders.
Dish towels or other substitutes can become entan-
gled, causing burns. Keep pot holders dry. Wet pot
holders create steam and cause burns. Keep pot
holders away from open flames when lifting or
moving utensils.
•
Use only fryer baskets included with the module.
•
Always properly clean and maintain the module as
outlined in care recommendations on page 14.
•
The stainless steel lid must only be placed over the
fryer module after it has cooled down.
•
Children should not be left alone or unattended in an
area where the fryer module is being used. Never
allow them to sit, stand or play on or around the
module at any time. Do not store items of interest to
children around or below the module.
•
When using the fryer module, do not touch the
module or immediate surrounding areas. These
surfaces become extremely hot and could cause
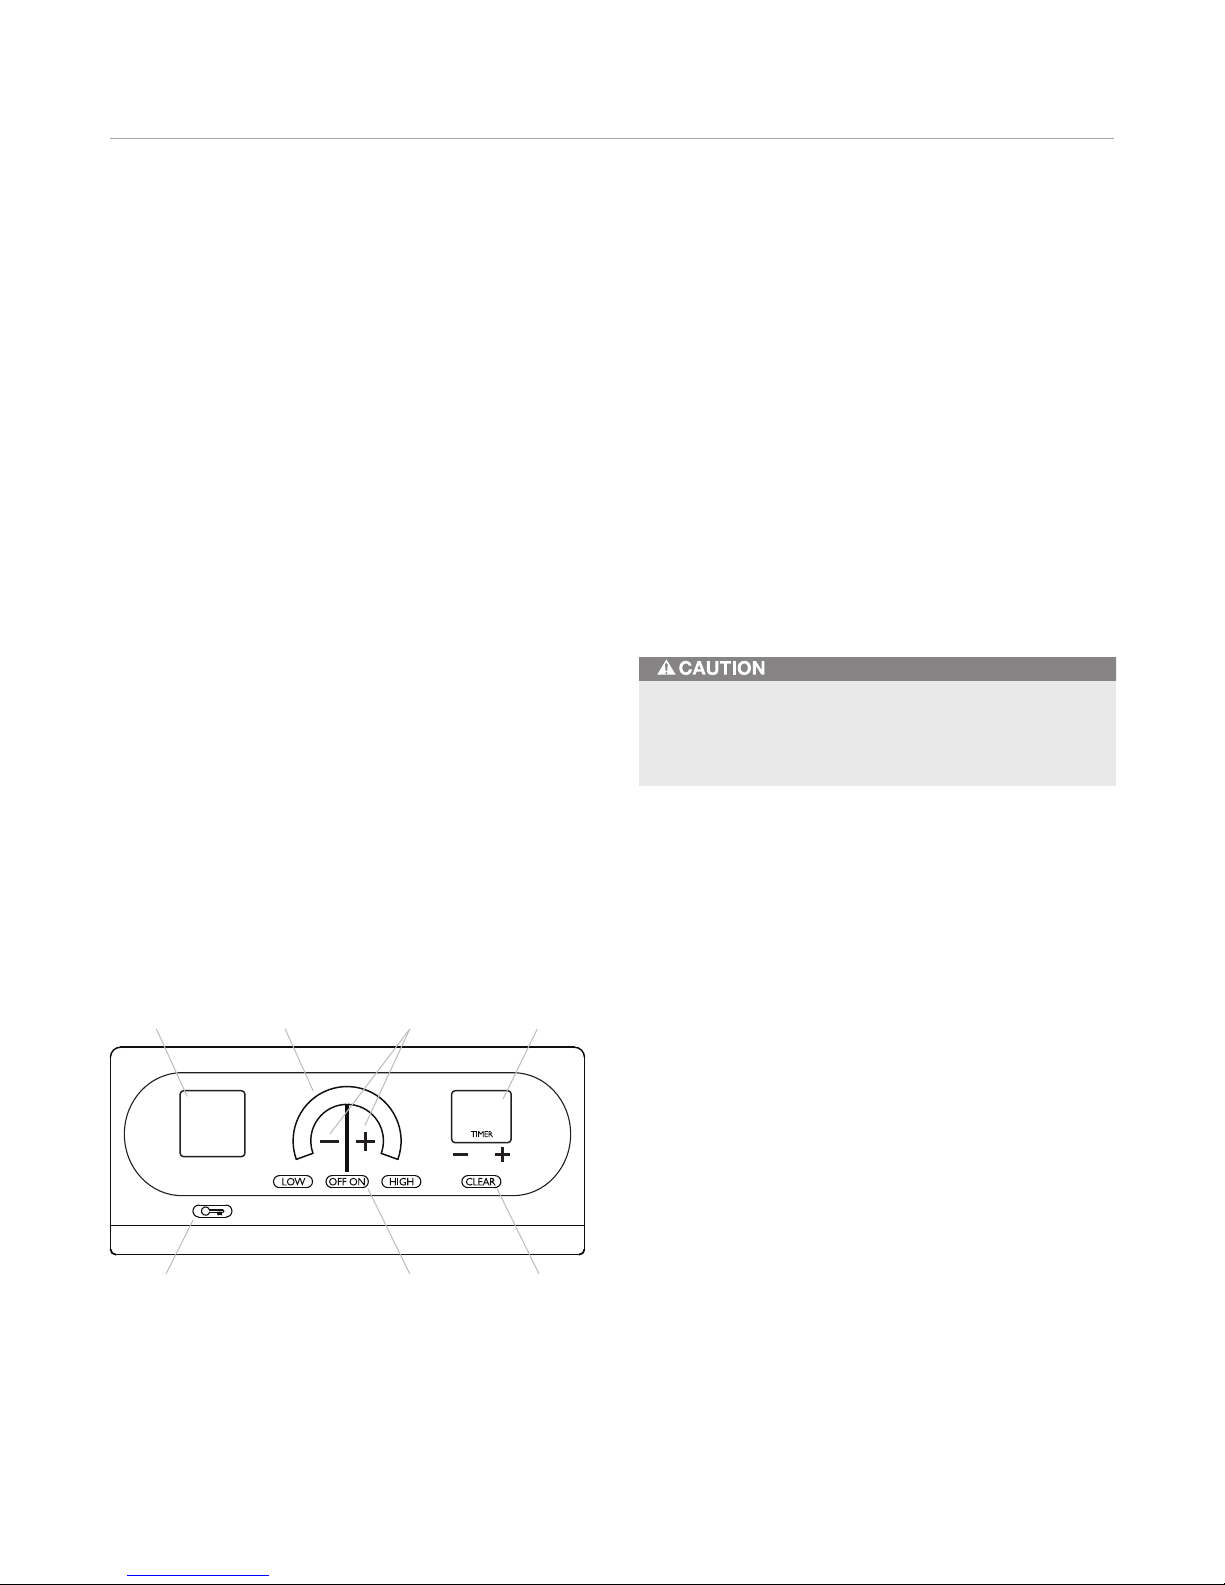
burns. Be certain that all controls are turned off by
touching the OFF ON touch pad and that the module
has cooled before touching or cleaning any surfaces.
•
Never leave the fryer module unattended.
•
Do not use water on grease fires. Smother fire or
flame or use dry chemical or foam-type extinguisher.
•Countdown timer with 1 to 99 minute range.
•Easy manual locking drain capability.
•CSA certified for US and Canada.
•Two and five year residential warranty—exclusions
apply, see warranty at the end of this guide.
Fryer Module Features 6
Fryer Module Features
•ntegrated design allows for installation of multiple
cooktops or modules.
•Crafted of heavy-duty stainless steel.
•Fried foods emerge crisp and light, due to precise
control of the 2,600-watt heating element.
•Melt feature for shortening or lard.
•lluminated touch controls with graduated control
lighting, temperature display and preheat indicator.
•Three wire baskets—large and two small, each with
basket hanger.
•Large 11/4gallon (3.8 L) capacity basin accommodates
large portions of small items or food as large as a
cornish hen.
•Low-profile stainless steel lid.
•Lock mode.
FRYER MODU E
Model F15/S
This appliance is certified by Star-K to meet
strict religious regulations in conjunction with
specific instructions found on www.star-k.org.
2,600-watt heating
element
Low-profile lid
lluminated touch
controls
Large-capacity
basin
Stainless steel
construction
Graduated control
lighting
Fryer Module Features 7
wolfappliance.com
Large basket
Wire basket hanger
Small baskets
Fryer basin
Low-profile lid
Fryer Module Features
FRYER MODU E ASSEMB Y
To assemble the fryer module, place the wire basket
hanger into the fryer basin. Hang either the large or small
fryer baskets onto the basket hanger.
The low-profile lid cannot be placed over either the large
or small fryer baskets until the handles are collapsed. To
collapse the handles, pull the handle apart just above the
basket and rotate the handle inward.
IMPORTANT NOTE: The wire basket hanger is reversible.
The baskets have hangers on both ends so that you can
latch them in the front or back, whichever you prefer.
OPTIONA ACCESSORIES
Optional accessories are available through your authorized
Wolf dealer. To obtain local dealer information, visit the
locator section of our website, wolfappliance.com.
•Filler strip for installation with another cooktop or
module.
Fryer module assembly.
Drain outlet
Fryer Module Operation
INITIA START-UP
Before using for the first time, clean your fryer module
thoroughly with hot water and a mild detergent. Rinse and
dry with a soft cloth. This removes any residual oil and
grease left on the surface from the manufacturing process.
Refer to care recommendations on page 14.
When the module is powered up for the first time it will
default to lock mode. To unlock the control panel, touch
and hold the key symbol for 3 seconds.
IMPORTANT NOTE: A small amount of smoke and odor
may be noticed during the initial break-in period.
Modes of Operation
OCK MODE
n lock mode, all touch pad operations on the control
panel are disabled and the heating element is deenergized.
A steady glowing light within the “key” symbol indicates
that the module is locked. Refer to the illustration below.
•To lock the control panel, touch and hold the key
symbol for 3 seconds. Three chimes will sound and the
light within the key symbol will illuminate. The module
is now in lock mode.
•To unlock the control panel, touch and hold the key
symbol for 3 seconds. Two chimes will sound and the
light within the key symbol will go out. The module is
now in idle mode.
IMPORTANT NOTE: When the module is powered up for
the first time or if there has been a power outage, the
module will default to lock mode.
ID E MODE
After unlocking the control panel as described in lock
mode, the module enters the idle mode of operation. All
touch pad operations on the control panel are enabled.
Fryer Module Operation 8
Oil must be added to the fryer basin before turning the
unit on. Burns or damage to the fryer module may
result when pouring oil into a heated fryer basin.
Temperature
LED display
Lock “key”
touch pad
Power bar
indicator
Temperature
adjustment
OFF ON
touch pad
Timer LED
display
CLEAR
touch pad
Control panel.
To change the power level setting once the unit is
activated and the power bar indicator remains steadily lit:
•Touch the +symbol to increase the temperature
set point.
•Touch the –symbol to decrease the temperature
set point.
•Touch H GH to increase the temperature set point to
400°F (205°C).
•Touch LOW to decrease the temperature set point to
190°F (90°C).
•Touch OFF ON to turn the module off.
Fryer Module Operation 9
wolfappliance.com
Fryer Module Operation
SETTING CONTRO S
The control panel of your fryer module is illuminated and
features touch controls with graduated control lighting and
temperature display. Refer to the illustrations below.
To activate the fryer module, first touch the OFF ON touch
pad on the control panel. The power bar indicator will
begin to blink and show a half-power status. To complete
the activation, touch one of the following symbols or touch
pads while the power bar indicator is still blinking:
•Touch the +symbol to set the temperature to 350°F
(175°C) and complete the activation.
•Touch the –symbol to set the temperature to 350°F
(175°C) and complete the activation.
•Touch H GH to set the temperature to 400°F (205°C)
and complete the activation.
•Touch LOW to set the temperature to 190°F (90°C) and
complete the activation.
Touch control panel. Temperature readout display.
TEMPERATURE
D SPLAY
+AND –
TOUCH PADS
LOW OFF ON H GH
Fryer Module Operation 10
ME T FEATURE
The melt feature is used to slowly melt solid shortening or
lard to a liquid state. Use this feature before heating short-
ening or lard to the desired deep-frying temperature. Stir
frequently while melting. Do not preheat the fryer when
using the melt feature.
To initiate melt feature, touch LOW. “MELT” will illuminate
in the temperature display. This will slowly melt shortening
or lard for 10 minutes, then heat to and maintain an oil
temperature setting of 190°F (90°C). After 10 minutes,
“MELT” will disappear from the temperature display.
The melt feature will not initiate if the oil temperature is
above 125°F (50°C). The fryer will heat to and maintain an
oil temperature setting of 190°F (90°C).
To avoid damage to the fryer, melt all solid fats before
attempting to heat to deep-frying temperature. This
also prevents heating oils to unsafe temperatures.
SETTING USES
OW 190°F (90°C) Melting shortening or lard
350°F (175°C) Frying most frozen foods
Fresh doughnuts
French fries
365°F (185°C) Frying seafood, breaded
370°F (190°C) Frying chicken pieces, breaded
375°F (190°C) Frying vegetables, breaded
380°F (195°C) Frying tortilla chips
Cornish hens
Fryer Module Operation
TEMPERATURE SETTING GUIDE