woodcut bowlsaver User manual

BOWLSAVER
U S E R
G U I D E
Bowlsaver User Support Video
available at www.woodcut-tools.com
in the User Guides Tab.

P R O D U C T B A C K G R O U N D
T h e t w o b l a d e d W o o d c u t T o o l s B o w l s a v e r h a s b e e n a v a i l a b l e f o r
o v e r 2 0 y e a r s . T h e B o w l s a v e r h a s b e e n d e s i g n e d f o r b o w l b l a n k s u p
t o a p p r o x i m a t e l y 3 5 0 m m x 1 5 0 m m ( 1 4 " x 6 " ) i n s i z e .
F r o m t h i s b l a n k t h e B o w l s a v e r w i l l c u t b o w l s a s s m a l l a s 7 5 m m ( 3 " )
d i a m e t e r a n d u p t o 3 0 0 m m ( 1 2 " ) d i a m e t e r , p r o v i d i n g y o u w i t h t h e
b e n e f i t o f s a v i n g w o o d a n d t h e r e f o r e m o n e y .
W O O D C U T
-
T O O L S
.
C O M
| #
W O O D C U T T O O L S
B O X C O N T E N T S
1
2
3
4
5
6
1 . R o t a t i o n P l a t e
2 . T a i l s t o c k a s s e m b l y
3 . S c r e w s
4 . A l l e n K e y s
5 . B l a d e s
6 . H a n d l e C l a m p
7 . H a n d l e
7
A B O U T W O O D C U T T O O L S
E s t a b l i s h e d i n 1 9 9 0 , W o o d c u t T o o l s i s a f a m i l y o w n e d m a n u f a c t u r e r
o f i n n o v a t i v e , h i g h q u a l i t y t o o l s f o r w o o d t u r n e r s b a s e d i n H a w k e s
B a y , N e w Z e a l a n d .
A t t e n t i o n t o d e t a i l , h a r d w o r k a n d a n a b s o l u t e c o m m i t m e n t t o q u a l i t y
a r e t h e h a l l m a r k s o f o u r b u s i n e s s . O u r p r o d u c t s a r e d e s i g n e d b y
t u r n e r s f o r t u r n e r s . D r i v e n b y t r a d i t i o n w h i l e p u s h i n g t h e b o u n d a r i e s
w i t h i n n o v a t i v e p r o d u c t s . T o v i e w o u r c o m p l e t e r a n g e o f p r o d u c t s
v i s i t w w w . w o o d c u t - t o o l s . c o m .

W O O D C U T
-
T O O L S
.
C O M
| #
W O O D C U T T O O L S
A S S E M B L Y
F i t t h e l a r g e a n d s m a l l b l a d e s i n t o p o s i t i o n a n d p l a c e t h e h a n d l e
c l a m p o n t o p .
I n s e r t t h e t w o c a p s c r e w s a n d t i g h t e n b y h a n d , c h e c k t h a t t h e s m a l l
b l a d e d o e s n o t p r o t r u d e p a s t t h e p l a t e . T i g h t e n s c r e w s f i r m l y .
F i r s t t a k e t h e r o t a t i o n p l a t e a s s e m b l y a n d p l a c e t h e t o o l p o s t i n t o
p o s i t i o n u n d e r n e a t h t h e b a s e p l a t e . S i m p l y t h r e a d t h e t o o l p o s t i n t o
t h e h o l e p r o v i d e d , a n d t i g h t e n w i t h t h e a l l e n k e y p r o v i d e d .
E n s u r e t h e t o o l p o s t i s t i g h t , t h e n l o o s e n t h e l o c k s c r e w o n t h e s h a f t
c o l l a r a n d l i f t t h e s h a f t c o l l a r u p u n d e r n e a t h t h e b a s e p l a t e a s f a r
a s i t w i l l g o a n d t h e n l i g h t l y t i g h t e n b y h a n d .
R e m o v e t h e t o o l r e s t , s l i d e t h e t a i l s t o c k b a c k a n d d r o p t h e
b o w l s a v e r u n i t i n t o p l a c e .
A d j u s t t h e r o t a t i o n p l a t e a n t i c l o c k w i s e u n t i l t h e p l a t e l i n e s u p w i t h
t h e s e c o n d t h r u s t t a b .

W O O D C U T
-
T O O L S
.
C O M
| #
W O O D C U T T O O L S
A S S E M B L Y
N e x t u s e y o u r d r i v e s p u r t o d e t e r m i n e t h e c o r r e c t h e i g h t , r a i s e t h e
s a v e r u n t i l t h e c u t t e r i s o n c e n t r e , t h e n l o w e r t h e s h a f t c o l l a r a n d
t i g h t e n t h e l o c k i n g s c r e w ( f i n e a d j u s t m e n t m a y b e n e c e s s a r y t o
s u i t t a i l s t o c k ) .
L a s t l y f i t t h e M o r s e t a p e r a s s e m b l y b r a c k e t t o t h e r e a r o f t h e b a s e
p l a t e t o c o m p l e t e t h e a s s e m b l y . N o w y o u c a n r e m o v e t h e s a v e r
u n t i l y o u r b o w l i s r e a d y t o b e c o r e d .
1 . C u t t i n g B l a d e
2 . T o o l P o s t M o u n t
3 . T h r u s t P a d s
4 . B a s e P l a t e & T o o l
P o s t M o u n t
5 . T a i l S t o c k
6 . W o o d e n B o w l B l a n k
F I T T I N G T H E B O W L B L A N K
S e l e c t y o u r b o w l b l a n k a n d m e a s u r e t h e d i a m e t e r . T h e f o l l o w i n g
i s b a s e d o n a n e x a m p l e o f a b o w l b l a n k w h i c h i s 1 3 ” ( 3 3 0 m m ) a n d
a t h i c k n e s s o f 4 - 1 / 2 ” ( 1 1 0 m m ) .
S c r e w y o u r f a c e p l a t e t o t h e f r o n t o f t h e b o w l r e a d y t o a t t a c h t o
y o u r l a t h e . S e l e c t a c h u c k b a s e d o n t h e d i a m e t e r o f t h e
b o w l . W o o d c u t T o o l s r e c o m m e n d s t h a t t h e c h u c k j a w s t o b e
a p p r o x i m a t e l y 3 0 % o f t h e d i a m e t e r o f t h e b l o c k h e l d . F o r o u r
e x a m p l e b l o c k w e r e c o m m e n d a 4 ” ( 1 0 0 m m ) j a w s e t f i t t e d t o a
N o v a S c r o l l c h u c k . I t i s i m p o r t a n t t o n o t u s e t o o s m a l l a s e t o f
j a w s f o r t h e s i z e o f t h e b o w l a n d t h e r e f o r e r i s k t h e b o w l c o m i n g
l o o s e .

F I T T I N G T H E B O W L B L A N K
W O O D C U T
-
T O O L S
.
C O M
| #
W O O D C U T T O O L S
S e t y o u r l a t h e t o a m o d e r a t e s p e e d ( r e c o m m e n d a b o u t 6 0 0 r p m )
a n d t h e n m o u n t t h e b o w l t o t h e l a t h e .
A d j u s t t h e c h u c k u n t i l a l m o s t c l o s e d , m e a s u r e t h e i n s i d e d i a m e t e r
w i t h c a l l i p e r s a n d m a r k a c i r c l e w i t h y o u r p e n c i l o n t h e f a c e o f
t h e b o w l .
U s i n g a 3 / 8 ” ( 1 0 m m ) g o u g e o r s p e c i a l i s t t o o l c u t t h e s p i g o t
a c c u r a t e l y t o s u i t t h e c h u c k . T h e s p i g o t h e i g h t s h o u l d b e
a p p r o x i m a t e l y 1 / 4 ” ( 6 m m ) .
E n s u r e t h a t t h e f a c e i s f l a t f o r t h e c h u c k t o r e g i s t e r a g a i n s t .
For the bottom of the bowl we
recommend the 5/8” (16mm) and
1/2” (13mm) Woodcut Tools
replaceable tip bowl gouges.
Shape the bowl, keep the bevel
rubbing and cut with the grain
and slice the wood away.
Now remove the faceplate and fit
the bowl squarely in the chuck
and tighten firmly.
S H A P I N G T H E B O T T O M O F T H E B O W L
P L A N N I N G
Proceed to face the front of the bowl and prepare to mark out the bowls you will
reclaim. It is important to carefully consider the wood in the mother bowl and the
finished shape before marking out the pitch circles on the face of the bowl. The
aim is to save as much wood as possible without compromising the largest most
valuable bowl.
Allow a rim of 1” (25mm) for wet wood or 3/4”(19mm) for dry. More can be
allowed for a designer rim. Do not let the Bowlsaver dictate the shape of the
finished bowl.

P L A N N I N G
W O O D C U T
-
T O O L S
.
C O M
| #
W O O D C U T T O O L S
S E T T I N G U P T H E B O W L S A V E R T O C U T
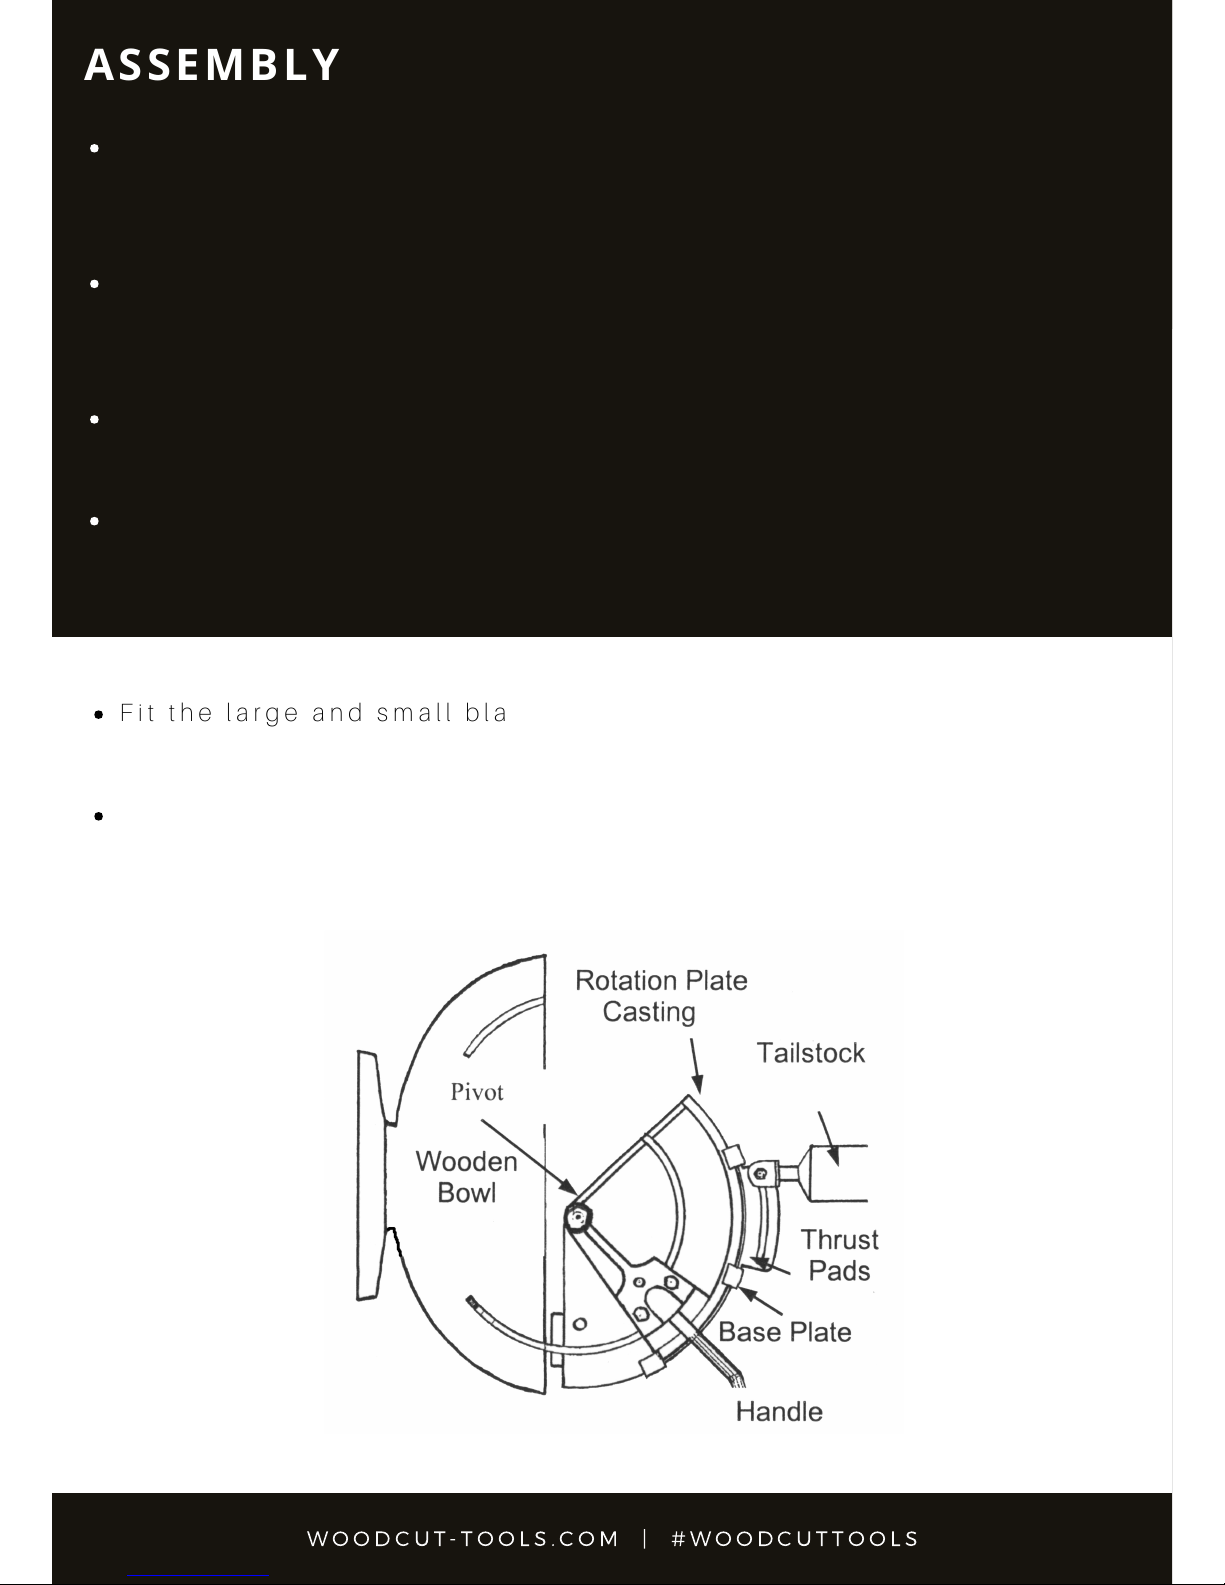
R e m o v e t h e t o o l r e s t f r o m t h e b a n j o a n d r e p l a c e t h e b o w l s a v e r b a c k
i n t o t h e b a n j o , s i t t i n g i t d o w n o n t h e c o l l a r t o s e t t h e c o r r e c t
h e i g h t .
S t a r t o f f w i t h t h e l a r g e r b l a d e a n d r e m o v e t h e l a r g e s t b o w l f i r s t ,
t h e n s w a p o v e r t o t h e s m a l l e r b l a d e f o r t h e n e x t s i z e d o w n . B o w l s
u n d e r 8 ” ( 2 0 0 m m ) c u t w i t h t h e s m a l l b l a d e .
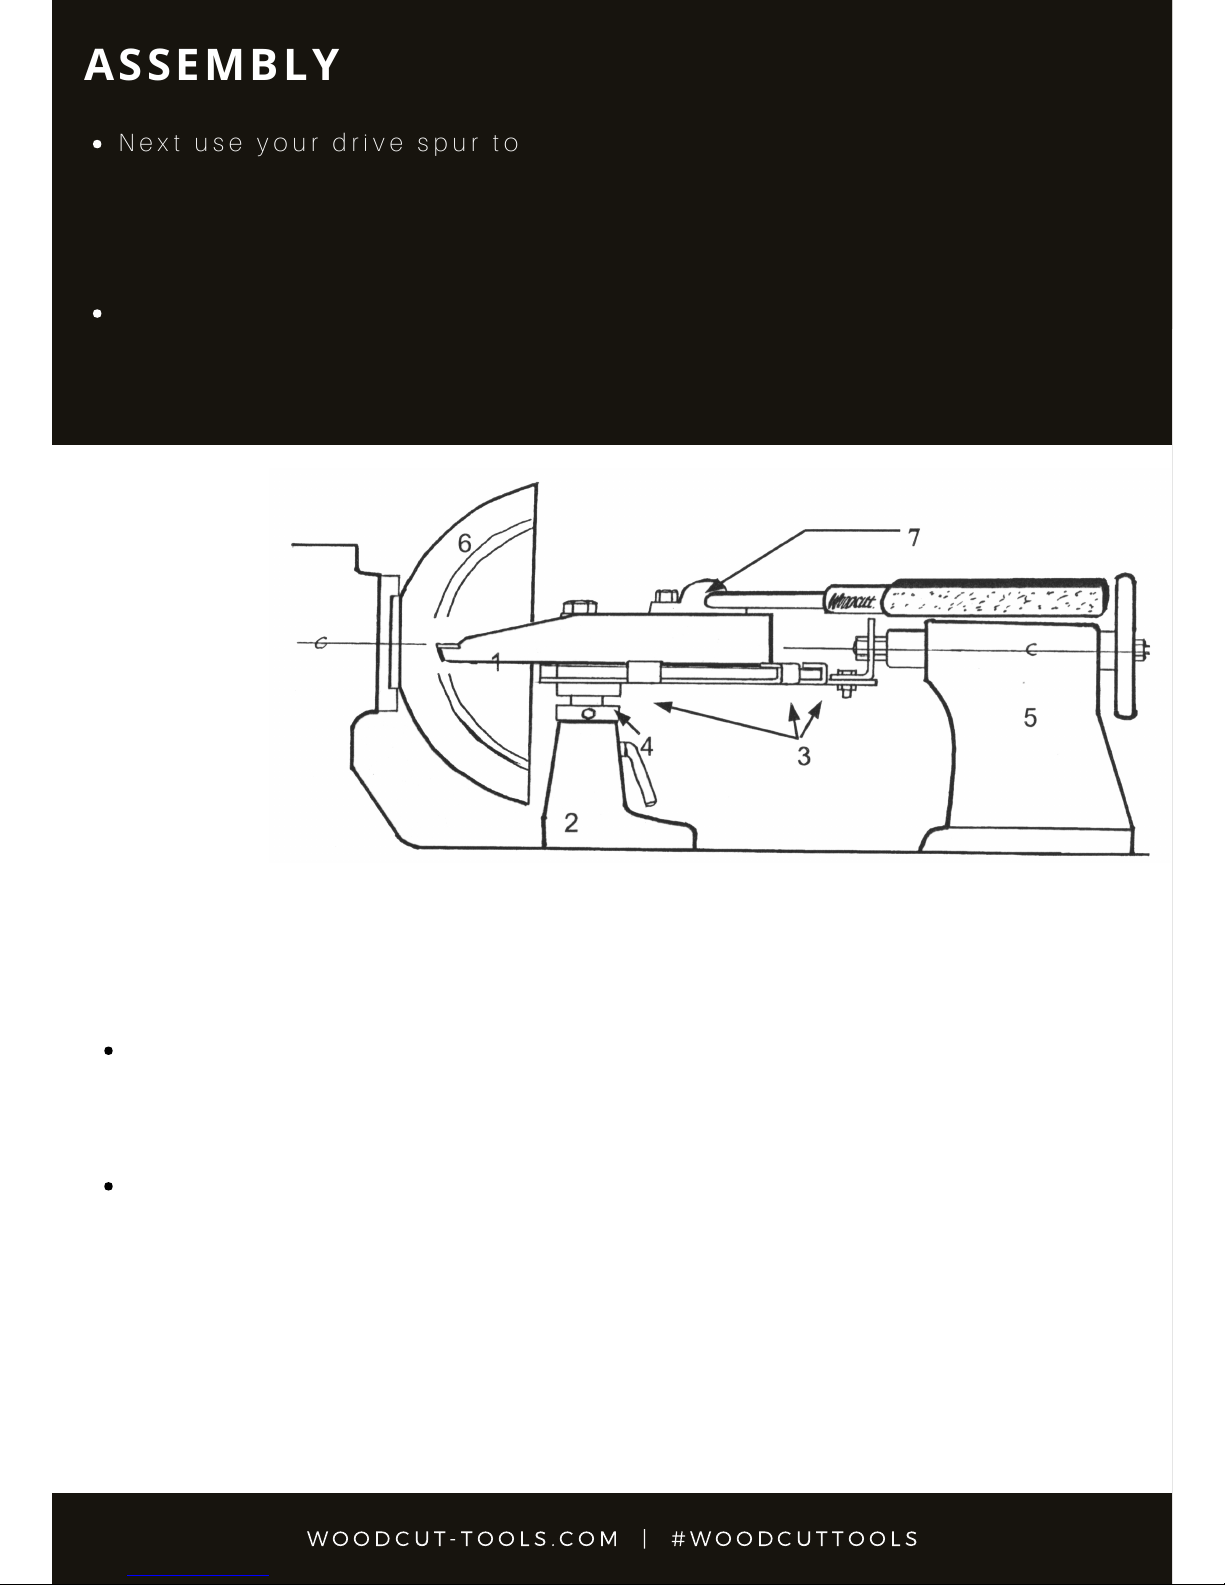
W i t h t h e B o w l s a v e r i n t h e t o o l r e s t w e w i l l n o w m o v e t h e w h o l e
t o o l r e s t a n d B o w l s a v e r u n i t u p t o t h e f a c e o f t h e b o w l .
S l i d e t h e t o o l r e s t a c r o s s u n t i l t h e t i p o f t h e c u t t e r l i n e s u p w i t h t h e
p i t c h c i r c l e .
T h i s i s c a l l e d t h e p o i n t o f e n t r y . I t i s n o t n e c e s s a r y t o h a v e t h e
p i v o t b o l t i n t h e c e n t r e o f t h e b o w l .
N e x t s e t t h e d e p t h o f c u t ( h o w f a r t h e b l a d e g o e s i n t o t h e b o w l ) .
Y o u w i l l f i n d a t e m p l a t e h a s b e e n p r o v i d e d i n t h e m i d d l e o f t h i s
g u i d e t o m a k e y o u r o w n d e p t h g a u g e .
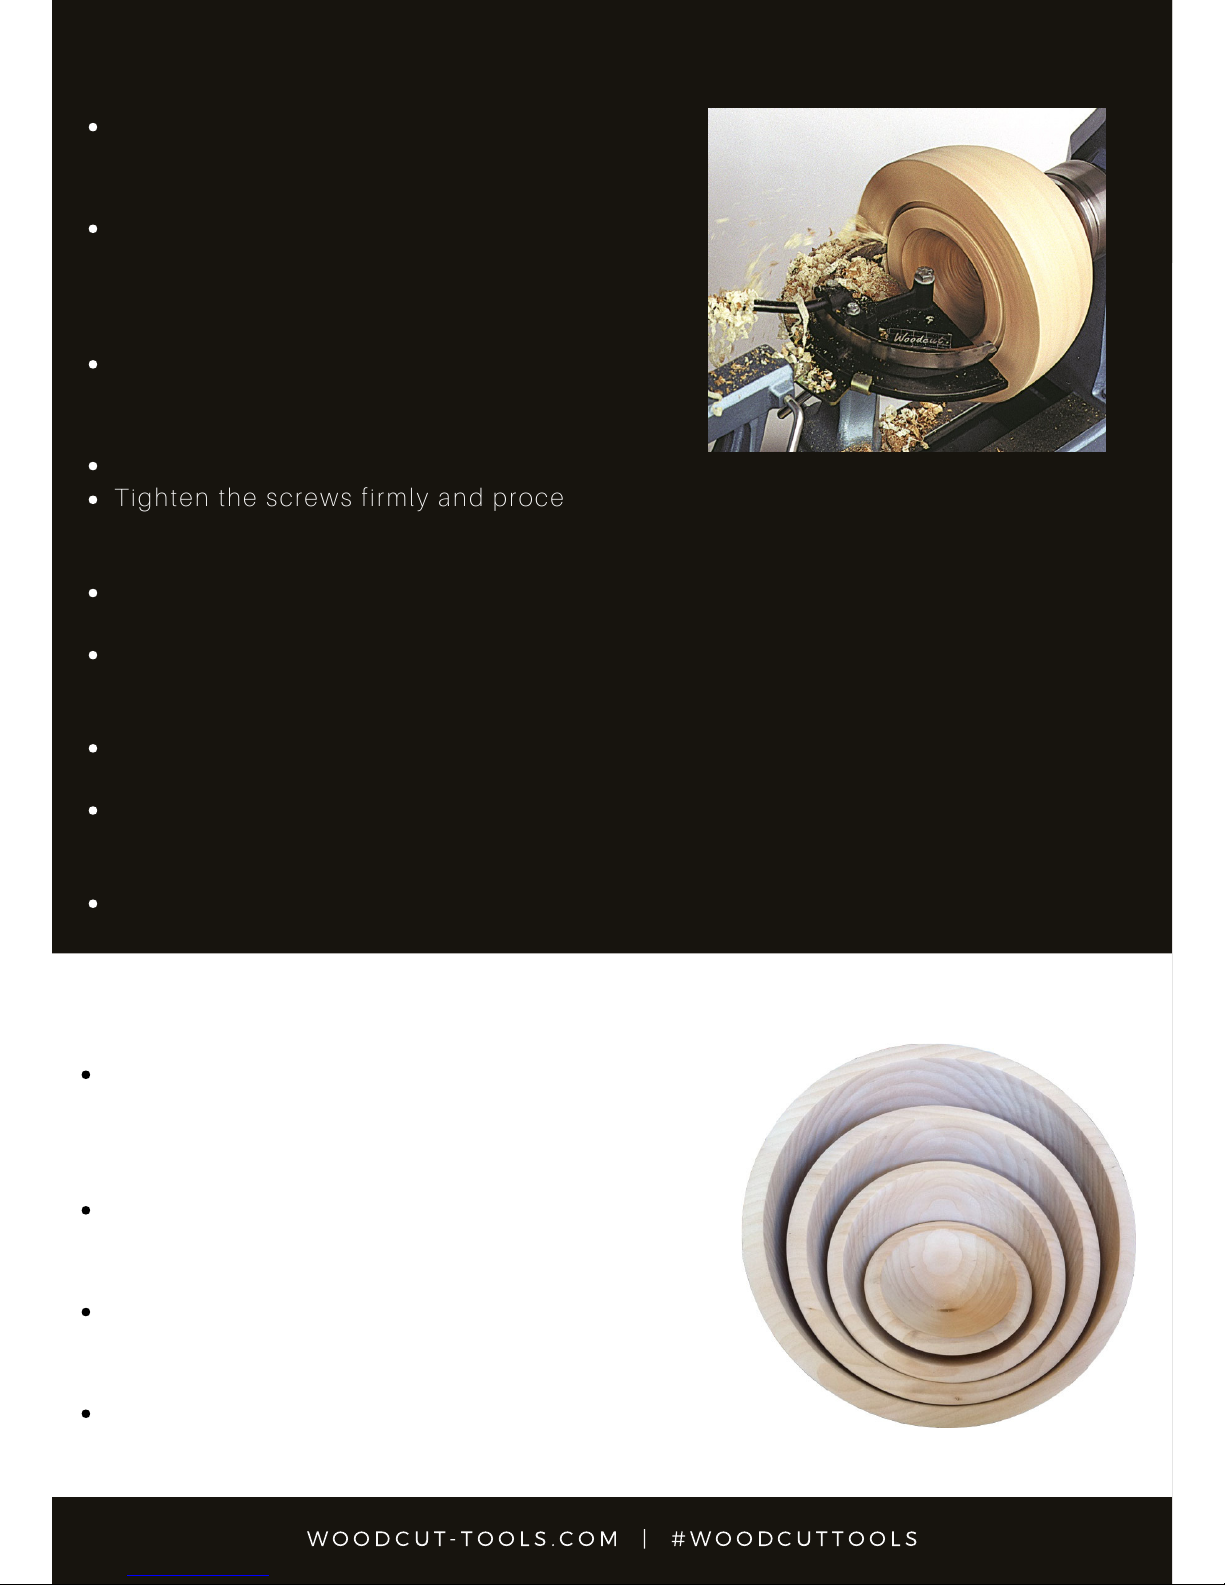
Once you have made a decision mark
the pitch circle for that bowl, then divide
the rest of the face of the bowl up
according to the number of additional
bowls that you wish to core out. This will
largely depend on the depth of the
blank.
A blank of 3” (75mm) in depth will
produce two bowls, a blank of 4” to 5”
(100 to 125mm) in depth will safely
produce three and a 6"(150mm) blank
four.
Cut a spigot on the front of the blank
to enable the core to be remounted for
the next bowl.

S E T T I N G U P T H E B O W L S A V E R T O C U T
W O O D C U T
-
T O O L S
.
C O M
| #
W O O D C U T T O O L S
Place the large gauge against the base of the bowl and move the unit forward
until the centre of the bolt is level with the point. Keep the cutter on the point of
entry. If this is correct then lock your toolrest firmly.
Slide your tailstock forward, loosen the wingnut underneath the tailstock
bracket fitting, and fit the morse taper into the taper of your tailstock. Lock your
tailstock in place and wind the handwheel forward a little to hold the taper firmly
in place.
Double check the tightness of all your mounting points (chuck, toolrest,
toolpost, tailstock and the tri-knob underneath). You are now ready to start
cutting.
T H E F I R S T C U T
The Bowlsaver User Support Video available at www.woodcut-tools.com in the
User Guides Tab is a great reference.
Check your lathe speed. This will depend upon the size and the balance of the
block that you are cutting but use a lower speed to start with.
Once again, make sure that the chuck is tight on the bowl and then start the
lathe.
The hand positions of the Bowlsaver are quite important. Bring your body close
up to the Bowlsaver handle and your left hand can rest and apply downward
pressure to the blade. This will help dampen any vibration.
Alternatively calipers can be used for setting the depth or to make this process
even easier use the optional Woodcut Laser Guide, both pictured below.

T H E F I R S T C U T
W O O D C U T
-
T O O L S
.
C O M
| #
W O O D C U T T O O L S
You can see that a few minutes time spent carefully conserving a piece of
this wood is going to be well worthwhile.
As you progress and start to come around into the end grain you’ll notice
that the shavings will become small, short, little fibrous chips.
It’s important at this time to stop and clear those shavings so that they
don’t pack around the blade and put extra strain on your lathe. Once cleared
carry on as before. From time to time a shaving will sit on top of the cutter and
inhibit progress. Simply withdraw the blade, wipe it off and carry on cutting.
Let the cutter work at it’s own pace. The Bowlsaver, used patiently, will do the
job as effectively on a light machine as it will on a heavy-duty lathe.
As you proceed around towards the finish of the cut, listen carefully and you will
hear a change in the tone of the cut. This will give you an indication of
how much wood is left in the base now to cut off. Stop the lathe at this point.
Feel the bowl with your fingers and check whether it’s almost ready to come
off. You may have to do this 2 or 3 times, particularly when you’re first starting
out with the Bowlsaver, until you get comfortable with it.
Don’t be afraid if you go too far. If the bowl does dislodge, simply switch the
lathe off and retrieve the bowl.
It is very important that the blade is fed very slowly into the wood (not
hesitantly but at steady rate). There is no need to rush this operation. The
whole operation will take only 2 to 4 minutes and you can withdraw the blade at
any time and start again at the same point where you left off.

T H E S E C O N D C U T
W O O D C U T
-
T O O L S
.
C O M
| #
W O O D C U T T O O L S
Tighten the screws firmly and proceed to line up the cutter with the point of
entry.
Take the small gauge and adjust the depth of cut until correct.
Couple the tailstock to the taper and tighten all the mounting points, including
the chuck.
You may wish to increase the lathe speed to 800 rpm for the smaller bowl.
Proceed to make the cut as before withdrawing the blade frequently to clear
shavings until the bowl is ready to break free.
Move the unit including the tailstock back and remove the second bowl.
T H E F I N A L B O W L
Place the new bowl in the chuck, replace the
toolrest and turn a spigot on the base to suit the
small chuck (2”-50mm).
Fit the small chuck, remount the bowl and hollow
out the inside with a suitable gouge.
We suggest you use a 3/8” (10mm)
Woodcut Tools Replaceable Tip Bowl Gouge.
Now you have three bowls ready to be finished and
polished once they have completely seasoned.
Proceed to remount the saved bowl using
the same procedure as before.
Create a new spigot on the bottom of the
bowl. Re-mount the bowl in the chuck and
re-mount the Bowlsaver on the lathe.
Loosen the clamp bolts and exchange the
blades, the small blade now becomes the
working blade and the large the lazy blade.

C U T T E R M A I N T E N A N C E
W O O D C U T
-
T O O L S
.
C O M
| #
W O O D C U T T O O L S
Before grinding your cutter, check the angle. Parallel for soft wood and
negative 5 degrees for hardwood.
Tips can be replaced by a saw doctor who has the ability to braise a
replacement stellite tip available from your local Woodcut Tools distributor.
Bench Grinder
Y o u r B o w l s a v e r i n c l u d e s a q u a l i t y s t e l l i t e c u t t i n g t i p , t o g i v e a l o n g
l a s t i n g a n d h a r d w e a r i n g c u t . W i t h p r o p e r c a r e i t w i l l s a v e u p t o
5 0 0 b o w l s b e f o r e i t n e e d s r e p l a c i n g . C o n t a c t y o u r l o c a l
W o o d c u t T o o l s s u p p l i e r f o r a r e p l a c e m e n t s e t o f b l a d e s .
Y o u w i l l n o t i c e t h a t t h e t o p o f t h e t i p i s h o l l o w g r o u n d , t h i s i s
e s s e n t i a l t o t h e p e r f o r m a n c e o f t h e t o o l . T h e h o l l o w g r i n d i s b e s t
l e f t a l o n e a n d s h a r p e n i n g d o n e b y a v e r y l i g h t g r i n d t o b r i n g u p a
b u r r , a s p e r p i c t u r e b e l o w .

W O O D C U T
-
T O O L S
.
C O M
| #
W O O D C U T T O O L S
U S E R S U P P O R T
Please find the Bowlsaver User Support
Video at www.woodcut-tools.com in
the User Guides Tab.
Subscribe to our Woodcut Tools
YouTube channel, Facebook and
Instgram pages, to stay up to date
with our latest product videos.
#woodcuttools
#woodcutbowlsaver

G E N E R A L S A F E T Y R U L E S
W O O D C U T
-
T O O L S
.
C O M
| #
W O O D C U T T O O L S
Woodcut Tools recommends these guidelines to ensure your safety.
1. Please read this user guide before operating this product.. Ensure you are familiar with the product's application and limitations plus the specific
hazards peculiar to it.
2. Wear safety glasses. A full face mask is recommended. . Safety glasses (must comply with ANSI STANDARD Z87.1 USA) Everyday eye glasses usually
are only impact resistant; they are not safety glasses. Also use face or dust mask if cutting operation is dusty.
3. Wear appropriate clothing. Do not wear loose clothing, gloves, neckties, rings, bracelets or other jewellery, which may get caught in moving parts.
Non-slip footwear is recommended. Wear protective hair covering to contain long hair.
4. Use ear protectors. Use earmuffs for extended period of operation. Use muffs rated to 103 DBA LEQ (8 hr).
5. Do not operate in a high risk environment.. Don’t use power tools in damp or wet locations, or expose them to rain. Keep work area well lighted.
6. Ensure the work area is clean. Cluttered areas and benches invite accidents. Build up of sawdust is a fire hazard.
7. Keep children and visitors away. All children, infirm and visitors should be kept a safe distance from work area.
8. Ensure the workshop is childproof with locks, master switches, or by removing starter keys.
9. Ground all tools. If the tool is equipped with a three-prong plug, it should be plugged into a three hole electrical receptacle. If an adapter is used to
accommodate a two-prong receptacle, the adapter lug must be attached to a known ground. Never remove the third prong.
10. Ensure the tool is disconnected from the power supply while the motor is being mounted, connected or reconnected.
11. Disconnect tools from wall socket before servicing and when changing accessories such as blades, bits, cutters and fuses.
12. Prevent accidental starting . Make sure switch is in the Off position before plugging in power cord.
13. Never leave machine running unattended. Do not leave tool unless it is turned off and has come to a complete stop.
14. Keep guards in place and in working order.
15. Use the correct tool. Do not use a tool or attachment to do a job for which it was not designed.
16. Use recommended accessories. The use of improper accessories may cause hazards.
17. Don't force the tool. It will do the job better and be safer at the rate for which it was designed.
18. Maintain tools in optimum condition. Keep tools sharp and clean for best and safest performance. Follow instructions for lubricating and changing
accessories.
19. Avoid standing on the tool. Serious injury could occur if the tool is tipped or if the cutting tool is accidentally contacted.
20. Remove adjusting keys and wrenches. Form a habit of checking to see that keys and adjusting wrenches are removed from tool before turning it on.
21. Don't over reach. Keep proper footing and balance at all times.
22. Direction of feed. Feed work into a blade or cutter against the direction of rotation or the blade or cutter only.
23. Attention to work. Concentrate on your work. If you become tired or frustrated, leave it for awhile and rest.
24. Secure work. Use clamps or a vice to hold work when practical. It’s safer than using your hand and frees both hands to operate tool.
25. Check for damaged parts. Before further use of the tool, any part that is damaged should be carefully checked to ensure that it will operate properly
and perform its intended function. Check for alignment of moving parts, binding of moving parts, mounting, and any other conditions that may affect its
operation. Any damaged part should be properly repaired or replaced.
26. Drugs, alcohol and medication. Do not operate tool while under the influence of drugs, alcohol or any medication. 27. DUST WARNING. The dust
generated by certain woods and wood products can be harmful to your health. Always operate machinery in well ventilated areas and provide for
proper dust removal. Use wood dust collection systems whenever possible.
W A R R A N T Y T E R M S
We are committed to our products and customers and guarantee our tools against faulty workmanship and faulty materials for twelve months. Fair wear
and tear excluded. We will replace or repair any tool returned to the supplier or factory free of charge. Freight to and from the factory will be at the expense
of the purchaser.
Woodcut Tools Limited
Hawkes Bay
New Zealand
Other manuals for bowlsaver
1
Table of contents
Other woodcut Cutter manuals