WorkPro RP17315 User manual

OPERATOR'S MANUAL
AIR ANGLE DIE GRINDER
W182003A
SAVE THIS MANUAL FOR FUTURE REFERENCE
WARNING: To reduce the risk of injury, the user must read and understand the operator’s manual before
using this product.
Thank you for buying a WORKPRO product. Your Air Angle Die Grinder has been engineered and manufactured to
WORKPRO’s high standard for dependability, ease of operation, and operator safety. When properly cared for, it will
give you years of rugged, trouble-free performance.

2
FIG. 1
FIG. 2
FIG. 3 FIG. 4
2
2
3
4
5
6
1
1
8
7
9
2
1
3mm
6mm
89

Danger! - Read the operating instructions to reduce the risk of inquiry.
Notice! Wear ear-muffs. The impact of noise can cause damage to hearing.
Notice! Wear a breathing mask. Dust which is injurious to health can be generated when working on wood
and other materials. Never use the device to work on any materials containing asbestos!
Notice! Wear safety goggles. Sparks generated during working or splinters, chips and dust emitted by the
device can cause loss of sight.
Each time before use, oil the compressed connection.
3
GB
Direction of rotation
OIL DAILY

4
GB
errors made in following the safety regulations and
instructions may result in an electric shock, fire and/or
serious injury.
Keep all safety regulations and instructions in a
safe place for future use.
Protect yourself and your environment from risks and
accidents by taking the appropriate precautionary
measures.
Residual risks
Even if you use the equipment in accordance with the
instructions, certain residual risks cannot be eliminated.
2. Layout and Unpacking
2.1 Layout (Fig. 1)
1. Clamp nut
2. Clamps (3mm, 6mm)
3. Clamp holder
4. Operating switch
5. Safety lock-off
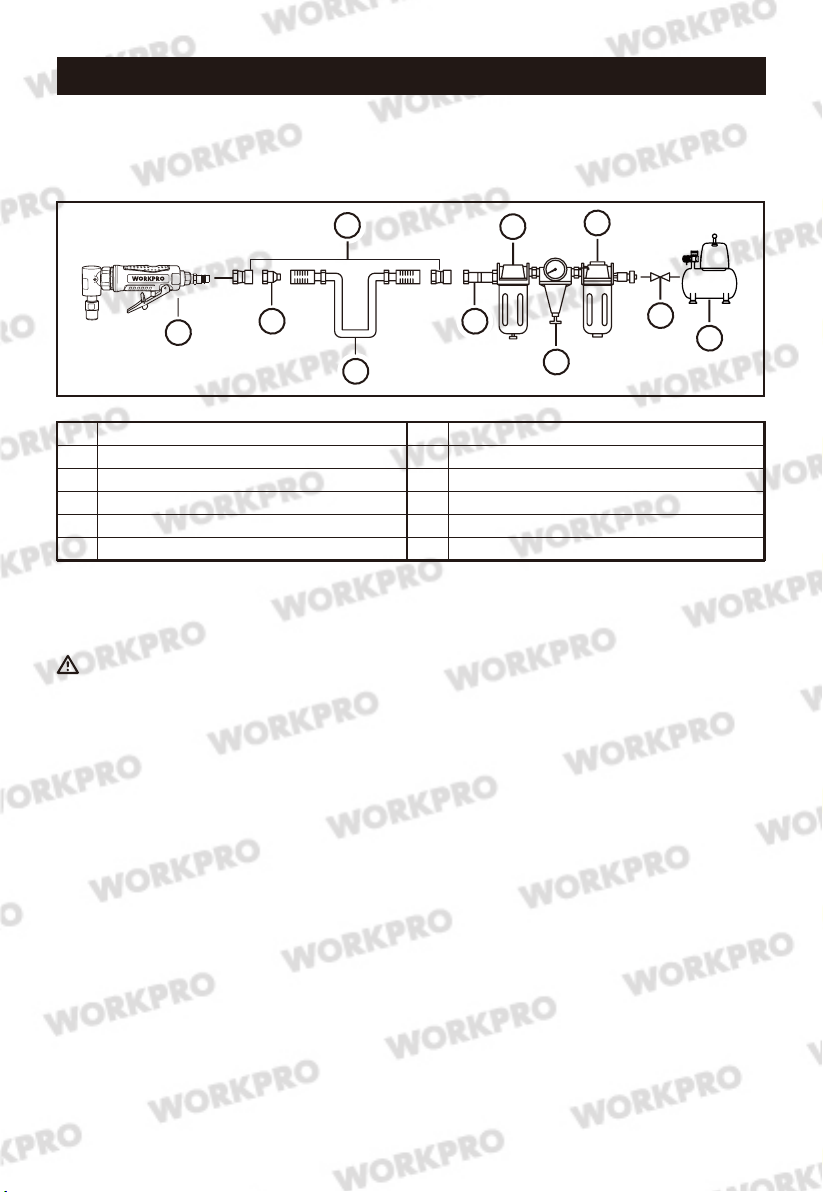
6. Compressed air connection
7. Lubricant
8. Chuck key, 11.5 mm
9. Chuck key, 17 mm
2.2 Items supplied
Carefully remove the tool and accessories from the
box. Make sure that all items listed in the packing list
are included. Inspect the tool carefully to make sure no
breakage or damage occurred during shipping. Do not
discard the packing material until you have carefully
inspected and satisfactorily operated the tool.
This package contains:
Clamp (one installed and one replacement)
Compressed air connection
Lubricant
Chuck key:11.5mm,17mm
Operating instruction
Check for damage to the tool, parts or accessories
which may have occurred during transport. Take the
time to thoroughly read and understand this manual
prior to operation.
Danger!
The equipment and packaging material are not
toys. Do not let children play with plastic bags, foils
or small parts. There is a danger of swallowing or
suffocating!
Danger!
When using the equipment, a few safety precautions
must be observed to avoid injuries and damage.
Please read the complete operating instructions and
safety regulations with due care. Keep this manual in a
safe place, so that the information is available at all
times. If you give the equipment to any other person,
hand over these operating instructions and safety
regulations as well. We cannot accept any liability for
damage or accidents which arise due to a failure to
follow these instructions and the safety instructions.
1. Safety regulations
KEEP CHILDREN, VISITORS AND BYSTANDERS
AWAY FROM TOOL. Distractions can cause misuse
and possible loss of control. When tool is not
operational it should be locked in a safe place out of
the reach of children.
USE SAFETY GLASSES AND EAR PROTECTION:
Air tool operators and others in work area should
always wear safety glasses and ear protection to
prevent injury from flying debris as well as possible
hearing damage.
NEVER USE OXYGEN, COMBUSTIBLE OR ANY
OTHER BOTTLED GAS as a power source or it can
cause an explosion and serious personal injury.
DO NOT CONNECT TOOL TO COMPRESSED AIR
THAT EXCEEDS 120PSI.
MAKE SURE HOSE IS FREE OF ANY OBSTRUC-
TIONS OR SNAGS. Entangled hoses can cause loss
of balance or footing.
KEEP THE TOOL POINTED AWAY FROM YOUR-
SELF and others at all times and keep hands, any
body parts away from rear area to safety guard
against possible injury.
DISCONNECT TOOL FROM AIR SUPPLY
BEFORE LOADING FASTENERS to prevent
accidental firing during connection.
DISCONNECT TOOL FROM AIR SUPPLY HOSE
and close the compressor before performing
maintenance and during non-operation.
DO NOT OVERREACH DURING USAGE. Maintain
proper footing at all times to avoid loss of balance
and possible injury.
NEVER USE A TOOL THAT IS LEAKING AIR, HAS
MISSING OR DAMAGED PARTSOR REQUIRES
REPAIR. and make sure all the screws are securely
tightened.
ALWAYS OPERATE TOOL IN CLEAN WELL LIT
AREAS. Be sure the work area is dear of any debris.
ONLY USE PARTS AND ACCESSORIES recommend
by manufacturer.
Danger!
Read all safety regulations and instructions. Any

5
GB
No.
1
2
3
4
5
Description
Air angle die grinder
Quick connector
Quick coupler
Air hose
Lubricator
No.
6
7
8
9
Description
Regulator
Filter
Cut-off valve
Air compressor
3. Proper use
The equipment is designed for the grinding, deburring, engraving and cleaning of iron, plastic and similar materials
using the appropriate grinding pins (not included).
The equipment is to be used only for its prescribed purpose. Any other use is deemed to be a case of misuse. The
user / operator and not the manufacturer will be liable for any damage or injuries of any kind caused as a result of
this. Please note that our equipment has not been designed for use in commercial, trade or industrial applications.
Too small a diameter of the hose and too long a hose line will result in loss of power.
257
133
6
8
9
4
Air System

Caution!
Residual risks
Even if you use this tool in accordance with
instructions, certain residual risks cannot be rules
out. The following hazards may arise in connection
with the equipment’s construction and layout:
Lung damage if no suitable protective dust mask is
used.
Damage to hearing if no suitable ear protection is
used.
Health damage caused by hand-arm vibrations if
the equipment is used over a prolonged period or is
not properly guided and maintained.
5. Before starting the equipment
Disconnect the compressed air supply before
performing any cleaning, adjusting and maintenance
work
Air supply:
Via a compressed air source with pressure setting
function, e.g. a compressor. Before starting up, please
also read the section on care and maintenance.
Performance values of the compressor:
The compressor used should have a tank volume of at
least 50 liters.
Setting values for work:
Set a maximum working pressure of 8.3 bar at your
compressed air supply.
5.1 Lubricating the tool
Each time before starting and during prolonged
operation:
Insert 3-5 drops of special compressed air oil into
the compressed air connection (6)
Let the equipment run briefly so that any surplus oil
is blown out.
5.2 Fitting the grinding pins (not included in
delivery) (Fig. 3, 4)
Unscrew the clamp nut (1).
Insert the appropriate clamp (2) and screw on the
clamp nut (1) by hand.
Insert the grinding pin (make sure the shaft diameter
is correct).
Make sure that the clamping length is at least 10
mm.
Tighten the clamp nut (1) using the two chuck keys
(8,9) .
Check that the grinding pin is secure.
Wear ear-muffs.
The impact of noise can cause damage to hearing.
Total vibration values (vector sum of three directions)
were determined in accordance with ISO/TR 11688-1
and ISO/TR 11688-2.
Vibration emission value a = 5.02 m/s²
K Uncertainty = 1.5 m/s²
Warning!
The specified vibration value was established in
accordance with a standardized testing method. It may
change according to how the equipment is used and
may exceed the specified value in exceptional circum-
stances.
The specified vibration value can be used for initial
assessment of a harmful effect.
Keep the noise emissions and vibrations to a
minimum.
Only use appliances which are in perfect working
order.
Service and clean the appliance regularly.
Adapt your working style to suit the appliance.
Do not overload the appliance.
Have the appliance serviced whenever necessary.
Switch the appliance off when it is not in use.
Wear protective gloves.
h
6
GB
4. Technical data
Danger!
Sound and vibration
Sound and vibration values were measured in
accordance with ISO/TR 11688-1 and ISO/TR
11688-2.
L sound pressure level
K uncertainty
L sound power level
K uncertainty
88.1 dB(A)
3 dB
99.1 dB(A)
3 dB
pA
pA
WA
WA
Description
Operating pressure
Rated speed
Air consumption
Clamping Capacity
Air Inlet Diameter
Air angle die grinder
90psi (6.3 bar)
20000 rpm
3cfm (85.5l/min)
3mm, 6mm
6.3mm (1/4")
Recommended hose
diameter(internal) 9.5mm(3/8")

Clean the equipment regularly with a moist cloth
and some soft soap. Do not use cleaning agents or
solvents; these could attack the plastic parts of the
equipment. Ensure that no water can seep into the
device.
7.2 Maintenance
Warning!
Disconnect the equipment from the compressed air
supply before you carry out any maintenance or
cleaning work.
Compliance with the maintenance instructions listed
here will help this quality product provide you with a
long service life and trouble-free operation.
Regular lubrication is essential for your equipment to
work properly for a prolonged period of time.
Regularly check the speed and the vibration level by
simply observing the tool.
NOTE: Use environmentally friendly compressed air oil
if you want to operate the equipment outside the
workshop.
The following lubrication options are available:
Lubrication
Each time before using the compressed air tool insert
3-5 drops of special compressed air oil into the
compressed air connection. If the compressed air tool
has not been used for several days you must insert
5-10 drops of special compressed air oil into the
compressed air connection before switching on.
Store your compressed air tool only in a dry room.
8. Disposal and recycling
If your tool has become damaged beyond repair, do
not throw it out. Bring it to the appropriate recycling
facility.
6. Operation
6.1 Connecting to a compressed air supply
Connect the air connection (6) to the quick-lock
coupling of a compressed air hose (the hose is not
supplied).
Note the maximum permissible operating pressure
of the equipment.
6.2 Switching on and off (Fig. 1)
With a firm grip on the angle die grinder, slowly apply
hand pressure to the operating switch until the desired
speed is obtained, and steadily moving tool to right
and left until achieving desired appearance (finish) on
workpiece.
NOTE: The tool always turns the Grinding Drum/Drill
Chuck clockwise.
If air angle die grinder requires more force to accomplish
task, verify that it receives sufficient, unobstructed
airflow (CFM) and increase pressure (PSI) output of
regulator up to maximum air pressure rating of tool.
If the tool still does not have sufficient force at
maximum pressure and sufficient airflow, then a
larger tool may be required.
Turn off air compressor. Slowly squeeze the
operating switch to release any remaining air
pressure from Die Grinder. Then disconnect air
hose.
6.3 Practical tips
Exert only moderate pressure on the workpiece, so
that it can be machined at constant speed.
Instead of accelerating your work, high pressure will
cause the drive unit to slow down and even stop.
For your own safety, it is essential to secure small
workpieces with a screw clamp or vise.
Precision work/engraving: Hold the drive unit like a
pen (single-handed).
Rough work: Hold the drive unit like the handle of a
hammer (two-handed).
7. Cleaning and maintenance
Disconnect the compressed air supply from the
equipment before performing any cleaning work.
7.1 Cleaning
Keep all safety devices, air vents and the motor
housing free of dirt and dust as far as possible. Wipe
the equipment with a clean cloth or blow it with
compressed air at low pressure.
We recommend that you clean the device immedi-
ately each time you have finished using it.
7
GB

8
GB
9. Trouble shooting
The following form lists the common operating system with problem and solutions. Please read the form carefully
and follow it.
Warning!
If any of the following symptoms appears during your operating, stop using the tool immediately, or serious
personal injury could result. Only a qualified persons or an authorized service center can perform repairs or
replacement of tool.
PROBLEM POSSIBLE CAUSES SOLUTIONS
Tool runs at
normal speed but
loses under load
Tool runs slowly.
Air flows slightly
from exhaust
Tools will not run.
Air flows freely
from exhaust
Tool will not shut
off
Lubricating clutch housing.
Check for excess clutch oil. Clutch
cases need only be half full. Overfilling
can cause drag on high speed clutch
parts, ie. a typical oiled/lubricated
wrench requires 1⁄2 ounce of oil.
GREASE LUBRICATED.
NOTE: Heat usually indicates insufficient
grease in chamber. Severe operating
conditions may require more frequent
lubrication.
Motor parts worn.
Cam clutch worn or sticking due to
lack of lubricant.
Check air inlet filter for blockage.
Pour air tool lubricating oil into air inlet
as per instructions.
Operate tool in short bursts quickly
reversing rotation back and forth where
applicable.
Repeat above as needed.
Pour air tool lubricating tool into air
inlet.
Operate tool in short bursts of forward
and/or reverse rotation where applica-
ble.
Tap motor housing gently with plastic
mallet.
Disconnect supply. Free motor by
rotating drive shank manually where
applicable
Replace “O” ring.
Motor parts jammed with dirt
particles.
Power regulator in closed position
Air flow blocked by dirt.
One or more motor vanes stuck due to
material build up.“O” rings throttle
valve dislodged from seat inlet valve.
“O” rings throttle valve dislodged from
seat inlet valve.
NOTE: Repairs should be carried out by a qualified person.

9
GB
UKCA-DECLARATION OF CONFORMITY
Herewith we,
ZHEJIANG RONGPENG AIR TOOLS CO.,LTD.
Shuiquetou Village, Pengjie Town, Luqiao District, Taizhou City, Zhejiang Province, China,
318057
Declare that the following Appliance complies with the appropriate basic safety and health require-
ments of the UKCA Directives(see item 4) based on its design and type, as brought into circulation
by us.
This declaration relates exclusively to the machinery in the state in which it was placed on the
market, and excludes components which are added and/or operations carried out subsequently by
the final user.
1. Product: Air Angle Die Grinder
2. Model No.: RP17315
3. Serial number: N/A
4. Applicable UKCA Directives: UK SI 2008 No. 1597( Supply of Machinery(Safety) Regulation 2008)
Used Harmonized Standards: BS EN ISO 11148-9: 2011
5. Responsible for documentation: (Sea&Mew Accounting Ltd, Electric Avenue Vision 25, London,
6. Additional used UKCA Directives: N/A
7. Date/place/Name/Authorized signature 8. Title of Signatory:
2021-9-10/Taizhou/Shen xiaoqi Engineer
Table of contents
Other WorkPro Grinder manuals