Worx Nitro WG855 Series User manual

WG855 WG855.X
P02
P18
P30
2x20VDethatcher
2x20VDethatcher
2x20VDethatcher
EN
F
ES

1
10
2
7
8
3
11
6
13
14
16
17
9
5
4
12
15

A1
A1 A2
A3
A6
A5
2
A4
1
2
A7 B

A1
A1 A2
A3
A6
A5
2
A4
1
2
A7 B
A1
C D
E1
F2
F1
2
E2
F3 G1
G2 H
1
2
1
2
2
1
100%
0%

A1
C D
E1
F2
F1
2
E2
F3 G1
G2 H
1
2
1
2
2
1
100%
0%

A1
I J
K
K2
2
1
1

7
2x20V Dethatcher EN
TABLE OF CONTENT
1. PRODUCT SAFETY
2. COMPONENT LIST
3. TECHNICAL DATA
4. INTENDED USE
5. OPERATING INSTRUCTIONS
6. MAINTENANCE
7. TROUBLESHOOTING
1.PRODUCT SAFETY
WARNING: Some dust created by power
sanding, sawing, grinding, drilling and other
construction activities contains chemicals
known to the State of California to cause cancer,
birth defects or other reproductive harm. Some
examples of these chemicals are:
• Lead from lead-based paints;
• Crystalline silica from bricks and cement and
other masonry products;
• Arsenic and chromium from chemically-treated
lumber.
Your risk from these exposures varies, depending
on how often you do this type of work. To reduce
your exposure to these chemicals: work in a well
ventilated area, and work with approved safety
equipment, such as those dust masks that are
specially designed to lter out microscopic
particles.
WARNING: This product can expose
you to chemicals including lead and
Di(2-ethylhexyl)phthalate (DEHP) which are
known to the State of California to cause
cancer and birth defects or other reproductive
harm. For more information go to www.
P65Warnings.ca.gov.
Important Safety Instructions
WARNING: Read all safety warnings and
instructions. Failure to follow the warnings and
instructions may result in electric shock, re and/
or serious injury
FOR ALL APPLIANCES:
1) Avoid Dangerous Environment - Don’t use
appliances in damp or wet locations.
2) Don’t Use In Rain.
3) Keep Children Away - All visitors should be kept
at a distance from work area.
4) Dress Properly - Do not wear loose clothing or
jewelry. They can be caught in moving parts.
Use of rubber gloves and substantial footwear is
recommended when working outdoors. Wear
protective hair covering to contain long hair.
5) Use Safety Glasses - Always use face or dust
mask if operation is dusty.
6) Use Right Appliance - Do not use appliance for
any job except that for which it is intended.
7) Don’t Force Appliance - It will do the job better
and with less likelihood of a risk of injury at the
rate for which it was designed.
8) Don’t Overreach - Keep proper footing and
balance at all times.
9) Stay Alert - Watch what you are doing. Use
common sense. Do not operate appliance when
you are tired.
10)Store Idle Appliances Indoors - When not in
use, appliances should be stored indoors in dry,
and high or locked-up place - out of reach of
children.
11)Maintain Appliance With Care - Keep cutting
edge sharp and clean for best performance and
to reduce the risk of injury. Follow instructions
for lubricating and changing accessories. Keep
handles dry, clean, and free from oil and grease.
12)Check Damaged Parts - Before further use
of the appliance, a guard or other part that
is damaged should be carefully checked to
determine that it will operate properly and
perform its intended function. Check for
alignment of moving parts, binding of moving
parts, breakage of parts, mounting, and any
other condition that may affect its operation. A
guard or other part that is damaged should be
properly repaired or replaced by an authorized
service center unless indicated elsewhere in
this manual.
FOR ALL BATTERY – OPERATED GARDENING
APPLIANCES:
1. Prevent unintentional starting. Ensure the
switch is in the off-position before connecting
to battery pack, picking up or carrying the
appliance. Carrying the appliance with your
nger on the switch or energizing appliance
that have the switch on invites accidents.
2. Disconnect the battery pack from the appliance
before making any adjustments, changing
accessories, or storing appliance. Such
preventive safety measures reduce the risk of
starting the appliance accidentally.
3. Recharge only with the charger specied by the
manufacturer .A charger that is suitable for one
type of battery pack may create a risk of re
when used with another battery pack.
4. Use appliances only with specically
designated battery packs. Use of any other
battery packs may create a risk of injury and
re.
5. When battery pack is not in use, keep it away
from other metal objects, like paper clips, coins,

8
2x20V Dethatcher EN
keys, nails, screws or other small metal objects,
that can make a connection from one terminal
to another. Shorting the battery terminals
together may cause burns or a re.
6. Under abusive conditions, liquid may be ejected
from the battery; avoid contact. If contact
accidentally occurs, ush with water. If liquid
contacts eyes, additionally seek medical help.
Liquid ejected from the battery may cause
irritation or burns.
7. Do not use a battery pack or appliance that is
damaged or modied. Damaged or modied
batteries may exhibit unpredictable behavior
resulting in re, explosion or risk of injury.
8. Do not expose a battery pack or appliance to re
or excessive temperature. Exposure to re or
temperature above 130°C may cause explosion.
9. Follow all charging instructions and do
not charge the battery pack or appliance
outside of the temperature range specied
in the instructions. Charging improperly or at
temperatures outside of the specied range may
damage the battery and increase the risk of re.
10. Have servicing performed by a qualied repair
person using only identical replacement parts.
This will ensure that the safety of the product is
maintained.
11.Do not modify or attempt to repair the appliance
or the battery pack (as applicable) except as
indicated in the instructions for use and care.
ADDITIONAL SAFETY
WARNINGS FOR YOUR
LAWN DETHATCHER
a) Do not expose the machine to rain or wet
conditions. Water entering the machine will
increase the risk of electric shock
b) Do not use the machine in bad weather
conditions, especially when there is a risk of
lightning. This decreases the risk of being struck
by lightning.
c) Thoroughly inspect the area for wildlife where
the machine is to be used. Wildlife may be
injured by the machine during operation.
d) Thoroughly inspect the area where the machine
is to be used and remove all stones, sticks,
wires, bones, and other foreign objects. Thrown
objects can cause personal injury.
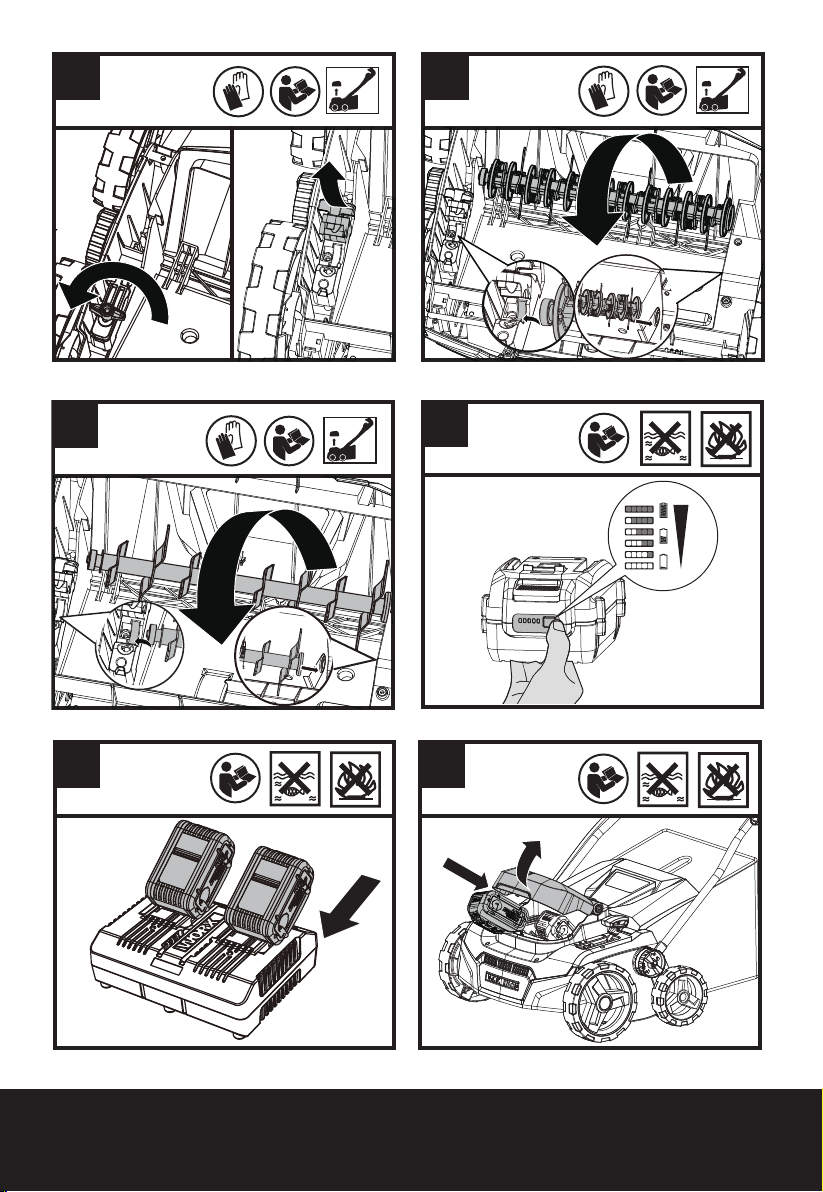
e) Before using the machine, always visually
inspect to see that the tines and the tines
assembly are not worn or damaged. Worn or
damaged parts increase the risk of injury.
f) Check the catcher frequently for wear or
deterioration. A worn or damaged catcher may
increase the risk of personal injury.
g) Keep guards in place. Guards must be in
working order and be properly mounted. A guard
that is loose, damaged, or is not functioning
correctly may result in personal injury.
h) Keep all cooling air inlets clear of debris.
Blocked air inlets and debris may result in
overheating or risk of re.
i) While operating the machine, always wear
non-slip and protective footwear. Do not operate
the machine when barefoot or wearing open
sandals. This reduces the chance of injury to the
feet from contact with the moving tines.
j) While operating the machine, always wear long
trousers. Exposed skin increases the likelihood
of injury from thrown objects.
k) Do not operate the machine in wet grass. Walk,
never run. This reduces the risk of slipping and
falling which may result in personal injury.
l) Do not operate the machine on excessively
steep slopes. This reduces the risk of loss of
control, slipping and falling which may result in
personal injury.
m) When working on slopes, always be sure of your
footing, always work across the face of slopes,
never up or down and exercise extreme caution
when changing direction. This reduces the risk
of loss of control, slipping and falling which may
result in personal injury.
n) Use extreme caution when reversing or pulling
the machine towards you. Always be aware
of your surroundings. This reduces the risk of
tripping during operation.
o) Hold the machine by insulated gripping surfaces
only, because the tines may contact hidden
wiring Tines contacting a “live” wire may make
exposed metal parts of the machine “live” and
could give the operator an electric shock.
p) Do not touch tines and other hazardous moving
parts while they are still in motion. This reduces
the risk of injury from moving parts.
q) When clearing jammed material or cleaning
the machine, make sure all power switches
are off and the battery pack is disconnected.
Unexpected operation of the machine may result
in serious personal injury.
SAFETY WARNINGS FOR
BATTERY PACK
a) Do not dismantle, open or shred cells or battery
pack.
b) Do not expose battery pack to heat or re. Avoid
storage in direct sunlight.
c) Do not short-circuit a battery pack. Do not store
battery packs haphazardly in a box or drawer
where they may short-circuit each other or be
short-circuited by conductive materials.
When
battery pack is not in use, keep it away from other
metal objects, like paper clips, coins, keys, nails,

9
2x20V Dethatcher EN
screws or other small metal objects, that can make
a connection from one terminal to another. Shorting
the battery terminals together may cause burns or a
re.
d) Do not subject battery pack to mechanical
shock.
e) In the event of battery leaking, do not allow the
liquid to come into contact with the skin or eyes.
If contact has been made, wash the affected
area with copious amounts of water and seek
medical advice.
f) Do not use any battery pack which is not
designed for use with the equipment.
g) Keep battery pack out of the reach of children.
h) Always purchase the battery pack recommended
by the device manufacturer for the equipment.
l) Keep battery pack clean and dry.
j) Wipe the battery pack terminals with a clean dry
cloth if they become dirty.
k) Battery pack needs to be charged before use.
Always use the correct charger and refer to
the manufacturer’s instructions or equipment
manual for proper charging instructions.
l) Do not leave battery pack on prolonged charge
when not in use.
m) After extended periods of storage, it may
be necessary to charge and discharge the
battery pack several times to obtain maximum
performance.
n) Recharge only with the charger specied by
Worx. Do not use any charger other than that
specically provided for use with the equipment.
o) Retain the original product literature for future
reference.
p) Use only the battery pack in the application for
which it was intended.
q) Remove the battery from the equipment when
not in use.
r) Dispose of properly.
s) Do not mix cells of different manufacture,
capacity, size or type within a device.
t) Keep the battery away from microwaves and
high pressure.
SYMBOLS
Read operator’s manual
Keep bystanders away.
Batteries may enter water cycle if
disposed improperly, which can
be hazardous for ecosystem. Do
not dispose of waste batteries as
unsorted municipal waste.
Do not burn
Li-I on
Li-Ion battery This product has
been marked with a symbol
relating to ‘separate collection’
for all battery packs and battery
pack. It will then be recycled or
dismantled in order to reduce
the impact on the environment.
Battery packs can be hazardous
for the environment and for
human health since they contain
hazardous substances.
Wear protective gloves.
Remove battery from the
socket before carrying out
any adjustment, servicing or
maintenance.
Blade continues to rotate after
the machine is switched off. Wait
until all machine components
have completely stopped before
touching them

10
2x20V Dethatcher EN
POSITEC Inc. has established
a partnership with the RBRC
Corporation to recycle any
Positec batteries with the
RBRC-call2recycle seal. For
environmental protection, please
do not discard batteries in the
trash. After the batteries’ life
cycle is ended, then please call
1-800-822-8837 for a free service
that will properly dispose of the
battery.
2.COMPONENT LIST
1. OPERATING BAIL
2. START BUTTON
3. HANDLE BAR
4. UPPER HANDLE
5. HANDLE LOCK KNOB
6. LOWER HANDLE
7. GRASS COLLECTION BAG
8. HEIGHT ADJUSTMENT LEVER
9. LOWER HANDLE LOCK COVER
10. BATTERY PACK COVER
11. SAFETY FLAP
12. CABLE CLIP
13 MIDDLE HANDLE
14. POWER CORD
15. TINE LOCK KNOB
16 BLADE CYLINDER
17. TINE CYLINDER
*Not all the accessories illustrated or described
are included in standard delivery.
3.TECHNICAL DATA
Type WG855 WG855.X
(855- designation of
machinery, representative of battery operated
dethatcher)
WG855 WG855.X**
Voltage 40V Max.(2x20V Max.)***
No load speed 3400/min
Dethatching width 36 cm (14”)
Bag capacity
40 L (1.1 bushels)
Heigt adjustment
levers
4(Level +1,Level 0,Level
-1,Level -2)
Level Height
Level
+1
Level
0
Level
-1
Level
-2
+6mm
(+1/4’’)
-3mm
(-1/8’)’
-6mm
(-1/4’)’
-9mm
(-3/8’’)
Machine
Weight(bare tool)
23.06 lbs (10.45 kg)
**X puede ser seguido por uno o dos caracteres.
Todos los modelos son iguales, excepto el número
de modelo y la marca registrada. El sujo en los
modelos puede ser un número del “1” al “999” o la
letra inglesa “A” a “Z” o “M1” a “M9” que signica un
paquete diferente o el Varios accesorios embalados
en el paquete.
*** Voltage measured without workload. Initial
battery voltage reaches maximum of 20 volts.
Nominal voltage is 18 volts.
SUGGESTED BATTERIES
AND CHARGERS
Category Type Capacity
20V Battery WA3012 4.0Ah
20V Charger WA3884 4.0A
We recommend that you purchase your accessories
from the same store that sold you the tool. Refer to
the accessory packaging for further details. Store per-
sonnel can assist you and offer advice.
4.INTENDED USE
This product is intended for domestic lawn
dethatching.

11
2x20V Dethatcher EN
5.OPERATION INSTRUC-
TION
NOTE: Read instruction handbook before
operation this machine.
ASSEMBLY & OPERATION
ACTION FIGURE
ASSEMBLY
Assembling the handles See Fig. A1, A2,
A3, A4, A5, A6, A7
Choosing the appropriate
height of the handles and
assembling the handles.
NOTE: The height of both
sides should be the same.
Attaching the cable clips See Fig. B
Assembling the grass
collection bag
See Fig. C
Assembling the grass
collection bag to the
dethatcher NOTE: Depress
the grass collection bag
slightly to ensure that it is
completely installed.
See Fig. D
Removing/emptying grass
collection bag
WARNING! Always
check the safety
ap close the discharge
outlet before using. Never
lift the safety ap when
the machine is being
used without tted grass
collection bag.
See Fig. E1,E2
Installing the tine cylinder
or the blade cylinder.
See Fig. F1, F2, F3
Checking the battery charge
condition
NOTE: Fig. G1 only applies
for the battery pack with
battery indicator light.
See Fig. G1
Charging the battery pack
NOTE: The batteries are
shipped uncharged. Each
battery must be fully
charged before the rst
mow.
Always fully charge the two
batteries at same time.
More details can be found in
charger’s manual.
See Fig.G2
Fitting the battery pack
NOTE: This machine will
only run when batteries are
installed. It is recommended
to use the same amp hour
batteries and charge the two
batteries at the same time.
When you use two batteries
with different amp hours, the
machine will only run to the
lower common denominator.
See Fig.H
OPERATION
Starting and Stopping
For starting, press both
the Start Button and the
Operating bail at the same
time. And then release the
Start Button
For stopping, release the
Operating bail.
See Fig.I
Adjusting the operating
height
Pull the height adjustment
lever to adjust the working
height.
WARNING! Stop,
release Operating Bail
and wait until the motor
stops before adjusting
height.
Always place in “level +1”
when moving, transporting,
or storing the dethatcher.
The blades continue to
rotate after the machine
is switched off, a rotating
blade can cause injury. Do
not touch rotating blades.
See Fig. J
Storage See Fig. ,K
DETHATCHING TIPS
Your new dethatcher is designed to remove withered grass
and scarify the soil to allow the soil get more nutrients. It
is suggested use tine cylinder to remove withered grass,
and use blade cylinder to scarify the soil. Please review
the following recommendations for optimum dethatching
performance.
1) Avoid dethatching when the grass is wet from
rain or dew. Wet grass may form clumps which
interfere with the dethatching action and reduce
the runtime.
2) For the best dethatching performance, it is
suggested to use lawn mower to mow excess
grass before using the dethatcher.
3) For the best performance, keep the dethatcher

12
2x20V Dethatcher EN
housing free of built-up grass. From time to time
turn off dethatcher and wait for the tine cylinder
and blade cylinder to come to a complete
stop. Then Remove the battery packs and turn
dethatcher on its side. Using an object such as a
stick, wipe out any accumulation of grass around
the area of tine cylinder and blade cylinder. Be
careful of the sharp edges of the tine cylinder
and blade cylinder. Ensure to clean the area often
when cutting wet or new grass and every time
after the machine is used.
4) It is recommended to walk at normal pace, and
not to start/stop the dethatcher too often during
operation.
5) For best performance, please ensure use two
fully charged battery packs at the same time.
6) Choose the tine cylinder or blade cylinder to
operate the machine according to the different
working conditions. Please wear protective
gloves when replacing tine cylinder or blade
cylinder.
7). You will rst need to remove all debris from the
yard, including any sprinkler heads and other
obstacles. Then you will need to mow your
lawn to half of the normal height of your typical
cutting. The lower cut will allow the dethatcher to
work more effectively.
6.MAINTENANCE
WARNING: Stop the dethatcher, remove the batteries
before removing the grass collection bag.
WARNING:Remove battery pack from the machine before
carrying out any servicing ,cleaning or maintenance.
Never use water or chemical cleaners to clean your power
tool. Wipe clean with a dry cloth. Always store your power
tool in a dry place. Keep the motor ventilation slots clean.
Keep all working controls free of dust. If you see some sparks
ashing in the ventilation slots, this is normal and will not
damage your power tool.
Note: To ensure long and reliable service, perform the fol-
lowing maintenance procedures regularly. Check for obvious
defects such as a loose, dislodged or damaged tine cylinder
or blade cylinder, loose ttings, and worn or damaged compo-
nents. Check that the covers and guards are all undamaged
and are correctly attached to dethatcher. Carry out any neces-
sary maintenance or repairs before operating dethatcher. If
the dethatcher should happen to fail despite regular mainte-
nance, please call our customer helpline for advice.
STORAGE (See Fig. K)
Turn the machine on its side and clean the area of tine
cylinder
and blade
cylinder
. If grass cuttings are com-
pacted in the area, remove with a wooden or plastic
implement.
Loosen the knobs and fold the Handle bar.
Store the machine in a dry place. Do not place other
objects on top of the machine.
7.TROUBLESHOOTING
PROBLEM SOLUTION
1. Dethatcher
doesn’t
run when
Operating Bail
is activated.
A. Check to make sure battery
packs have been installed.
B. Release Operating Bail to
turn dethatcher off. Remove
batteries, turn dethatcher over
and check that tine cylinder and
blade cylinder are free to turn. If
not free, return to an authorized
servicer. Tine cylinder and blade
cylinder should turn freely.
C. Has battery been fully
charged? Plug in charger and
wait for green light to come on.
For starting, press both the Start
Button and the Operating bail at
the same time.
(See Fig. I)
2. Motor
stops while
operationg.
A. Release Operating Bail to
turn dethatcher off. Remove
batteries, turn dethatcher over
and check that tine cylinder and
blade cylinder are free to turn. If
not free, return to an authorized
servicer. Tine cylinder and blade
cylinder should turn freely.
B. Has battery been fully
charged? Plug in charger and wait
for green light to come on.
3. Dethatcher
runs but
not working
properly or
performance
is
unsatisfactory.
A. Has battery been fully charged?
Plug in charger and wait for green
light to come on.”
B. Release Operating Bail to turn
scarier/aerator off. Remove
batteries. Turn scarier/aerator over
and check:
-Tine cylinder and blade cylinder for
sharpness - Replace tine cylinder
or blade cylinder as needed if tine
cylinder or blade cylinder is worn or
damaged.
-Deck and discharge chute for
clogging.
C. Operating height is not
appropriate.Adjust the height.

13
2x20V Dethatcher EN
4. Dethatcher
is too hard to
push.
A. Raise height to reduce deck
drag on grass. Check each wheel
for free rotation.
B. Check whether grass is
wrapped on tine cylinder or blade
cylinder, if so, release Operating
Bail to turn scarier/aerator off
and remove battery packs, then
remove the grass. It is suggested
to check whether grass is
wrapped on tine cylinder or blade
cylinder and remove excess grass
before operation.
5. Dethatcher
is abnormally
noisy and
vibrates.
A. Release Operating Bail to
turn dethatcher off. Remove
batteries. Turn dethatcher on side
and check tine cylinder or blade
cylinder to ensure it has not been
bent or damaged. If tine cylinder
or blade cylinder are damaged,
replace with replacement tine
cylinder or blade cylinder. If
the underside of the deck is
damaged return dethatcher to an
Authorized service center.
6. Battery
charger LED’s
not on.
A. Check plug connection.
B. Replace charger.
7. Battery
charger LED
does not ip to
green.
A. Battery needs to be diagnosed.
Take to authorized service center.
8. Dethatcher
not picking
up grass
clippings with
the Grass
Collection
Bag.
A. Chute clogged. Release
Operating Bail to turn dethatcher
off. Remove batteries. Clear
chute of grass clippings.
B. Bag full. Empty bag more
often.
9. Low or
diminished
run-time after
many uses
A. Return to Authorized Service
location - may need new battery.
10. The battery
charger
LED ashes
red and the
battery can’t
be charged.
A. The battery overheats after
continuous use. Remove battery
from the charger and allow it to
cool to 42°C or less.
FOR BATTERY TOOLS
The ambient temperature range for the use and
storage of tool and battery is 0°C-45°C.
The recommended ambient temperature range for
the charging system during charging is 0°C-40°C.
This manual suits for next models
2
Table of contents
Other Worx Nitro Lawn And Garden Equipment manuals