Woxcon WL-HD-02 User manual

WL-HD-02
HDMI 1.4 Wireless Transmission System
All Rights Reserved
Version: WL-HD-02_2020V1.0
User Manual

2
Table of Contents
Product Introduction ........................................................................................................ 3
Features .......................................................................................................................... 3
Packing List ..................................................................................................................... 3
Tec hnical S p eci f i c a t i o n .................................................................................................... 4
Transmitter ............................................................................................................... 4
Receiver ................................................................................................................... 5
Panel Description ............................................................................................................ 6
System Installation .......................................................................................................... 7
System Connection .................................................................................................. 7
Indicator Status ........................................................................................................ 8
Product Pairing ......................................................................................................... 9
Main Screen of Receiver ............................................................................................... 10
Web Setting ................................................................................................................... 11

3
Product Introduction
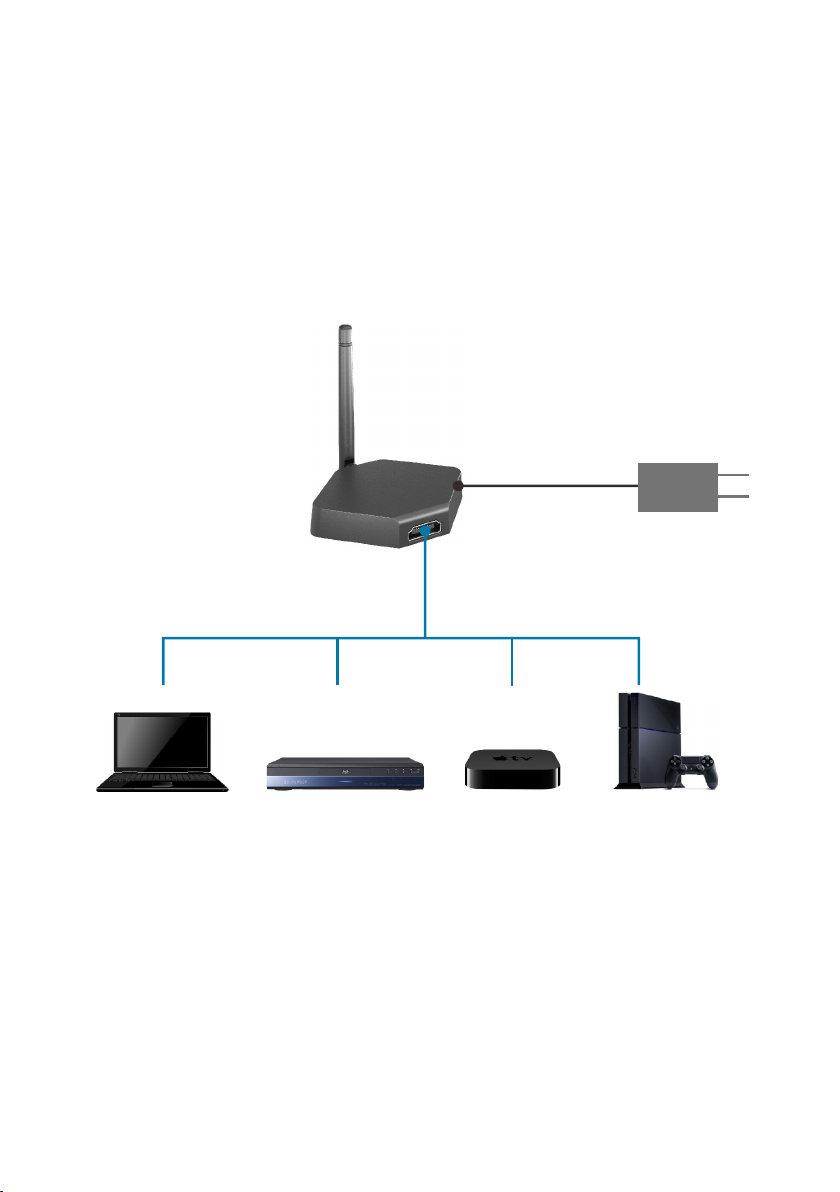
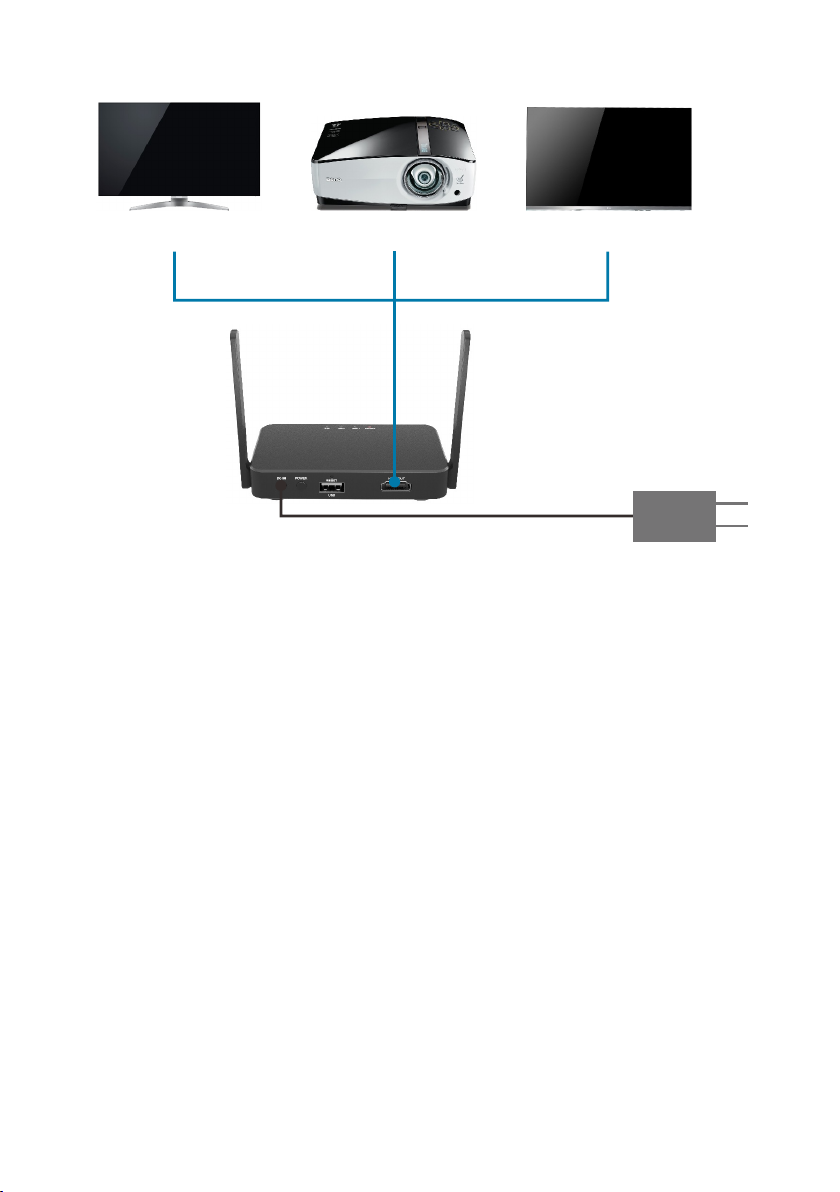
The WL-HD-02 is the powerful but low-cost HDMI 1.4 wireless transmission system
product. It contains one transmitter and one receiver. The receiver is equipped with
802.11ac dual-antenna and Gigabit Ethernet to bring the great connection and smooth
streaming. The system uses wireless high-definition wireless technology to transmit
audio and video signals wirelessly through 5G frequency without uncompressed. The
transmitted video resolution is up to 1080p@60Hz and the transmission distance is up
to 30 meters. The product connection is simple and easy to understand, and the
transmission signal is stable. It is the best choice for wireless audio and video
transmission in the office and home audio-visual systems.
Features
l One-key pairing without any settings. The paired devices do not need to be paired
again, they can be automatically connected after power on (the pairing is already
done at the factory).
l Supports HDMI 1.4 and HDCP 1.4.
l Input video is up to 1080p@60Hz, and output video is up to 4K@30Hz.
l Wireless transmission and the transmission distance is up to 30 meters.
l Supports 3D video transmission.
l High speed 802.11ac Wi-Fi module, up to 866Mbps (5Ghz).
l Supports PNP.
l User-defined main screen.
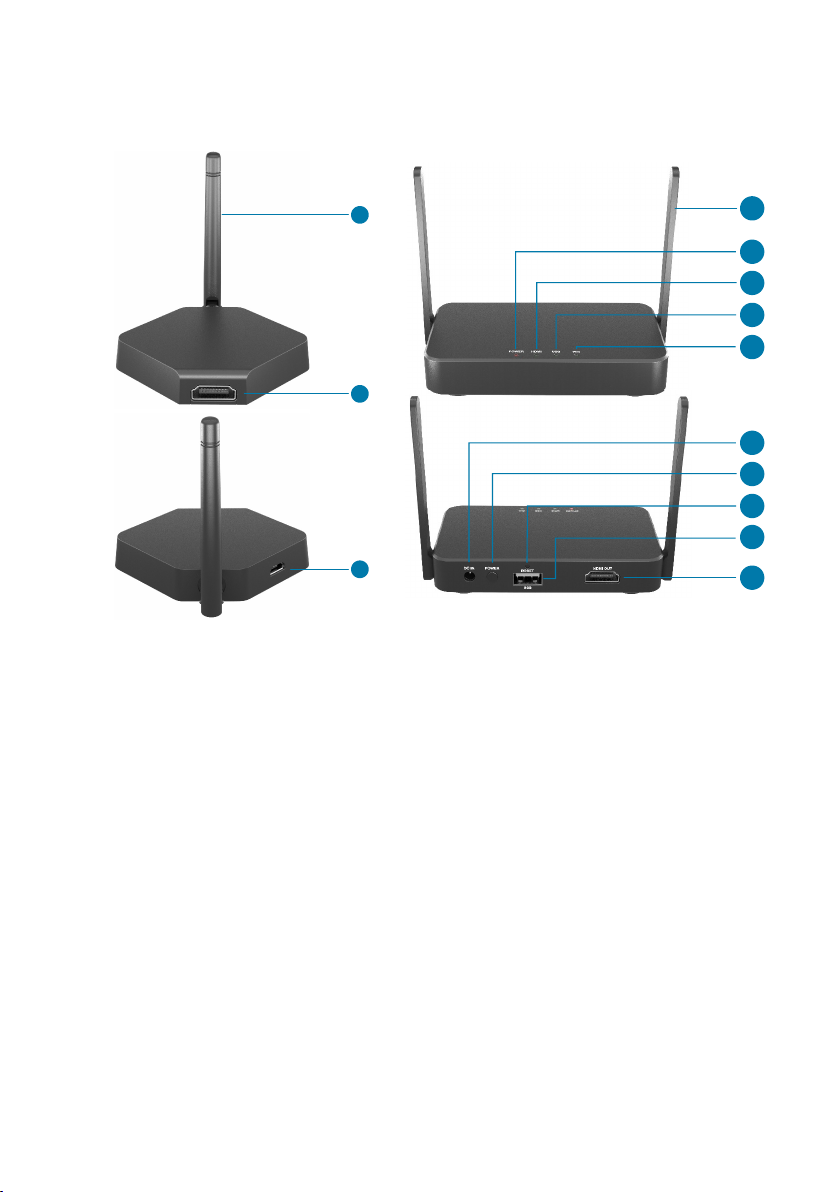
Packing List
l 1x WL-HD-02 Transmitter with external antennas
l 1x WL-HD-02 Receiver with external antennas
l 2x HDMI Cable (1 meter)
l 2x Power Adapter (5V DC)
l 1x User Manual
Note: Please contact your distributor immediately if any damage or defect in the
components is found.

4
Technical Specification
Transmitter
CPU
1Ghz RISC CPU
Tec hnical S t a n dard
WirelessHD1.1
Input Resolution
Up to 1920x1080@60Hz
I/O
l HDMI In
l USB type A male
WLAN Standard
IEEE 802.11a/n/ac, Wi-Fi compliant
Wi-Fi
802.11ac 1T1R, max. bandwidth 433Mbps (5Ghz)
Wi-Fi Frequency
5Ghz: 5.150Ghz~5.825Ghz
Power
DC 5V, 1A
HDCP
HDCP 1.4
LED Indication
Power
Power Consumption
Standby: 2W approx.; Casting: 4.5W approx.
Working Temp.
0 to +40℃ (+32° to +104°F)
Storage Temp.
-20 to +70℃ (-4° to +158°F)
Relative Humidity
10% to 90%, Non-condensing
Dimension (W*H*D)
65mm x 16mm x 65mm
Net Weight
45g

5
Receiver
CPU
1Ghz RISC CPU
Tec hnical S t a n dard
WirelessHD1.1
Output Resolution
Up to 4K@30Hz
I/O
l HDMI out (HDMI1.4)
l USB type A (USB 2.0 for Pairing)
l DC 5V
WLAN Standard
IEEE 802.11ac 2x2, Wi-Fi compliant
Wi-Fi
802.11ac 2T2R, max. bandwidth 866Mbps (5Ghz)
Wi-Fi Frequency
5Ghz: 5.150Ghz~5.825Ghz
Power
DC 5V, 2A
HDCP
HDCP 1.4
LED Indication
Power, HDMI, Wi-Fi status, USB
Key
Reset button
Power Consumption
Standby: 5W approx.; Casting: 7.5W approx.
Working Temp.
0 to +40℃ (+32° to +104°F)
Storage Temp.
-20 to +70℃ (-4° to +158°F)
Relative Humidity
10% to 90%, Non-condensing
Dimension (W*H*D)
120mm x 25mm x 80mm
Net Weight
110g

6
Panel Description
Transmitter
Receiver
1. Antenna
2. HDMI IN: Connects to source
device.
3. Micro USB: Uses for product
pairing and power supply.
1. Antenna
2. POWER LED
3. HDMI LED
4. USB LED
5. Wi-Fi LED
6. DC IN: Connects to power adapter.
7. POWER: Power on the device.
8. RESET: Reboot the device.
9. Type-A USB: Uses for product pairing.
10. HDMI OUT: Connects to display device.
3
2
1
2
3
4
5
6
7
8
9
1
10

7
System Installation
System Connection
Note: This product cannot be used on partition walls. When installing, please make the
front panels of the transmitter and receiver face to face each other, and avoid too many
objects between the two units to avoid blocking the signal.
1. Connect source device to the HDMI input port of transmitter with the HDMI cable.
2. Connect the power adapter to the Micro USB port of transmitter, or connect the
Micro USB port to the USB port of source device with USB cable.
3. Connect display device to the HDMI output port of receiver with an HDMI cable.
4. Connect power adaptor to the DC IN port of receiver.
PC
HDMI Cable
USB Cable
DVD STB PS4
5V1A Power adapter

8
5. After system installing, press the POWER button of receiver, the indicators of two
units change from slow flashing to fast flashing, and finally becomes steady on.
Simultaneously, the video signal of source device will be output and showed on the
display device.
Note:
l The receiver is compatible with VESA mounting screw holes. Please use the 5x5
bracket and M4 screws.
l Due to Wi-Fi signal requires enough space, please DO NOT block the antenna or
mount it behind of TV/Panel.
Indicator Status
l Slow flashing (One second interval): Means searching for devices.
l Flashing: The transmitter and receiver is connected successfully.
l Steady on: The audio and video signals on the input and output are correctly
transmitted.
Monitor
HDMI Cable
USB Cable
DVD TV
5V2A Power adapter

9
Product Pairing
Since the transmitter and receiver are already paired at the factory, there is no need to
match them for the first usage. But if the display device has no images after
connection, the two units needs to be paired again by following the below steps.
1. Directly connect the Micro USB port of transmitter to the Type-A USB port of
receiver with USB cable.
2. Power on the receiver.
3. The display device will show “Pairing…” to start the pairing process.
4. After the pairing is successfully, the display device will show “Pairing OK”.
One receiver can be paired with multiple transmitters, and the switching principle is as
follows:
1. Disconnect: Once removing the current connected transmitter, the receiver will
automatically match the next transmitter.
2. Connect: Once a new transmitter is connected, the receiver will not automatically
match the new transmitter.
USB Cable

10
Main Screen of Receiver
When the Receiver is successfully turned on, the screen will be shown on display:
Icons Description for Function & Link Status:
Note: Outbound link can select only one of Wi-Fi.
Airplay activated after web setting. (Default is off)
The receiver has been powered on, however, there is
neither transmitter nor device linked.
Shift in 3, which means “under pairing” or “building the
connection”.
Completing pairing or connection, the number showed total
transmitter or device linked.
Outbound Wi-Fi disconnected.
Shift in 3, outbound Wi-Fi is connecting.
Wi-Fi SSID & Password
Status Icon
Web Setting IP

11
Outbound Wi-Fi connected with the router name shown
underline.
Wi-Fi connection fail, invalid password or other Errors.
Web Setting
Receiver IP: When Devices (either laptops or mobile phones) connect with Receiver
with SSID and Password directly, applying the IP in web browser can enter Admin
setting page for more advance setting. The SSID and password are shown on the main
screen of display device.
Here takes mobile phone as an example.
1. Connect the mobile phone to the Wi-Fi, and then enter password.

12
2. Type the Web Setting IP in the internet browser, it will enter the main setting page.
l Network Management
1) Select a 5G Internet to connect.
2) Remember Wi-Fi setting.

13
l Device Management
1) Language: Set language for the web page.
2) Resolution: Set the output video resolution
for receiver.
Note: if the source input resolution is
1080p, when set the output resolution to
4K, the system needs to be reboot.
3) Resolution Mode: Only for this connected
display/ For any connected display.
4) Display Mode: Fit to Screen/ Stretch to Full
Screen.
5) Watchdog Timer: ON/OFF
3. Type the default password “000000”, and click “OK” to enter admin setting page.

14
l Wi-Fi Channel: Set the Wi-Fi mode (Country, Channel, Bandwidth).
l SSID: Modify the SSID, hide SSID or not, or turn on/off SSID.
l Password: Modify the password of Wi-Fi SSID, or hide the password setting.
l My Screen: The main screen of receiver can be change by this tab. Prepare the
main screen and then enter the tab to upload it.
l Dynamic Wallpaper: Set dynamic wallpaper.
l Admin Password: The default admin password is “000000”, it can be changed by
this tab.
l Screen Saver: Set the screen saver to OFF, 15 Minutes, 30 Minutes or 1 Hour.
l Upgrade: Upgrade software version.
l Reboot: Reboot the device.
l Reset to Factory Default: Reset the device to factory default.
Table of contents
Popular Microphone System manuals by other brands

Monacor
Monacor DH-95N quick start guide

FITNESS AUDIO
FITNESS AUDIO U Series Wireless Mic System operating manual

HME
HME System 400 operating instructions

Sennheiser
Sennheiser EM 1046 Technische Daten

Pixel
Pixel Voical Air user guide

Beamreach networks
Beamreach networks BeamPlex BRU-100 Installation and Maintenance