X-Vision pro-hd User manual

Professional Full HD IP Camera
Quick Setup Guide
Version 1
Thank you purchasing the XC Camera from Xvision Pro HD.
Please ensure that you read and understand this Quick Setup Guide before operating the camera.
Please store this Quick Guide in an easily accessible location.
HD IP
PRO
PRO
PRO PRO
PRO PRO PRO
PRO PRO PRO
PRO PRO
PRO
Domes
Bullets
Box Cameras
PRO

XC Camera Camera Setup Guide
PRO
2
www.xvision.com
Contents
1. Introducon ........................................................................................... 4
1.1 Package Contents ........................................................................... 4
2. Installaon ............................................................................................. 5
2.1 Pre-requisites ................................................................................. 5
2.2ConneconGuide........................................................................... 6
3. Mounng Camera Guide ......................................................................... 7
3.1 Domes ............................................................................................ 7
3.2 Bulllets ............................................................................................ 8
4. Xvision Pro IP Device Search Tool ............................................................ 12
4.1Windows........................................................................................ 12
5. Network Setup ....................................................................................... 13
5.1Windows........................................................................................ 13
6. Accessing The XRN/XC via IE ................................................................... 15
7. FAQ’s ...................................................................................................... 19

XC Camera Camera Setup Guide
PRO
3
www.xvision.com
Safety Precauons
1. Do not install the equipment in an environment with too much moisture, dust or smoke dust as this
may result in re or electric shock.
2. In the unlikely event that the equipment should malfuncon and emit an abnormal smell or smoke,
please immediately stop it, shut o the power and contact your supplier.
3. Please do not place this equipment near a heat source to avoid risk of re.
4. Please do not store, install and use this product in danger areas with inammable or explosive
substances.
5. Please make sure the power is turned o when installing the product.
6. Please ensure that you install the camera in an area with good venlaon.
7. When installing the camera, please make sure that it does not face any objects giving out strong lights
as this will damage the CCD of the camera.
8. Please do not use the camera in an environment where temperatures that exceed either -20°C to
+55°C.

XC Camera Camera Setup Guide
PRO
4
www.xvision.com
ThisManualwillcoverthefollowing:
• InstallofXCCameras
• Basicsengsetup
• FindingafreeIPaddress
• SenganIPaddress
• AcveXControls
• ViewingonIE
1. Product Overview
1. Introducon
XC Camera Soware CD
Itisrecommendedthattheunitsbesetupandtestedbeforebeingmountedorinstalled.
PleasenotethatasofFebruary2014alloftheXRN/XCunitsonlysupportInternetExplorerandtheCMS
soware.Thenewrmwareisininthenalbetastagestosupportallbrowsers,thiswillbeavailableon
ourwebsiteandwillalreadybeloadedtocameraspurchasedinMay2014.
Theseinstruconsareforguidanceonlydetailedinformaonisinaccordancewiththeproduct.
Theinstruconsmayincludesometechnicalinaccuraciesortypographicalerrors,thesewillbecorrectedin
futureupdates.
Theproductorproceduresdescribedintheinstruconsmaybechangedorupdatedatanymewithout
priornoce.
Screenshotsusedintheinstruconareonlyforindicaonsandexplanaons.
1.1 Package Contents
*Cameramodeland
stylemaydier
Installaon Pack
*Contentsofpackwillvary
dependingonmodelandstyle
ofcamera
User Manual

XC Camera Camera Setup Guide
PRO
5
www.xvision.com
1. Product Overview
2. Installaon
Checkyouhaveeverythingshowninthecontentspage,ifyoudonotpleasecontactyoupleaseof
purchase.
Notebeforeyoubegininstallaon:
• ConnectonlyoneXCIPcameraatametoyourLAN,asallcamerassharethesamedefaultIP
192.168.1.188
• ScrewDrivers
• Router/Switch/HubforyourLAN,thisisneededtoconnectallNetworkIPequipmenttogether.
• AWindowsPC/LaptoponsiteconnectedtothesameLAN(Router/Switch)asyourequipment.
• Cat5PatchcablestoconnectyourXCandRouter/Switchalltogether
2.1 Pre-requisites
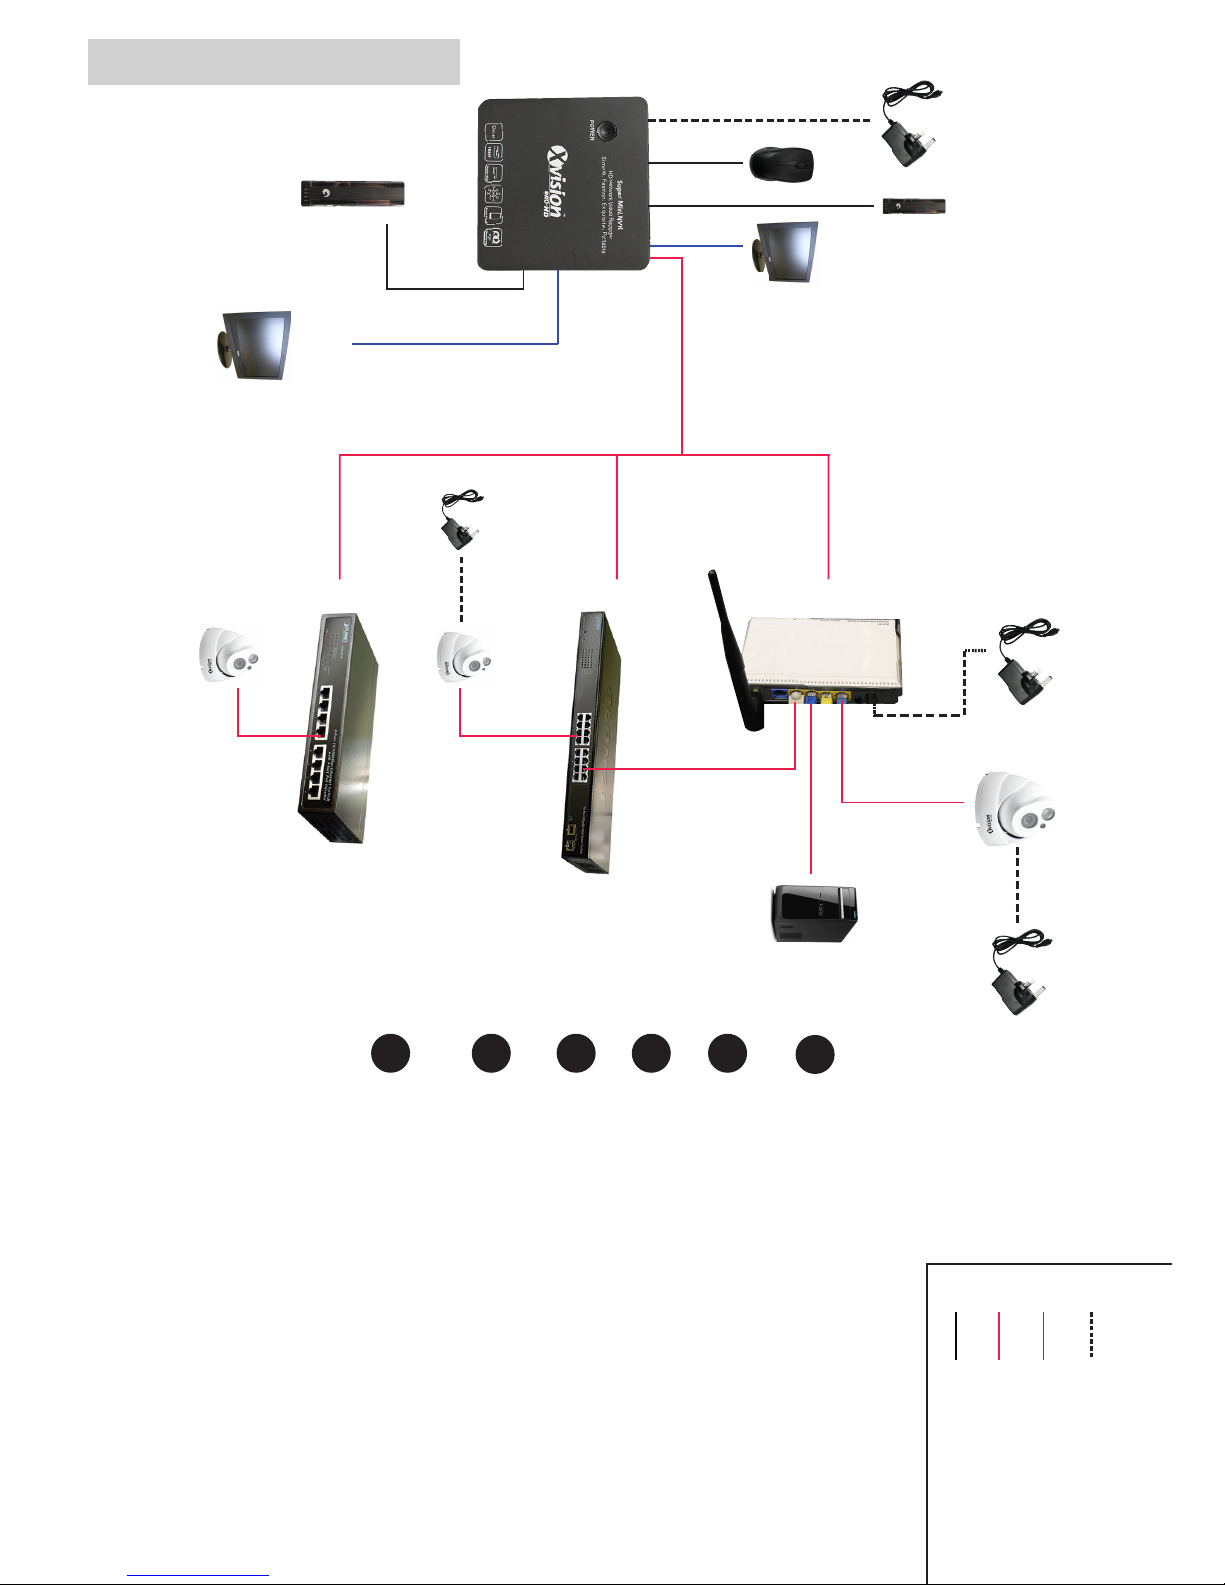
2.5 Connection Guide
USB
Mouse*
PSU
HDMI to
Monitor*
HDD
USB2.0*
Router
Network
Switch
PoE Switch
PSU XC Camera
Windows
PC/Laptop*
LAN
VGA
to Monitor*
HDD
ESATA*
XC Camera
Optional**
** If adding more than one XRN/XC device
XC Camera***
*** XC1080 range PoE. XC720 requires a PoE splitter/injector/PSU
PSU
Network Cable
* Required but not supplied
Optional**
1Connect either your VGA*/HDMI*cable to your XRN
and the other end of the cable to your monitor.
2
Place the Ethernet (CAT 5) patch cable next to your
XRN and then the other end to your Switch*/Router*.
Please remember not to plug into your XRN unit yet.
3Next plug in the Mouse*to one of the 2 available USB
ports.
4Next, plug in you’re chosen recording hardware
either ESATA*or USB2.0 HDD*.
5To power the unit, connect the PSU to the micro USB
on the XRN.
6
Finally, turn your power source on, press the
button on the top of the XRN0808E marked ‘Power’.
For the other XRN there is an on/o at the back
of the units.
Instructions
Scenario 1
*
Scenario 2
Scenario 3
PSU
Key:
Power Supply
VGA or HDMI Cable
Network Cable
USB Cable

XC Camera Camera Setup Guide
PRO
7
www.xvision.com
1. Product Overview
3. Mounng Camera Guide
TheXCcamerascanbewallorceilingmounted,sotoinstallthecamerayouwillneedtoadjustittothe
desiredangle.TheXCrangeconsistsofbullets,minidomes,vandaldomesandspeeddomes.Belowyou
willseehowtoinstalleachcameratype.
5.Screwthecamerabaseintothewallorceiling.
2.Usethecamerabaseasatemplateandmark
outtheholesinthewall/ceilingwhereyouwishto
install the camera.
4.Takethebaseandfeedthroughthecamera
wires.(Youcandrillaholethroughthecentreand
feedthewiresthroughthewall/ceiling.Butforthis
examplewehavejustfedthroughthebaseforthe
cabletobeexternal).
1.Firstly,unscrewthebaseofthecameraby
holdingtheboomandmovingthering
an-clockwise.
3.1 Domes
ThebelowexampleusestheXC720VCamera.
3.Getthecorrectdrillbitforthetypeofwallyou
aredrilling,thendrilltheholesinthewalland
insertthewallplugsintotheholes.
6.Screwthebracketandcamerabackontothe
basebyturningtheringclockwise.Pleasedon’t
ghtencompletelyifyouwishtochangethe
camera angle.

XC Camera Camera Setup Guide
PRO
8
www.xvision.com
7.Adjustthecameraangletothedesiredview. 8.Tightenthebracket,andsecureusingthethread
screwsprovidedintheinstallaonpack.

XC Camera Camera Setup Guide
PRO
9
www.xvision.com
1.Firstly,exposethescrewholeatthebaseofthe
camera,bypushingintheclip(shownbelow)and
twisngthebaseaway.
2.Usethebaseasastenciltodrillholesintothe
wall.
Domes Connued
ThebelowexampleusestheXC1080DPCamera.
5.Oncescrewedinandwiresfedthrough,screw
thecamerabackontothebase.Todothis,twist
thehousingclockwiseontothebaseunlyouhear
itclickintoplace.
6.Now,youcanadjustthecameraangletogetthe
desiredview.Todothis,turnthedomecover
an-clockwiseunlitbecomeslose.Thenadjust
thecameraandre-aachthedomecoverby
twisngclockwise.
3.Feedthewiresthroughthebaseofthecamera.
Ifyouwanttofeedthewiresthroughtheoutside
ofthecamera,youwillneedtobreakthesideof
thecamerabase(ShownBelow).
4.Iffeedingthroughthewallorceiling,drillahole
forthewirestogothrough.

XC Camera Camera Setup Guide
PRO
10
www.xvision.com
3.2 Bullets
5.Toturnthecamera180°,youwillneedtoloosen
thescrewholdingthebrackettothecamera.
1.Placetheinstallaonstencilonthedesired
installaonareaanddrillthroughthestencilholes.
Theninsertthewallplugsintotheholes.
4.Toadjustthecameraangle,loosenthebracket
ofthecamerawiththeallenkeyprovided.
ThebelowexampleusestheXC720BCamera.
3.Whenthebracketanglehasbeenadjustedand
holesdrilled,putthescrewsthroughtheholesin
thebracketandscrewinthewall.
2.Ifyouwishtorunthecablethroughthewallor
ceiling,youwillneedtodrillaholeforthewires
togothrough.Ifoutside,youcanrunthecable
throughthebracketasshownbelow.
This manual suits for next models
1
Table of contents
Other X-Vision IP Camera manuals

X-Vision
X-Vision VIS449EX User manual

X-Vision
X-Vision XPB731WIR-2 User manual

X-Vision
X-Vision XIR504 Guide

X-Vision
X-Vision X2C4000BP User manual

X-Vision
X-Vision XP5000T User manual

X-Vision
X-Vision X720B User manual

X-Vision
X-Vision X101T User manual

X-Vision
X-Vision XPB621 User manual

X-Vision
X-Vision X2C4000 User manual

X-Vision
X-Vision Pro HD User manual


