XAG ACS2 User manual

ACS2 Control Stick
User Manual
EN
Version AU V1.0


To Users
Dear user, thank you for choosing XAG products.
For safety reasons and the best experience possible, XAG recommends that
you read through the Module Assembly & Maintenance Manual and Disclaimer
in this document before attempting to use the P-Series Agricultural UAVs.
Contact Us
If you have any questions about this document, please contact our Technical Support via email:

List of Items 5
Remote Controller Overview 6
Using the Remote Controller 8
Inserting SIM Card 8
Charging the Remote Controller 9
Turning the Remote Controller ON/OFF 10
Connecting to Remote Controller 11
Hotspot Settings 12
Firmware Update 13
Remote Controller Status Indicator Description 15
Indicator - Battle Level 15
Indicator - Smart Device Connection 15
Indicator - Smart Device Connection 16
Indicator - Control Status 16
Indicator - Flight Status 16
Indicator - RTK Status 16
Controls 17
UAV 17
TAKE-OFF / LAND 17
Altitude Control 17
Return to Home (RTH) 17
Motion Control 18
Hover / Switch Mode 18
Speed Control 18
Spray / Spread Control 19
Terrain Button 19
UGV 20
Unlock / Unpark 20
Motion Control 20
Control Mode 20
Speed Control 21
Smart Mode 21
Cruise Control 21
Technical Specifications 22
Disclaimer 23
Warning 23

5
XAG AUSTRALIA
List of Items
Please carefully check if the product contains all the items listed below and your dealer if
there are any missing items.
ControlStick (Body)
× 1
USB To Type-C
Cable
× 1
Type-C To Type-C
Cable
× 1
Micro USB To Type-C
Cable
× 1

XAG AUSTRALIA
Remote Controller Overview
The main structural components of the ACS2 Remote Controller are as follow.
01
06
05
02
04
03
10
09
08
07
15
14
11
13
12
16
LED – Battery Level
LED – Smart Device Connection
LED – Device (UAV/UGV) Connection Indicator
LED – Control Status
LED – Flight Status
LED – RTK Status
Heat Sink
Spray/Spread +
Spray / Spread Button
Spray/Spread –
Speed +
Speed Broadcast Button
Speed –
Button A
Smart Mode Button
Button B
17
18
19
20
22
21
23
24 25
17
18
Yaw Control – Left
Yaw Control – Right
19
20
Terrain Button
RTH Button
21
22
Directional Control - Forward
Directional Control – Sideway Right
23
24
Directional Control - Backward
Directional Control - Sideway Left
25 Hover Button
26 Power Button
27 Nano SIM Slot
28
29
Altitude +
Altitude –
30 Power Port
Rear View
Front View
Bottom View

7
XAG AUSTRALIA
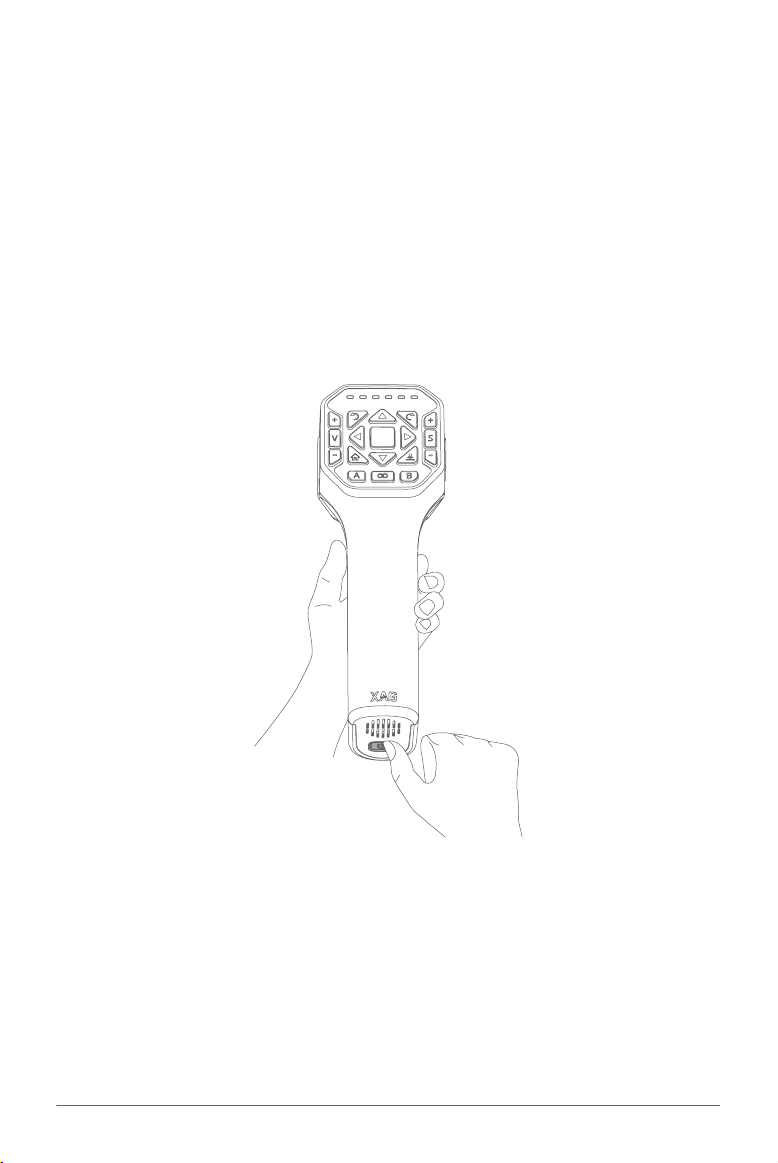
LED – Battery Level Indicates the Battery Level of the Remote Controller
LED – Smart Device Connection Indicates whether the remote controller is connected to Smart
Device
LED – Device (UAV/UGV)
Connection Indicator
Indicates whether the remote controller is linked to the UAV/UGV
LED – Control Status Indicates the Flight mode of the Device (Manual / Autonomous)
LED – Flight Status Indicates the Flight mode of the Device (Autonomous / Manual)
LED – RTK Status Indicates the RTK Status of the Remote Controller
Heat Sink Used to dissipate heat from internal Components
Spray/Spread + Increase the rate of Spray / Spread
Spray / Spread Button Press to Enable / Disable Spray or Spread
Spray/Spread – Decrease the rate of Spray / Spread
Speed + Increase Speed
Speed Broadcast Button Press to broadcast the current Speed
Speed – Decrease Speed
Button A Records Point A of the Operation route
Smart Mode Button Used to enable Advanced Functions
Please refer to Operating Handbook for Advance Function
Button B Records Point B of the Operation route
Yaw Control – Left Rotate Device CCW (Counter-Clockwise)
Yaw Control – Right Rotate Device CW (Clockwise)
Terrain Button UAV: Used to Broadcast and Turn ON/OFF Terrain Following
RTH Button UAV: Press and Hold this RTH button to initiate Return to Home (RTH)
UGV: Double Press this RTH Button to Enable/Disable Follow-me
Mode
Directional Control – Forward
Directional Control – Sideway Right
Directional Control – Backward
Directional Control – Sideway Left
Hover Button Press to Hover or Enter Autonomous Operation
Power Button Used to turn the remote controller ON / OFF
Nano SIM Slot Provides Cellular connection
Altitude + Increase Altitude
Altitude – Decrease Altitude
Power Port Connects to a power source to charge the Remote Controller
01
02
03
04
05
06
07
08
09
10
11
12
13
14
15
16
17
18
19
21
22
23
24
20
25
26
27
28
29
30

XAG AUSTRALIA
Using the Remote Controller
Inserting SIM Card
SIM Card Cut-Corner
Chip Side
1. Before inserting the nano-SIM Card, please ensure the remote controller is turn OFF
2. Gently unplug the rubber plug on the left of the Remote Controller
3. Insert the nano-SIM card in as the direction shown in the figure
4. Close and Secure the Rubber Plug
ACS2 uses a nano-SIM. Damages caused by the use of other specifications of SIM
will be beared by user
Warning

9
XAG AUSTRALIA
Charging the Remote Controller
Indicator Description
Quick Charging
Standard Charging
Charging Mode
Indicator Description
Green 60% - 100%
Yellow 30% - 60%
Red < 30%
Battery Level
Uses a Type-C USB Cable to connect the Charging Adapter and the Remote Controller Power Port.
The Battery Level and the mode of charging is indicated by the Battery Level Indicator

XAG AUSTRALIA
Turning the Remote Controller ON/OFF
TURN ON
1. Press and Hold the Power Button until all the indicators flash simultaneously
2. Release and then Press and Hold the Power Button again until a Broadcast is heard from the
Remote Controller
TURN OFF
1. Press and Hold the Power Button until all the indicators flash simultaneously
2. Release and then Press and Hold the Power Button again until all indicators are off

11
XAG AUSTRALIA
STEP 3 - Open the XAG App, and confirms your
Smart Phone / Tablet is connected to
the ACS2
[ ](The Icon turns green)
Connecting to Remote Controller
STEP 1 - Open your Wi-Fi Settings on your Smart
Phone / Tablet
STEP 2 - Refresh and Connect to the Hotspot of
the ACS2 Remote Controller
• Default Hotspot Name:
ACS2_XXX
• Default Password:
20070401
Please keep the Smart Phone / Tablet at a minimal distance of 20cm away from the ACS2 Remote
Controller to prevent signal interference
🧷IMPORTANT

XAG AUSTRALIA
Hotspot Settings
STEP 1 - Open XAG APP and tap on the Icon [ ]to open Remote Controller Module Page
STEP 2 - Select Hotspot Setting
STEP 3 - Edit and save the new Settings
1
01 2
02 32
03

13
XAG AUSTRALIA
Firmware Update
4
04
3
03
2
02
STEP 1 - Open XAG APP and tap on the Avatar to Open
the Menus
STEP 2 - Tap on “Devices”
STEP 3 - Tap on the Device to expand the Menu
STEP 4 - Tap on the [ICON] for Firmware Update page
The Avatar
2
01

XAG AUSTRALIA
05 3 4
06 07
STEP 5 - Tap & Select the Available Firmware and select “UPDATE”
STEP 6 - Firmware will be automatically downloaded and transferred to the Remote Controller
STEP 7 - Once the transferred is completed, Instruction will be provided to restart the Remote
Controller
• During the Firmware update progress, do not power off the device or disconnect the Remote
Controller from the Smart Device
• If there is a notification that transfer failed, please restart the update procedure
• When the Remote Controller is being updated from the APP, please ensure there are sufficient
data and cellular connectivity
🧷IMPORTANT

15
XAG AUSTRALIA
Remote Controller Status Indicator Description
Indicator - Battle Level
Indicator Description
Green 60% - 100%
Yellow 30% - 60%
Red 10% - 30%
Red (Flashing) < 10%
When the ACS2 Remote Controller is ON, Battery Level can be observed by its Indicator Colour
No. of Indicator Battery Level
1 Green light <5%
2 Green light 5% - 20%
3 Green light 20%-40%
4 Green light 40%-60%
5 Green light 60%-80%
6 Green light 80%-100%
When the ACS2 Remote Controller is OFF, Battery Level can be observed by pressing the Power button once
Indicator - Smart Device Connection
Indicator Status
Green Smart Device Connected
OFF Smart Device Not Connected

XAG AUSTRALIA
Indicator - Smart Device Connection
Indicator - Control Status
Indicator - Flight Status
Indicator - RTK Status
Indicator Status
Green Device (UAV/UGV) Connected
OFF Device (UAV/UGV) Not Connected
Indicator Status
Green Autonomous Mode
OFF Manual Mode / No Device
Indicator Status
Green Manual Mode
OFF Autonomous Mode / No Device
Indicator Status
Green (Flashing) Float
Green RTK
Yellow RTK Module Standby Mode
Red Abnormal Module
OFF RC has no RTK Module

17
XAG AUSTRALIA
Controls
UAV
TAKE-OFF / LAND
If any of the button is released within 3 seconds, the command will
be cancelled
🧷IMPORTANT
Altitude Control
Press & Hold the Altitude + Button
Press & Hold the Altitude - Button
The safety distance of the UAV is 2 meters above ground; UAV
will not be able to descent once it reaches the height of 2 meters
above ground
🧷IMPORTANT
Return to Home (RTH)
• Press and Hold the RTH Button to command the UAV to
return to Take-off-Point
TAKE-OFF: Press and Hold both Altitude Control
Buttons for 3 Seconds, the UAV will
automatically take off to a height of 2.5
meters and hover
LAND: Press and Hold both Altitude Control
Buttons to command the UAV to land

XAG AUSTRALIA
Motion Control
Hover / Switch Mode
Hover: Press the Hover Button to command the
UAV to Hover
Switch Mode: Press and Hold the Hover Button
to switch Mode. The ACS2 Remote
Controller will exit Manual Control and
enter Autonomous Mode, the Controller
will also broadcast Autonomous Mode
Speed Control
Broadcast: Press the Speed Broadcast Button once
to broadcast the current Speed
Increase Rate: Press the Speed + Button to increase the
Flight Speed by 0.5m/s
Decrease Rate: Press the Speed - Button to decrease
the Flight Speed by 0.5m/s
The Maximum Flight speed of the UAV with Obstacle detection is
0.5m – 6.0m/s
🧷IMPORTANT
Move the UAV Forward
Move the UAV Backward
Move the UAV Sideway to the Left
Move the UAV Sideway to the Right
Rotate the UAV Counter-Clockwise (CCW)
Rotate the UAV Clockwise (CW)

19
XAG AUSTRALIA
Spray / Spread Control
Enable/Disable: Press the Spray/Spread Button to turn
on/off the Spraying / Spreading
Increase Rate: Press the Spray/Spread + Button to
Increase the Dosage Rate of Spray/
Spread
Decrease Rate: Press the Spray/Spread + Button to
decrease the Dosage Rate of Spray/
Spread
Terrain Button
Broadcast: Press the Terrain Button Once to
broadcast the current Mode (GPS Height
/ Terrain Follow)
Switch Mode: Press the Terrain Button Twice to switch
between GPS Height and Terrain Follow

XAG AUSTRALIA
UGV
Unlock / Unpark
Vehicles with deactivated parking can be moved freely by pushing
or pulling
Atten
Unlock: Press and Hold both Altitude Control
Buttons for 3 Seconds to Unlock the
Vehicle
Unpark: After unlocking the vehicle in Manual
Mode, Press and Hold the Altitude -
Button for 1.5 Seconds to deactivate
Parking
Press to drive the Vehicle Forward
Press to drive the Vehicle Backward
Rotate the Vehicle Counter-Clockwise
(CCW)
Rotate the Vehicle Clockwise (CW)
Motion Control
Control Mode
Autonomous: Press and Hold the Hover Button to enter
Autonomous Mode
Manual: Press any Motion Control button to exit
Autonomous Mode for Manual Control
Table of contents
Other XAG Remote Control manuals