manuals.online logo
Brands
  1. Home
  2. •
  3. Brands
  4. •
  5. xelux
  6. •
  7. Motorcycle Accessories
  8. •
  9. xelux enduro User manual

xelux enduro User manual

R
A C T I V E E Y E P R O T E C T I O N
R
A C T I V E E Y E P R O T E C T I O N
Instruction Manual
www.xelux.ch
enduro
Welding Helmet
Schweisserschutzmaske
SCHWEISSEN IN FARBE
R
A C T I V E E Y E P R O T E C T I O N
castelberg design gmbh | Räffelstrasse 29 | 8045 Zürich | Switzerland | 2020
Instruction Manual
Warning
The welding helmet XELUX enduro is intended to use for arc
welding exclusively. Arc welding without safety equipment is
dangerous and can lead to inammation of the cornea as well as
cataract cataract (clouding of the lens in the eye). The welding
helmet XELUX enduro must be used together with an appropriate
welding lter. Set up your work place accordingly. Make sure to
have proper lighting, ventilation and re safety as well as a solid
stance.
Please read the instruction manual before rst use.
This personal protective equipment (PPE) is complies with EU
regulation 2016/425, with effect from April 21, 2018.
Characteristics
CE certied according to EN175.
Maximum head coverage with minimum weight.
Front window 90 x 110 mm.
No metal parts.
Ergonomic design for ideal balance, fume deection and air ex-
change.
Application
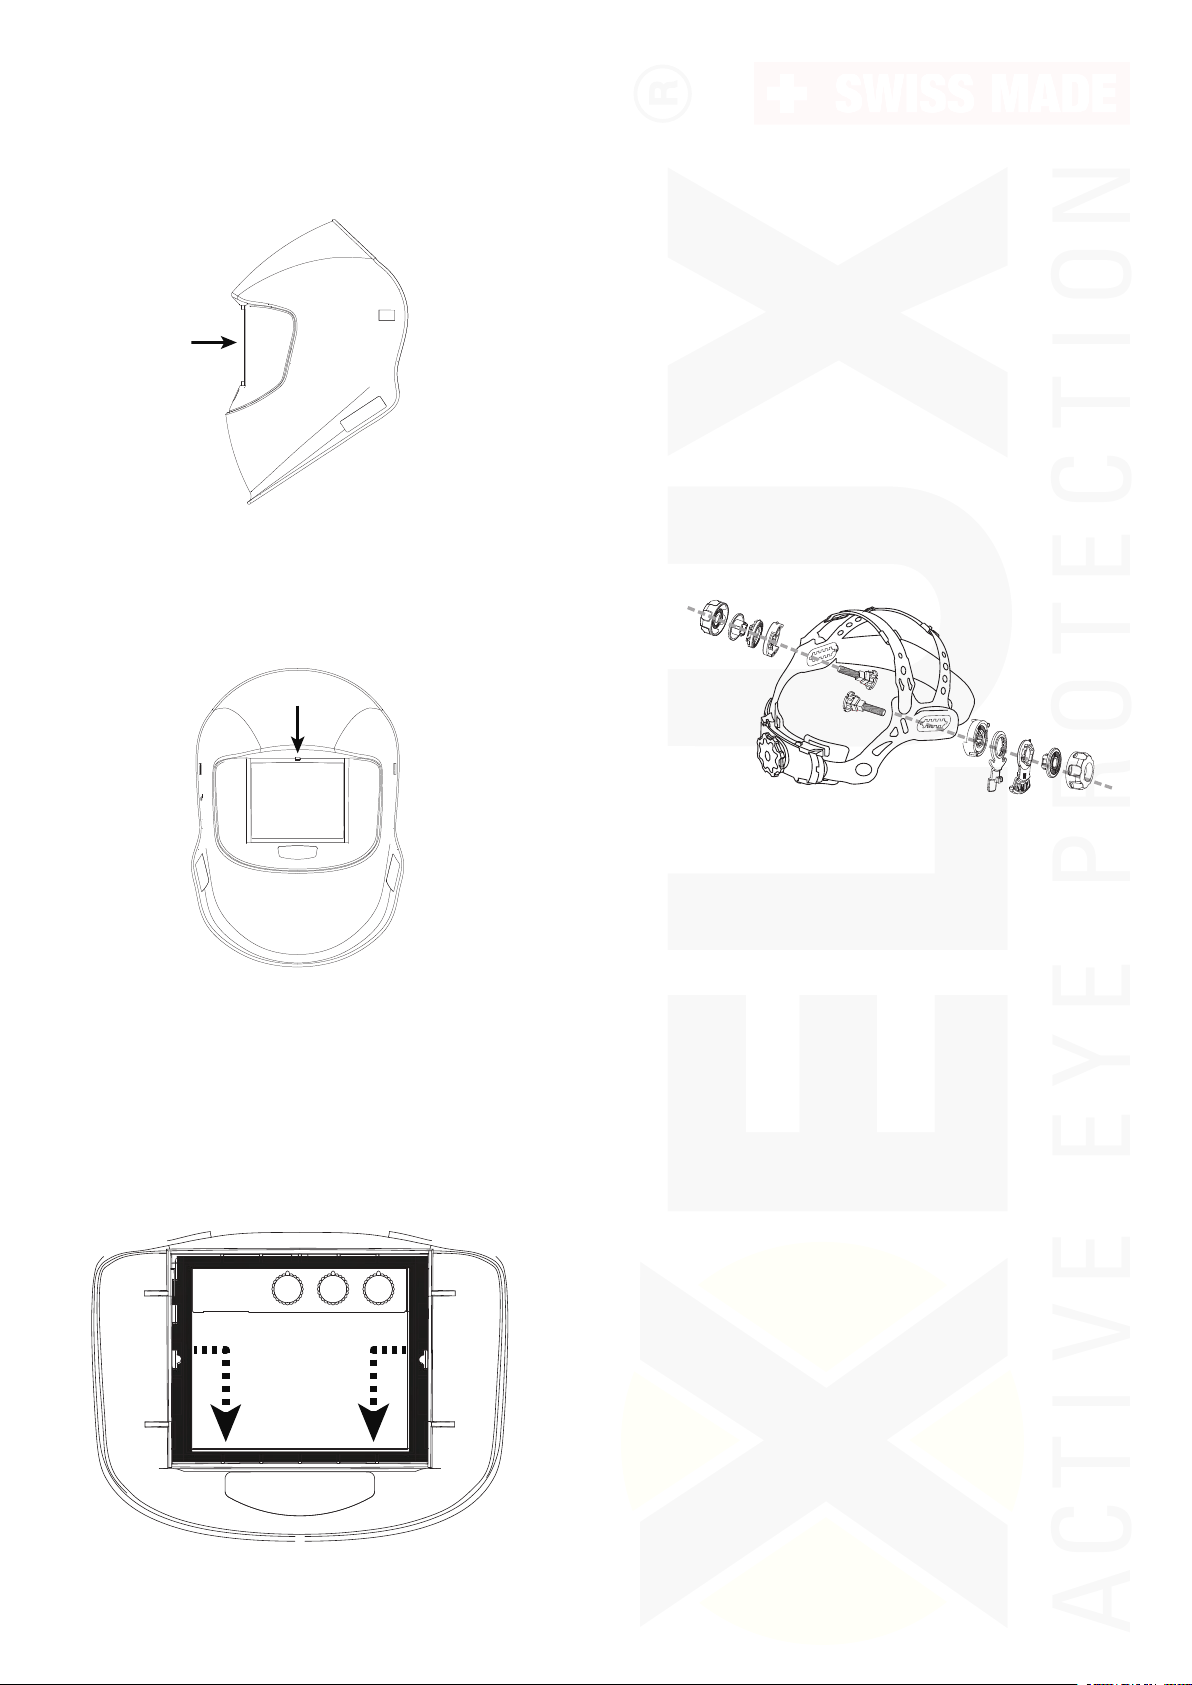
Check that all parts of the welding helmet XELUX enduro are cor-
rectly assembled, especially the protection plates of the lter. Make
sure that an autodarkening welding lter is in place, and that it is
CE certied according to EN379 for autodarkening welding lters or
EN166/EN169 for glass lters.
The external protection plate (110 x 90 mm) in front of the lter pro-
tects against splatters, fumes and heat. Additionally, it also protects
the user against possible impacts of particles. All protection plates
should be CE certied and should be marked accordingly to EN166.
The inner protection plate (110 x 65 mm or 110 x 90 mm) protects both
the inside of the lter and the user in case of breakage of the lter.
In order to adapt the headgear to your head, you can adjust it in
height, you can move it forward and backward with the upper and
side adjustment options. To adjust the head circumference, use the
rear ratchet button.
The side stopper makes sure the welding helmet XELUX enduro does
not exceed its intended top and bottom positions.
Technical specication
Helmet material: Polyamide (PA)
Headgear material: Polyethylene (PE), skin friendly and safe.
Sweatband material: Polyester, foamed and skin friendly.
Total weight: 375 g with headgear
Melting point: >200°C
Dimension outer protection plate: 90 x 110 mm
Dimension inner protection plate: 65 x 110 or 90 x 110 mm
Standards: EN175 – EN166
Warranty: 36 months from date of purchase
Lifetime: min. 8 years
Marking CE – Standards – Notied Body
CAS – EN175 9 F W CE
CAS = Manufacturer
EN175 = EN standard
9 = protection against molten metal and hot solids
F = protection against high speed particles
W = stability to water immersion
CE marking
Manufacturer: castelberg design gmbh, Räffelstrasse 29, 8045 Zü-
rich, Switzerland
Notied Body: Certottica SCRL, Zi Villanova, I-32013 Longarone BL
The declaration of conformity can be found on our website: www.
xelux.ch
Maintenance, lifetime, storage and warranty
Helmet and headgear can be cleaned with a mild detergent and wa-
ter. You are not supposed to use any type of solvent since they could
affect the resistance of helmet and headgear.
To disinfect use a common disinfectant and a towel. Make sure
cleaning liquids are applied to the towel, not directly to the welding
helmet.
Sweatband should be washed or replaced at appropriate intervals
for sanitary reasons. Hand wash at max. 50ºC with a mild detergent
and rinse thoroughly. Do not machine dry.
Filter and protection plates should be cleaned with a non-abrasive
cloth or microber cloth.
In order to offer maximum protection both for the lter and the user,
the protection plate should be checked regularly.
Being exposed to splatters, heat and fumes, it should be replaced as
soon as visual defects can be noticed (deformation, scratches).
If you use an inside protection plate this should be replaced as well
if it is dirty or scratched.
Obstructed vision will stress the user and can cause eye fatigue and
headaches.
Due to the selection of materials used for the manufacturing of the
helmet and its components, there is no limitation in the time of usa-
ge. If handled properly, only protection plates and sweatband will
need regular replacement.
The welding helmet XELUX enduro should be stored at temperatures
from -10°C to 40°C+ and at a relative humidity below 80 %. Avoid
moisture and sunlight. Storage in conjunction with acids, alkalis, oils
and organic solvents is dangerous.
Manufacturer warranty for material and manufacturing errors is 36
months. Damages that result from physical abuse of the product are
not covered by the warranty. Warranty only applies for the descri-
bed use case and only for unmodied products. Besides warranty
claims, no other damages will be covered.
R
A C T I V E E Y E P R O T E C T I O N
castelberg design gmbh | Räffelstrasse 29 | 8045 Zürich | Switzerland | 2020
Replacement of the outer protection plate
Remove the outer protection plate by inserting a ngernail at the
top center part.
Bend the new protection plate lightly and place it in the two lateral
grooves
Replacement of the inner protection plate and lter
Remove the tensioner (black frame). Remove the protection plate
to be replaced and insert a new one. Attach the tensioner (black
frame) to the desired groove with the bend down towards the lter.
For safety reasons, you must use an inner safety shield, unless the
lter is certied as break resistant.
Replacement of headgear
To remove the headgear:
1. Unscrew both knobs on the left and right side
2. Remove the disc underneath on both sides
3. The headgear can now be removed.
To insert the headgear:
1. Unscrew the knobs on the left and right end of the headgear
2. Remove the disc underneath the removed knobs
3. Make sure the sweatband is oriented towards the front of the
helmet
4. Push the now exposed screws on the left and right side of the
headgear through the corresponding holes in the helmet. Hold
on to the screw so it does not fall out of the headgear.
5. From the outside of the helmet, stick the removed discs back
onto the screw
6. Screw on the knobs on both sides
Security advice
The welding helmet XELUX enduro has been designed for use with
electric arc hand welding and should not be used for other pur-
poses. Particular caution is called for, when moving about while
wearing the welding helmet, as the eld of vision is restricted and
the automatically darkening welding lter can be unexpectedly
darkened by a bright source of light.
The welding helmet XELUX enduro is not allowed to be used for laser
welding and oxy-acetylene welding.
In rare cases allergic reactions to the welding helmet are possible.
If the welding helmet causes skin irritations, it should not be used
further and seeking medical advice is recommended.
Always use welding lters of a shade that corresponds to the type of
welding that you are doing.
In case of welding with mineral glass lters, make sure a protection
plate is located in front and behind
the lter in order to protect the welder’s eyes in case of breakage of
the glass lter.
For information and instructions about the auto darkening welding lter
please refer to the separate instruction manual for the XELUX X-Series.
Inside View
R
A C T I V E E Y E P R O T E C T I O N
castelberg design gmbh | Räffelstrasse 29 | 8045 Zürich | Switzerland | 2020
Accessories and Spare parts
Headgear
Item No. 80.520
Sweatband
Set of 2 pieces
Item No. 77.420
Inner/Outer Protection Plate
110 x 90 mm, Set of 10 pieces
Item No. 30.220
Inner Protection Plate CUT OUT
110 x 90 mm, Set of 10 pieces
Item No. 25.470
Inner Protection Plate
110 x 65 mm, Set of 10 pieces
Item No. 50.123
ShadeOn + 1 SST (Shade State)
Set of 2 pieces
Item No. 57.360
For the full program, please contact your distributor.
Distribution
Distribution is taken car of by the qualied retailers. We gladly
recomend you a suited distribution partner.
Please visit our website xelux.ch, where you can nd further
information.
If you have any questions, please do not hesitate to contact us.
We will gladly help you.
Distributor:

Popular Motorcycle Accessories manuals by other brands

R&G AB0026BK Fitting instructions

R&G

R&G AB0026BK Fitting instructions

Bisado Technologies LOOKING N1 Night Plus user manual

Bisado Technologies

Bisado Technologies LOOKING N1 Night Plus user manual

UNIT 1 FARO user manual

UNIT 1

UNIT 1 FARO user manual

hepco & becker Easyrack 661954 01 01 quick start guide

hepco & becker

hepco & becker Easyrack 661954 01 01 quick start guide

Leatt Body Protector 4.5 Junior manual

Leatt

Leatt Body Protector 4.5 Junior manual

SRC Royal Enfield Himalayan quick start guide

SRC

SRC Royal Enfield Himalayan quick start guide

Gazzini 10039625 Instructions for use

Gazzini

Gazzini 10039625 Instructions for use

Suzuki 990D0-13K26-CRB installation instructions

Suzuki

Suzuki 990D0-13K26-CRB installation instructions

hepco & becker 6504547 00 05 Mounting instructions

hepco & becker

hepco & becker 6504547 00 05 Mounting instructions

Dakota Digital MCL-30K-SPD Installation

Dakota Digital

Dakota Digital MCL-30K-SPD Installation

hepco & becker 6619515 01 05 quick start guide

hepco & becker

hepco & becker 6619515 01 05 quick start guide

Tool it LCD SPACE 11 TRUE COLOR manual

Tool it

Tool it LCD SPACE 11 TRUE COLOR manual

Sena C1 manual

Sena

Sena C1 manual

Dynojet POWER VISION PV3-22-12 installation guide

Dynojet

Dynojet POWER VISION PV3-22-12 installation guide

hepco & becker 502606 00 01 Mounting instructions

hepco & becker

hepco & becker 502606 00 01 Mounting instructions

DUCATI Performance 96680572A manual

DUCATI Performance

DUCATI Performance 96680572A manual

GÜDE GSH-3S-VL-TC-2 Translation of the original instructions

GÜDE

GÜDE GSH-3S-VL-TC-2 Translation of the original instructions

Ciro CI59910 quick start guide

Ciro

Ciro CI59910 quick start guide

manuals.online logo
manuals.online logoBrands
  • About & Mission
  • Contact us
  • Privacy Policy
  • Terms and Conditions

Copyright 2025 Manuals.Online. All Rights Reserved.