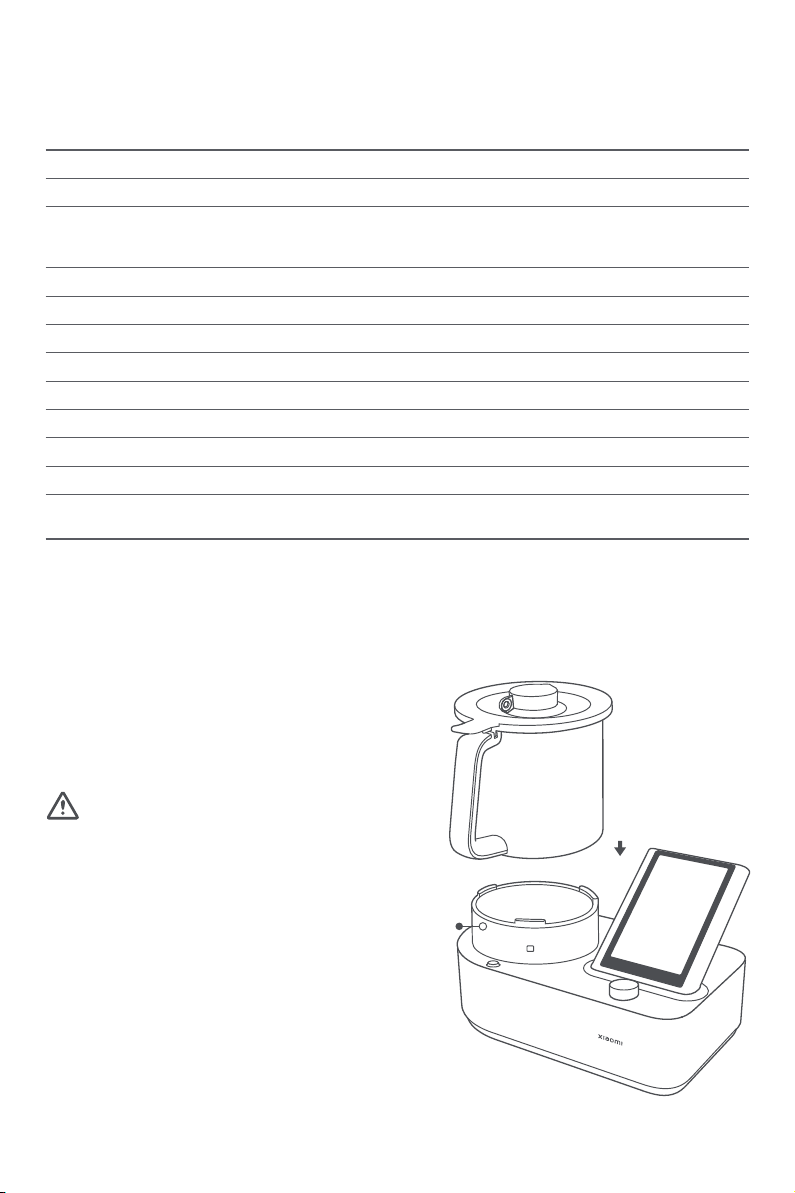
Xiaomi MI MCC01M-1A User manual

คูมอการใชงานคูมอการใชงานหุนยนต์ทําอาหารอจฉรยะ Xiaomi ·199
Xiaomi slimme kookrobot Gebruikershandleiding ·181
Robot nấu ăn thông minh Xiaomi Hướng dẫn sửdụng ·163
Inteligentnego robota kuchennego Xiaomi Instrukcja obsługi ·127
Manual do utilizador do Robô de cozinha inteligente Xiaomi ·109
Руководство пользователя Умный кулинарный робот Xiaomi
Smart Cooking Robot ·91
Manuel d’utilisation du Xiaomi Smart Cooking Robot ·73
Manuale utente Xiaomi Smart Cooking Robot ·55
Smart Cooking Robot User Manual ·01
Manual de usuario de Xiaomi Smart Cooking Robot ·19
Intelligenter Kochroboter von Xiaomi Benutzerhandbuch ·37
Xiaomi AkıllıYemek Pişirme Robotu Kullanım Kılavuzu ·145


Read this manual carefully before use, and retain it for future
reference.
Safety Precautions
01
To ensure your safety and minimize the risk of personal injury or
property damage, please observe and obey the following safety
precautions.
· This product is for household use only.
· Appliances can be used by persons with reduced physical
sensory or mental capabilities or lack of experience and
knowledge if they have been given supervision or instruction
concerning use of the appliance in a safe way and if they
understand the hazards involved.
· Please keep the product out of the reach of children. Children
shall not play with or use this product.
· Do not place the product on unstable or wet surfaces. Keep the
product preferably 30 cm or more away from re or heat sources.
· The normal operating altitude range of this product is 0–2000
meters.
· Do not place the cooking base on heated or heatable surfaces
including stoves, ceramic stoves, or induction stoves, nor near
any high-temperature areas.
· Do not crush, strike, or scratch the product with anything sharp
or heavy to prevent injuries or malfunction.
· The product cannot be used with an external timer or
independent remote control.
· Do not modify, disassemble, or repair the product by yourself to
avoid re, electrical shock, and scalding.
· Stop using the product immediately if it malfunctions or breaks
down to avoid re, electric shock, and scalding.
· Ensure that the silicone parts of the product do not come into
contact with solutions that contain more than 50% alcohol.
WARNINGS

· Turn othe product and disconnect the power before replacing
accessories or touching movable parts.
· Do not use accessories or parts that did not come with this
product to avoid re and personal injury.
· Steam and heat may damage, discolor or deform your furniture
and walls, keep the product away from furniture and walls,
preferably 30 cm and above.
· Use in a well-ventilated area to ensure that heat is properly
dispersed.
· The blades inside the pot are sharp. Please be careful when
emptying the pot and cleaning the blender assembly.
Precautions for Power Supply
· Do not use any power supply other than 220–240 V AC to avoid
re and electrical shock.
· Do not unplug by pulling on the power cord, so as to avoid
electric shock or re caused by short-circuiting.
· Do not allow children to use the product without an adult's
supervision. Keep it out of the reach of infants to prevent electric
shock, burns, or other injuries.
· Do not plug or unplug the power cord with wet hands, so as to
avoid electric shock or injuries.
· Use only power sockets rated at 10 A minimum.
· Unplug the power cord from the electrical outlet before
performing any maintenance or moving the product.
· If the power cord is damaged or broken, it must be replaced or
repaired by the manufacturer or the aer-sales department so as
to avoid safety hazards.
02

Precautions During Use
· Do not ll the pot above the maximum line ("2.2 L" mark).
· Do not remove the measuring cup during high-speed operation,
so as to prevent grease or liquid spills.
· Do not aempt to force open the pot lid or locking mechanism.
The pot lid can only be opened when the speed is at zero and the
locking mechanism has been released.
· Do not use the whisk during prolonged cooking, such as slow
cooking, slow simmer, or fermentation.
· Do not touch moving parts to prevent mechanical damage.
· Do not place hands into the pot.
· Keep body and hair away from the blender assembly.
· Ensure that there is enough water in the pot when steaming.
Please add water if the cooking time increases.
· Do not touch the measuring cup during or immediately aer use.
Keep away from children and infants and take special
precautions to prevent them from being scalded.
· Do not move or shake the product during use.
· Do not place scraper into the pot during cooking.
· Do not cover the top of the product during use, otherwise, the
steam may be unable to escape.
· When adding water during blending, the water temperature
should be less than 60℃to prevent burns and scalds if liquid
overows.
· The rotation speed will automatically decrease if the liquid
temperature is too high during high-speed rotation.
· Note that pouring high-temperature liquid into the pot can
cause the liquid to spray out due to vaporization.
· The pot must be used with the included cooking base.
03

Precautions Aer Use
· Promptly empty ingredients in the pot aer use. Remove the
blender assembly and clean it in a timely manner, being careful
not to be scratched by the blades.
· Stop using the product immediately and unplug it from the
power source if it malfunctions or breaks down.
· Thoroughly wipe the pot dry and clean before placing it onto the
cooking base.
Precautions for Malfunctions or Breakdowns
If any of the following conditions occur, immediately disconnect
the product from power and contact the aer-sales service team
for assistance.
· The power plug or power cord has become very hot during use.
· Smoke is arising from the cooking base or there is a burning
smell.
· Some part of the product is cracked, loose or unstable.
· The pot deforms.
Precautions for Cleaning and Maintenance
· Do not immerse the product in water or splash it with water.
· Unplug the product before cleaning the cooking base.
· Do not use steel wool or other hard objects to clean the pot.
· Use only socloth for cleaning.
· Do not allow water or dirt to penetrate the casing of the cooking
base.
· If the product will not be used for a long time, unplug the power
cord and take measures to protect it from moisture, dust, and
household pests.
04

Product Overview
Accessory List
Smart Cooking Robot
Cooking Base
Pot Lid
Measuring Cup
Pot
Control Knob
Screen
Power Buon
Steamer Set × 1Blade Cover × 1
Whisk × 1
Blender Blade Base × 1
(Pre-installed in the pot)Blender Blade × 1
(Pre-installed in the pot)
Basket × 1 Measuring Spoon Set × 1Scraper × 1
Note: Illustrations of product, accessories, and user interface in the user manual are for reference purposes only. Actual product and
functions may vary due to product enhancements.
05

Component Description
06
Component Functions
Pot
Pot Lid
Measuring Cup
Cooking Base
Blender Assembly
Steamer Set
Basket
Whisk
Scraper
Measuring Spoon Set
Used to cook and process ingredients in combination with the blender assembly.
Used to seal the pot. It can prevent juices from splashing during operation. There is an open
mouth in the center, which can be used with the measuring cup for adding ingredients partway
during cooking.
Used to measure ingredients and block the open mouth in the center of the lid.
It is the key component of the product with an electric motor inside. It can provide power.
Used with the pot to blend and cut up ingredients.
Used to steam food.
Used to steam food and cook soor delicate dishes and to sieve fruit and vegetable juices.
Used to whisk cream or egg whites.
Used to scrape food remnants from the inside of the pot.
Used to measure small amounts of liquid or powder ingredients.
Blade Cover Used to enhance the convection of liquid in the pot and protect soer ingredients from being
cut up by the blade.
Component Name Function
Component Instructions
1. Align the pot handle with the positioning point,
then vertically place the pot onto the holder on the
cooking base.
2. Try to slightly rotate the pot to the leand right. If
the pot cannot be rotated but can move slightly,
then it has been placed correctly.
· Place the product on a clean, sturdy, and stable
counter surface in the kitchen.
· Keep the product away from the edge of the
counter to prevent the product from falling due to
movement during operation or being bumped.
· Do not place the product on heated or heatable
surfaces including stove, ceramic stove, or
induction stove, nor near high-temperature areas.
Keep the product away from external heat sources.
· Do not place the product underneath furniture like
shelves or cupboards, as this may cause the
furniture to be damaged by steam generated during
cooking.
Pot
The pot is used to process or heat ingredients. It consists of a stainless steel bowl, a lid, and a blender assembly. Before
cooking, it must be correctly placed onto the cooking base. Please follow the steps below:
CAUTIONS
Holder

07
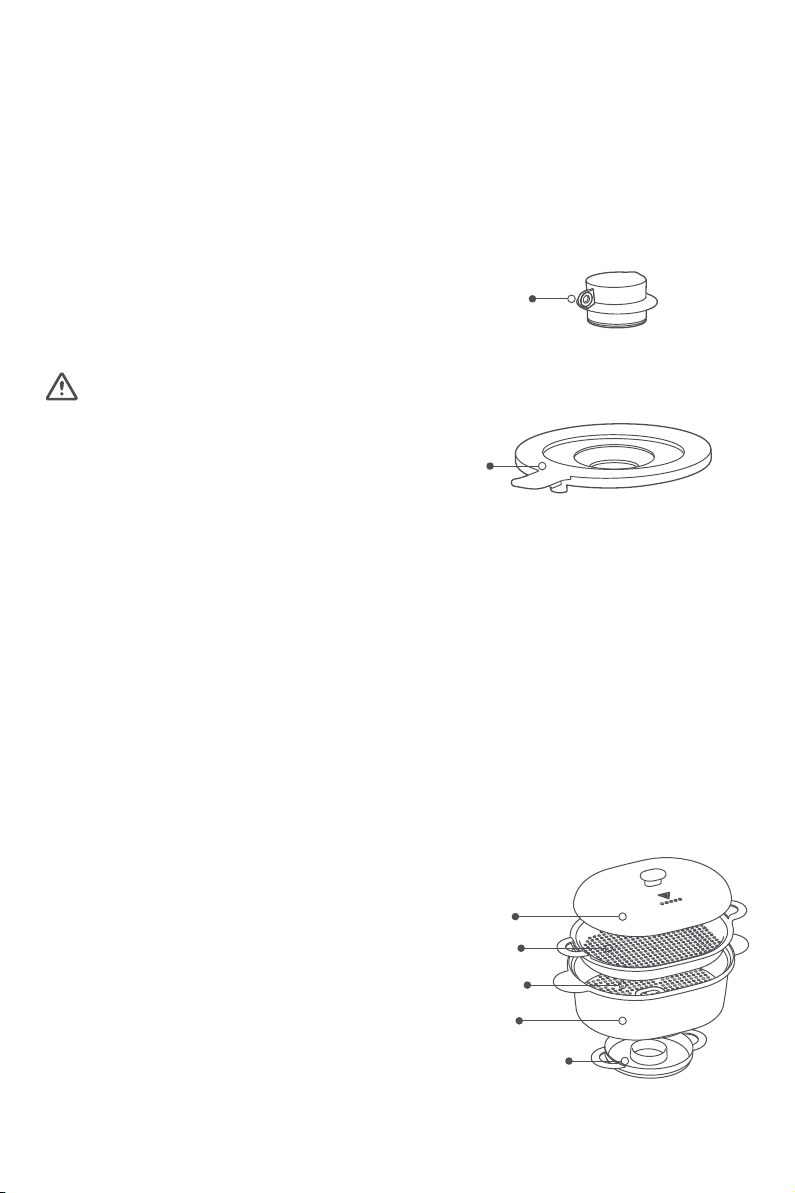
Blender Assembly (Blender Blade + Blender Blade Base)
Remove the blender assembly before cleaning the blender assembly and the pot, then install them back correctly aer
cleaning and drying for future use. The blender blade is used for blending, cuing, and mixing food, therefore, it must always be
properly installed and fully locked with the blender blade base; otherwise, an accidental injury may occur. Please follow the
steps below:
1. To avoid the blender blade falling oaccidentally,
hold the handle of the pot with its mouth facing
upwards.
2. Rotate the blender blade base clockwise to remove
it, and temporarily leave the blender blade in the
pot.
3. Carefully lithe handle of the blender blade to
remove it from the pot, along with the rubber seal.
4. When cleaning the blender blade, special care must
be exercised to avoid being cut. Wipe dry aer
cleaning.
5. Hold the handle of the blender blade along with the
rubber seal, align the blender blade with the
opening on the boom of the pot, and put the
blender blade into it till the rubber seal is in contact
with the boom of the pot.
6. Install the blender blade base onto the boom of
the pot from below, then rotate it counterclockwise
till the blender blade and the blender blade base are
rmly locked together.
· The blades are extremely sharp. Take extra care
when installing, disassembling, using, or cleaning
them.
· Do not touch the blades. Doing so may result in
injury.
· When disassembling the blender blade, ensure that
the pot mouth is facing upwards. Otherwise, the
blender blade may fall oand cause personal injury
or deforming the blades.
· Do not place hands into the pot before removing it
from the cooking base.
· To avoid burns by residual heat from cooking, make
sure that the pot and the blender blade are cool
enough to touch before removing them.
· Make sure that the blender blade is correctly
installed. Check the blender blade and the rubber
seal regularly.
· When installing the blender blade, make sure that
the blender blade and the rubber seal are t in place.
· Make sure that the rubber seal is intact. Otherwise,
the product may be damaged because of the liquid
leaking into the cooking base.
· Make sure that the blender blade is correctly
installed and completely locked before cooking.
CAUTIONS
Rotate clockwise to open
the blender blade base.
Blender Blade
Blender Blade Base
Blade Handle
Rubber Seal
Blender Blade

Pot Lid
The pot lid is used to seal the pot. To ensure safety during use, the cooking robot can only be turned on when the lid is put in
place and locked. Please follow the steps below:
1. With the lid handle to the right of the pot handle,
then rmly place the lid on the pot and press it
down with both hands. Then turn the lid clockwise
until the lid handle is aligned with the pot handle.
Make sure they are rmly locked together.
2. Press the control knob to start cooking, and the
pot will be automatically locked.
3. The cooking robot will automatically detect
whether the lid is in place or not. If not, the screen
will display a prompt.
4. The pot will be automatically unlocked once the
cooking is completed.
· Do not force open the pot lid to avoid damaging the
lock of the pot lid.
· Some hot steam may remain inside the pot aer
cooking is completed. To avoid burns and scalds by
the steam, please exercise caution when opening
the pot lid.
· Do not remove the measuring cup during cooking.
In some recipes, the measuring cup will need to be
removed to ensure the release of excess steam.
Please refer to the specic recipe for details.
· Have a regular check to ensure that the rubber seal
on the pot lid is not damaged.
· Do not remove the rubber seal when cleaning.
· For a beer next-cooking experience, clean the pot
in a timely manner aer use to prevent odors arising
from food residue.
Steamer Set/Basket
The steamer set and basket are used for steaming food. The steamer set is composed of a steamer lid, a steamer tray, a boom
insert, a steamer pot, and a water collection tray. The steamer set is directly mounted onto the pot lid, so that steam can go
through the open mouth in the pot lid during cooking to steam the food. To use the steamer set, please follow the steps below:
1. Place the steamer set onto the sunken part on the
pot lid. Make sure they are aligned and locked
rmly.
2. To use the basket, place it into the pot with food
ingredients in it to steam.
3. You can use the dierent parts of steamer set
based on your needs.
4. To collect condensed juices when steaming, place
the water collection tray between the steamer pot
and the pot lid. If the water collection tray is
removed, the juices will ow into the pot.
Steamer Lid
Steamer Tray
Boom Insert
Steamer Pot
Water Collection Tray
08
CAUTIONS
Measuring Cup
Pot Lid

09
· Food ingredients need to be distributed evenly
inside the steamer pot, and the total weight of the
ingredients to be cooked each time along with
plates or dishes cannot exceed 2 kg.
· Be careful of steam burns when removing the
steamer set or basket.
· Make sure there is enough water in the pot to
prevent damage to the cooking robot caused by
boiling dry.
· Promptly clean the steamer set and basket to avoid
clogging the holes on the steamer set.
· The measuring cup needs to be removed when
using the steamer set.
· Be mindful of the water amount in the water
collection tray to avoid water overowing. Normally,
the water collection tray can collect condensed juices
during steaming for about one hour.
Measuring Cup
The measuring cup can be used to block the open mouth in the pot lid to prevent heat loss and ingredient splashing. It can also
be used to measure liquids. If only a small amount of liquid is needed, then the measuring cup does not need to be removed.
Slowly pour the liquid on the pot lid, and it will ow into the pot through the gap between the measuring cup and pot lid. To add
more liquid or solid ingredients into the pot, follow the steps below:
1. Press the control knob to pause the current
cooking task.Holdthemeasuringcuphandleandpullit
upwardstoremovethemeasuring cup.
2. Add the ingredients to the pot.
3. Align the measuring cup with the open mouth in
the pot lid and gently press down to reinstall the
measuring cup onto the pot lid.
4. Press the control knob to resume cooking.
· When removing the measuring cup during cooking,
exercise caution to avoid burns by the hot steam
that may remain inside the pot.
· In some recipes, the measuring cup will need to be
removed to release excess steam. Please refer to
the specic recipe for details.
Scraper/Measuring Spoon Set
The scraper can be used to remove cooked-on food and clean the pot. The measuring spoons are used to measure small
amounts of powder or liquid ingredients. The spoons have dierent volume versions: 10 milliliters, 5, milliliters, 2.5 milliliters,
and 1.25 milliliters. Keep the following in mind when using these accessories:
· None of the accessories can be used for other
purposes.
· Do not place the scraper or measuring spoons
inside the pot during cooking.
· Check accessories regularly, and replace in a
timely manner if damage is found.
CAUTIONS
CAUTIONS
CAUTIONS
Handle
Basket
Measuring Cup
Scraper Measuring Spoon Set

10
Whisk
In addition to whipping cream or egg whites, the whisk can also be used at low speed to ensure even mixing of the food, so as to
prevent food from sticking or burning onto the pot boom. Follow the steps below for installation and removal:
1. Place the whisk onto the blender blade by inserting
it into the gap of the cross-blade, and turn it slightly
to x it in place. Make sure that it cannot be easily
removed.
2. Hold the handle of the whisk and shake upwards to
remove.
· Do not use a speed over Level 5.
· Do not use the scraper while using the whisk.
· It is forbidden to install or remove the whisk while
the cooking robot is in use.
Connecting with Mi Home/Xiaomi Home App
How to Use
9DD2934D
Plug the power cord into a 220-240 V AC socket, connect the power, and turn on the cooking robot, and then the boot animation
will show on the screen.
The cooking robot's screen will automatically go out by default if no operation is performed in 10 minutes, and its auto-otime
can be adjusted in the seings. Aer the screen is ofor 10 minutes, the cooking robot will enter the energy-saving mode. Press
and hold the control knob for 3 seconds or go to the drop-down menu to turn othe cooking robot. To start the cooking robot,
press the control knob. If the cooking robot will not be used for an extended period, press the power buon to turn the cooking
robot o.
Note: You can wake up the screen by tapping the screen or pressing the control knob.
This product works with the Mi Home/Xiaomi Home app*. Use the Mi
Home/Xiaomi Home app to control your device, and to interact with other
smart home devices.
Scan the QR code to download and install the app. You will be directed to
the connection setup page if the app is installed already. Or search "Mi
Home/Xiaomi Home" in the app store to download and install it.
Open Mi Home/Xiaomi Home app, tap "+" on the upper right, and then follow
prompts to add your device.
CAUTIONS Handle
Whisk
Blade Cover
The blade cover is used to enhance the convection of liquid in the pot and protect soer ingredients from being cut up by the
blade. It is suitable for simmering and sous-vide cooking, and can also be used with the steam/boil mode and the stew mode.
When removing and installing the blender blade, the blade cover will also protect your hand from being cut. Take the following
steps to install and remove the blade cover:
Installing: Align the center of the blade cover with
the blade handle, and press down the blade cover to
make sure it is secured in place.
Removing: Hold the handle of the blade cover to
remove it upward.
· Do not use at a speed over Level 1.
· Make sure the temperature does not exceed 100°C.
· Only use the blade cover when stewing or boiling with
an adequate amount of liquid. Do not boil-dry the blade
cover at high temperatures.
CAUTIONS
Blade Cover

11
* The app is referred to as Xiaomi Home app in Europe (except for Russia). The name of the app displayed on your device should be taken
as the default.
Note: The version of the app might have been updated, please follow the instructions based on the current app version.
Wi-Fi Connection
When turning on the cooking robot the rst time, please follow the instructions on the screen to connect to Wi-Fi.
Follow the on-screen instructions to complete the initial setup when the cooking robot is turned for the rst time. Press the
control knob or swipe the screen to the leto proceed to the next step during operation. Press the control knob again to enter
the home screen aer completing the setup.
Seings can be changed at any time in Prole > Seings.
Initial Setup
Usage Seings
Seing values: The cooking parameters such as time, temperature, and speed can be set before and during cooking. The
cooking robot can only work if both time and speed are set. Tap the time, temperature, and speed icons on the screen to set
values, and turn the control knob to change the values. Press the control knob to start cooking once the value seings are
completed.
Selecting recipes: Choose the Recipes on the screen or tap the icon on the top right corner to search the recipes. Follow the
step-by-step recipe to operate the cooking robot for cooking.
Seing time
1. Tap the time seing icon to enable time seing.
2. Rotate the control knob to set cooking time.
· The preset time can be changed at any time during
cooking (except for certain modes). Tap the time
seing icon and turn the control knob to select
desired cooking time. The cooking robot will resume
cooking as per the latest set time till the cooking is
complete.
· Before the preset time ends, press the control knob
to pause the cooking robot and add ingredients
during cooking. Press the control knob again to start
the cooking robot and resume cooking as per the
original preset time.
· To end cooking before the preset time, tap the time
seing icon and turn the control knob to 00:00:00.
Seing temperature
1. Tap the temperature seing icon to enable
temperature seing.
2. Rotate the control knob to set the temperature.
· The cooking temperature can be changed at any
time during cooking (except for certain modes).
· If there is no need to heat, set the temperature to
"--".
CAUTIONS
CAUTIONS

12
Seing speed
1. Tap the speed seing icon to enable speed seing.
2. Rotate the control knob to set the rotation speed.
· The speed can be changed at any time during
cooking (except for certain modes).
· The cooking robot can start cooking aer the time
and speed are set.
· There are 20 speed levels for both forward and
reverse rotation. Turn the control knob clockwise to
adjust the forward speed, and counterclockwise to
adjust the reverse speed. The higher the level, the
faster the speed.
· Do not use high speeds when cooking hot food or
soup over 60℃, so as to prevent the food from
overowing and causing burns.
· By rotating the control knob clockwise or counter
clockwise, you can change the rotation direction of
the blender blade. To gently stir and mix the food, use
the reverse rotation.
Preset modes
The cooking robot has multiple preset modes to meet various cooking needs. You can go to the home screen to select the
preset modes including weighing, extreme rotation, dough kneading, ice shaving, juicing, grinding, mincing, chopping,
cleaning, steam/boil, or stew. Take the mincing and weighing modes as examples and follow the steps below.
Mincing
1. Clean the ingredients and cut them into small pieces, then put them into the pot. Make sure that the amount of the
ingredients does not exceed the pot maximum level.
2. Correctly install the pot onto the cooking base, then put on the pot lid. Make sure that the lid is installed correctly and locked
onto the pot.
3. Turn on the cooking robot, select mincing mode on the screen, and press the control knob. The cooking robot will run based
on the preset values and automatically stop upon completion of the process. Press the control knob to pause midway.
4. Remove the pot from the cooking base once ingredient processing is completed, and use the scraper to take out the food.
· Remove tendons, bones, and skin from the meat before processing, and thaw the frozen meat rst.
· Please do not use the mincing mode to process hard ingredients like frozen meat, ice cubes, or bones.
· The cooking robot will shake slightly during operation, please do not leave the cooking robot unaended.
· Turn othe cooking robot if it vibrates excessively or ingredients stick to the sides of the pot. Use the scraper to spread the
ingredients evenly across the boom of the pot and then turn the cooking robot back on.
1. Install the pot onto the cooking base and select weighing mode on the mode screen.
2. Place the ingredients to be weighed into the pot, and the screen will then display the weight of the ingredients.
3. Press and rotate the control knob to zero, and then add the next ingredient to the pot. The weighing process can be repeated
till an accumulated maximum weight of 5000 g is reached.
· The weighing mode can only be used when no any other modes are running.
· When using the weighing mode, please make sure that the cooking robot is on a level surface. Otherwise, the weighing results
may be inaccurate.
· Tap "" in the top lecorner of the weighing screen to exit weighing mode.
CAUTIONS
CAUTIONS
CAUTIONS
Weighing

13
Mode Functions
Mode Name Function Description
Manual
Enabled by default. Set the
time, temperature, and speed
to start cooking.
Note: The maximum operating time is four
hours, the maximum temperature is 150℃,
and the maximum speed level is 10.
For those who are unfamiliar with the product operation, it is
recommended to follow the steps and seings provided by the
recipes stored in the cloud or the preset recipes in the cooking
robot.
Extreme
rotation Used to quickly tamp food.
This mode has the highest speed. Tap the extreme rotation
mode icon again to exit this mode. Do not leave the cooking
robot unaended while it is in operation to prevent it from
shaking and causing accidents.
Dough
kneading Used to knead dough. Temperature and speed are not adjustable. Water and other
ingredients can be added through the open mouth in the pot lid.
Shaved ice Used to crush ice. You can
select coarse ice or ne ice.
Temperature is not adjustable. Make sure the pot lid and the
measuring cup are in place when the cooking robot is running to
prevent crushed ice from splashing out.
Juicing
Used to juicing. It is suitable
for ingredients like fruits
and vegetables.
Temperature is not adjustable. Make sure the pot lid and the
measuring cup are in place when the cooking robot is running
to prevent juices from splashing out.
Grinding Used to grind grains and
crush ingredients.
The temperature is not adjustable. It is recommended to cut
the ingredients into small pieces to fully help and evenly grind
the ingredients.
Mincing Used to make meat llings
and crush ingredients.
Temperature is not adjustable. It is not suitable for hard
ingredients or ingredients with high water content, such as
frozen meats and fruits.
Chopping Used to chop larger
ingredients.
Temperature is not adjustable. Make sure the pot lid and the
measuring cup are in place when the cooking robot is running
to prevent ingredients from splashing out.
Cleaning Used to clean the pot.
Do not ll the water above the maximum level. Make sure the
pot lid and the measuring cup are in place when the cooking
robot is running.
Stew Used to stew food.
The blender blade supports intermient rotation to prevent
over-stirring ingredients. This mode is suitable for stewing
ingredients over a long period of time, such as stewing meat
and soups.
Note: On-screen mode names may vary due to product enhancements, please refer to the actual product.
High temp Used to stir-fry at
high-temperatures.
With a maximum temperature of 180℃, this mode is suitable for
stir-frying food at high temperatures, such as stir-frying
vegetables or eggs.
Steam/boil Used to steam food.
Temperature and speed are not adjustable. The blender blade
does not work in this mode. This mode is suitable for cooking
delicate foods such as dumplings and tofu. It is not suitable for
cooking methods other than steaming, like stir-frying.
Weighing Used to weigh ingredients.
It is strongly recommended to tap "Returns to zero" on the
screen before each weighing to ensure the cooking robot can
precisely weigh the ingredients.

14
Recipe Function
Care & Maintenance
For a beer smart cooking experience, kindly connect the product to a network before use.
Tap Recipes in the top lecorner of the screen to access personal recipes; tap the search bar (the magnifying glass icon) in the
top right corner of the screen to search for recipes by entering keywords.
· Before the rst use, thoroughly clean all components and accessories except for the cooking base.
· Thoroughly clean and dry all used accessories aer each use.
· Use the clean mode between cooking steps or dishes to clean the residual food in the pot. You can nd the mode on the mode
screen.
· Do not use sharp objects or metal wool to clean the pot, instead, use stainless steel cleaner.
· Use a socloth to clean the surface of the plastic accessory such as the steamer set.
· Disconnect power source before cleaning the cooking base.
· Wipe down the cooking base using a slightly damp cloth and mild detergent.
· Be careful not to use too much water when cleaning the cooking base to prevent air and water from entering it.
· The pot and the blender assembly may damage if they come into contact with water, other liquids, or food residue over a long
period of time. Promptly clean the components aer each use.
· Prolonged stewing or contact with acidic substances may cause rusting, please pay aention to the ingredients used.
· Regularly check the cooking base and accessories including the pot, power cord, rubber seals on the pot lid, and blender
assembly for damage.
· To avoid product damage, regularly check the product's ventilation ports to make sure there is no blockage.
· Unplug the product when it is not in use.
· There is a drain structure inside the holder of the pot on the cooking base. If a large amount of broth or liquid is accidentally
spilled onto the holder, do not turn over the cooking base, as the liquid will automatically ow into the boom drain hole. Use
an absorbent sponge or socloth to wipe othe liquid that remained on the cooking base surface.
· The product should be kept dry and clean, and placed in a dry, well-ventilated environment.
· Do not use damaged accessories.
· The blender assembly and accessories are consumables. For best cooking results, replace them in a timely manner based on
their condition and the frequency of use.
Mode Examples
Mode Name Time Speed Level Ingredient Amount
Extreme rotation 2 seconds × 3 times Extreme rotation 2 lemons (cut into wedges)
Dough kneading 5 minutes Dough kneading 450 g of our, 300 ml of drinking water
Shaved ice 8 seconds Level 8 for coarse ice, Level 9.5
for ne ice 200 g of 3 cm³ ice cubes
Juicing 30 seconds Level 9 400gofpears,1000mlofdrinkingwater
Grinding 20 seconds Level 9.5 200 g of 3 cm³ rock sugar
Mincing 15 seconds Level 8 300 g of 2 cm³ beef cubes
Chopping 6 seconds Level 9 100 g of garlic
Cleaning
Deep cleaning
Residual dough
cleaning
90 seconds
8 minutes
13 minutes
Level 6
Level 6
Level 4 or 6
Stew 60 minutes Level 0.5
Note: On-screen mode names may vary due to product enhancements, please refer to the actual product.
High temp 10 minutes Level 0.5
1000 ml of drinking waterSteam/boil 60 minutes Level 0
1000 ml of drinking water
300 g of vegetables or eggs
1000 ml of drinking water
Manual 15 minutes Level 0.5–10. The maximum
temperature is 150°C.
200 g of carrots, and 500 ml of drinking
water. Allow the cooking robot to rest
for 25 minutes aer each run.

15
Specifications
Name Smart Cooking Robot
1700 W
MCC01M-1A
220–240 V~
50–60 Hz
10 kg
13.8 kg
Induction heating
413 × 316 × 344 mm
Model
Net Weight Heating Method
Item DimensionsGross Weight
Rated Voltage
Rated Frequency
Total Rated Power
2.2 L
Capacity
1200 W
Heat Rated Power
500 W
Motor Rated Power
All products bearing this symbol are waste electrical and electronic equipment (WEEE as in directive 2012/19/EU) which should
not be mixed with unsorted household waste. Instead, you should protect human health and the environment by handing over
your waste equipment to a designated collection point for the recycling of waste electrical and electronic equipment,
appointed by the government or local authorities. Correct disposal and recycling will help prevent potential negative
consequences to the environment and human health. Please contact the installer or local authorities for more information
about the location as well as terms and conditions of such collection points.
Hereby, Chunmi Technology (Shanghai) Co., Ltd. declares that the radio equipment type MCC01M-1A is in compliance with
Directive 2014/53/EU. The full text of the EU declaration of conformity is available at the following internet address:
hp://www.mi.com/global/service/support/declaration. html.
For detailed e-manual, please go to www.mi.com/global/service/userguide.
AT BE BG CH CY CZ DE DK EE EL ES
FI FR HR HU IE IS IT LI LT LU LV
MT NL NO PL PT RO SE SI SK TR
Wireless Specifications
Wi-Fi
Bluetooth
The WLAN function for this device is restricted to indoor use only when operating in the 5150 to 5350 MHz frequency range.
2.4 GHz: 2412–2472 MHz
5 GHz: 5180–5240 MHz/5260–5320 MHz/5500–5700 MHz/5745–5825 MHz
IEEE802.11 a/b/g/n/ac/ax
Max. Power: 16.19 dBm (2.4 GHz), 18.88 dBm (5 GHz), 13.91 dBm (5.8 GHz)
2.4 GHz: 2400–2483.5 MHz
Max. Power: 5.8 dBm

16
Troubleshooting
Problems Fault Diagnosis & Solutions
Liquid has entered the
area under the pot.
Immediately unplug the power cord.
Turn othe cooking robot.
Use a rag to wipe oexcess liquid from the area under the pot.
Check if the blender blade is properly installed and if the rubber seal is damaged.
Do not move or tilt the cooking base, so as to prevent liquid from entering the cooking base
and contacting live components.
Do not aempt to disassemble the cooking base, as it does not contain any parts that can
be repaired on your own.
If you are not sure whether liquid has owed into the cooking base or not, do not turn on the
product, but contact customer service.
The product does not start, and
the screen does not turn on.
Check whether the power cord is correctly plugged into the socket.
Check whether the product is turned on.
The pot cannot be installed
onto the cooking base. Check whether the pot and the blender assembly are installed correctly.
The product stops working
during use.
Remove the pot from the cooking base.
Remove some ingredients or add some liquid.
Wait for ve minutes (cool-down time).
Reinstall the pot.
Check whether the ventilation port on the back of the cooking base is unobstructed.
Press the control knob to restart the product.
If the system error message persists aer the cool-down time is over, please contact
customer service.
Measured weight is incorrect.
Check whether there are any objects touching the sides of the cooking base.
Check whether the cooking base is being pulled by the power cord, which could cause the
weighing module to be unbalanced.
Check whether the product is placed on a clean, stable, and at counter.
Do not touch the product at any time during the weighing process.
Basic cooking operations are
interrupted.
Added ingredients do not meet requirements.
Remove the pot from the cooking base and empty it.
Reinstall the empty pot onto the cooking base.
Restart the cooking process.
The heating function does
not work.
The heating time may not be set correctly. Check that the heating time has been set.
The temperature has not been selected. Check that the temperature has been set.
The pot temperature has already exceeded the set temperature.
The cooking robot cannot
connect to Wi-Fi.
The system version cannot be
updated.
Try to connect again aer reseing the Wi-Fi in the seings screen.
Check whether Wi-Fi signal is strong enough.
Check whether the product is currently cooking.
Check whether the Wi-Fi network works properly.

17
Fault Codes
If the cooking robot is not working properly, the screen will show an error code. Please refer to the table below to nd the
corresponding solutions.
The pot lid is
not detected.
Possible Causes Solutions
Fault Codes
The pot is not
detected.
The pot lid is not put or locked in place.
The pot is not installed or is installed incorrectly.
Put the pot lid in place and press rmly,
then try again.
Align the pot to the correct position and
install it, then try again.
Please contact the aer-sales service
team to arrange maintenance.
Please contact the aer-sales service
team to arrange maintenance.
Please contact the aer-sales service
team to arrange maintenance.
Please contact the aer-sales service
team to arrange maintenance.
Please contact the aer-sales service
team to arrange maintenance.
Please contact the aer-sales service
team to arrange maintenance.
Please contact the aer-sales service
team to arrange maintenance.
Please contact the aer-sales service
team to arrange maintenance.
Please contact the aer-sales service
team to arrange maintenance.
Please contact the aer-sales service
team to arrange maintenance.
E-03
E-04
E-05
E-07
E-8
E-10
E-11
The overvoltage protection is triggered.
The IGBT sensor is damaged.
The sensor at pot boom is damaged.
Heating communication has an error.
E-12 The coil plate has an open circuit.
High-temperature alert is triggered by
the sensor at the pot boom.
The IGBT temperature is too high.
The cooking robot will automatically
resume working when the voltage goes
back to normal.
The cooking robot will automatically
resume working when the voltage goes
back to normal.
The cooking robot will automatically
resume working when the temperature
goes down.
The cooking robot will automatically
resume working when the temperature
goes down.
E-16
E-17
E-18
E-19
E-21
The motor overcurrent protection is triggered.
The motor high-voltage protection is triggered.
The motor low-voltage protection is triggered.
The motor phase loss protection is triggered.
The motor temperature is too high.
E-13 The pot is not locked in place.
E-20 The motor jam protection is triggered.
The cooking robot will automatically
resume working when the temperature
goes down.
Please contact the aer-sales service
team to arrange maintenance.
E-22 The motor sensor has an open circuit.
Please contact the aer-sales service
team to arrange maintenance.
E-23 The motor sensor has a short circuit.

For further information, please go to www.mi.com
Manufactured for: Xiaomi Communications Co., Ltd.
Manufactured by: Chunmi Technology (Shanghai) Co., Ltd.
(a Mi Ecosystem company)
Address: Building 11, 1333 Jiangnan Avenue, Changxing Science and Technology Park, Lingang, Shanghai, P.R. China
Made in China
User Manual Version: V1.0
18
Possible Causes Solutions
Fault Codes
The cooking robot will automatically
resume working when the temperature
goes down.
The cooking robot will automatically
resume working when the temperature
goes down.
The cooking robot will automatically
resume working when the temperature
goes down.
The cooking robot will automatically
resume working when the temperature
goes down.
The cooking robot will automatically
resume working when the temperature
goes down.
The cooking robot will automatically
resume working when the temperature
goes down.
The cooking robot will automatically
resume working when the temperature
goes down.
E-24 The MOSFET temperature is overheating.
E-25 The MOSFET temperature sensor has an
open circuit.
E-27
E-28
E-29
E-30
The motor's communication has an error.
The cooling fan has an error.
The weighing communication has an error.
The Android communication has an error.
E-26 The MOSFET temperature sensor has a
short circuit.
Table of contents
Languages: