manuals.online logo
Brands
  1. Home
  2. •
  3. Brands
  4. •
  5. Xinlehong Toys
  6. •
  7. Motorized Toy Car
  8. •
  9. Xinlehong Toys 9109 User manual

Xinlehong Toys 9109 User manual

(l'lot suitEble ror children under 8 years old) fu..*'
XINLEHONG TOYS
* This instruction manual is suitable for products 9109 and 9 112.
(1). Detachable small parts should be put away, do not let children devour.
(2). lf there is radio interference to operate the venue, please select the
venue operator.
(3). Remote control when low-power, please immediately stop the operation
(4). On backout after the removal, please do not place discarded to avoid
contamination sanitation-
(5). Would be grateful if your remote control model
stored in dry, cool place.
(6). Do not place near fire and high temperature,
moist slorage.
(7). When the battery is water wet, add water to
fully clean.
(1). Product configuration AI
,,f;
in
I
/ TransmitterRemote control car
Transmitter High-speed
steering wheel racing front
wheel
Large wheel
lnstruction
manual
(2). Product configuration Bl-
,*)
I
' Iransmitter
Transmitter High-speed
steering wheel racing lront
wheel
Large wheel
,62
G<6\"
\-y/)):
Battery pack lnstruction
manual
(1). Use a philips screwdriver to loosen the screws
on the battery cover by the counter-clockwise,
open the battery cover.(Fig.1)
(2). lnsert 6X"AA" battery with the correct polarity.
(Fis.2)
(3). Close battery lid and lock screw tightly.(Fig.3)
Aworrce:
1. lnstall the battery must recognize the battery and
battery box is precise plus or minus polarity, can't
installation reverse.
2. Do not mix new and old batteries together when in use.
3. Please don't mix different types ot batteries when
in use. (Fis.2)
I
@;
,w
(Fis.3)
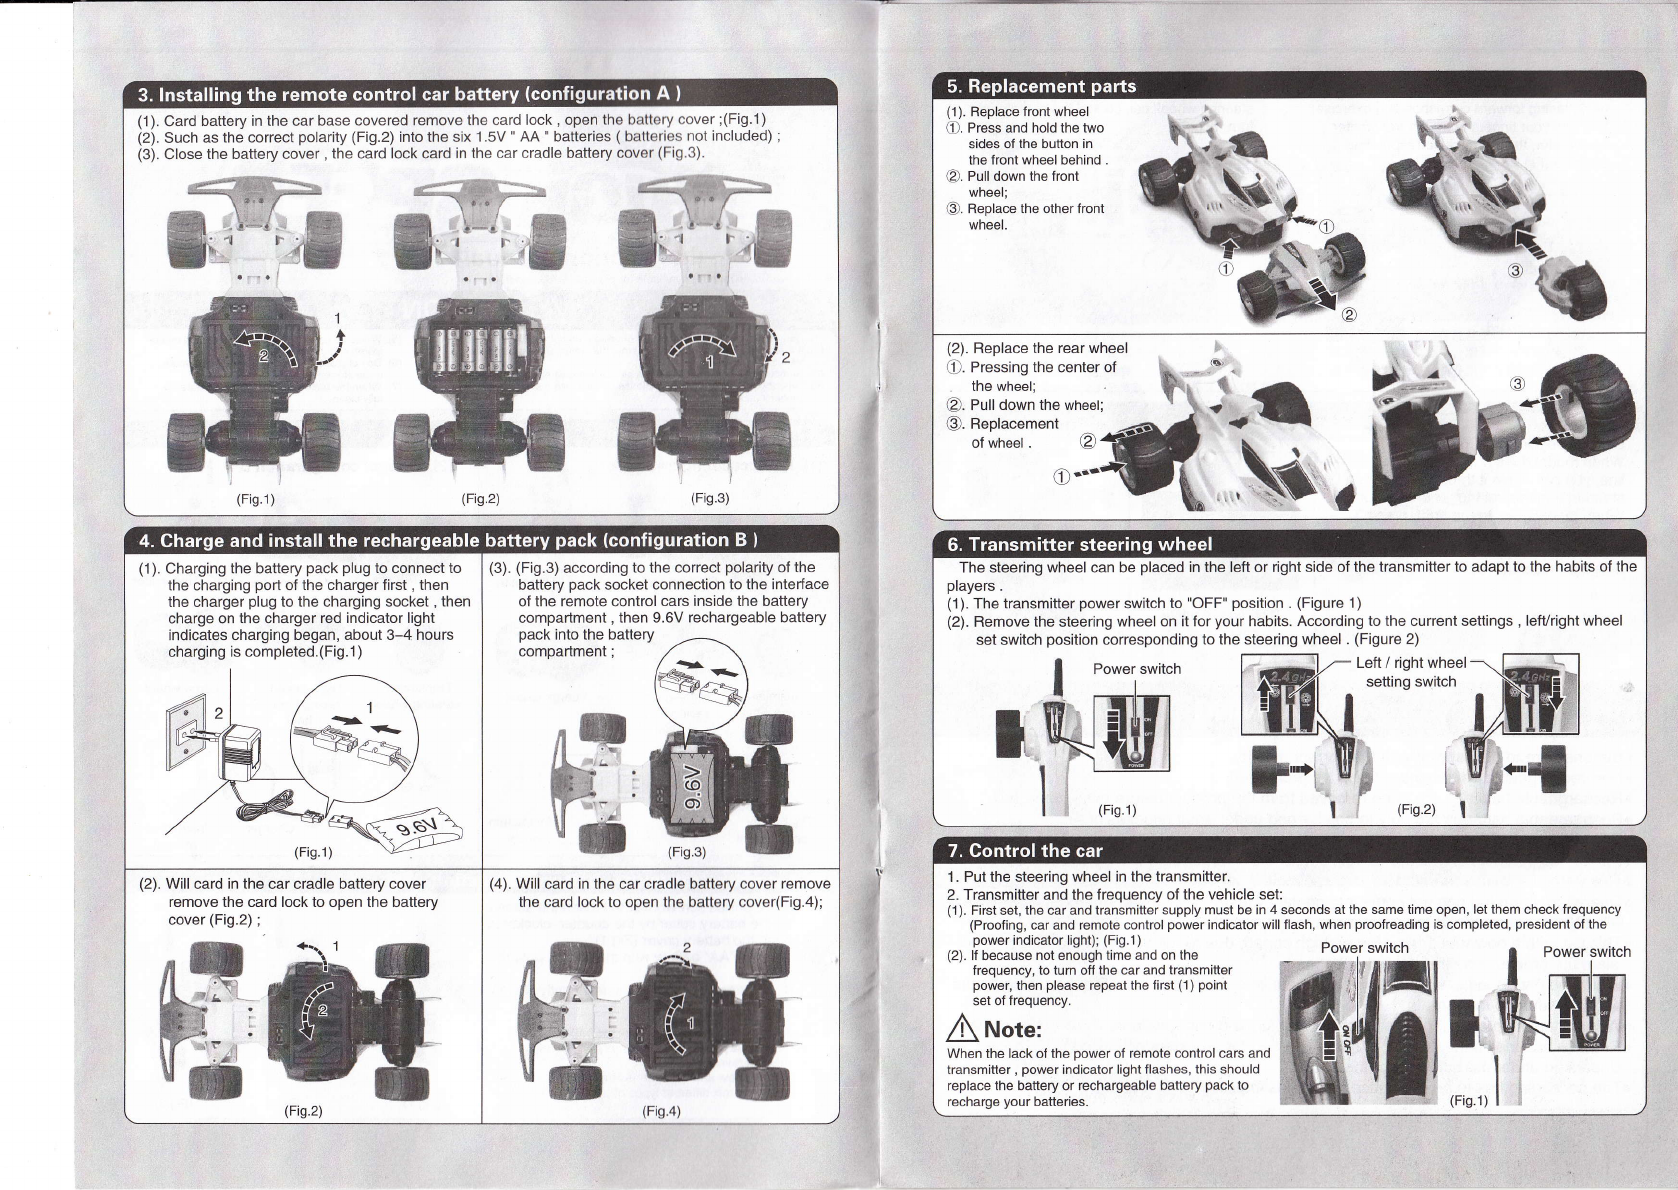
(1). Card battery in the car base covered remove the card lock, open the battery cover;(Fig.1)
(2). Such as the correct polarity (Fig.2) into the six 1.5V'AA " batteries ( batteries not included) ;
(3). Close the battery cover , the card lock card in the car cradle battery cover (Fig.3).
(Fis.3)
(1 ). Replace front wheel
O. Press and hold the two
sides of the button in
the front wheel behind
e). Pull down the front
wheel;
O. Replace the other front
wheel.
(2). Replace the rear wheel
@. Pressing the center of
the wheel: ,ns@
Charging the battery pack plug to connect to
the charging port o1 the charger first , then
the charger plug to the charging socket , then
charge on the charger red indicator light
indicates charging began, about 3-4 hours
charging is completed.(Fig.1 )
(3). (Fig.3) according to the correct polarity ol the
battery pack socket conneclion to the interface
of the remote control cars inside the battery
compartment, then 9.6V rechargeable battery
(2)- Will card in the car cradle battery cover
remove the card lock to open the battery
cover (Fig.2) ;
(Fiq.2)
(4). Will card in the car cradle battery cover remove
the card lock to open the battery cove(Fig.4);
ilQ
15- 'a '
ffiEI
lfa.
ur (Fis.a)
The steering wheel can be placed in the left or right side oi the transmitter to adapt to the habits of the
players .
(1). The lransmitter power switch to "OFF" position . (Figure 1 )
(2). Remove the steering wheel on it for your habits. According to the current settings , lefUright wheel
set switch position corresponding to the steering wheel . (Figure 2)
Power switch Left / right wheel
setting switch
S,*i
(Fig.1) | (Fis.2) |
I
il
1. Put the steering wheel in the transmitter.
2. Transmitter and the frequency ot the vehicle set:
(1 ). First set, the car and transmitter supply must be in 4 seconds at the same time open, let them check frequency
(Proofing, car and remote control power indicator will flash, when proofreading is completed, president of the
power indicator light); (Fig.1)
(2). lf because not enough time and on the
frequency, to turn off the car and transmitter
power, then please repeat the first (1) point
set of frequency.
,/l\ Note:
When the lack of the power of remote control cars and
transmitter, power indicator light flashes, this should
replace the battery or rechargeable battery pack to
recharge your batteries.
Power switch I power switch
With fingers throw the transmitter throttle
back, racing fonrvard corresponding exercise;
forc with your fingers apart the transmitter
accelerator, the car back corresponding
4. When the throttle control car, and turned the
steering wheel, can control the car lefuright
turn. (Fig.3)
exercise. (Fig.2)
Lta,il
\/ Backward fl'
Fonvard TIIrI T1Til
(Fis.2)
Direction regulate control rod:
When model does not run in a straight
line, you can move it through the button
steering trim control trigger on the button.
When model goes to the right, press "L"
(left) irim button, when the model
movesto the left, press "R" (right) button
until the model moves in a straight line.
I
I
I
I
oBatteries are to be inserted with the correct polarity.
oNon-rechargeable batteries are not to be recharged.
oRechargeable batteries are to be removed from the product before being charged
oRechargeable batteries are only to be charged under adult supervision.
oDifferent types of batteries or new and used batteries are not to be mixed.
oExhausted batteries should be removed from the product.
oThe supply terminals are not to be short-circuited.
oOperation, the hand can not come into contact with the transmitter antenna, Otherwise it
will affect the remote distance; broken antenna need to be handled by adults .
oThis carwith a powerful driving force , high speed, due to the inertia of the reasons, not
slam the brakes , use the special attention to .
oWhen the car speed is slowed down when the body battery is low . Please racing by the
above method to recharge .
oWhen charging please look for the charging plug and charging port .
oRemove batteries if the product is notto be used foran extended period.
oUnpacked under the guidance of the adult .
oThe packaging has to be kept since it contains important information.

This manual suits for next models

1

Popular Motorized Toy Car manuals by other brands

Tameo Kits TMK 222 Assembly manual

Tameo Kits

Tameo Kits TMK 222 Assembly manual

RJ Speed RJS2003 manual

RJ Speed

RJ Speed RJS2003 manual

Jamara 404521 instruction manual

Jamara

Jamara 404521 instruction manual

NORDIC PLAY 805-774 manual

NORDIC PLAY

NORDIC PLAY 805-774 manual

Buddy Toys BEC 8135 manual

Buddy Toys

Buddy Toys BEC 8135 manual

Carrera Go! FORMULA CUP Assembly and operating instructions

Carrera

Carrera Go! FORMULA CUP Assembly and operating instructions

Rayline MJX manual

Rayline

Rayline MJX manual

HPI Racing CRAWLER KING instruction manual

HPI Racing

HPI Racing CRAWLER KING instruction manual

Associated Electrics RC10GT2 manual

Associated Electrics

Associated Electrics RC10GT2 manual

LRP S8 NXR user manual

LRP

LRP S8 NXR user manual

HOMCOM 370-227V70 Installation and operation manual

HOMCOM

HOMCOM 370-227V70 Installation and operation manual

Maverick SCOUT RC instruction manual

Maverick

Maverick SCOUT RC instruction manual

Cen GST 7.7 manual

Cen

Cen GST 7.7 manual

Hong Nor Sabre X3 Electric instruction manual

Hong Nor

Hong Nor Sabre X3 Electric instruction manual

Hobbytech SPIRIT EVO RTR instruction manual

Hobbytech

Hobbytech SPIRIT EVO RTR instruction manual

Carson Specter instruction manual

Carson

Carson Specter instruction manual

Horizon Hobby Axial RYFT RBX10 instruction manual

Horizon Hobby

Horizon Hobby Axial RYFT RBX10 instruction manual

Tyco R/C C4639-0920 user manual

Tyco R/C

Tyco R/C C4639-0920 user manual

manuals.online logo
manuals.online logoBrands
  • About & Mission
  • Contact us
  • Privacy Policy
  • Terms and Conditions

Copyright 2025 Manuals.Online. All Rights Reserved.