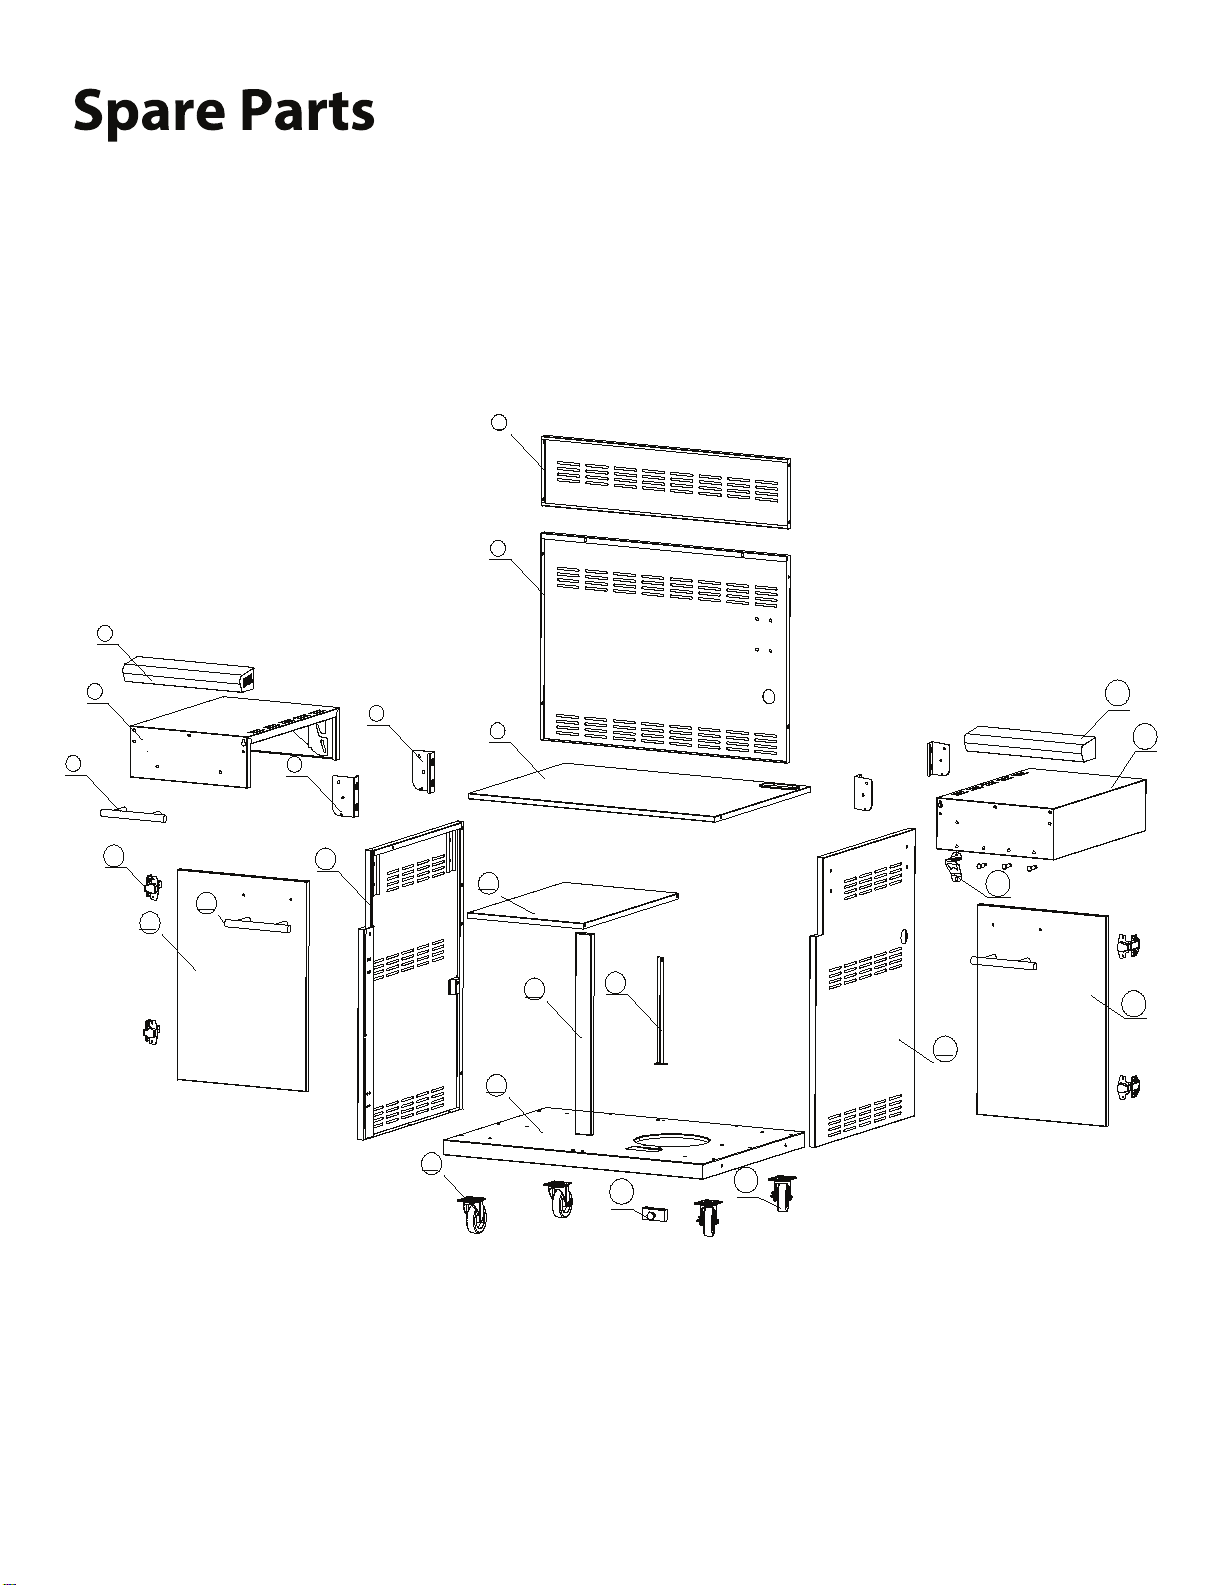
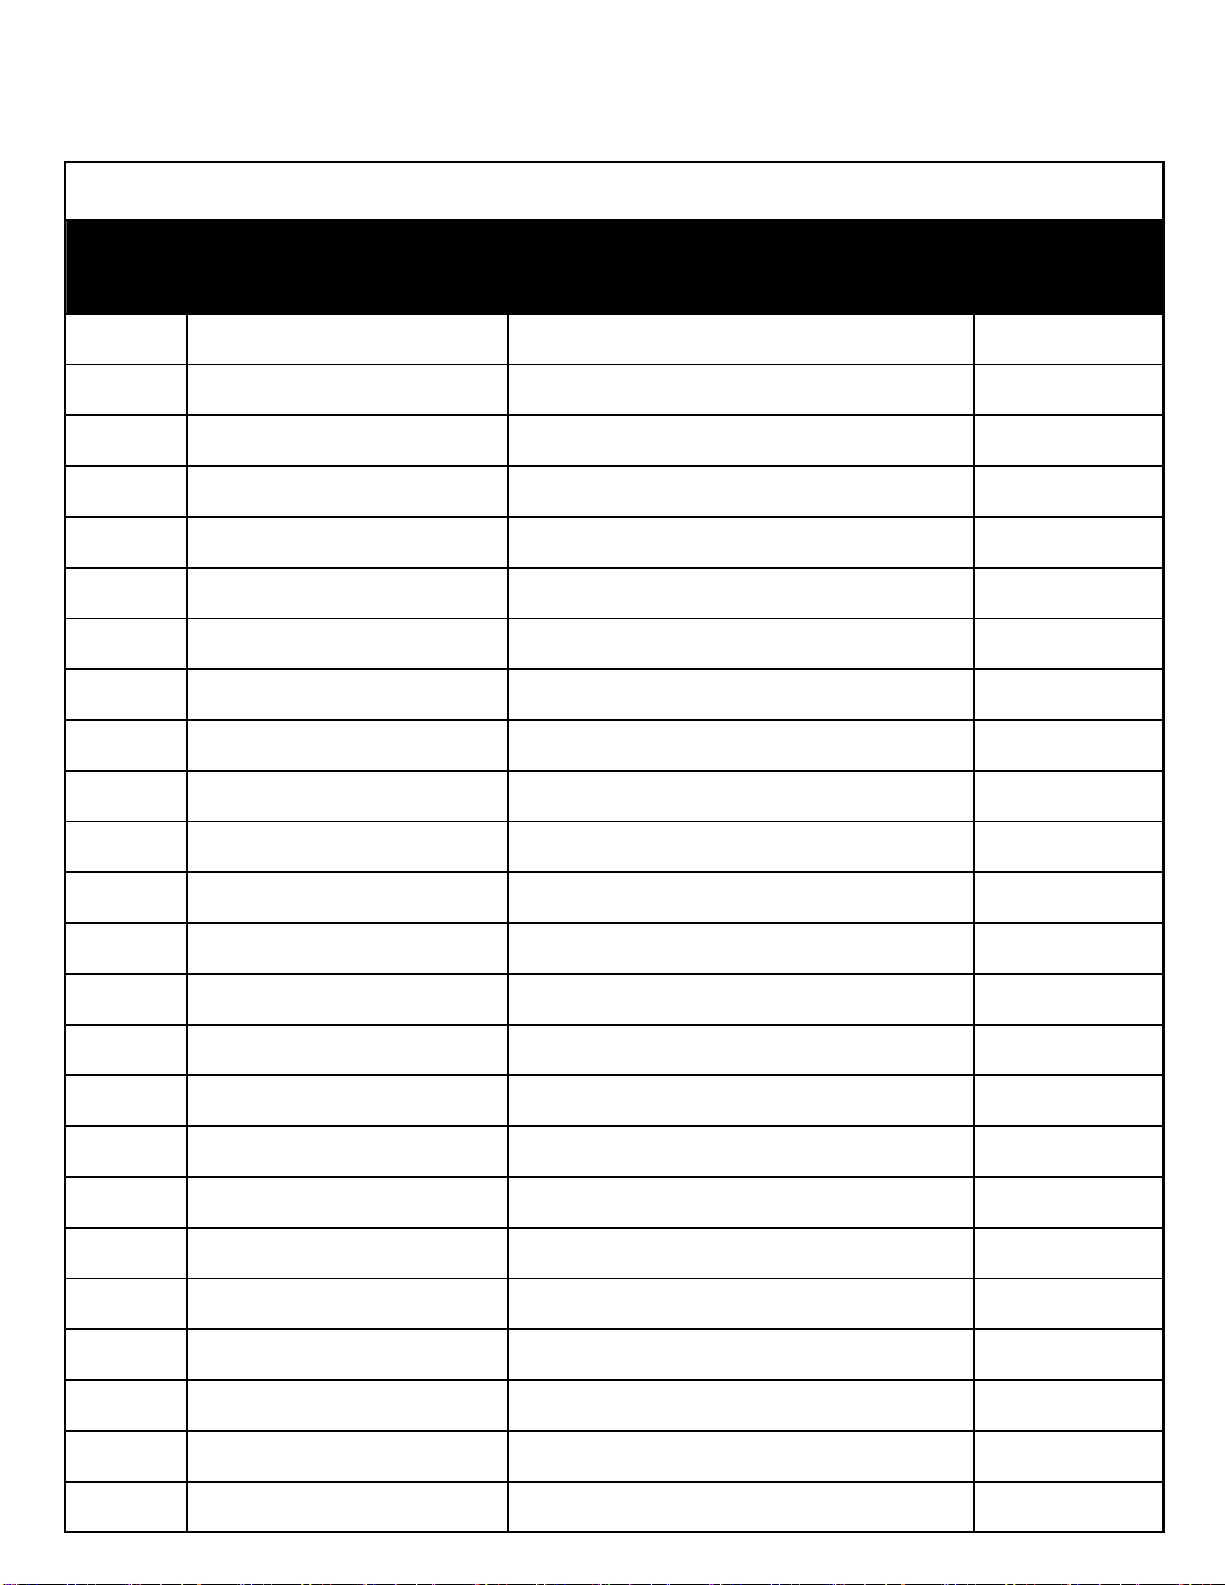
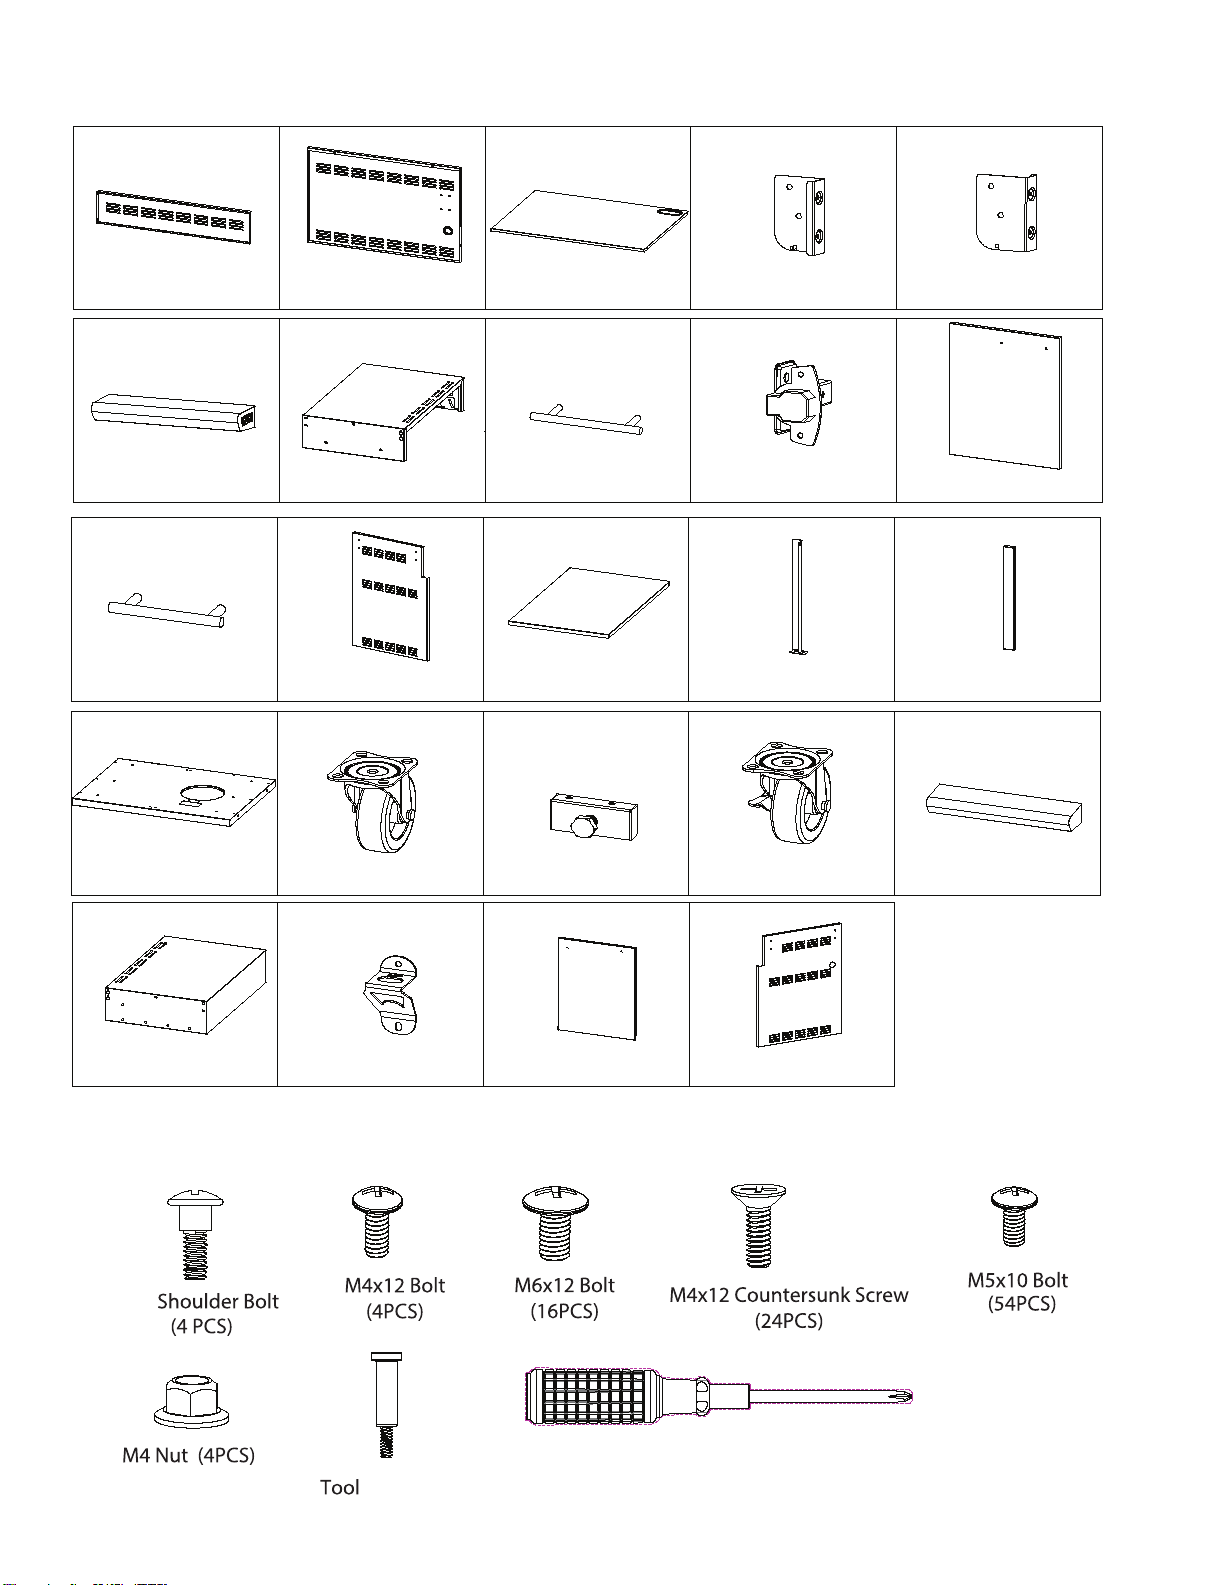
Xo XOG32CARTXLT User manual

PERFORMANCE
GRILL CARTS
ATTENTION:
Warning: Heavy Weight Hazard!
XO PERFORMANCE GRILL CART ASSEMBLY INSTRUCTIONS
MODELS:
XOG32CARTXLT
XOG40CARTXLT
THIS INSTRUCTION MANUAL CONTAINS IMPORTANT INFORMATION NECESSARY FOR THE PROPER
ASSEMBLY AND SAFE USE OF THE APPLIANCE. PLEASE READ AND FOLLOW ALL WARNINGS AND
INSTRUCTIONS THAT ACCOMPANY BOTH THIS CART AND THE GRILL BEFORE ASSEMBLING AND
USING THE APPLIANCE. THIS PRODUCT IS DESIGNED FOR OUTDOOR USE ONLY. DO NOT OPERATE
IN ANY ENCLOSED SPACE.
FAILURE TO FOLLOW ALL SAFETY INSTRUCTIONS MAY RESULT IN PROPERTY DAMAGE, INJURY OR DEATH.

When buying any XO appliance,
you can be con you have chosen a
high quality, innovative and stylish product
from a company that cares about you!
If you require service or have questions,
there are 2 ways to contact our appliance experts;
Online @ https://xoappliance.com/priority-service-for-your-xo-product/
Or by phone 973-403-8900
CONGRATULATIONS
on purchasing your XO.
Before you proceed, take just a
moment to register your XO at:
www.xoappliance.com/register-your-product/
REGISTRATION HELPS YOU BY -
Ensuring warranty coverage should you need service
Providing ownership veri cation for insurance purposes
XO can notify you in the event of product changes or recalls.
Or simply scan here to be taken
to the registration page...
UNDERCOUNTER
2

Unpacking
•
• Remove all cardboard, foam packaging material and nylon bags.
•Use the attened cardboard as an assembly surface, then dispose / recycle all packaging
materials afterward.
• Verify all the contents in the box and gather the required tools. See “Tools Needed” below.
Tools Needed
1 x Box Cutter
1 x #2 Phillips head
screwdriver
Contact XO Appliance at www.xoappliance.com
or (973) 403-8900 regarding any missing parts.
3

XOG32CARTXLT
XOG40CARTXLT
4

Diagram
27
9
75
11
1
2
3
6
7
4
5
8
9
10
11
12
13
15 14
16
17
18
19
20
21
22
23
24
XOG32CARTXLT | XOG40CARTXLT
5

Spare Parts List
XO GRILL CARTS (32"&40")
S.No. Spare Part SKU Description Qty
1. XOPG64974 Cart rear upper panel 1
2. XOPG64975 Cart rear lower panel 1
3. XOPG64976 Top panel 1
4. XOPG64978 Side shelf left bracket 2
5. XOPG64979 Side shelf right bracket 2
6. XOPG64980 Left side shelf front 1
7. XOPG64982 Left side shelf 1
8. XOPG64984 Side handle 1
9. XOPG64985 Hinge 4
10. XOPG64986 Left Door 1
11. XOPG64988 Door handle 2
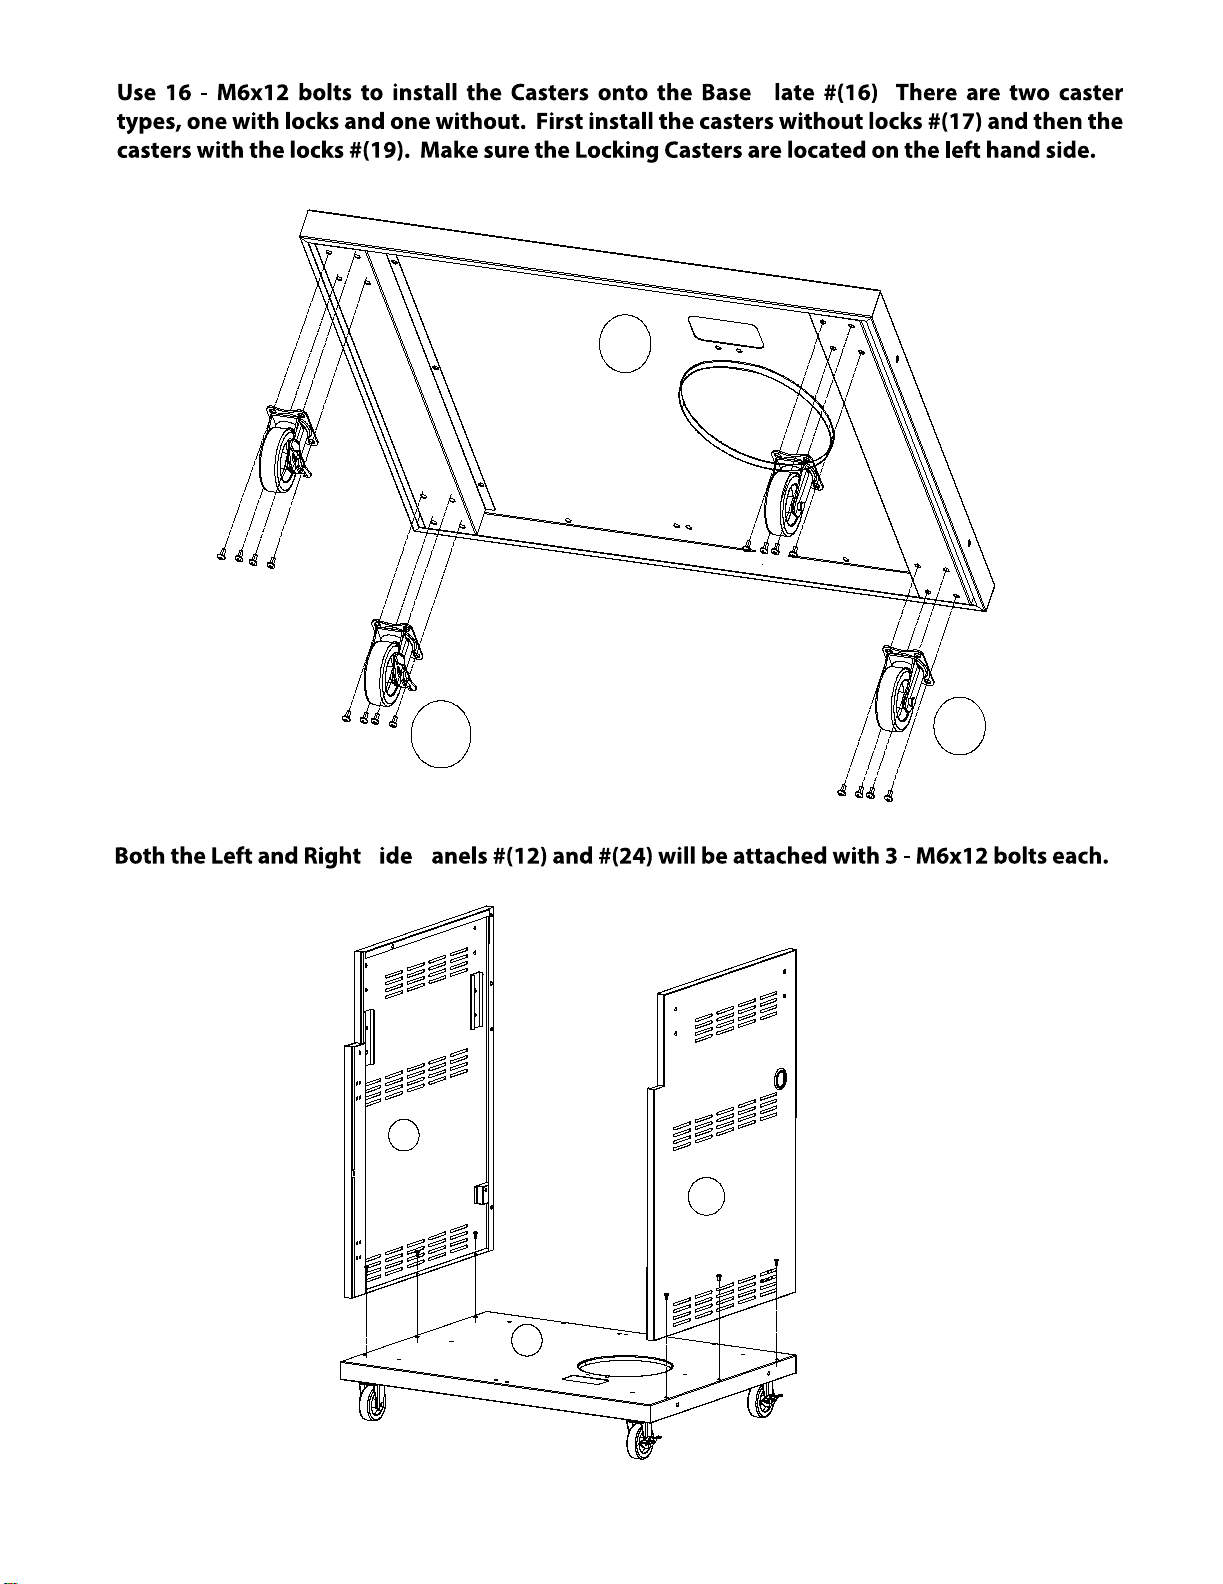
12. XOPG64989 Cart left side panel 1
13. XOPG64991 Center shelf 1
14. XOPG64992 Back panel support 1
15. XOPG64993 Front panel support 1
16. XOPG64977 Bottom panel 1
17. XOPG64994 Casters without locks 2
18. XOPG64996 Cylinder lock down 1
19. XOPG64995 Casters with locks 2
20. XOPG64981 Right side shelf front 1
21. XOPG64983 Right side shelf 1
22. XOPG64997 Bottle opener 1
23. XOPG64987 Right Door 1
24. XOPG64990 Cart right side panel 1

M6
Hardware
Parts Supplied
Peg (3PCS)
Screwdriver
(1PC)
1 x Cart Rear Upper Panel 1 x C art Rear Lower Panel 1 x Top Panel 2 x Side Shelf Left Bracket
2 x Side Shelf Right Bracket
1 x Left Side Shelf Front 1 x Left Side Shelf Front 1 x Side H andle 4 x Hinge 1 x Left D oor
2 x Door Handle 1 x Cart Left Side Panel 1 x Center Shelf 1 x Back Panel Support 1 x Front Panel Support
1 x Bottom Panel 2 x C aster W ithout Lock 1 x Gas Tank Lock 2 x Caster With Lock 1 x Right Side Shelf Front
1 x Right Side Shelf 1 x Bottle O pener 1 x Right door 1 x Cart R ight Side Panel
7

16
17
19
12
24
16
P
S P
8

2
24
1
12
24
eft -
fas
-
9

2
USING 4 - M4X12 BOLTS, MOUNT THE 12V TRANSFORMER TO THE CART REAR LOWER PANEL
ON THERIGHT HAND SIDE AS SHOWN BELOW. THIS WILL BE USED LATER TO POWER THE
INTERIOR HALOGEN LIGHTS AND CONTROL PANEL LEDS.
10

1 4
1 6
1 4
1 6
15
1615
16
B P Support to B P
F P Support B P
11

13
14
15
12
13
12
15 14
3
12
15
24
3
12
15
24
A
B
Side P P Support R
Upper P R Side P
Back Panel Support
Attach the Center Shelf #(13) to the Left Side Panel #(12), Front Panel Support #(15) and
12

18
16 18
16
L n lace the anel 2
-
the H s Hinges to the L Right D s #(10, 23). H
attach to each D #(10 , 23) using 2 - bolts
2 Hinges #(9) using 2 - both the L Right D s #(10, 23).
LEFT DOOR RIGHT DOOR
11
9
10
11
9
9
11
23
11
9
13

4
5
4
5
to the left side panel as
STOP
as shown
If you are attaching the
XO Side Burner Cart -
Go to that Manual and
attach it at this time.
If you are NOT attaching the
Side Burner Cart - proceed
with attaching Side Shelf
Brackets to the right side of
the cart at this time.
14
1
2
1
12
42
3
To adjust the gap between the doors - To adjust the gap between the door and the frame -
turn Screw A on the hinges. turn Screw B on the hinges.

66
7
8
7
ide Shelf Front #(6) to the Left Side Shelf #(7), turn both parts upside down. Start,
but do not tighten down 2 - lts as shown below into the Left Side Shelf Front #(6). Align the
heads of the bolts with the keyhole slots in the Left Side Shelf #(7) and slide into place to align both
parts. Install the additional - as shown and tighten all 5 bolts.
With the Left Side Shelf Assembly still upside down, install the towel holder by ing the 2 -
Side Handle #(8), and using the bolts to install the Side Handle #(8) to the
Left Side Shelf #(7) as shown below.
15

4
5
4
20
20
21
Install an M5x15 shoulder bolt at the top of each Shelf racket . After the installation
use an additional M5x15 shoulder bolt to install the Side Shelf A Shelf racket,
front and rear as shown.
To attach the Right Side Shelf Front #(20) to the Right Side Shelf #(21), turn both parts upside
down. Start, but do not tighten down 2 - M5x10 bolts as shown below into the Right Side Shelf
Front #(20). Align the heads of the bolts with the keyhole slots in the Right Side Shelf #(21) and
slide into place to align both parts. Install the additional 3 - M5x10 bolts as shown and tighten
all 5 bolts.
16

22
4
5
5
Attach the supplied Bottle Opener #(22) to the Side Shelf Assembly with 2 -
Install Tool Pegs and screw them into place.
Install an M5x15 shoulder bolt at the top of each Shelf Bracket #(4, 5). After the installation
use an additional M5x15 shoulder bolt to install the Side Shelf Assembly to the Shelf Bracket,
front and rear as shown.
17

BEFORE MOUNTING THE GRILL
TO THE CART -
LOCK THE CASTERS TO PREVENT
ACCIDENTAL MOVEMENT.
TEAM
LIFT
WARNING: DO NOT ATTEMPT TO LIFT AND PLACE THE GRILL ALONE
AFTER ENSURING THE CART HAS BEEN IMMOBILIZED, TOGETHER WITH OTHERS LIFT AND PLACE
THE GRILL INTO THE ASSEMBLED CART. THE FLANGE SURROUNDING THE SIDES AND BACK OF
THE GRILL WILL REST ON THE TOP EDGES OF THE SIDES. SLIDE THE GRILL IN APPROXIMATELY
TWO THIRDS OF THE WAY.
LEAVE THE OPENING IN THE RIGHT, REAR
OF THE CENTER SHELF EXPOSED.
FEED YOUR GAS LINE AND THE ELECTRICAL
FEED THROUGH THE OPENING AND CONNECT
THESE TO THE GRILL BEFORE SLIDING THE
APPLIANCE ALL THE WAY INTO THE CART.
IMPORTANT: READ THE SECTION ON CONNECTING
THE GAS LINE IN YOUR GRILL MANUAL AND BE CERTAIN
TO FOLLOW ALL THE SAFETY INSTRUCTIONS.
18
OPEN THE GRILL AND REMOVE THE GRATES TO REDUCE ITS WEIGHT.

M5 x 10
AFTER CONNECTING THE UTILITIES AND SLIDING THE GRILL IN SO THE GRILL FLANGE IS
SUPPORTED ON BOTH THE SIDES AND BACK BY THE CART PANELS -
OPEN THE HOOD -
ON BOTH SIDES
OF THE GRILL FIREBOX
THERE IS A HOLE FOR AN
ATTACHMENT SCREW
(SEE DRAWING BELOW)
USING AN M5X10 BOLT
ON EACH SIDE
F
AFTER THE GRILL IS SECURED IN PLACE
YOU CAN REMOVE THE REAR UPPER
PANEL TO TIGHTEN THE CONNECTIONS
IF NECESSARY - NEVER OPERATE
THE GRILL WITH THE REAR UPPER
PANEL REMOVED
ASTEN THE GRILL TO THE CART
REPLACE THE COOKING GRATES
AFTER THIS STEP YOU ARE READY TO FINISH YOUR GRILL SET UP - CONSULT YOUR GRILL
OPERATING MANUAL FOR ADDITIONAL INFORMATION.
19

XO APPLIANCE | 120 EAGLE ROCK AVE. SUITE 303 | EAST HANOVER, NJ 07936
P. 973.403.8900 WWW.XOAPPLIANCE.COM
IMPORTANT
REFER TO YOUR GRILL OPERATING MANUAL
FOR INFORMATION REGARDING THE GAS
CONNECTION TO YOUR GRILL.
FAILURE TO FOLLOW ALL SAFETY GUIDELINES
MAY RESULT IN PROPERTY DAMAGE, INJURY OR DEATH.
20
This manual suits for next models
1
Table of contents
Other Xo Outdoor Cart manuals
Popular Outdoor Cart manuals by other brands

Jet
Jet PUC-3117 instructions

Graham Field
Graham Field Lumex VERSACART 7010A Assembly and operation instructions

West Elm
West Elm Round Cocktail Cart 2731339 Assembly instructions

Yard Works
Yard Works YRD610 quick start guide

SereneLife
SereneLife SLGZX3 user manual

d & b audiotechnik
d & b audiotechnik Y Series Rigging manual