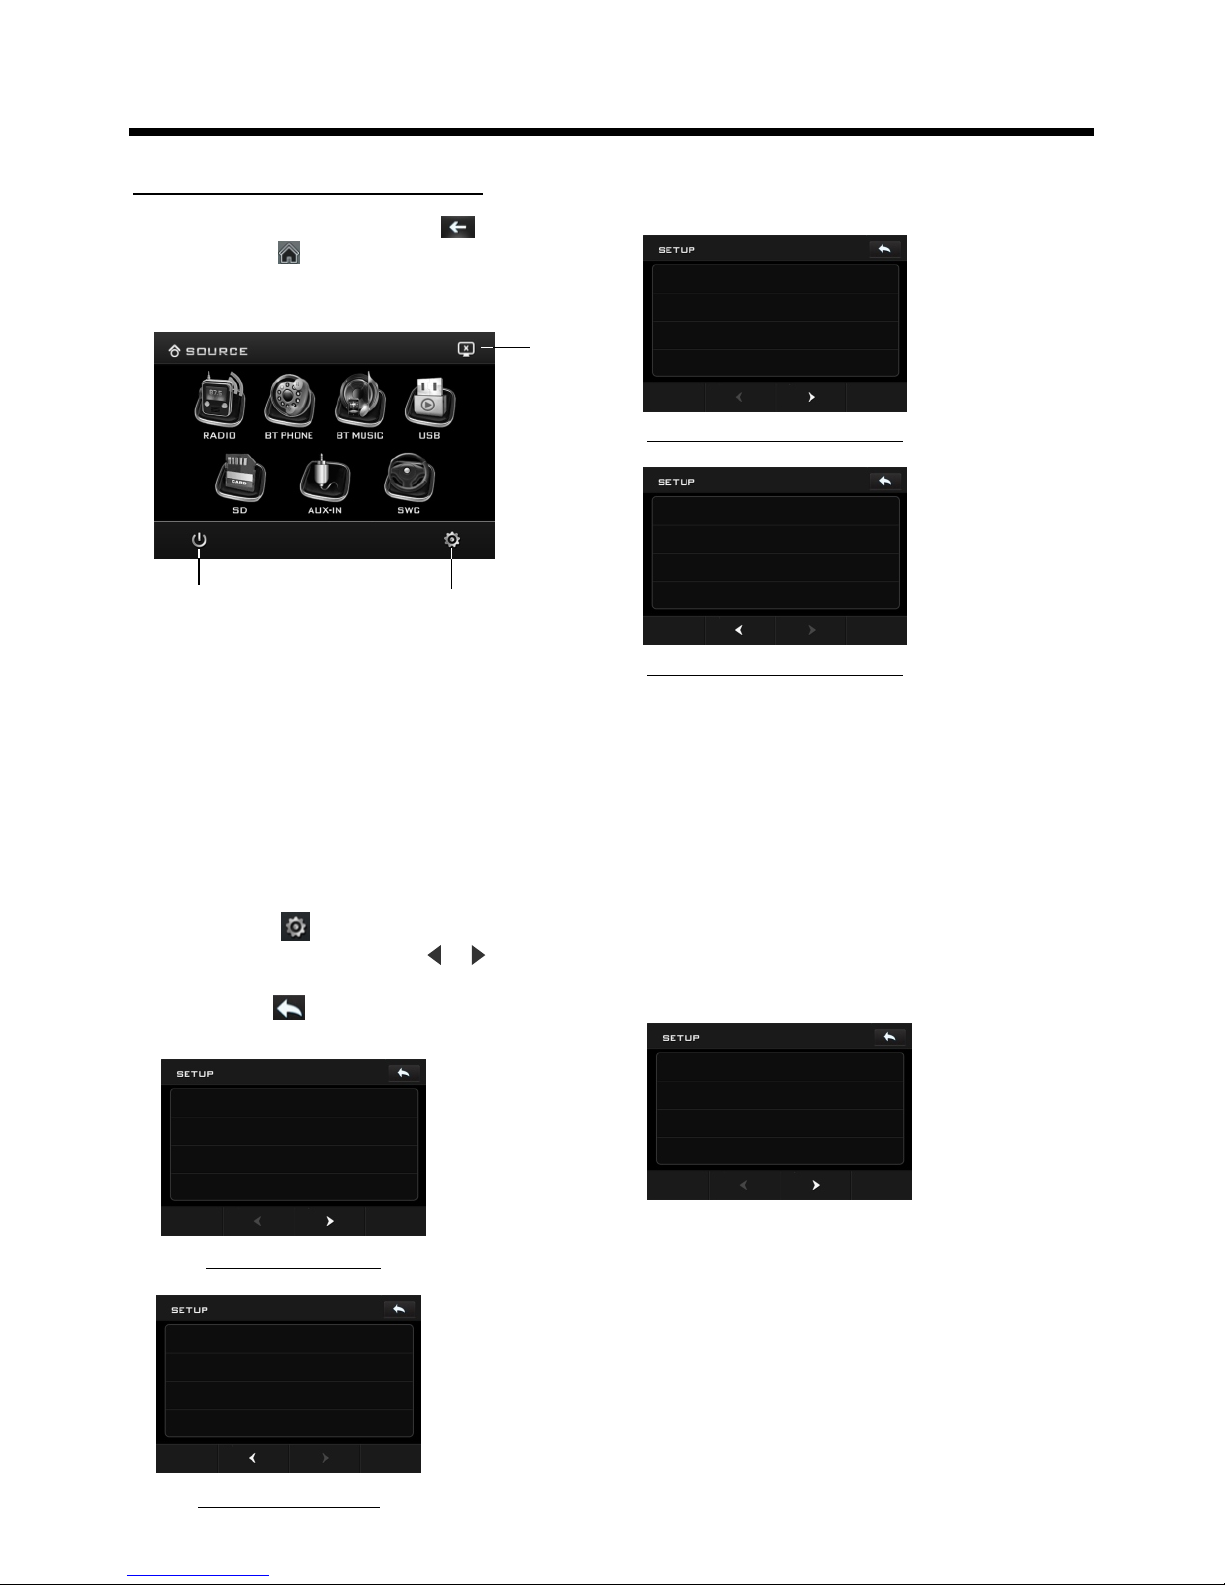
manuals.online logo
Brands
  1. Home
  2. •
  3. Brands
  4. •
  5. Xomax
  6. •
  7. Car Receiver
  8. •
  9. Xomax XM-VRSU4309BT v2 User manual

Xomax XM-VRSU4309BT v2 User manual

Other Xomax Car Receiver manuals

Xomax XM-2R422 User manual

Xomax

Xomax XM-2R422 User manual

Xomax XM-VRSU412BT User manual

Xomax

Xomax XM-VRSU412BT User manual

Xomax XM-CDB618 User manual

Xomax

Xomax XM-CDB618 User manual

Xomax XM-RD264 User manual

Xomax

Xomax XM-RD264 User manual

Xomax XM-DVBT2-01 Manual

Xomax

Xomax XM-DVBT2-01 Manual

Xomax XM-2VRSUA744 User manual

Xomax

Xomax XM-2VRSUA744 User manual

Xomax XM-RSU247BT User manual

Xomax

Xomax XM-RSU247BT User manual

Xomax XM-RD276 User manual

Xomax

Xomax XM-RD276 User manual

Xomax XM-DTSB928 V2 User manual

Xomax

Xomax XM-DTSB928 V2 User manual

Xomax XM-2VA718 User manual

Xomax

Xomax XM-2VA718 User manual

Xomax XM-VN745 User manual

Xomax

Xomax XM-VN745 User manual

Xomax XM-2DTSBN6214 User manual

Xomax

Xomax XM-2DTSBN6214 User manual

Xomax XM-RSU227BT User manual

Xomax

Xomax XM-RSU227BT User manual

Xomax XM-RSU225BT User manual

Xomax

Xomax XM-RSU225BT User manual

Xomax XM-RSU228 User manual

Xomax

Xomax XM-RSU228 User manual

Xomax XM-RSU216BT User manual

Xomax

Xomax XM-RSU216BT User manual

Xomax XM-DA755 User manual

Xomax

Xomax XM-DA755 User manual

Xomax XM-DTSB931 User manual

Xomax

Xomax XM-DTSB931 User manual

Xomax XM-R280 User manual

Xomax

Xomax XM-R280 User manual

Xomax XM-VRSU311BT User manual

Xomax

Xomax XM-VRSU311BT User manual

Xomax XM-CDB619 User manual

Xomax

Xomax XM-CDB619 User manual

Xomax XM-DTSBN915 Service manual

Xomax

Xomax XM-DTSBN915 Service manual

Xomax XM-RSU249BT-R User manual

Xomax

Xomax XM-RSU249BT-R User manual

Xomax XM-RSU221BT User manual

Xomax

Xomax XM-RSU221BT User manual

Popular Car Receiver manuals by other brands

Linear Series LS5050 Operation and installation manual

Linear Series

Linear Series LS5050 Operation and installation manual

Kenwood KRC-160 instruction manual

Kenwood

Kenwood KRC-160 instruction manual

Sony XR-CA430X Service manual

Sony

Sony XR-CA430X Service manual

T+A Elektroakustik K1 CD-RECEIVER operating instructions

T+A Elektroakustik

T+A Elektroakustik K1 CD-RECEIVER operating instructions

SoundMax SM-CDM1052 instruction manual

SoundMax

SoundMax SM-CDM1052 instruction manual

Xtrons HD107HD user manual

Xtrons

Xtrons HD107HD user manual

Mopar RB3 manual

Mopar

Mopar RB3 manual

Clarion ADDZEST DMZ615 owner's manual

Clarion

Clarion ADDZEST DMZ615 owner's manual

Sony XAV-601BT Specifications

Sony

Sony XAV-601BT Specifications

PIE GM12-POD/S Operation manual

PIE

PIE GM12-POD/S Operation manual

Hyundai H-910H instruction manual

Hyundai

Hyundai H-910H instruction manual

Sony XR-C6100 Service manual

Sony

Sony XR-C6100 Service manual

Sony CDX-L600X - Fm/am Compact Disc Player Installation/connections

Sony

Sony CDX-L600X - Fm/am Compact Disc Player Installation/connections

Motorola VWA63 Service manual

Motorola

Motorola VWA63 Service manual

Sound Storm STM93R user manual

Sound Storm

Sound Storm STM93R user manual

Nextar D3201 instruction manual

Nextar

Nextar D3201 instruction manual

Alpine CDE-163BT owner's manual

Alpine

Alpine CDE-163BT owner's manual

Kenwood KDC-X303 quick start guide

Kenwood

Kenwood KDC-X303 quick start guide

manuals.online logo
manuals.online logoBrands
  • About & Mission
  • Contact us
  • Privacy Policy
  • Terms and Conditions

Copyright 2025 Manuals.Online. All Rights Reserved.

CAR AUDIO/VIDEO SYSTEM
FLIP DOWN AND REMOVABLE CONTROL PANEL
4.3” Wide Color TFT Touch Screen
REMOTE CONTROL
CONTROL PANEL USB PORT AND AUX INPUT
SD/MMC CARD SLOT
BUILT-IN MW/FM-RDS TUNER
BLUETOOTH A2DP & AVRCP COMPITABLE
XM-VRSU4309BT v2
INSTALLATION MANUAL
AU X IN
US B
TA
AF
IR
/CH1~6
VOL
MU
PT Y
MIC
MO D
To ensure safety while driving
and to comply with laws,
drivers should not watch video or
operate the video device while driving.
Installation
B. Hold the left end of the control panel to slide rightwards a little and pull it towards
you to remove it .
2) Connecting all wires according ot the wiring diagram as follows:
3) Attach control panel onto chassis.
A. Make the right hollow of control panel aim at the right bulge of chassis, then push
and hold control panel rightwards; at one time, move the left end of control panel
towards chassis to make the left hollow of control panel aim at the left bulge of
chassis and then release holding .
B. Flip control panel up till hearing a click sound to attach onto chassis.
* How to clean panel connector
Frequent detachment will deteriorate panel connectors. To minimize deterioration,
periodically wipe the panel connectors with a clean/soft/dry cloth .
4) Testing it for making sure that it can work properly .
1
2
Bulge
Hollow
Bulge
Hollow
Connector
Installation
4. Installing main unit according to installation diagram:
1) Insert the chassis of the car multi-media system into the sliding metal housing.
2) Use the metal strap to fix the rear part of chassis.
* Uninstalling main unit:
1) Remove metal strap from main unit;
2) Remove plastic trim frame from main unit;
3) Insert a key plate into left and right side of main unit and draw main unit out of
sliding metal housing.
Installation diagram
HEX NUT
SPRING WASHER
PLAIN WASHER
TAPPING SCREW
DASH BOARD
METAL MOUNTING
STRAP
CONSOLE
SLIDE BRACKET
HOUSING
FIXING TAB
HEX BOLT
Electric Connection

WIRING CONNECTION
Note:
the earth connection cable (parking brake B-) must be connected in order for
pictures to be played back to the monitor. If the cable has not been correctly
connected, the message “PARKING BRAKE” appears on the monitor.
RADIO ANTENNA JACK
RCA AUDIO OUT SOCKET
VIDEO OUTPUT SOCKET
VIDEO OUTPUT SOCKET
PINK (B+)12V
REAR CAMERA SWITCH
(B-)PARKING BRAKE
GREY
GREY/BLACK
FRONT
RCH SPK.
VIOLET
VIOLET/BLACK
WHITE
WHITE/BLACK
GREEN
GREEN/BLACK
REAR
LCH SPK.
AUTO ANTENNA BLUE
GROUND(B-)
MEMORY BACK-UP(B+)
IGNITION SWITCH(B+) RED
YELLOW
BLACK
REAR
RCH SPK.
FRONT
LCH SPK.
LIGHT GREEN
FUSE
KEY GROUND(BLACK)
KEY 1(BROWN)
KEY 2(WHITE)
ISO CONNECTOR
SUBWOOFER GREY
REAR CAMERA INPUT YELLOW
White Yellow
Yellow
Red
Remote Control
Using the Remote Control
Face the remote control towards the player front face IR mark (remote control signal
receiver).
Operation angle: About 30 degree in each the direction of the front of the IR mark.
Preparing the Remote Control
1.First push to inside as the direction indicated by the arrow (See )And then
Remove the battery holder as the direction indicated by the arrow (See ).
2.Replace the battery Set a new battery property with (+)side up as illustrated
(See ).
3.Insert the battery holder. Push in the holder to the original position(See ).
1
2
3
4
Inserting the Battery
Note :
The lithium cell in the battery compartment of remote control has been secured for
transport with a . Before initial use please remove this plastic so that the
remote control is ready for operation .
plastic
Changing of the view angle on multi-angle Digital Video media.
Basic Operation
Main Menu Operation
In many modes, touch the icon
or touch the range to enter the
main menu, the message like following
as below.
ADJUSTABLE ITEMS:
ANIMATION
In RADIO mode, you can change the
playing time of animation among of
“OFF, 10S, 30S, 1M,90S, 2M, 3M and 4M ”.
Note:
Please set the playing time of the
animation to “ 10S ” for the first, when
you turn the unit on .
KEY BEEP : ON or OFF.
Disc setup as follow:
FORMAT
This player is capable of playing discs
recorded in either PAL or NTSC formats.
Make the selection based on whether
you are connecting the unit to a PAL TV
or an NTSC TV. You can also set the unit
to AUTO (auto select). The disadvantage
to auto select is that each time you turn
the unit on it checks to see what kind of
monitor is connected, which causes a
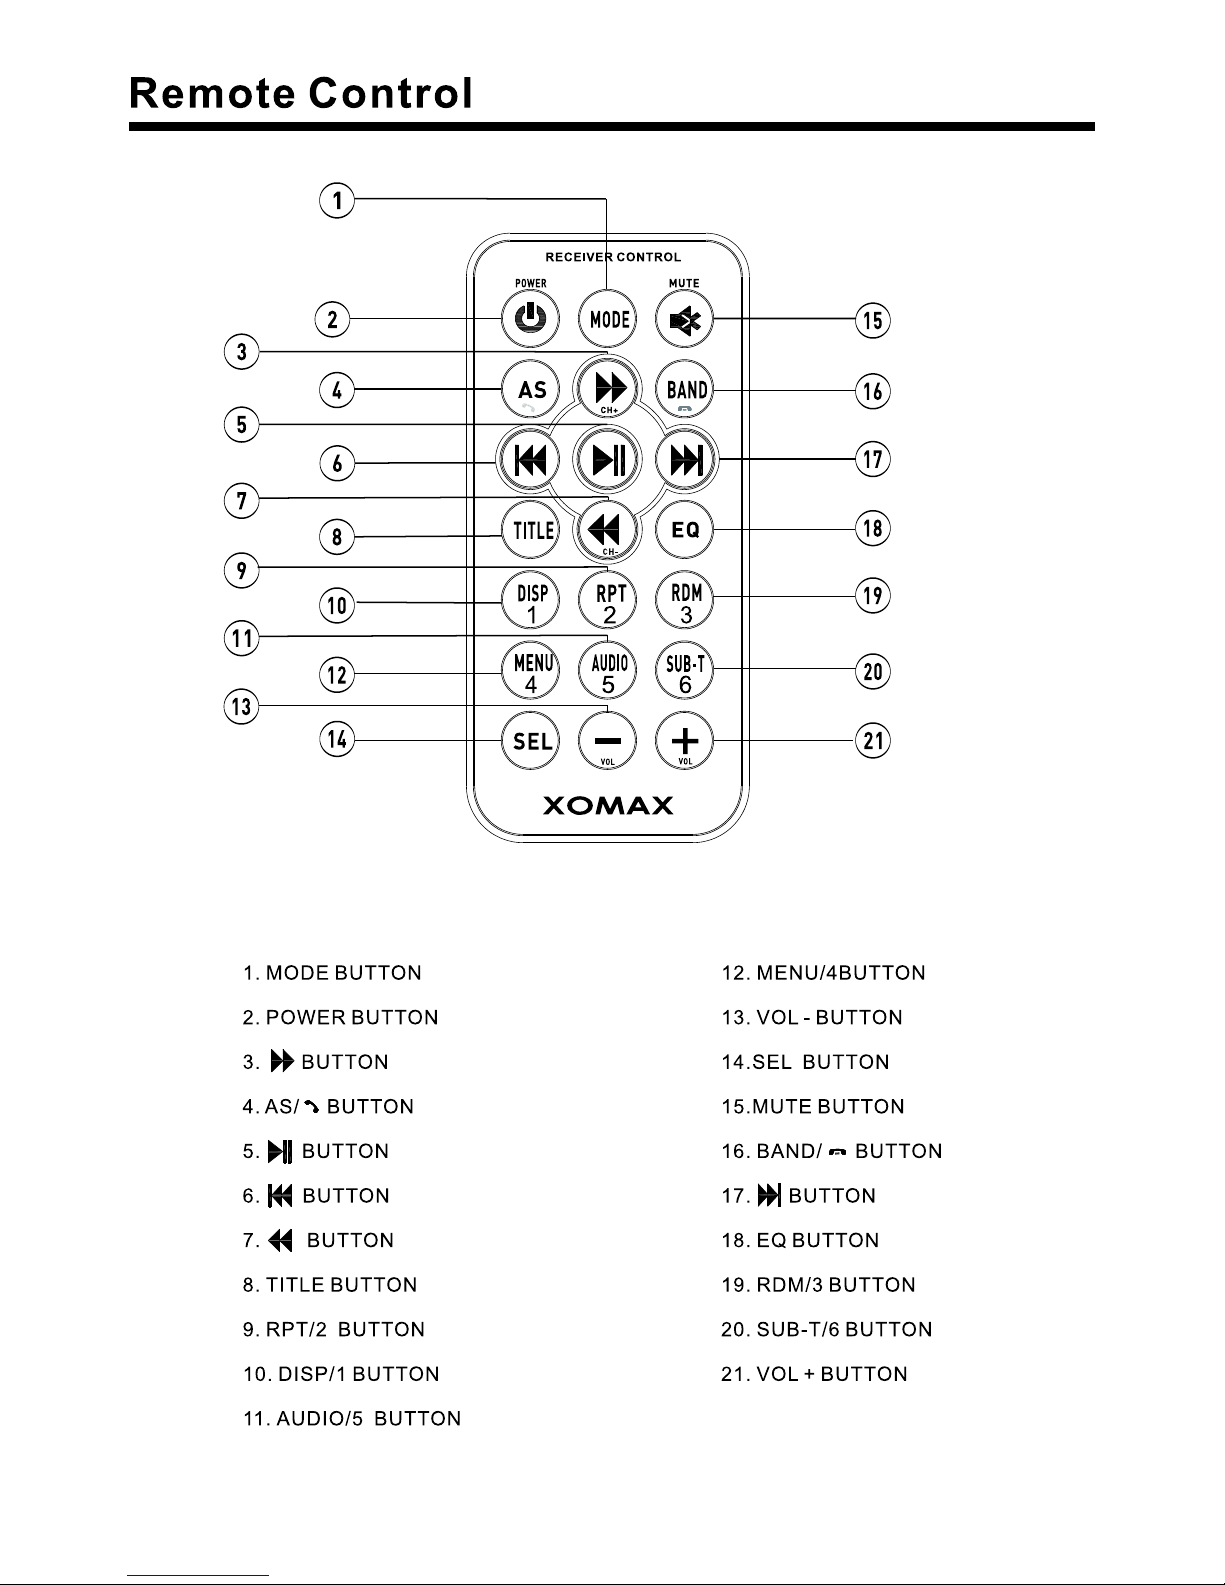
1. POWER icon
In any modes, touch the POWER icon
to switch the unit off .
2. When the unit is power on, tap to turn
off the display and the unit still work,
tap anywhere of the display to turn on
the display again.
3. SETUP icon
Touch to enter the SETTING mode,
the message will display as follow :
Touch the “ ” section on the
setting menu, touch the “ / ”
ranges to select the adjustment item,
Touch the “ ” icon to return to the
previous playback .
Setup interface 1
GENERAL
CLOCK
AUDIO
VIDEO
Setup interface 2
LANGUAGE
CALIBRATION
ILLUMINATION COLOR
General setup interface1
GENERAL
ANIMATION 2 MINUTE
KEY BEEP ON
DISC ...
RADIO ...
General setup interface2
WALLPAPER ...
BLUETOOTH ON
ABOUT ...
GENERAL
DISC
FORMAT AUTO
TV TYPE 16:9
RATING ADULT
(3)
(1)
(2)