Xoro HRS 8670 LAN User manual

HRS 8670 LAN
HD DVBS2 Receiver
HRS 2670 LAN
DVBS2 Receiver

operating instructions
Current device software and
manuals
can be
found
in the
download area
on www.xoro.de


of 4
Table of Contents (DE)
Safety instructions 4
Customer service and environment
6
Scope of delivery/connections and controls 7
Remote control 8
Connection to the TV 10
Connection to the network 10
Connection to the satellite reception system 11
Connection to the Hi-Fi system 11
Connecting USB devices 12
Installation 13
Antenna and search run 14
Sendersuche 17
Daily operation 18
EPG (Electronic Program Guide) 20
Recorder* 21
USB Media Player 22
Settings 25
Sender - Edit channel lists 25
Image edition 27
Sendersuche 28
Time 28
Preferences 29 System 29
Software Update 30 Network Settings 30
SAT-IP 31
USB and Apps
33 PVR Settings*
33
Apps: Wetter, RSS-Reader, DLNA 34
Troubleshooting 36
Specifications /Models and Functions 37
Warranty Conditions 38

of 5
*This manual describes how to operate multiple device models. Functions that are not
available on all models are marked with the words "Only certain model le". See the
device specifications at the end of the guide for an overview of the features available per
model .
Safety
that Blitz symbol in triangle Has the user on Dangerous tensions an unite Exposed
Components in Inner some Device There.
The exclamation point in the triangle alerts the user to important operating and
maintenance instructions (service) in this book, which should be followed absolutely.
• To avoid material or personal injury and to ensure flawless operation, have your satellite
reception system installed by a specialist company.
• The receiving system must be grounded according to the authorities.
• If the antenna is not precisely aligned, there may be image disturbances and other
reception problems (message "No reception"). This can only affect individual
transmitters or depend on the weather. Please have your antenna checked and aligned
by a specialist company.
• Use high quality antenna cables.
• If the LNB of your satellite antenna is too old, it may no longer be suitable for receiving
all current satellite programs. Install an LNB that is suitable for receiving all programs
(often referred to as "Digital" or "Universal" LNB).
Find out more about the correct alignment of your reception system and current channel lists on
the website of your satellite operator or in specialist shops.
Safety
• Never touch the device with damp or wet hands.
• The device can only be operated with the voltage described on the back. If you do not
know the mains voltage, please ask an electrician.
• This device must not be positioned near moisture and or water.
• For cleaning, remove the power plug from the socket.
• Do not use liquid cleaners or cleaning sprays. The device may only be cleaned with a
damp cloth.

of 6
• The power cable is sheathed and insulates the current. Please do not place any objects on
the cable as this could cause the protection function to be lost. Avoid heavy loads on the
cable, especially on sockets and connectors.
• If you want to pull the plug out of the socket, always pull on the plug and not on the cable.
The cable could otherwise crack.
• The device has overload protection. This may only be replaced by a professional.
• For additional protection of the device during a thunderstorm or when it is unattended for
a long time: Unplug the power plug from the socket and the antenna plug from the
antenna/cable connector socket. This prevents damage due to lightning strike/overvoltage.
Safety
• An outdoor antenna must not be installed near power lines or other circuits. When
attaching such antennas extreme caution, as contact with such lines can end fatally.
• Do not overload sockets, extension cables or other cables,as this can lead to electrical
shocks or electrical shocks.
• No objects may be inserted into the openings of the device, as electricity flows in some
places and the contact can cause fire or electric shock.
• Do not connect any additional devices, which are not recommended by the manufacturer .
• Do not place the device on an unstable surface. The device could be damaged or people
injured. Any fastenings should only be affixed according to the manufacturer's information
or obtained from the controller.
• The device can display a still image on the screen of the TV for an unlimited period of time.
This can cause damage to the screen.
• Plasma/OLED/LCD-TV: Never operate the device permanently in 4:3 mode (PillarBox). This
could cause damage to the screen if used for a longer period of time. Please refer to the
MANUAL of the TV.
• Do not increase the volume when a quiet passage is playing. This could lead to damage
to the speakers if a loud passage comes.
• the openings some Housing serve the ventilation, in order that that device not overheated.
these must always be held free.
• The device must not be used near heat sources, such as Ovens + heaters.
• Avoid heat build-up on the device.
• Protect the device from moisture and weather conditions.
• Do not place vessels of liquids on the device.
• Do not expose the device and remote control to direct sunlight. This impairs function and
could lead to injury.
• The device heats up during operation. Please do not place it on heat-sensitive surfaces.
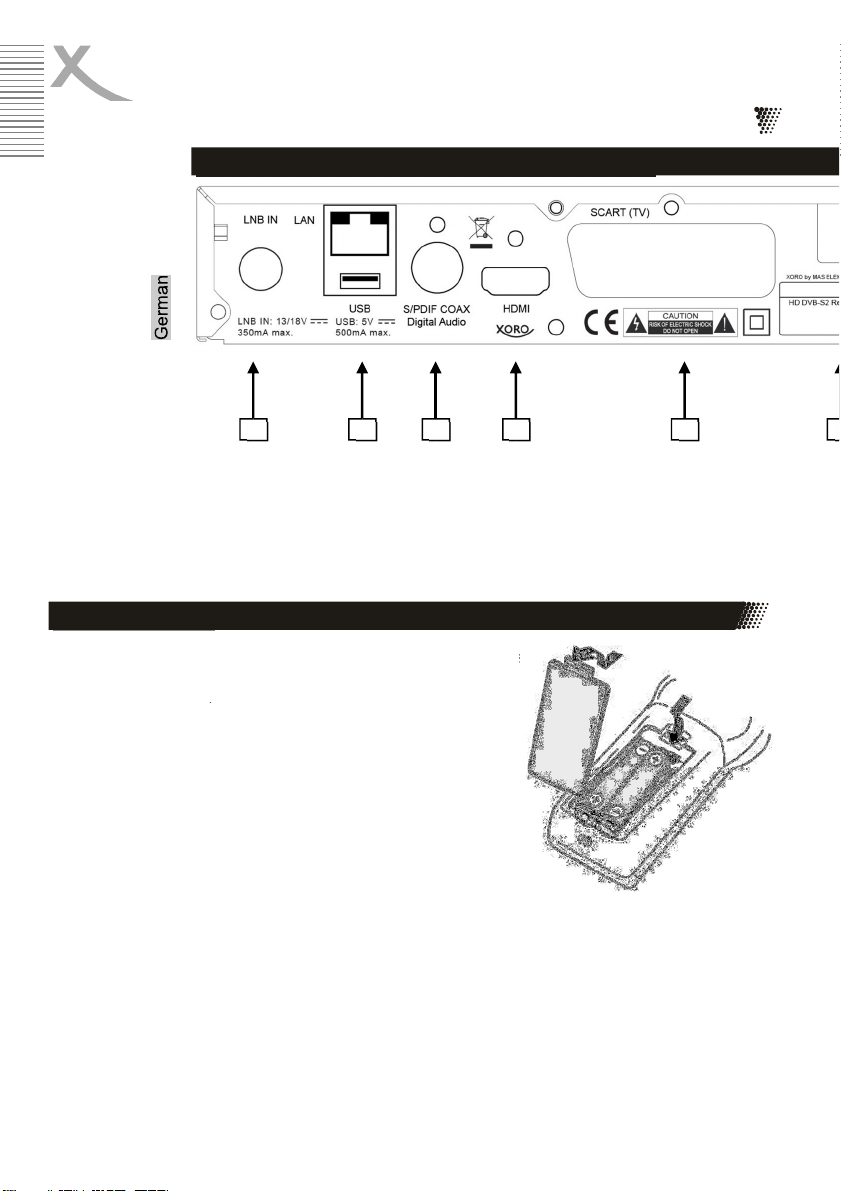
USB jacks
• The receiver's USB jacks are not suitable for charging devices with built-in battery (e..M.
phones,MP3 players, tablet computers, etc.).

of 7
• USB devices, which require a higher power than 500mA (0.5A), violate the USB
specifications and may not be recognized by the receiver.
use
• The device is designed for use in private homes.
Customer Service &
Environment
Servicefall
• Never carry out repairs yourself,please always leave this to qualified personnel.
• Contact the repair service for the following errors:
a. If the power supply or power cord is defective.
b. If items have fallen into the device.
c. If the device has come into contact with water.
d. If the device does not work despite the correct application.
e. If the device has been dropped or if the product has performance fluctuations.
• Heavy tobacco smoke damages the electronics of the device. Damage caused by tobacco
smoke will not be repaired under the warranty.
• Use original spare parts. Incorrect spare parts can lead to short circuits + fire or other
malfunctions.
Contact XORO Customer Service:
By phone:04161 - 800 24 24 (Mon-Fri, 11am to 5pm)
For eMail:support@ersservice.de
ERS GmbH Electronic Repair Service
Weidegrund 3/Halle1
21614 Buxtehude - Germany
We will be happy to help you with any questions you may have about
operation or if you have problems with your device.
Recycling of electrical appliances
The product is made of high quality materials and components, these are recyclable and can be
reused. The crossed garbage can on the product or on the packaging means that the product
complies with European directives.
Find out about the local regulations for the separate disposal ofelectronic equipment. Observe
local regulations and do not dispose of old products with normal household waste. By properly
disposing of old products, you contribute to the protection of the environment and the health of
the people.

of 8
Recycling of paper and cardboard
The material recycling symbol on the packaging carton and the user manual meansthat they are recyclable. Do
not dispose of the packaging with normal household waste.
Recycling of nutrients
The material recycling symbol on plastic parts means that they are recyclable. Do not dispose of the plastics
with normal household waste.
The Green Dot
The green dot on cartons means that MAS Elektronik AG pays alevy to the Society for Waste Prevention
and Secondary Raw Material Extraction.
batteries
Each consumer is legally obliged to hand over batteries at a collection point of his municipality or in the
trade, so that they can be disposed of in an environmentally friendly manner. Please do not dispose of
batteries in household waste.
conformance
MAS Elektronik AG hereby declares that this device is in accordance with the basic
requirements and the relevant regulations of the EMCguidelines and the guidelines for low-voltage devices.
This device meets the relevant requirements and relevant regulations of the EUEcodesignGuidelines.
Scope of delivery/connections
scope of delivery
Please make sure that the following parts are included in the packaging:
• XORO Satellite Receiver
• remote control
• Batteries
Notes:
• The device may only be used with the original accessories.
• Immediately after purchase, check the completeness of the accessories. If accessories
are missing, please contact directly the dealer at which you purchased the device.

of 9
1) Front USB port(see page 12)
2) Receiver for remote control signals
3) LED Display: Shows status, transmitter number or time
4) Switch to the previous transmitter (A)
5) Switch to the next transmitter (A)
6) Switch on/off (standby, corresponds to the POWERbutton on the remote control)
7) Operating LED (green: switched on,red: Standby/Standby)
Connections and
controls
-
front
3
5
4
6
1
2
7

of 10
Connections/Remote
Control
A) Antenna input (F-female)
B) Top: Network port (RJ45 jack), Bottom:USB port back (see page 12) C) Digital
audio output (S/PDIF coaxial)
D) HDMI output
E) SCART output
Safetyinstructions:
• Remove and renew old batteries. You could run out and damage the remote control.
• Remove leaking battery fluid with a cloth. Avoid skin contact with the liquid.
• If you swallow the battery fluid, see a doctor immediately.
• In case of skin/eye contact, wash out the skin/eyes and consult a doctor.
• Please keep batteries and the remote control away from children.
Connections and
controls
-
back
A
B
C
D
an
F
remote control
power cordF)
•
Insert the batteries (1.5V size AAA) into the compartmentent
a. When inserting the batteries, please pay attention to the
correct polarity (+/-). To do this, refer to the
Markings on the remote control and batteries.
•
Put the battery flap back on.
•
Remove the batteries from the remote control,
if you do not use the receiver for a long time.

of 11
remote control
Tastenbeschreibung
POWER (Device on/turnoff)
Mute (pause sound)
GOTO (Jump to a certain playback time, turn SAT-IP server on/off)
RPT/REPEAT ( Change playback mode when playing )
SUB-T ( Call subtitles )
AUDIO (Change audio tracks)
(Image search backward/forward)
I I (Previous/next file)
( Start/resumeplayback )
|| ( Pause playback /Timeshift*)
J ( Stop playback /Call Media Player)
Q (Recording*)
RED/PVR (Red function key, Show recording list *)
GREEN/V-FORMAT (Green function key, change HDMI resolution )
YELLOW/ASPECT (Yellow function key, change aspect ratio)
BLUE/TIMER (Blue Functions, Timer-list indicate)
MENU ( Show main menu )
EXIT ( Exit menu )
CH+/CH- (select items in the on-screen menus ,
Switching transmitters)
OK/LIST ( Confirm selection , Show channel list )
i/INFO ( View Information )
BACK/RECALL (call previous transmitter to the parent
Switch directory)
VOL+/VOL- ( Change volume )
EPG (Show electronic program guide)
TXT/TTX (Show video text)
PAGE +/- ( Scrollpagewisely through lists )
0-9 (Numbers )
TV/RADIO (Switching between TV and Radio Mode)
FAV (Show favorite list selection)
*only certain models
Note:The receivers are supplied with one of the two remote controls shown.

of 12
connect
Connection to the TV
Connections:
• Make sure that all devices are turned off and disconnected from the power supply.
• Read the operating instructions for the TV and other accessories and follow the safety
instructions.
• Finally, connect the power cord to an easily accessible power outlet.
The receiver can be connected to TVs with HDMII input as well as to devices with
SCART input. Whenever possible, you should connect your TV to the HDMI output of
the receiver. Only the HDMI output can output image signals in HD quality.
HDMI: Connect the HDMI port of the receiver to a free HDMI
Input of your TV. Read in the manual of your TV how to access the HDM Iinput. The TV
usually switches off automatically to the HDMI input when the receiver is turned on. An
HDMI cable is required for the connection. This is not included with the receiver.
SCART: Connect the SCART (TV) connector of the receiver to a free
SCART input of your TV. The TV usually switches off automatically to the
SCART input when the receiver is switched on. If this is not the case, please refer to
the manual of your TV how to access the SCART option. For the connection a SCART cable
(fullyswitched) is required. This is not included with the receiver.
Notes:
• The receiver is preset for connection to 16:9 TV. Please refer to page 27 to see how
to adjust the settings for a 4:3 TV. The change of the HDMI resolution and the signal
type for the SCART connection is described there.
• Use high-quality cables. Inferior HDMI cables (especially from lengths above 1.5m) can
cause image errors or make image transmission impossible. Inferior SCART cables with
poor shielding can lead to "ghostimages" or noise stumbling noises in the sound.

of 13
Use a high- Quality
Network cable,
to connect the receiver to
your Internet router
.
Connection to the network
(LAN/Ethernet)

of 14
connect
Connect the cable of your satellite reception system to the antenna input LNB IN of the receiver.
Notes:
• Screw the so-called F-plug hand-fixed with the LNB IN input.
• Make sure that no short circuits are on the Fplug.
• Use high quality antenna cables. Inferior cables can cause reception interference.
To connect digitally to a Hi-Fi system, you need a coaxial cable for S/PDIFsignals. These
cables are not included with the receiver. Connect the S/PDIF output to an S/PDIF input on
your Hi-Fi system. Check out the Hi-Fi System Manual to see how to access the audio input.
Note:
• The receiver outputs digital signals in PCM (stereo) or AC3 bitstream (Dolby Digital)
format. If you do not hear sound via your Hi-Fi system while viewing broadcasts with
Dolby Digital audiotrack, please refer to page 29 to see how you can change the output
format for the S/PDIF output.
• The receiver only provides analog stereo sound on the SCART jack. Suitable adapters
(SCART to Cinch) are available in specialist shops.
Connection to
the
satellite
reception system
Connection to
the
Hi
-
Fi system

of 15
Initial
connect
• USB mass storage devices (Max. Capacity:2048GB (2TB)/File Systems:FAT32/NTFS)
• XORO HWL 155N USB Wi-Fi Stick
Notes:
• The USB Wi-Fi stick XORO HWL 155N is not included in the scope of delivery of the receiver
and must be purchased separately. Read on page 30 how to set up the receiver to use a
Wi-Ficonnection.
• The "Live Stream" (SAT-IP) function is not available via USB Wi-Fi.
• Create a backup of all files on a USB storage device before connecting them to the
receiver.
• If your USB storage device is no longer recognized, the file system may becorrupted. Please
check it with your computer's data diagnostic or format it again (see page 34).
• The receiver may need . some time until USB devices are detected and ready for operation.
During this time, the receiver can react delayed to inputs from the remote control.
• A variety of different USB storage media is currentlybeing sold, if necessary.do not all meet
the specifications for USB mass torage devices. If your USB storage device is not
recognized, please try another USB memory.
• Storage devices with partition style "MBR" up to 2048GB (2TB) are supported, at higher
capacity compatibility cannot be guaranteed under all circumstances.
• PVR recordings may need lots of storage space. The receiver records broadcasts in the
quality (resolution, data rate, etc.) in which they are transmitted by the transmitter.
Therefore, it is not possible to predict exactly how much disk space a recording occupies.
An HD recording in high quality and with several sound tracks (plan here for approx.
5GB per hour) occupies significantly more space than a transmission in standard quality
with low data rate.
• For USB recording and timeshift, a correspondingly fast storage device is required. If the
storage device is too slow,ld malfunctions and aborted recordings occur. Especially older
USB sticks or sticks, with small capacity (<16GB), are often unsuitable for PVR
recordings (especially in HD). Hard drives have a better price / performance ratio. Even
older USB drives usually offer more than enough write/read speed.
• USB 3.0 devices and their cables have additional contacts for fast data transfer in the
plugs. These contacts will not connect when these devices are connected to USB 2.0
host controllers. This ensures backward compatibility with USB 2.0 Host Controllers. The
receiver has a USB 2.0 host controller, so max. USB 2.0 speed is achieved.
• If you connect two USB storage devices to the receiver at the same time, the first
connected device becomes "USB1", the second device becomes "USB2". The numbering
Connecting USBDevices
USBjacks:
The following USBdevices are supported:

of 16
of the devices therefore depends on the port order
and not on the USB jack used. After restarting the
receiver, the numbering of the devices may change.
We therefore recommend to connect only one USB
storage device for timer recordings. Please also note
page 33 (recording device) and page 22 (media
player).
Installation
In the case of First commissioning of the receiver Appears on
the TV-screen the XORO Installations menü*. this menu
comprises following options:
1. OSD language
2. Land
3. Sendersuche
4. Pre-prog. Load list
You can use the arrow keys to switch between the four menu items. If the menu item is colored,
you can customize it with the keys .
OSD Language
Select the language in which the screen menus are displayed .
Land
Select the country in which you operate the receiver.
Settings
Customers,to which the following applies, can access advanced settings via the menu
"SenderSearch/Satellite Setting" and perform a search:
• Customers with rotatable satellite antennas (motor)
• Customers with multiple satellite antennas or LNB (DiSEqC)
• Customers with non-standard receiving components
Most customers can use the installation at this point with the selection "Pre prog. Load List"
Complete.
Pre-prog. Load List (LoadPre-programmed List) - Recommended
In the software of the Recveivers a list of stations for the satellite ASTRA 19.2° is stored ex
works. In this list the German TV channels are stored on the front program numbers. In most
cases, the installation of the receiver is complete with the loading of the sender list. If you
have a "Unicable" receiver, you have to make the Unicable settings after loading the pre-
programmed list. Please refer to the following pages.
If necessary,adjust . OSD language and country and decide if you want to use the pre-
programmed sat list. Press ok to confirm your selection.

of 17
Initial
• If you have decided to use the pre-programmed list, now the first TV channel will appear
on your screen. If you are unable to see any TV channels after loading the stored
channel list, please check the wiring, your antenna settings and/or perform a channel
search.
• If you have decided not to use the pre-programmed list, the menu "Antenna and
Search" will appear on the screen.
* If the device does not display the menu "XORO Installation" after the first power on, please
read on page 30 how to return the device to the delivery state.

of 18
Initial
Antenna and search - preparation
Preparation:
In order to successfully perform a channel search, you need to know some information about
your receiving system:
• Which satellite is their antenna aimed at? UK Freesat is at 28.2east
• If you have multiple antennas or an antenna with several LNB you need to know what
kind of switcher (Toneburst or DiSEqC)you are using and to which port which
antenna/LNB is connected.
• With a UniCable/SCR EN50494 receiving system, you need to know which user band is
available and which band frequency is associated with it.
Check with the installer of your antenna system if you do not know some parameters.
Example:
Most satellite antennas in Ireland are oriented towards the ASTRA 28.2° satellite and have a
"Universal" or "Digital" LNB. In these cases, we recommend you do a full auto scan on Astra
28.2east.
If you do not want to use the pre-programmed transmitter list, the usual settings for ASTRA 28.2°
receivers are the following:
Satellite:
028.2E Ku_ASTRA2
LNB
-
Type:
09750/10600
LNB Voltage:
13/18V
22KHz:
auto
Toneburst:
no

of 19
Initial
Antenna and search - procedure
• Use the buttons to select the first satellite you want toset up.
• Press ok . A hook appears in front of the selected satellite. The hook causes the satellite
to be taken into account in the following transmitter search.
• Press the arrow key to switch to the right side.
• You can use the keys to select the different settings, and use the keys to change
them.
• If you have adjusted all the settings for the satellite, press the MENU button to switch back
to the left side.
If you can receive several satellites with your receiving system, now select another satellite
with the buttons, press the OK button for this one as well, and then make the settings on
the right.
• Repeat the steps for all satellites that you can receive with your antenna system.
Notes:
• in Lower Part of the menus becomes, after the settings for the Selected satellites correct
executed Were the Approximate values for the Signal is displayed.
• If a satellite is missing from the list, you can press the RED button ADD
A window opens, enter the longitude,East/West, and band values. Give the new satellite
a name. If you add a new satellite, the search mode "BlindSearch" must be used for the
following channel search. When you add a satellite to the list, you may see. despite
correct settings, no signal quality is displayed. This display is only available for satellites
for which a transponder list has been stored.
DiSEqC 1.0/11
No
:
Motor:
No
On the left side of the on-screen menu, you can see
a list of satellites for which the receiver pre-orders
lists
On the right, you can see the settings for
satellite , which you are working on the left side of the
Have chosen.
Antenna a
nd
search
-
procedure

of 20
Initial
• With the Taste GOTO you display the transponders stored for the selected satellite. The
RED button allows you to add new transponders. The OK button is used to select
transponders for a search.
Antenna and search - explanation of the parameters
LNB Type
Select which oscillator frequency your LNB
uses. The correct value can be found in the
manual of your LNB. (Default: 09750/10750)
If you have a Unicable/SCR EN50494
receiver, please choose the LNB type Unicable
(A or B, for a Unicable system for receiving a
satellite A is usually the right choice). Now select
a free user band and its band frequency.
Please refer to the instructions for your Unicable recommendation system for details. Ask your
landlord about the free user tape when the connection is provided in a rental apartment. The
settings "LOF Lowband"and "LOW Highband" need to be changed very rarely and should always
be left at 09750 und10600 .
LNB Supply
The setting determines with which voltage the antenna system is supplied. The level of voltage
also determines whether horizontally or vertically polarized transponders are received. This
setting must only be changed in very rare cases. An incorrect setting causes senders to be
missing or no reception possible. (Standard: 13/18V)
22KHz
By switching on a 22KHz signal, the receiver can switch the LNB for receiving another frequency
band. This setting only needs to be changed in very rare cases. An incorrect setting causes
senders to be missing or no reception possible. (Standard: Auto)
Toneburst
Toneburst switches have two inputs, allowing you to connect two antennas or LNB to the
receiver. If you have such a switch, you must choose to which of the connections (A or
B)the satellite selected on the left is connected.
This manual suits for next models
1
Table of contents
Other Xoro Receiver manuals
Popular Receiver manuals by other brands

axing
axing HoE 1-00 Operation instructions

Visual Tools
Visual Tools AX-TV user manual

Philips
Philips D2999 instructions

PS Engineering
PS Engineering PXE7300-SR Installation and operation manual

Ramsey Electronics
Ramsey Electronics FR146 instruction manual

BRB Systems USA
BRB Systems USA TX-101 instruction manual