XTM XTM477PK User manual

PLU:667041

2
WELCOME
Thank you for purchasing the XTM477PK 5 Watt UHF CB Radio. Please ensure that you
have read the product manual and instructions in full, prior to installation and use.
Failure to do so may result in product failure/damage or incorrect operation and therefore
impact the product performance.
FEATURES
BOX CONTENTS
INTRODUCTION
•Super Compact Chassis
•80 Narrow-band channels
•5 Watt transmission power
•13.8 VDC Nominal
•Fixed Cord Handpiece/Microphone
•Aluminium Die Cast Chassis
•Squelch Control
•Duplex Repeater Function
•Channel Scan
•Easy To Read Backlit Display
•Mute Out (capable of muting car stereo)
•External Speaker Port
•UHF CB radio
•Spring Antenna base
•65CM Whip Antenna (Ground Independent)
•5M RG 58 Cable with FME connector
•FME to PL259 (Std UHF) connector

3
SAFETY INFORMATION AND WARNINGS............................PAGE: 4
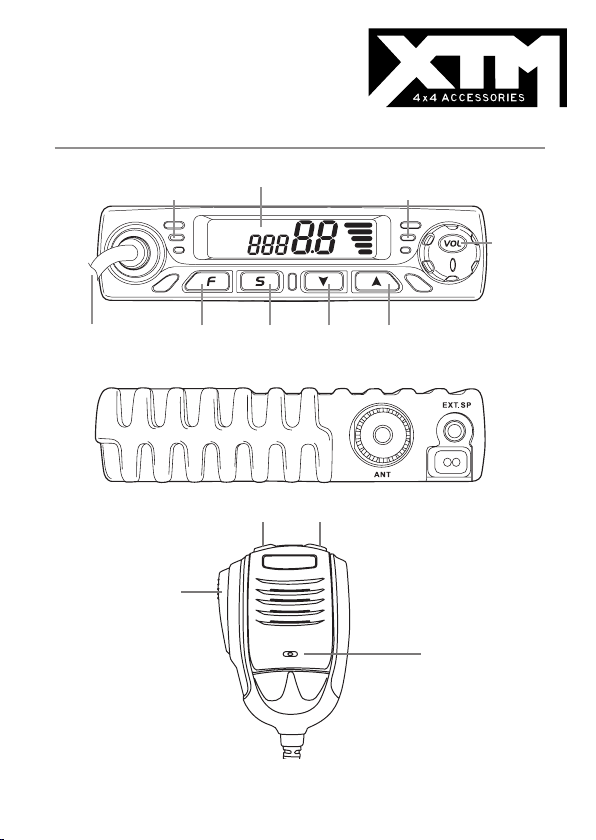
RADIO CONTROLS
..................................................................PAGE: 6
LCD DISPLAY & BATTERY INFORMATION...........................PAGE: 7
RADIO OPERATION
- Power ON/OFF
...................................................
PAGE: 8
- Volume control
....................................................
PAGE:
8
- Channel selection
...............................................
PAGE:
8
- Mute out ..............................................................PAGE:
8
- CALL button ........................................................PAGE:
8
- INST button .........................................................PAGE:
8
- S button...............................................................PAGE:
8
- F button...............................................................PAGE:
9
- Arrow Up & Down buttons...................................PAGE:
9
- Resetting.............................................................PAGE:
9
MENU FEATURES
- To Enter The Menu
..............................................
PAGE:10
- SQL Setting the squelch level
.............................
PAGE:10
- CTC CTC-CTCSS
...............................................
PAGE:10
- DUP Duplex - Via Repeaters
..............................
PAGE:10
- SCN Scan
...........................................................
PAGE:11
- BCL Busy channel lockout
..................................
PAGE:11
- CAL Call ring tone
...............................................
PAGE:11
- RBP Roger beep
.................................................
PAGE:11
- BEP Button beeps
...............................................
PAGE:12
- Exit the Menu
......................................................
PAGE:12
CHANNEL OPERATIONS
- Transmit and receive procedure
..........................
PAGE:12
- Radio operation and EME exposure
...................
PAGE:12
- Electromagnetic interference/compatibility
...........
PAGE:12
- Medical devices - Pacemakers
............................
PAGE:12
- Medical devices - Hearing aids
.............................
PAGE:13
- Other medical devices
..........................................
PAGE:13
- General warnings
..................................................
PAGE:13
- Transmitting - Sending speech
.............................
PAGE:13
- Call-ring tone
.........................................................
PAGE:13
- Roger beep
............................................................
PAGE:13
DUPLEX INFORMATION
- Duplex receive/transmit channel guide
...............
PAGE:14
UHF CB CHANNEL GUIDELINES
- Radio communications
........................................
PAGE:15
- Important channel information
............................
PAGE:15
UHF CHANNELS AND FREQUENCIES
- UHF channel frequency table
.............................
PAGE:16
WARRANTY INFORMATION
.....................................................
PAGE:20
CONTENTS

4
Please read this information before installing or using your UHF radio.
The operation of your UHF radio in Australia is subject to conditions in the following
Licence: In Australia the ACMA Radio communications (Citizen Band Radio Stations) and
in New Zealand by MED the General User Radio Licence for Citizen Band Radio.
Check the State and Federal laws and regulations regarding the use of two way radios in
the area where you drive, and always obey them.
When using the radio in a vehicle, do not place your radio in the area over an airbag, or
in the airbag deployment area. Airbags inate with great force, if a radio is placed in the
airbag deployment area and the air bag inates, it may be propelled with great force and
cause serious injury to the occupants of the vehicle.
Turn your radio OFF when in any area with a potentially explosive atmosphere. Sparks in
such areas could cause an explosion or re resulting in injury or even death.
NOTE: Areas with potentially explosive atmospheres are often, but not always clearly
marked. They include fueling areas such as below deck on boats; fuel or chemical transfer
or storage facilities; areas where the air contains chemicals or particles, such as grain,
dust, or metal powders; and any other area where you would normally be advised to turn of
your vehicle engine.
To avoid possible interference with blasting operations; turn your radio OFF near electrical
blasting caps, or in a “blasting area”, or in areas posted: “Turn off the two way radio.” Obey
all signs and instructions.
Your two-way radio complies with Australian Communications Authority Radio
Communications (Electromagnetic Radiation-Human Exposure) Standard, 2003. To
assure optimal radio performance and make sure human exposure to radio frequency
electromagnetic energy is within the guidelines set out in the above standards always
adhere to the following radio operating procedures.
Unauthorised antennas, modications, or attachments could damage the radio and violate
compliance. DO NOT hold the antenna when the radio is “IN USE.” Holding the antenna
reduces the effective range. DO NOT use the radio if the antenna is damaged.
If a damaged antenna makes contact with a persons skin, a minor burn may result.
INFORMATION ON SAFE OPERATION
SAFETY AND GENERAL USE WHILST IN A VEHICLE
FOR VEHICLES FITTED WITH AIRBAGS
POTENTIALLY EXPLOSIVE ATMOSPHERES
BLASTING CAPS AND AREAS
EXPOSURE TO RADIO FREQUENCY ENERGY
RADIO OPERATION AND EME EXPOSURE
SAFETY INFORMATION AND
WARNINGS

5
Nearly every electronic device is susceptible to electromagnetic interference (EMI). To
avoid the possibility of electromagnetic interference and/or compatibility conicts, turn off
the radio in any location where posted notices instruct you to do so such as health care
facilities.
Refer to aviation regulator & aircraft manufacturer prior to installing this unit into any aircraft
The Advanced Medical Technology Association recommends a minimum separation
of 15cm be maintained between a radio and pacemaker. These recommendations are
consistent with the independent research by, and recommendations of, the U.S. Food and
Drug Administration. People with pacemakers should:
•ALWAYS keep the radio more than 15cm away from the pacemaker when the radio is
powered on.
•NOT carry the radio in the breast pocket (handheld models).
•Use the ear opposite the pacemaker to minimise the potential for interference.
•Turn the radio OFF immediately there is any reason to suspect that interference is taking
place.
Some radios may interfere with some hearing aids. In the event of such interference, you
may want to consult your hearing aid manufacturer to discuss alternatives.
If you use any other personal medical device, consult the manufacturer of your device to
determine if it is adequately shielded from RF energy. You physician may be able to assist
you in obtaining this information.
Keep the radio out of reach of babies and/or young children. Never use your radio outdoors
during a thunderstorm.
ELECTROMAGNETIC INTERFERENCE/COMPATIBILITY
AIRCRAFT
MEDICAL DEVICES – PACEMAKERS
MEDICAL DEVICES – HEARING AIDS
MEDICAL DEVICES - OTHER
GENERAL WARNINGS
SAFETY INFORMATION AND
WARNINGS

6
RADIO LAYOUT
RADIO LAYOUT
RADIO CONTROLS
FIG. 1
RB SC
BP
Push To Talk Button
Microphone
Fixed
Microphone cord
(Non removable)
Memory/
Function
Scan Channel
DOWN
Channel
UP
LCD Display
Power
ON/OFF
Volume
Control
Green Receive
Light
Red Transmit
Light
Selcall Button Instant Channel Button

7
When installing your radio in your vehicle, check that during installation you do not
damage any wiring or vehicle components that may be hidden around the mounting
position. For optimum performance your radio needs to be installed correctly. If you are
unsure about how to install your radio, we suggest you have your radio professionally
installed by a UHF specialist or Auto electrician. When installing the radio, avoid mounting
it close to heaters or air conditioners.
Never press the PTT or CALL button before connecting the antenna to the radio.
Screw the mounting bracket and microphone bracket to rm surfaces.
To install the radio: 1. Fix the radio bracket in a suitable location.
2. Then x the radio in the bracket using the thumb screws.
LCD DISPLAY AND INFORMATION
LCD DISPLAY
CAUTION
DC POWER CONNECTION
The CB radio is designed for 12/24 Volt DC. 13.8 VDC nominal voltage.
ONLY Replace Fuse with 2 Amp 3AG glass fuse.
ANTENNA INFORMATION
The antenna is of critical importance, to maximize your output power and receiver
sensitivity. A poorly installed, inferior quality antenna or one not designed for the correct
frequency band will give poor performance. You should only purchase an antenna
designed for the 477MHz frequency band.
ANTENNA INSTALLATION
1. Connect the antenna to the rear antenna socket using a PL259 coaxial connector.
2. To obtain maximum performance from the radio, select a high quality antenna and
mount it in a good location.
Never press the PTT or CALL button before connecting the antenna to the radio.
RB SC
BP
Scan Transmit & Receive
Signal Meter
Channel Number 01-80Button Beep
Roger Beep CTCSS/DCS
Code

8
RADIO OPERATION
Turn Volume Control CLOCKWISE to switch the radio ON (REFER TO PAGE 6 FIG. 1)
Rotate Volume control clockwise to increase the volume. (REFER TO PAGE 6 FIG. 1).
Volume levels 1-15.
Press the Channel Up and DOWN buttons to scroll through to desired channel. For your
reference a list of the available channels, corresponding frequencies and guidelines
for their use and selection is printed on page 15. For Australia, channels 05 and 35 are
reserved for EMERGENCY CALLS ONLY.
POWER ON/OFF
VOLUME CONTROL
CHANNEL SELECTION
Capable of muting the car stereo when you receive incoming trafc on the transceiver.
Mute out wires present a Zero Ohm Short circuit when Squelch is OPENED - Black wire
MUST go to Ground/ Earth side of mute circuit
MUTE OUT
Short press of CALL button transmits Selcall CTCSS / DCS tones (If enabled in menu
settings)
CALL Button (On Microphone)
Short press of INST button switches radio to preset INSTant channel.
DEFAULT INST channel is 09. This can easily be changed by selecting another channel
and then pressing INST for 2 seconds
Example : To select Channel 40 as INST channel
• Use the ▲ & ▼ Arrow buttons on the faceplate to select channel 40
• Press and Hold INST button for 2 seconds
Instant Channel is now Channel 40
INST Button (On Microphone)
SCAN mode (If enabled in menu settings)
Radio will scan through all 80 channels until it hears a transmission (Busy Channel)
Radio will stop on the busy channel until transmissions stop – the radio will then
commence scanning again.
To turn Scan OFF Short press S button again
S Button (On Radio Fascia)

9
Short press of Fbutton places the radio Into Menu / Program mode
Long Press (2 Seconds) takes the radio Out of Menu / Program mode
When radio is NOT in Menu / Program mode a LONG press of Fbutton turns SQUELCH
OFF
LONG press of Fbutton again turns SQUELCH ON
RADIO OPERATION
F Button (On Radio Fascia)
Pressing ▲ & ▼ arrow buttons changes Channels in normal mode & option settings in
MENU mode
Long Press (2 Seconds) of ▲ &▼ arrow buttons in normal mode FAST STEPS radio
through channels
▲ & ▼ Arrow buttons (On Radio Fascia)
To reset the system, Press and Hold the “F” Button while turning the CB radio ON.
RESETTING - Factory reset

10
SHORT press on the F button once
There are 10 squelch level settings (0 → 9) Zero is off, 1 is the lowest Squelch level and 9
is the highest level. Squelch removes the background noise and weaker signals from your
receiver. To hear only signals from nearby CB users, increase the Squelch level. To hear
signals from CB users further away, decrease the Squelch level.
DEFAULT SQL Setting is 3
Use the ▲ & ▼ Arrow buttons on the faceplate to change the squelch level settings,
SHORT press on the F button to step onto the next Menu Feature
MENU FEATURES
SQL - Squelch (GLOBAL SETTING)
SHORT press on the F button twice
There are 38 CTCSS codes & amp; 104 DCS user selectable coded tones, 1 Only CTCSS or
DCS code can be selected.
DEFAULT CTC Setting is OFF
NOTE : When CTC is turned ON you can ONLY communicate with other CB’s that have the
identical CTCSS or DCS code set on their units.
• Use the ▲ & ▼ Arrow buttons on the faceplate to select the required CTCSS or DCS code.
• Long Press the F button to set the changes & exit programming for this channel.
This needs to be FULLY repeated for EACH Channel 01 → 80 that you wish to turn ON
the CTC function for – Different CTCSS / DCS Codes can be set on different channels
if required.
SHORT press on the F button to step onto the next Menu Feature
CTC - CTCSS / DCS Selcall (PER CHANNEL SETTING)
SHORT press on the F button three times
NOTE: Duplex – Repeater option can only be enabled for Channels 01 → 08 & Channels
41 → 48. This option NEEDS to be turned ON individually for each of the 16 channels that
you wish to use for repeater operation.
Example to turn ON DUP Duplex – Repeater option for Channel 01
• Use the ▲ & ▼ Arrow buttons on the faceplate select Channel 01
• SHORT press F button 3 times until CTC appears in the display
• Use the ▲ & ▼ Arrow buttons on the faceplate to select R1
• Long Press F button to set the changes & exit programming for this channel.
This needs to be FULLY repeated for EACH Channel 01 → 08 & Channel 41 → 48 that
you wish to turn ON the Repeater function for.
DEFAULT DUP Setting is OFF for all channels
SHORT press on the F button to step onto the next Menu Feature
DUP Duplex Option - (PER CHANNEL SETTING)
SHORT press on the F button once.
This allows you to enter the menu and change settings as per your requirements.
Pressing the F button again will step you through the Menu options
Some settings are [GLOBAL SETTINGS] affecting ALL Channels when changed
Some settings are [PER CHANNEL SETTINGS] affecting only the channel they are set on.
The options available to you are:
TO ENTER THE MENU

11
SHORT press on the F button four times
This turns the Scan feature ON or OFF
Options are oS (Scan ON) or GS (Scan OFF)
When Scan option is turned ON – Short pressing S button on the faceplate will make the
radio scan through all 80 channels until it hears a channel that has trafc on it. Scan will
stop on Channels with trafc and continue to scan again when channel goes quiet.
DEFAULT SCN Setting is ON
SHORT press on the F button to step onto the next Menu Feature
MENU FEATURES
SCN Scan (GLOBAL SETTING)
SHORT press on the F button ve times
This disables the transmitter from operating on channels that are busy with Trafc at the
time you push the PTT button on the microphone. This option is rarely needed – Use
caution when setting this option!
This option needs to be set on EACH Channel that you want the BCL option turned on
Options are oF (BCL OFF) or on (BCL ON)
Use the ▲ & ▼ Arrow buttons on the faceplate to select the required Channel 01 → 80 to
change BCL settings on.
SHORT press on the F button ve times
Use the ▲ & ▼ Arrow buttons to select oF (BCL OFF) or on (BCL ON)
Long Press Fbutton to save the changes & exit programming for this channel
This needs to be FULLY repeated for EACH Channel 01 → 80 that you wish to turn
ON the BCL function for.
DEFAULT BCL Setting is OFF on ALL 80 channels
SHORT press on the F button to step onto the next Menu Feature
BCL Busy channel lockout (PER CHANNEL SETTING)
SHORT press on the F button 6 times
This sets the Tone melody that is played when you press the CALL button on the
microphone
There are 5 selectable tone melodies C1 → C5
Use the ▲ & ▼ Arrow buttons on the faceplate to select the desired tone melody
C1 → C5 , As selections are made the radio will play a short demo of the selected tone
melody.
DEFAULT CAL Setting is C1
SHORT press on the F button to step onto the next Menu Feature
CAL Call ring tone (GLOBAL SETTING)
SHORT press on the F button seven times
This turns ON or OFF the End of Transmission (EOT) Tone (Roger Beep) that is
transmitted immediately after you release the Push To Talk button of the microphone – It
is used to indicate to other users that you have nished your transmission.
Options are oF (RBP OFF) or on (RBP ON)
Use the ▲ & ▼ Arrow buttons on the faceplate to select oF (RBP OFF) or on (RBP ON)
DEFAULT RBP Setting is OFF
SHORT press on the F button to step onto the next Menu Feature
RBP Roger beep (GLOBAL SETTING)

12
CHANNEL OPERATIONS
Your two-way radio contains a transmitter and a receiver. To control your exposure and
ensure compliance with the general population/uncontrolled environment exposure limits,
always adhere to the following procedure: Transmit no more than 50% of the time.
• To receive calls, release the PTT button.
• To transmit (talk), press the Push to Talk (PTT) button. Transmitting 50% of the time, or
less, is important because the radio generates measurable RF energy exposure only when
transmitting (in terms of measuring standards compliance).
TRANSMIT AND RECEIVE PROCEDURE
Unauthorised antennas, modications, or attachments could damage the radio and violate
compliance. Do NOT hold the antenna when the radio is “IN USE.” Holding the antenna
reduces the effective range. Do not use the radio if the antenna is damaged. If a damaged
antenna makes contact with your skin, a minor burn can result.
RADIO OPERATION AND EME EXPOSURE
Nearly every electronic device is susceptible to electromagnetic interference (EMI). To
avoid the possibility of electromagnetic interference and/or compatibility conicts, turn off
your radio in any location where posted notices instruct you to do so such as health care
facilities.
ELECTROMAGNETIC INTERFERENCE/COMPATIBILITY
The Advanced Medical Technology Association recommends that a minimum separation of
6 inches (15cm) be maintained between a radio and a pacemaker. These recommendations
are consistent with the independent research by and recommendations of the U.S. Food
and Drug Administration
People with pacemakers should:
• ALWAYS keep the radio more than 15cm from their pacemaker when the radio is turned ON.
• Not carry the radio in the breast pocket (Handheld Radio).
• Use the ear opposite the pacemaker to minimise the potential for interference.
• Turn the radio OFF immediately if there is any reason to suspect that interference is taking
place.
MEDICAL DEVICES - PACEMAKERS
SHORT press on the F button eight times
This turns ON or OFF the beeps that are heard when you press the buttons on the front
panel.
Use the ▲ & ▼ Arrow buttons on the faceplate to select oF (BEP OFF) or on (BEP ON)
DEFAULT BEP Setting is ON
BEP Button beeps (GLOBAL SETTING)
Press F button for 2 seconds
Pressing F button for 2 seconds in normal mode turns Squelch OFF – To turn Squelch back
on Press F button again for 2 seconds
To EXIT Menu at any time (Whilst in menu mode)

13
Some radios may interfere with some hearing aids. In the event of such interference, you
may want to consult your hearing aid manufacturer to discuss alternatives.
CHANNEL OPERATIONS (Cont...)
MEDICAL DEVICES - HEARING AIDS
If you use any other personal medical device, consult the manufacturer of your device to
determine if it is adequately shielded from RF energy. Your physician may be able to assist
you in obtaining this information.
OTHER MEDICAL DEVICES
Keep the radio out of reach of babies and young children.
GENERAL WARNINGS
The transmitting range will depend on the antenna, terrain, surroundings and environment,
it will be affected by obstructions such as hills, buildings and foliage. The use of duplex
mode will extend the transmission range in areas where a repeater station is present.
Your XTM477PK is simplex “one way at a time”. While you are speaking, you can not
receive a transmission.
Your XTM477PK is an open-license band. Always identify yourself when transmitting on the
same channel.
IMPORTANT: Before transmitting on a UHF channel listen to ensure it is not already
in use.
TRANSMITTING RANGE
The unit is continuously in the Receive mode when the unit is turned ON and not
transmitting. When a signal is received on the current channel, “RX” icon will be displayed
on the LCD screen. a. Press and hold the PTT (Push to Talk) button to transmit your voice.
The transmit signal icon “TX” will display on the LCD screen. b. Hold the unit in a vertical
position with the Mic (Microphone) 5 cm away from the mouth. While holding the PTT
button, speak into the microphone in a normal tone of voice. c. Release the PTT button
when you have nished transmitting.
For others to receive your transmission, they must be on the same channel as you.
TRANSMITTING - Sending Speech
You can use the CALL button to send a tone to other users on the same channel. To
activate this feature; a. With the unit in normal mode, press and release the CALL button.
The unit will transmit a 2-second page tone to the other unit/s set with the same channel
within transmitting range. NOTE: This function is only possible every 60 seconds.
CALL-RING TONE
This is a tone which is automatically transmitted whenever the PTT button is released.
This alerts the receiving party that you have ended the transmission, and you are now
in receive mode.
ROGER BEEP

14
DUPLEX INFORMATION
The following table displays the receive and transmit channels when using repeater stations:
*Channel 5/35 is emergency channel only
REPEATER
CHANNEL 2 / 32
OBSTRUCTION (HILL / MOUNTAIN)
VEHICLE 1
RADIO IN DUPLEX MODE ON CHANNEL 2
TRANSMISSION FROM VEHICLE 1 (CHANNEL 32)
TRANSMISSION FROM VEHICLE 1 (CHANNEL 2)
TRANSMISSION FROM VEHICLE 2 (CHANNEL 32)
TRANSMISSION FROM VEHICLE 2 (CHANNEL 2)
VEHICLE 2
RADIO IN DUPLEX MODE ON CHANNEL 2
DUPLEX RECEIVE/TRANSMIT CHANNEL GUIDE
VISUAL REPRESENTATION OF DUPLEX

15
NOTE: The operation of your UHF radio in Australia and New Zealand is subject to
conditions in the following Licences: In Australia, the ACMA Radio Communications
(Citizen Band Radio Stations) and in New Zealand by MED the General User Radio
Licence for Citizen Band Radio.
No Licence is required to own or operate this radio in Australia or New Zealand. The
Radio Communications (Citizen Band Radio Stations) Class Licence 2002 contains
the technical parameters, operating requirements, conditions of Licence and relevant
standards for Citizen Band (CB) radios. CB radios must comply with the class Licence for
their use to be authorised under the class Licence.
Licences for Repeater Channels 44 & 45 will not be Licenced for an additional 6 to 12
months to allow extra time for owners of Channel 5 Emergency repeaters to upgrade
equipment to meet new standards.
Channels 1 to 8 and 41 to 48 – Repeater Channels. Enable duplex mode on your radio to
use any available repeaters.
Channels 5 & 35 – Emergency use only. Monitored by volunteers, no general
conversations are to take place on these channels.
Channels 22 & 23 – Data transmissions only (excluding packet).
Channels 31 to 38 and 71 to 78 – Repeater inputs. Do not use these channels for simplex
transmissions as you will interfere with conversations on channels 1 to 8 and 41 to 48.
The Australian Government legislated that channels 5 & 35 on the UHF CB Band are
reserved for emergency use only.
As at January 2007 the maximum penalties for the misuse of the legally allocated CB
emergency channels are:
•For general misuse – if an individual 2 years of imprisonment,
otherwise $165,000 (a $220 on-the-spot ne can be issued in minor
cases); or,
•For interference to an Emergency call – an individual, 5 years
imprisonment, otherwise $550,000.
A list of currently authorised channels can be obtained from the ACMA website in Australia
and the MED website in New Zealand.
Please note the following channel guidelines:
If you do nd you are interfering with another persons conversation, just select another
channel.
• Channels 01-08 (and 31-38), and Channels 41-48 (and 71-78) are repeater channels.
• Channels 05 and 35 are emergency channels, do not use these unless it is an emergency.
• Channel 11 is a calling channel.
• Channels 22 and 23 are for telemetry and telecommand applications.
• Channel 40 - road channel (Australia).
• Channels 61, 62 and 63 are for future use and TX is inhibited on these channels.
UHF CB CHANNEL GUIDELINES
RADIO COMMUNICATIONS (CITIZEN BAND RADIO STATIONS)
CLASS Licence 2002
IMPORTANT CHANNEL INFORMATION

16
UHF CHANNELS AND FREQUENCIES
UHF CHANNEL FREQUENCY TABLE
Data Only
Data Only Reserved
Reserved
Reserved

17
UHF CHANNELS AND FREQUENCIES
(continued)
CTCSS TONE TABLE

18
UHF CHANNELS AND FREQUENCIES
(continued)
DCS CODE TABLE

19
UHF CHANNELS AND FREQUENCIES
(continued)
DCS CODE TABLE (continued)

20
This product is guaranteed against defects for a period of 24 months from
date of purchase. This warranty is provided by SRGS Pty Ltd ABN: 23 113
230 050 of 6 Coulthards Avenue, Strathpine, Queensland 4500, Australia.
Ph (07) 3482 7500. BCF will offer a repair, replacement product or store
credit if the product is assessed as being defective during the warranty
period.
To claim under this warranty, take this product to the Front Service Desk of
your nearest BCF store. For store locations, visit www.bcf.com.au.
You will need your receipt or proof of purchase. Additional information
may be requested of you to process your claim. Should you not be able to
provide proof of purchase with a receipt or a bank statement, identication
showing your name, address and signature may be required to process
your claim. This product may need to be sent to the manufacturer to assess
the defect before determining any claim. Faults or defects caused by
product modication, misuse and abuse, normal wear and tear or failure to
follow user instructions are not covered under this warranty.
Our goods come with guarantees that cannot be excluded under the
Australian Consumer Law. You are entitled to a replacement or refund for
a major failure and for compensation for any other reasonably foreseeable
loss or damage. You are also entitled to have the goods repaired or
replaced if the goods fail to be of acceptable quality and the failure does not
amount to a major failure.
Any expenses incurred relating to the return of this product to store will
normally have to be paid by you. For more information contact your nearest
BCF store.
The benets to the consumer given by this warranty are in addition to other
rights and remedies of the Australian Consumer Law in relation to the goods
and services to which this warranty relates.
PLU: 667041 CODE XTM50RKT
Manufactured and packaged for SRGS PTY LTD
ABN 23 113 230 050
6 Coulthards Avenue, Strathpine, Queensland 4500, Australia
MADE IN CHINA
WARRANTY
Table of contents