Xtreme XA-112 User manual

Page
1
Model XA-112 Gas 110CC ATV
Product Manual
Revised 01/20/09
Recommended age – 12 years or older
X-Treme TM Electric Scooters

Page
2
TABLE OF CONTENTS
TABLE OF CONTENTS……………………………….…………….………………1
IMPORTANT/SAFETY INFORMATION……………………..….….……..…….2-4
WARNING LABEL LOCATION & IDENTIFICATION……………………..……5-7
AGE RATING WARNING LABEL…………………………………………..…5
TIRE PRESSURE WARNING LABEL………………………………………..6
OVERLOADING WARNING LABEL……………………………………….…6
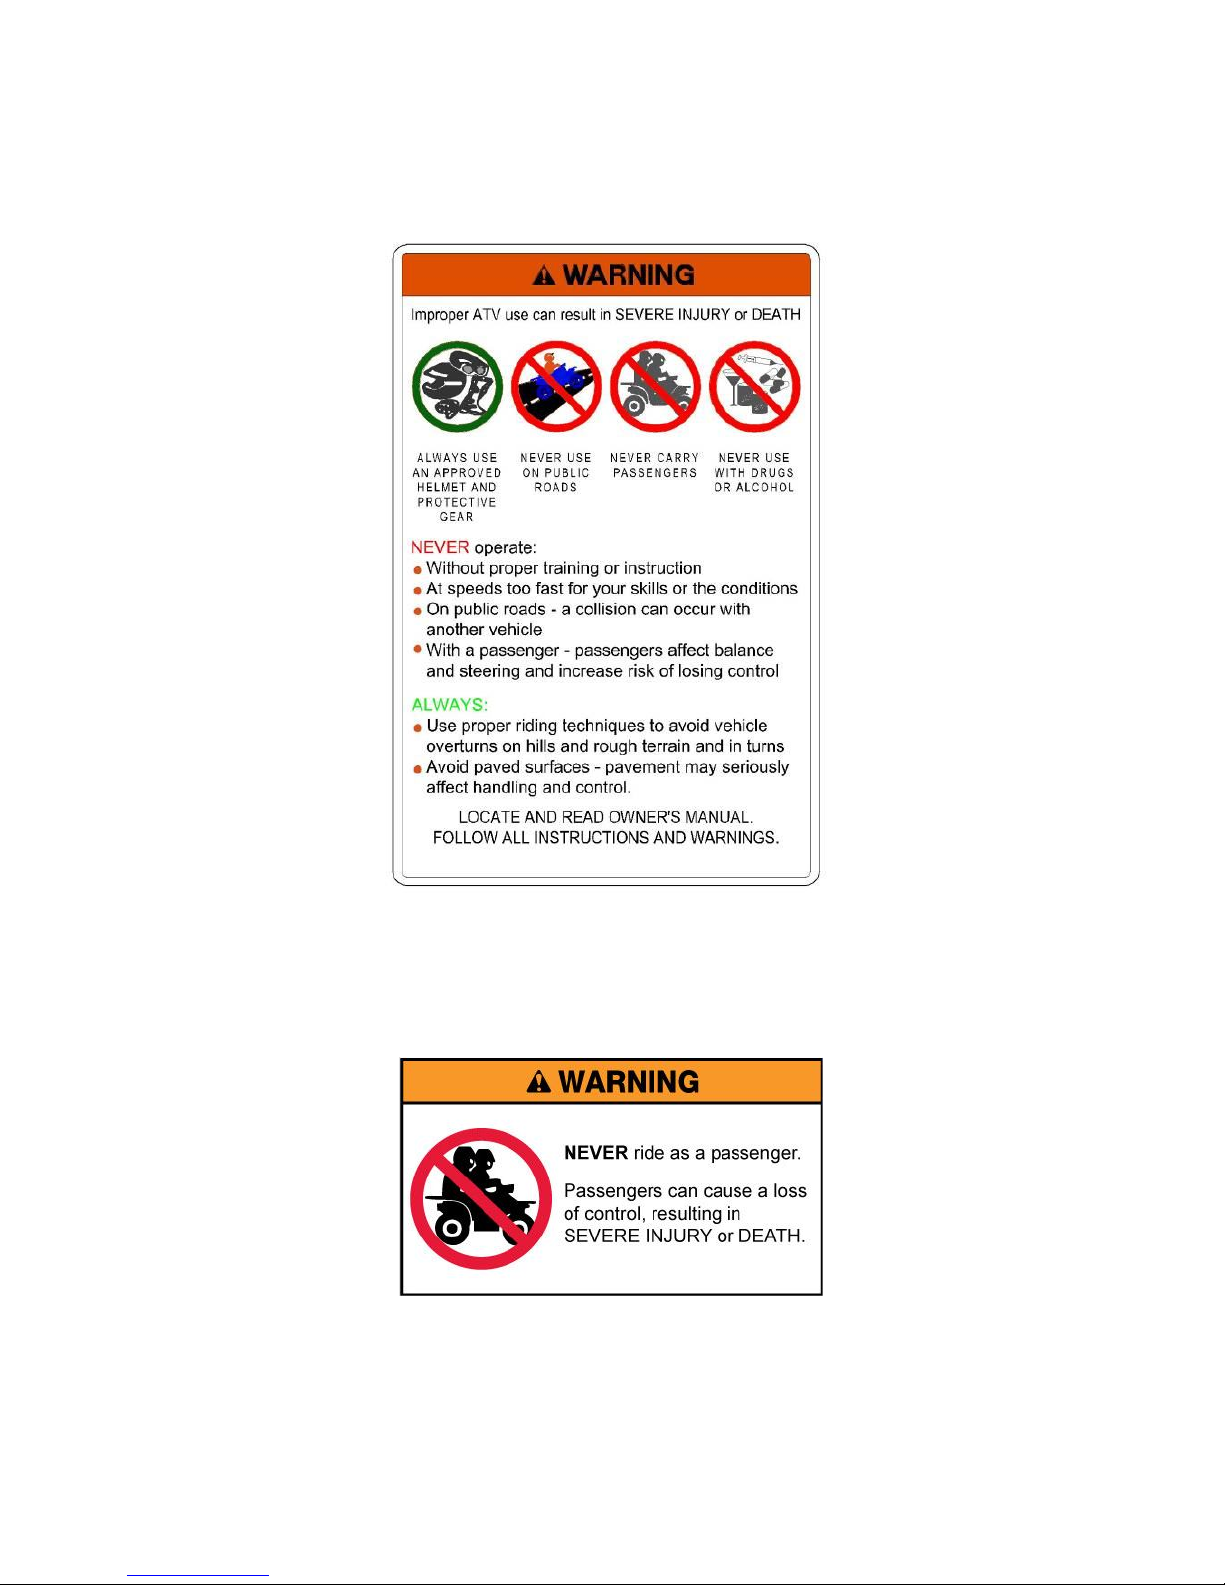
GENERAL WARNING LABEL…………………………………………………7
PASSENGER WARNING LABEL……………………………………………..7
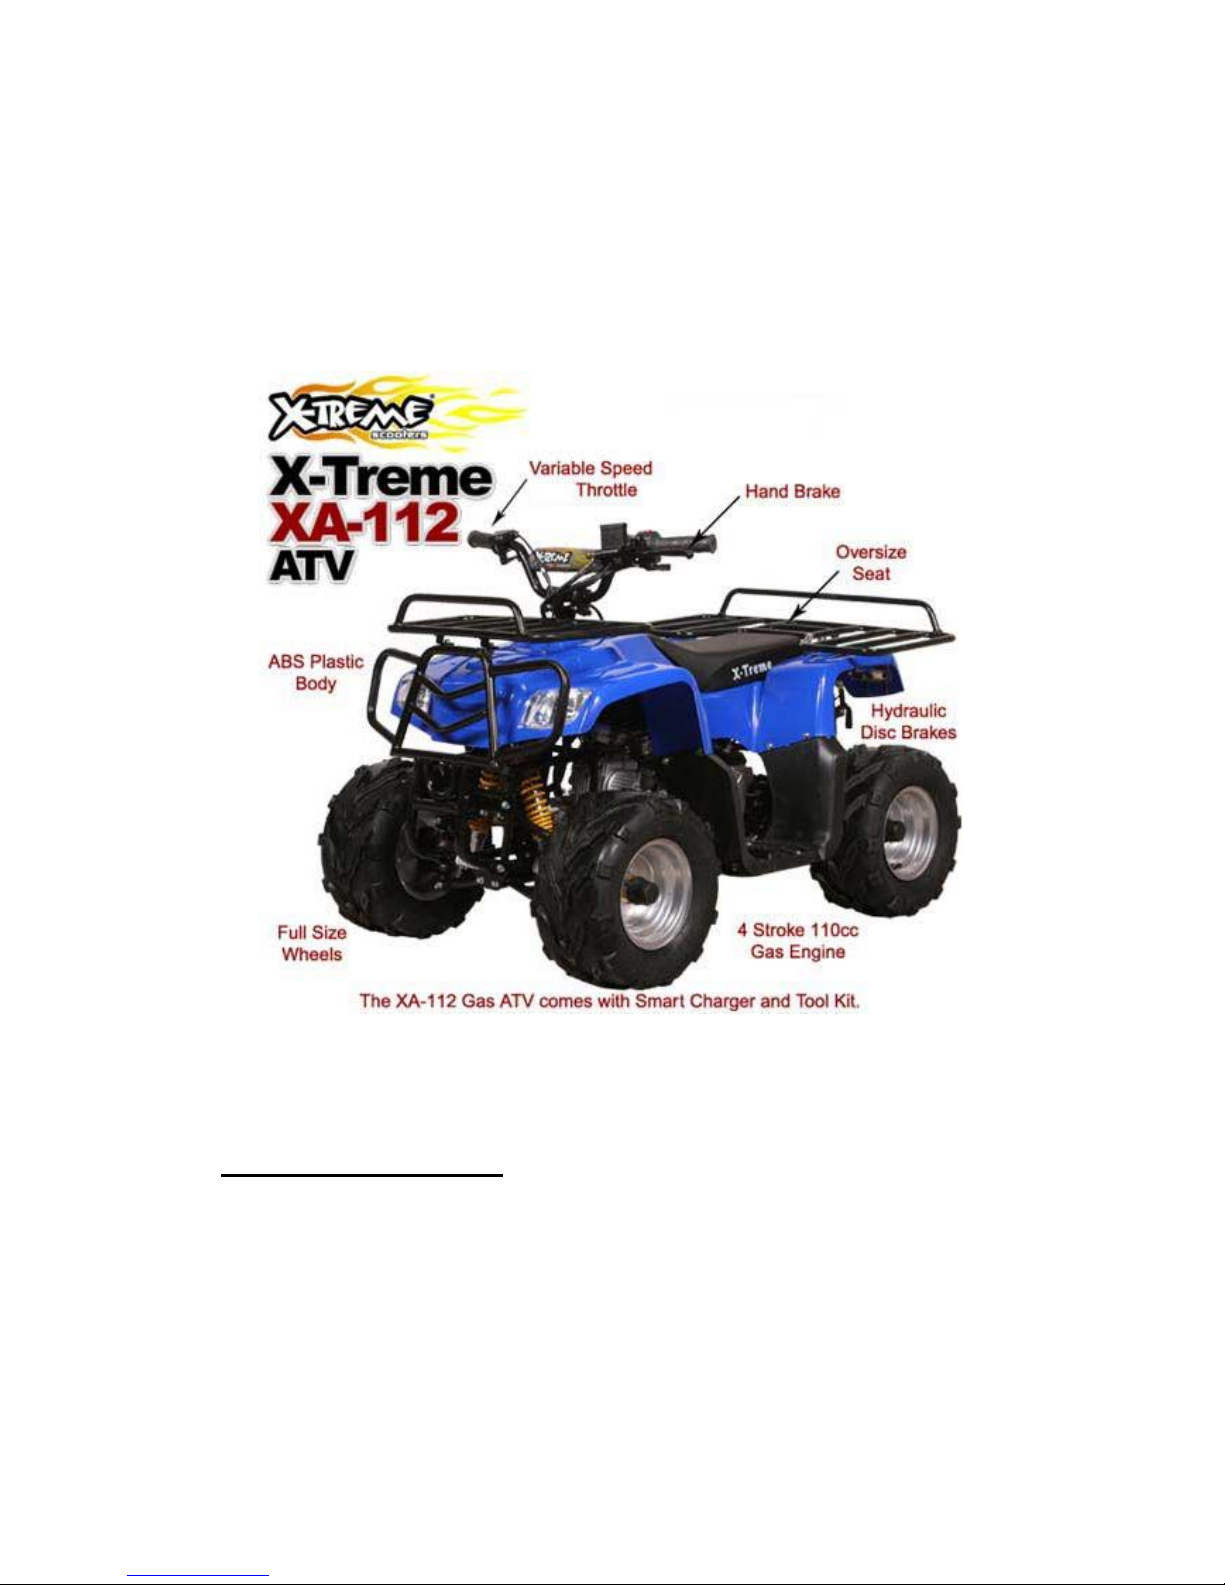
GETTING TO KNOW YOUR X-TREME XA-112………………….….…………..8
PACKAGE CONTENTS…………………………………………………………….8
GETTING STARTED/ASSEMBLY....……………………………..……………9-10
HANDLEBARS………………………………………………………………... 9
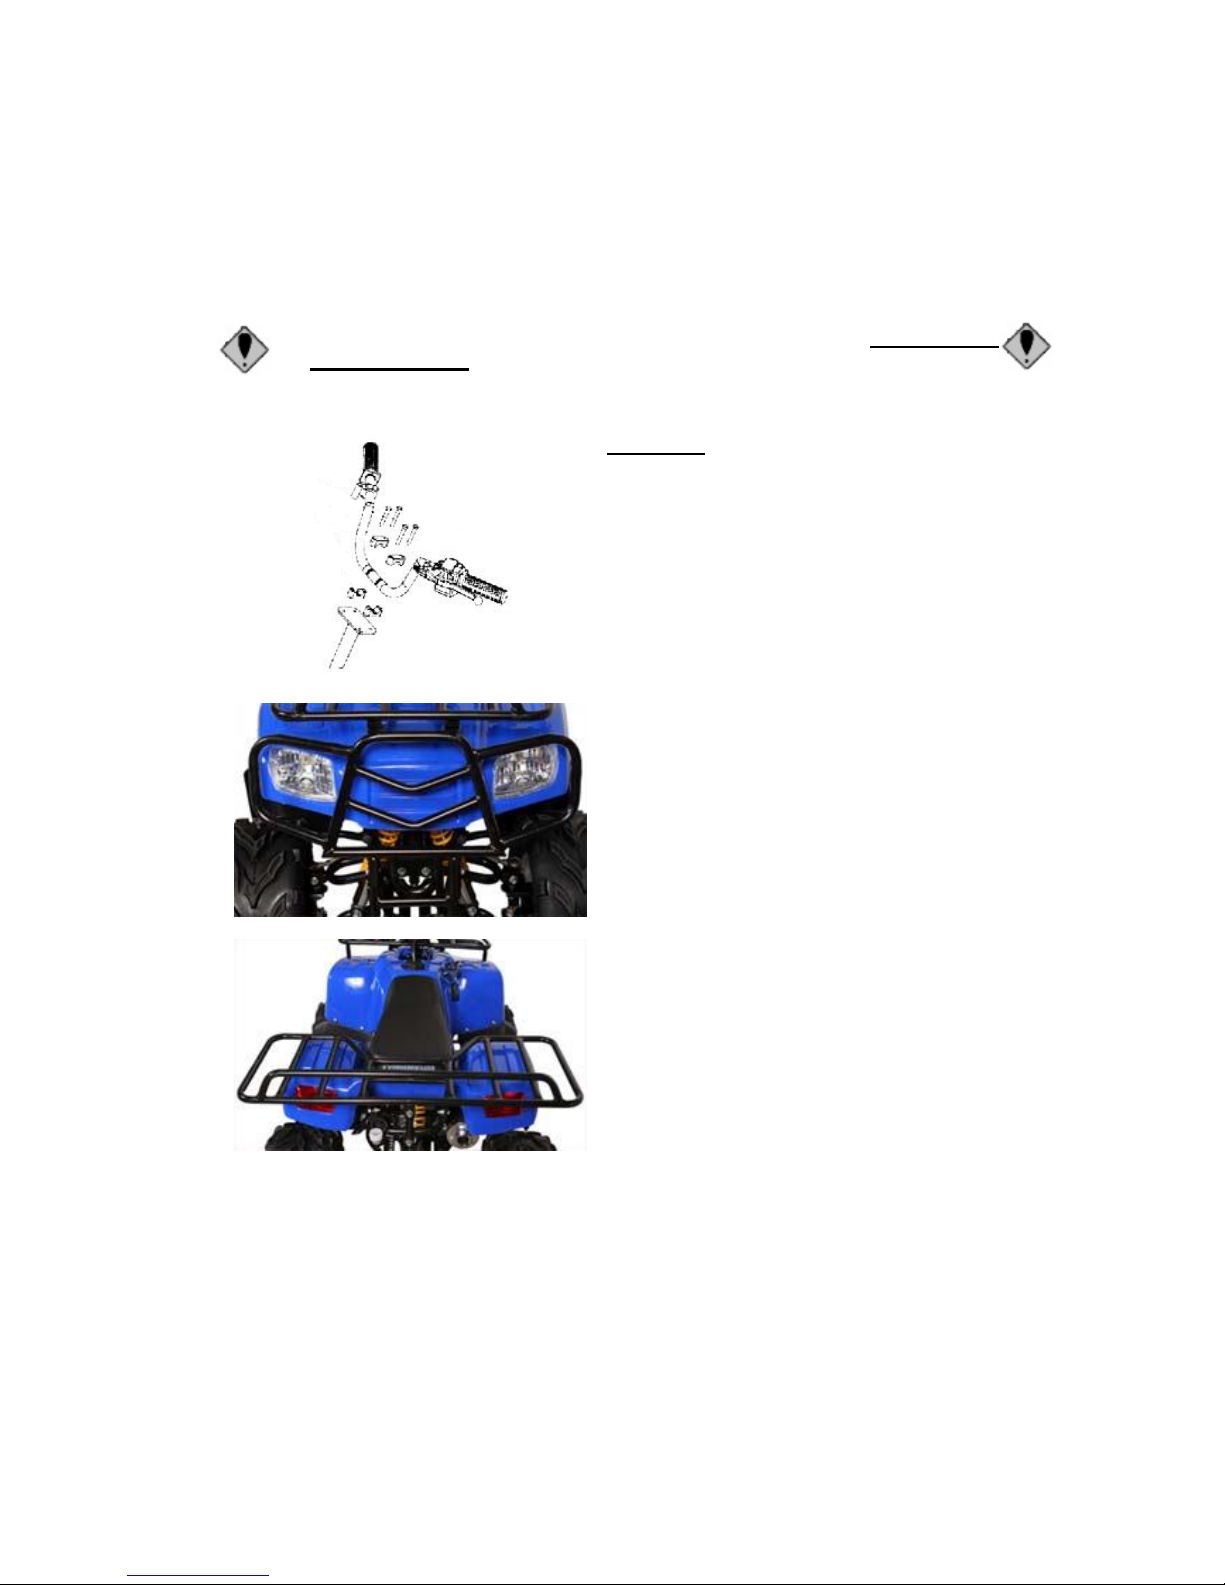
FRONT/REAR GRILL/GUARD……………………………………………… 9
BATTERY…………………………………………………………………… 9-10
WHEELS……………………………………………………………………….10
ITEM DESCRIPTIONS/OPERATION………………………………………..11-16
FRONT HANDLEBAR………………………………………………………..11
LEFT VIEW…………………………………………………………………….11
RIGHT VIEW…………………………………………………………………...12
IGNITION/SEAT/FUEL………………………………………………………..12
SEAT LOCK & FUSE ….……………………………………………………..13
LEFT HANDLEBAR…………………………………………………………...14
MAX SPEED ADJUSTMENT………………………………………………...15
ENGINE OIL…………………………………………………………………...15
TIRES & TIRE PRESSURE………………………………………………15-16
OPERATION GUIDE……………………………………………………..……17-18
PRE-RIDE INSPECTION……………………………………………………..17
STARTING……………………………………………………………………..18
MAINTENANCE/STORAGE…………………………………………………..19-24
ENGINE OIL……………………………………………………………………19
AIR CLEANER/FILTER……………………………………………………….20
BRAKE SYSTEM………………………………………………………….20-21
BATTERY………………………………………………………………………22
MAINTENANCE SCHEDULE………………………………………………..22
STORAGE……………………………………………………………………...23
WIRING SCHEMATIC………………………………………………………...24
1

Page
3
PLEASE BE SAFE WHEN RIDING
ALWAYS WEAR A HELMET AND OBEY ALL LAWS!
THIS IS A 4-CYCLE ENGINE
1. High-Octane Fuel Recommended. (90 octane or higher)
2. Your XA-112 comes pre-filled with oil, SAE15W/40 SE. It is
recommended that you use this same oil when refilling or
changing.
Please take care of your XA-112
FOR OFF ROAD USE ONLY – It is illegal to ride this vehicle
on public roads or highways
DO NOT JUMP or ABUSE THIS PRODUCT!
DO NOT RIDE IN WET/ICY CONDITIONS!
Failure to follow these instructions properly will
VOID YOUR WARRANTY!
2
IMPORTANT
Failure to follow these INSTRUCTIONS will
VOID YOUR WARRANTY!

Page
4
3
WARNING
This product does not conform to Federal Motor Vehicle Standards and is not
intended for operation on public streets, roads or highways. Serious injury can
result from the unsafe operations of this product. Operator can minimize these
risks by using certain safety equipment such as: safety helmet, goggles, gloves,
elbow and kneepads and appropriate footwear.
This XA-112 is a Type I ATV and is intended for use by a single operator age
16 or older and no passenger.
FOR OFF ROAD USE ONLY– it is illegal to ride this vehicle on public roads or
highways.
DO NOT operate this vehicle while under the influence of drugs or alcohol.
It is recommended that all operators read thru this user manual completely before
riding and have had proper safety and riding training or completed ATV riding
courses.
SAFETY
Persons without excellent vision, balance, coordination, reflex, muscle and
bone strength and good decision-making capabilities should not use this
product.
Riders under the age of 12
are not recommended to operate this ATV.
Manufacturer will not be responsible for injury to an operator that is under the
recommended age of 12.
Persons unwilling or unable to take responsibility for their own actions should
not use this product.
The user of this product assumes ALL risks associated with its use. To
minimize these RISKS, the user must wear safety helmet, goggles, gloves,
elbow and kneepads and appropriate footwear.
IMPORTANT
PLEASE READ THIS BEFORE USING THIS PRODUCT
READ THIS FIRST!

Page
5
4
SAFETY GUIDE
The recommended age for riding this scooter is 12 years or older.
To avoid damage to the motor and footplate, do not overload the ATV.
Never ride with more than one person.
Inspect your ATV thoroughly before each use for loose or missing parts.
Always remove the key from the ignition when not in use.
Keep hands, face, feet and hair away from all moving parts.
Do not touch the motor or wheels while they are rotating.
During normal operation, the exhaust will become hot. Be sure to wear
appropriate clothing to cover the legs while also being careful not to come in
contact with the exhaust while riding or until the ATV has had enough to cool
after use.
Brakes are designed to control speed as well as stop the ATV. Practice
braking for proper slowing down and smooth stops.
Maintain your X-Treme XA-112 as recommended in this Product Handbook.
Use only quality replacement parts as recommended by the manufacturer.
Inspect the entire ATV prior to each use. Replace any part that is cracked,
chipped or damaged before use.
*NEVER operate this ATV if you are under the age of 12
*NEVER ATTEMPT TO OPERATE THE ATV WHILE UNDER THE INFLUENCE
OF ALCOHOL.
If a situation arises that is not covered in the manual,
proceed with caution and use good judgment.
Contact your dealer or X-Treme (www.x-tremescooters.com/support/)
if you need further assistance
This manual should be considered a permanent part of theATV and should remain with the
ATV throughout its lifespan. This publication contains the latest production information
available before printing. X-Treme Scootersreserves the right to make changes at any
time without notice and without incurring any obligation.
QUICK
REFERENCE
SAFETY GUIDE

Page
6
Warning Label Location and Identification
ThisATV is rated as a Type I – Category G ATV. AnATV intended for recreational and/or
utility use by an operator age 12 or older. Below are the required warning labels and
their location. Should a label become removed or lost from the ATV, contact your dealer
or www.x-tremescooters.com/support/ for a replacement label.
1. Type I Age Recommendation Warning Label
This label is located on the right front fender facing the rider and is visible when riding.
Figure 1
5

Page
7
2. Tire Pressure Warning Label
This label is located on the rear left fender.
Figure 2
3. Overloading Warning Label
This label is located on the rear left fender.
Figure 3
6

Page
8
4. Type I General Warning Label
This label is located on the front left fender.
Figure 4
5. Type I Passenger Warning Label
This label is located on the rear left fender.
Figure 5
7

Page
9
GETTING TO KNOW YOUR X-TREME XA-112
PACKAGE CONTENTS
Your X-Treme XA-112 comes with the following items in the box. Please locate
all of the following:
1. The X-Treme XA-112 ATV
2. 12V Battery Charger
3. Tool Kit
4. Product Handbook
5. 4 Wheels
6. Ignition Key
7. Bag of parts (nuts, washers, cotter pins, spacers, handlebar clamps)
8

Page
10
GETTING STARTED
Please read and understand these instructions and the OPERATING
PROCEDURES section, prior to starting or riding your XA-112
9
Assembly
1. Carefully remove the XA-112 from the box.
2. Your XA-112 may comes with the
handlebars folded for shipping. Simply
rotate the handlebars to the desired
up-right position and secure in place using
the enclosed bolts as shown. First lay clips
on the bracket then fit it on the top of the
handle bar, you can then fit bolts through
clips then screw into the ATV bracket.
Leave loose until all 4 bolts are started and
then tighten when in position desired.
3. Your XA-112 also comes with the front
bumper/grill detached for shipping. Begin
by locating the 4 bolts. Next, attach the
left and right bracket to the ATV frame as
shown and secure with the supplied bolt as
shown.
4. Install the rear guard using the supplied
bolts as shown.
5. Install the battery, located under the seat.
To remove the seat, use the latch located
under rear of seat. Red wire attaches to (+)
terminal and Black wire to (-) terminal.

Page
11
10
Be sure to check the oil level after
assembly as well as before each time the
ATV is used.
Front Wheel Assembly:
Install wheel onto front spindle. Install 1.
Small tube, 2. Big washer, 3. Slotted nut.
Use the 4. Split pin to secure nut onto the
axle. Fully insert the split pin between
spines in nut and whole through the axle.
When completely through, bend the split
pin halves opposite of each other around
the nut.
Rear Wheel Assembly:
To fit the rear wheel, first you must insert
the right/left tube over axle.
Now you can fit the rear wheel onto the rear
axle.
Once in place you can fit the big washer,
then the slotted nut. Fully tighten the slotted
nut and secure it with the supplied split pin.
Fully insert the split pin between spines in
nut and whole through the axle. When
completely through, bend the split pin
halves opposite of each other around the
nut.
1.) Right rear axle tube
2.) Left rear axle tube
3.) Front wheel tubes
4.) Spit Pins
5.) Castle nuts
6.) Small washers
7.) Large washers
8.) Handle bar clips
9.) Handle bar bolts

Page
12
Item Descriptions
Front Handlebar Descriptions
Left View Descriptions
11

Page
13
Right View Descriptions
Ignition Switch
The ignition is located on the front right side.
X Indicates the off (left) position. Engine and lights will not operate and
the key can be removed.
Indicates the on (right) position. Engine and lights can be operated and
the key cannot be removed.
12

Page
14
Seat Lock
The seat lock is located behind and below the seat cushion. Pull the lock out to release
the seat. To lock, simply press the seat down with slight force until it locks into place.
Fuel and Fuel Tank
Always use High-Octane Fuel Recommended. (90 octane or higher) The capacity of the
fuel tank is 7.8L.
WARNING
Gasoline is extremely flammable and can be explosive under certain
conditions. Always refuel in a well ventilated area with the engine
turned off. Do not smoke or allow flames or sparks within the area
while refueling or where gasoline is stored.
Never overfill the tank.
After refueling, be sure the gas cap is securely closed
Be careful not to spill fuel when refueling. Spilled fuel or fuel vapors can
ignite. Be sure to clean up any spilled fuel and ensure the area is dry
before starting the engine.
Avoid repeated or prolonged contact with skin or breathing of fuel vapors.
ALWAYS KEEP FUEL OUT OF REACH OF CHILDREN.
13

Page
15
Left Handlebar Controls
Emergency Kill Switch
During normal use, the switch is set in the middle position. To stop the engine, simply
push the RED emergency kill switch to either the right or left position. Once the engine
has stopped you mustreset the switch by pressing it in (towards the front of the ATV) to be
able to start the engine again.
Parking Brake
When the ATV is not in use, and to keep the ATV from rolling, always engage the parking
brake. The parking brake is located on top of both the left and right hand brakes. Pull the
hand brake towards the rider and press the button down to engage the parking brake.
Electric Starter Button
To start the ATV using the electric starter button, the battery must be fully charged from
previous riding. First, set the parking brake. Then turn the ignition key to the right (ON)
position and depress the left hand brake while pressing the starter button.
Headlight Hi/Lo Switch
To change from Hi/Lo beam, simply push or retract the switch as shown below.
14

Page
16
Max Speed Control Adjustment
Your XA-112 comes with a speed adjustment control. Use this to limit the max speed
obtainable when required. To set the max speed, simply turn the screw on the right throttle
handle clockwise to lower the speed, or counter clockwise to raise the speed.
Engine Oil
The quality of the engine oil plays a vital role in the overall engine performance and life.
Using the recommended engine oil below will ensure a long engine life and low
maintenance.
Recommended oil is SAE15W/4o-SE or Class SE,SF,SC.
The XA-112 has been pre-filled with the recommended oil as listed above at the time of
manufacturing but ALWAYS check the oil level prior to each use and add when necessary.
Optimal temperature for the ATV is 104F to 14F.
Oil Change: It is recommended to change the oil every 50-100 hours of use. To
change the oil unscrew the drain plug located on the bottom of the crank case and drain
the oil being sure to dispose of the oil properly and within regulations. Replace the plug
and refill using the recommended oil as listed above.
CAUTION – RUNNING THE ENGINE WITH INSUFFICIENT OIL CAN CAUSE SERIOUS
DAMAGE TO THE ENGINE. BE SURE TO CHECK THE OIL LEVEL BEFORE EACH
USE AND ADD WHEN NECESSARY.
Tires & Tire Pressure – IMPORANT SAFETY NOTICE
Tire pressure should be checked before you ride while the tires are cold. Check the tires
for cuts, embedded foreign objects or sharp objects. Check rims for dents or
irregularities. See your X-Treme dealer for spare parts or visit
www.x-tremescooters.com.
DO NOT ATTEMPT to patch a damaged tire or tube as this can effect wheel balance.
IMPROPER TIRE inflation can cause abnormal tread wear and create a safety hazard.
Low tire pressure can result in tires slipping or coming loose from the rim causing theATV
to operate out of control. 15

Page
17
ALWAYS CHECK TIRE PRESSURE BEFORE EACH USE USING THE ENCLOSED
TIRE PRESSURE GUAGE. DO NOT OPERATE THE ATV IF THE TIRES ARE NOT
PROPERLY INFLATED TO THE REQUIRED PSI.
Tire Tread – For optimum performance and most importantly safety, the tire tread should
not fall under 2.0mm for either the front or rear tire. When the tire tread falls below this
measurement do not ride the ATV and contact your X-Treme dealer for replacement tires
or go directly to X-Treme at ww.x-tremescooters.com.
Kick Start
Located on the left side of the ATV near the foot plate is the manual kick start. This is
used to kick start the ATV initially and when the battery has lost its charge. To start the
ATV using the kick start first set the parking brake and then turn the ignition to the ON
position. While sitting on theATV facing forward, find the kick start located by your left
foot, turn the pedal out and use your foot to kick down on the kick start until the engine
starts to run.
16

Page
18
OPERATION GUIDE
Pre-Ride Inspection
WARNING – THE PRE-RIDE INSPECTION MUST BE COMPLETED BY ALL RIDERS
PRIOR TO USING THE XA-112. FAILURE TO PERFORM THIS INSPECTION CAN
LEAD TO SERIOUS INJURY.
Inspection Check List
Check engine oil and add if required. Check the engine for leaks.
Check the fuel level and add fuel if necessary. See page 13 for safety
guidelines when handling gasoline.
Test front and rear brakes and adjust if necessary. When brakes are
completely depressed, the ATV should not move when pushed.
Test parking brakes and ensure they operate properly.
Check all four tires for proper inflation pressure using the tire pressure gauge.
Inspect each tire for wear & tear and tread depth.
Check proper throttle operation. When let go, the throttle should spring back
to the idle position.
Inspect the ATV and test all nuts/bolts for tightness. Ensure all nuts/bolts are
securely fastened.
Test the steering to ensure the steering operates properly and freely when
turning right and left.
Test the Engine Kill Switch. With the ATV engine and parking brake are
applied, press the kill switch and the engine should stop completely.
If the ATV does not pass every pre-inspection check point - DO NOT
RIDE THE ATV until the issue has been resolved. Serious injury can
occur if the ATV is not functioning properly.
17

Page
19
STARTING THE ENGINE
Always us the following procedure below when starting your XA-112:
WARNING – NEVER RUN THE ENGINE IN AN ENCLOSED AREA. EXHAUST
EMISSIONS ARE DANGEROUS AND CAN LEAD TO DEATH.
Starting using the Electric Start
Ensure the ATV is on level ground and the parking brake is engaged
1. Insert the key into the ignition and turn to the ON position
2. Depress the hand brake
3. Press the electric start button while slightly turning the throttle
4. Once the ATV is running, release the starter button.
NOTE: Do not use the electric starter button for more than 5 seconds at a time.
Release for at least 10 seconds before pressing again.
5. When starting and warming up, be sure to maintain the throttle slightly.
6. Allow the engine to warm up for a few minutes before riding.
Once the ATV is properly started and has warmed up, release the parking brake and with
both hands on the handlebars, depress the throttle slowly to begin forward movement.
To slow down, release the throttle and depress both the left and right hand brakes to come
to a full stop.
Practice braking to ensure proper pressure to come to a full and safe stop. Never
depress both brakes strongly as it may lock up the wheels and reduce control of theATV.
To PARK the ATV, release the throttle completely. Come to a complete stop and turn the
ignition to the OFF position. Pull the hand brake towards the rider and press the button
down to engage the parking brake. 18

Page
20
MAINTENANCE
MAINTENANCE SCHEDULE
Proper care of your X-Treme XA-112 will insure optimal performance and longer life span.
The following are a few maintenance suggestions that will keep your X-Treme XA-112
running in top condition:
Engine Oil
Check the oil level before each use. The level must be maintained between the upper
and lower level marks on the dipstick.
1. Start the engine and let it run idles for a few minutes to warm up the engine.
2. Stop the engine and put the ATV on level ground.
3. After waiting a few minutes, remove the oil filler cap/dipstick and wipe it
clean.
4. Reinsert the dipstick without screwing it in.
5. Remove the dipstick.
The oil level should be between the upper and lower level marks on the dipstick. Add oil
when necessary.
Changing of Engine Oil
As noted in the maintenance schedule, the oil should be changed every 50-100 hours of
use. 1. Remove the cap from the crankcase and drain the oil completely.
2. Replace the cap.
3. Add the recommended oil. The amount to fill is approximately 0.8L
CAUTION – Running the engine with the improper oil levels can cause serious damage to
the engine.
NOTES: When operating the ATV in dusty/dirty conditions, oil changes should be
performed more frequently than specified in the maintenance schedule.
Please dispose of the used engine oil in a manor that is compatible with the environment
and your local regulations. We suggest recycling your oil at a service station that
accepts used oil. NEVER POUR USED OIL ONTO THE GROUND OR PLACE IN THE
TRASH. 19
Table of contents
Other Xtreme Offroad Vehicle manuals