Yaesu 857D User manual

Quick Guide to Operating the Yaesu 857D
This Quick Guide to Operating the Yaesu 857-D, through a series of five graduated exercises,
introduces operating the radio, its controls, and builds up confidence with the rig. There are
several references to the 857-D manual that came with the radio, so please have the manual handy
and use it when indicated as part of the exercises.
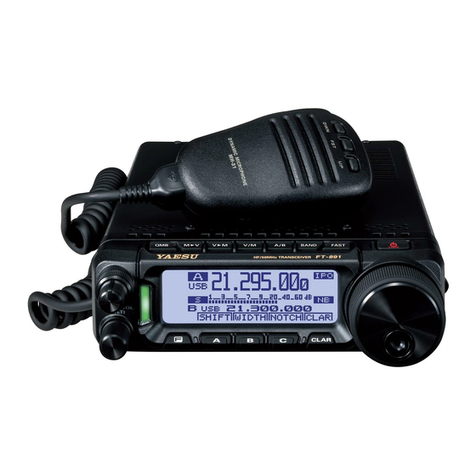
The Yaesu 857D HF/VHF/UHF 100 Watt transceiver is impressively multi-functional but very
compact. There is not much front panel real estate for knobs and buttons to control the radio.
Therefore many of the knobs and buttons perform multiple functions based on active menus
contained within the radio that interact with the display and control the radio.
One basic concept to keep in mind when operating the radio is that the radio has a VFO mode and
a Memory mode and behaves differently depending on the active mode. In VFO mode the radio is
very responsive to its full command structure. In Memory mode operator control is inhibited - the
radio rightfully assumes that the preset frequencies and operational parameters you have
previously stored in each memory location are to be protected from inadvertent tampering.
Therefore, one of the first controls the new operator needs to learn is the V/M key which toggles
the radio between VFO mode or Memory mode. Again, the radio will be fully responsive to
commands when either VFOa or VFOb is indicated in the upper left of the display instead of a
Mnnn.
Effectively operating the 857-D requires understanding the concept that there are two menu
system structures stacked on top of each other, sort of like a 17-story building stacked on top of a
broad foundation. The broad foundation is the MENU and consists of 91 menu items. I like to
think that when Yaesu first designed the 857D the engineers started with this 91-item base as the
original plan for operator control. They added some responsiveness by allowing you to place a
skip flag on any of the 91 items that might not be used frequently. You can then set Item #1 so that
the items with the skip flag would not be displayed during normal operation.
The designers soon found out they needed even more responsiveness, so they put the A, B, Ckeys
along the bottom of the display, then added a second menu structure, called the Multi-Function
Menu to assign various functions to these three A, B, Ckeys. You get to choose from a 17 row
list, as to which row will be assigned to the A, B, Ckeys. Again Yaesu did this to make the radio
more operationally agile. Some of the functions assigned to the A, B, C, keys do in fact jump to
some of the 91 items in the base MENU. Therefore you have to know how to navigate the
controls for both menu structures.
The base MENU structure of 91 items is entered by pressing and holding the FUNC key for one
second then using the Select Knob to select which of the 91 items to view and/or change. The
other menu structure, the Multi-Function Menu is entered by briefly pressing the FUNC key, then
using the Select Knob to select which of the 17 rows of the multi-function menu to assign to the
A, B, Ckeys. Both operations sound similar, but there is a profound difference in how they work.
When you have entered the MENU you have all the time in the world to use the Select Knob to
pick one of the 91 items. Conversely, when briefly pressing the FUNC key to enter the Multi
Function Menu, if the Select Knob is left unturned for five seconds, the radio automatically exits
the Multi Function Menu and the Select Knob defaults to its previous state. This automatic exit
can be confusing and frustrating to the new operator. The knowledgeable operator recognizes
what has happened and simply re-presses the FUNC key to re-enter the Multi Function Menu and
continue the selection process.
Embedded in the material on the following pages are lots of hints and tips particularly for
operating HF, so be sure to go through each of the pages. Let me know if the material was helpful
- feedback is appreciated.
Basic Operation of the Yaesu FT-857D Multi-Band Amateur Radio
The purpose of this document is to “learn by doing”. Through a series of simple, graduated tasks
the Ham operator will be introduced to key operating concepts and actually operate the FT-857D.
This radio has a built–in speaker. If you wish to use headphones, the headphone mini-jack is
located on the left side of the radio about ¾ inch in back of the lower left corner of the front panel.
The following instructions expect the radio to have 12V power available, to be connected to
appropriate antennas, and to have MENU item #080 set to SQL, (see Task #4: on how to set this
MENU item).
Task #1
Turn the radio on, place it in VFO mode, move it to the 3.5Mhz HF band, and operate SSB at
3987Khz. This frequency is a National EMCOMM Traffic Service (NETS) frequency.)
1. Turn the volume control down - rotate AF knob and its outer SQL/RF ring full counter-
clockwise. (Upr L Fnt Panel)
2. Turn power on – Press & hold Pwr On/Off button one second.(Blue button top R Center of
Fnt Panel)(
Note: Note: The radio returns to the state it was in when turned off.
3. Place in VFO mode – Press the V/M button until VFOa or VFOb shows in lit display (Outer
R Side Base of Main Tuning Knob)
Note: If in memory mode and the tuning knob is touched, the radio will go up a level to
Memory Tuning mode. Therefore you may need to press the V/M button twice to
toggle the display back from MTUNE to M-nnn to VFOx.
4. Move to the 3.5Mhz Band – Press either the Band(Up) or Band(Dwn buttons repeatedly until
Display shows frequency between 3.000 and 4.000.– (Top base of main Tuning Knob)
5. Place in LSB (Lower SideBand) Mode – Press the Mode(<) or Mode(>) buttons repeatedly
until Display shows LSB. (Top L Center of Fnt Panel above display)
6. Adjust the volume control – Rotate the AF knob, (but not its SQL/RF outer ring) clockwise
about ¼ turn – adjust as needed. (Upr L Fnt Panel)

7. Tune to 3987Khz – Rotate Main Tuning Knob until 3.987.00 is in Display.(Large Knob R Fnt
Panel)
Note: Press the Pwr On/Off button briefly to place the large Tuning Knob into Rapid Tuning
Mode with a small running stick-figure showing in the lower Right of the display.
Briefly press the same button again to return to normal tuning. If you plan to operate at
this frequency for some time the tuning knob can be disabled by pressing the Lock
button located below the V/M button on the outer R side of the main tuning knob. The
display will show a small lock in the lower R of the screen. Press the lock button again
to re-enable tuning.)Please try these out now.
8. Turn the Radio Off – Press and hold the Pwr On/Off button for one second.(Blue button top R
Center of Fnt Panel)
Congratulations, you have made an excellent start at learning how the FT-857D operates. Now
quickly build confidence by trying other (NETS) frequencies - LSB at 7232Khz and USB at
14.280Mhz. (Amateur Radio convention for SSB uses LSB below 10Mhz, and USB above.) Also
try listening to WWV, the National Bureau of Standards, broadcasting UTC time on 10Mhz AM.
Task #2:
We learned in Task #1 the basic controls to operate the radio in VFO mode as a simple HF
transceiver. We will learn in Task #2 that operating the FT-857 can be even easier in Memory
mode. Pre-loading a local repeater’s frequency, offset, PL tone, etc. into one of the memory
locations can greatly simplify VHF/UHF operation. HF frequencies/modes can also be pre-
loaded.
This task introduces Memory Mode and the use of the Select Knob located at the lower left of the
front panel. Rotating the Select knob in Memory mode selects the memory location you wish to
use.
Turn the radio on and operate it on a local VHF/UHF repeater stored in memory location M-003.
To perform this task the radio should have some local repeaters pre-stored in memory locations
M-001 thru M-003. If not, still perform this task using factory stored 60M channels in memory
locations M-601 thru M-605.
1. Turn the volume control down - rotate AF knob and its outer SQL/RF ring full counter-
clockwise.( Upr L Fnt Panel)
2. Turn Pwr On – Press and hold Pwr On/Off button 1one second.(Blue button top R Center of
Fnt Panel)
Note: The radio returns to the state it was in when turned off).
3. Place in Memory mode – Press the V/M button until M-xxx shows in lit display (Outer R Side
Base of Main Tuning Knob)

Note: If in Memory mode and the tuning knob is touched, the radio will go up a level to
Memory Tuning mode. Therefore you may need to press the V/M button to toggle the
display back from MTUNE to M-nnn.)
4. Move to memory location M-003 – Rotate the Select Knob either way until M-003 shows in
the display.– (Lwr L corner of Fnt Panel)
5. Adjust the volume control – Rotate the AF Knob, (but not its SQL/RF outer ring) clockwise
about ¼ turn – adjust as needed. (Upr L Fnt Panel)
6. Adjust the Squelch threshold – Rotate the SQL/RF ring clockwise just to the point the VHF/
UHF background noise suddenly is quiet. (Outer Ring Top L Fnt Panel)
Note: When a signal is received that breaks above the noise threshold it will be heard. This is
much less fatiguing than listening to background noise all the time.
7. Listen first, and if you wish to transmit, press the PTT (Push-To-Talk) button on the side of
the microphone. (Be sure your FCC license permits you to operate at this frequency)
8. Turn the Radio Off – Press and hold the Pwr On/Off button for one second.(Blue button top R
Center of Fnt Panel)
The Select Knob performs many functions on the FT-857D. We just learned in Memory Mode it
selects the memory location to access. In VFO or MTUNE modes, the SelectKnob performs
rapid tuning in two different ways. Simply rotating the Select Knob will increment the frequency
display at a faster rate than the main tuning dial. Alternately, a brief press of the Select Knob
inward will engage the Select Knob to slew the radio in 1-Mhz increments. This is particularly
useful for VHF/UHF when there is a need to move to a frequency at the other end of the band.
Press the Select Knob inward again to return it to the normal rapid tuning rate. Try these now to
get familiar with them.
Task#1 covered basic controls, and Task#2 covered operating from pre-stored memory locations.
Task#3 will intro the Multi Function Key Menu and Task#4 will intro the MENU.
Task #3:
There are two distinct menus: one is called the Multi-Function Key Menu, the other is just called
the MENU. The Multi-Function Key Menu determines what functions the A, B, Ckeys (found
just below the display.) will perform. It is a list of frequently used functions that is three columns
wide and 17 rows long, labeled MFa through MFq. The current row that is selected is indicated
in the lower portion of the display just above the A, B, Ckeys. The A, B, Ckeys are always “hot”
in that they will perform their currently assigned function when one of them is pressed. Changing
the A, B, Ckeys, i.e.- selecting another row, requires you to briefly press the FUNC key at the
lower left of the display to engage the Select Knob. Once engaged, rotating the Select Knob will
step thru the Multi-Function Key Menu rows. The Select Knob will automatically disengage
within five seconds of non-use and revert to its previous state, (e.g.- rapid tuning).

The MENU on the other hand is a list of 91 single items that you may need to access less
frequently. It is accessed by pressing and holding the FUNC key for one second Also, some Multi
Function Keys will jump to a MENU item.
Place the radio in operation and use the Multi Function Keys.
1. Place the radio in operation – Do steps 1 to 7 from Task#1
Note: Display should show VFOa or VFOb.
2. Enable Multi function Key Menu Row Selection – Briefly Press and release the FUNC key
and within five seconds begin rotating the Select Knob (Near lwr L corner of display)
Change A, B, Ckey assignments to enable switching VFOs – Rotate the Select Knob either way
until Mfa [A/B, A=B, SPL] shows in the display.– (Select Knob -Lwr L corner of Fnt Panel)(
Note: Select Knob must be rotated within five seconds of pressing FUNC key or the Select
Knob will revert back to its previous operation, e.g. – rapid tuning. If this happens,
press the FUNC key again before doing this step)
1. Copy the contents of the current VFO to the VFO not being displayed – Press the B [A=B]
key. (Below display center)
Note: The radio remembers the VFO settings last used for each band and will return to the
last active VFO on that band. Some operators will set one VFO for CW and the other
for SSB.
2. Verify both VFOs are now the same & leave VFOa on display – Press the A [A/B] key to
toggle between VFOs and make VFOa the current VFO.
Note: The above 2 steps should make you ready to try the next step
3. Now try Split Frequency Operation described in FT-857 manual pg# 67. (When done, be sure
to exit split frequency mode by pressing the C key)
The DNS button (next to Pwr ON/OFF) is a convenience key to instantly set the A, B, Ckeys to
Multi Function row p. Pressing the DNS button a second time will return the , B, Ckeys to their
previous row. Try this a few times to become familiar with it.
A handy reference for Multi Function Key Menu rows and item detail can be found in Pages 24-30
of the FT-857 manual. Some Multi Function keys will jump to the MENU, so be sure to go on to
Task#4 and cover entering and exiting the MENU.
The MENU is a list of 91 single items that you may need to access to adjust operational
parameters or to customize the radio. It is accessed by pressing and holding the FUNC key for
one second We learned in Task#3 that some Multi Function Keys will jump to a MENU item.
Recognizing how the display looks when in the MENU and how to exit with or without changing
the setting is a helpful skill that is introduced in Task#4.

Task #4:
Place the radio in operation & reduce HF power from 100W to 50W.
1. Place the radio in operation – Do steps 1 to 7 from Task#1.
Note: HF, VHF, and UHF power levels (100W, 50W, 20W), are set independently. The
current band needs to be an HF band to start this training task.
2. Enter MENU operation - Press and hold the FUNC key for one second (Near lwr L corner of
display)(
Note: No need to rush - no auto five second action will follow)
3. Move to Menu item #001 -Extended Menu, - Rotate the Select Knob either way until “MENU
MODE No-001 EXT MENU” shows in the top of the display. The current setting of this item,
ON or OFF, will be in large text on the display. (Select Knob -Lwr L corner of Fnt Panel)
4. Ensure Extended Menu is ON – Rotate the Large Main Tuning Knob L or Rt. to change the
current setting to ON. (R side of Fnt Panel)
5. Save the new setting and exit to normal operation- Press and hold the FUNC key for one
second (Near Lwr L corner of display)
Note: Turning Extended Menu to ON ensures all 91 menu items will be displayed as the
Select Knob is rotated. When EXT MENU is OFF, items tyou have previously
chosen to hide by pressing the Skip key are skipped over.)
6. Re-enter Menu operation and Move to MENU item #075, – Press the FUNC key for one
second and rotate the Select Knob either way until “MENU MODE No-075 RF Power Set”
shows in the top of the display. The current value of this item, between 5 – 100, will be in
large text on the display. (Select Knob -Lwr L corner of Fnt Panel)
7. Adjust the HF power level – Rotate the large main tuning knob to change the large text display
value to 50. (R side of Fnt Panel)
8. Save the new setting and exit to normal operation - Press and hold the FUNC key for one
second (Near Lwr L corner of display)
Note: Press and hold the Ckey for one second to exit without saving the new setting.)
(Additional details on exiting MENU mode and general operation can be found
starting on FT-857 Manual page 94.)
The sequence of: FUNC key for one second, Select Knob to select item, Large Main Tuning
knob to adjust the item, followed by FUNC key for ne second to save the change, (or Ckey for ne
second to exit without changing) is the key to operating “The Menu”.

Task #5: Using the CLAR button
Task #5 introduces the CLAR (Clarifier) knob. The CLAR knob is particularly useful when
operating HF to try to improve weak station reception when there is strong adjacent noise.
Operators familiar with RIT, Receiver Incremental Tuning, and PBT, Pass Band Tuning already
understand the two primary concepts associated with the CLAR knob.
Pressing the CLAR button in momentarily, (less than one second) activates RIT and engages the
Select Knob for adjusting RIT. Depressing the CLAR button momentarily again disengages RIT
and the Select Knob from RIT.
Pressing the CLAR button for more than one second engages PBT and engages the Select Knob
to adjust IF shift for PBT. Pressing the CLAR button again for more than one second disengages
PBT.
Note: Engaging one of these functions while the other is active will not deactivate the first
function. The Select Knob will switch to the new function, and the display will
change to allow adjustment of the new function, but the first function will remain
active at the setting it was at. Each function has to be specifically deactivated with the
appropriate press of the CLAR button.
1. Place the radio in operation – do steps 1 to 7 from Task#1 to place the radio in HF mode.
Note: The current band should be an HF band to start this training task.
2. Do Steps 1 thru 5 on Page 40, Clarifier – Receiver Incremental Tuning of the FT-857D manual
to introduce using RIT.
3. Go to the next page and do Steps 1 thru 3 IF Shift to introduce PBT.
Note: Leaving PBT or RIT engaged when tuning the HF bands can be very useful. It keeps
the Select Knob defaulted to one of these functions. Recall that when switching Multi
Function Keys, e.g. to engage noise reduction or enable switching VFOs, the Select
Knob will after 5 seconds resume its previous default setting of rapid tuning. An
inadvertent turn of the Select Knob could cause the HF operator to jump away from
and lose a weak station. The annoyance of the Select Knob tuning/jumping away from
an HF contact won’t happen if the Select Knob is left engaged to RIT or PBT. Also for
HF, Menu Item #80 should be set to make the SQL/RF knob an RF gain knob,
especially in noisy conditions. Ops should reduce RF gain and use the AF gain to try to
find a balance that achieves a “sweet spot” for best signal reception under the current
noise conditions.
Congratulations again – Understanding the concepts and completing the Tasks on the previous
pages has given you a basic introduction to operating the FT-857D and will make it much easier to
use the instruction manual that came with the radio.
Please forward comments or suggestions for improvements. 73 and good DX, Roger K6OU.
Table of contents
Other Yaesu Transceiver manuals

Yaesu
Yaesu FT-65R User manual

Yaesu
Yaesu VX-5R User manual

Yaesu
Yaesu FT DX 3000 User manual

Yaesu
Yaesu FT-8500 User manual

Yaesu
Yaesu FT5Dr User manual

Yaesu
Yaesu FT-747GX User manual

Yaesu
Yaesu FTM-100DR User manual

Yaesu
Yaesu FT DX 1200 User manual

Yaesu
Yaesu FT-221R User manual

Yaesu
Yaesu FT-1900E User manual

Yaesu
Yaesu FT DX 9000 CONTEST - 2 User manual

Yaesu
Yaesu Mark-V FT-1000MP User manual

Yaesu
Yaesu FT-8100R User manual

Yaesu
Yaesu FT DX 3000 User manual

Yaesu
Yaesu VX-5R User manual

Yaesu
Yaesu FT-710 User manual

Yaesu
Yaesu FT-8800R Assembly instructions

Yaesu
Yaesu VX-8GR User manual

Yaesu
Yaesu FTM-100DE User manual

Yaesu
Yaesu FT-77 User manual