Yaesu FTM-100DR User manual

Thank you for purchasing this Yaesu product.
This instruction manual explains information related to the “APRS Function”.
For information on basic operation of the transceiver, please refer to the enclosed
FTM-100DR/DE operating manual.
Company names and products in this manual are trademarks or registered
trademarks of the respective company.
FTM-100DR/DE
Instruction Manual (APRS Edition)
C4FM/FM 144/430 MHz
DUAL BAND TRANSCEIVER

1
Using APRS®functions
Contents
What is APRS®?...................................................................................................................................................... 3
APRS Initial Settings.............................................................................................................................................. 3
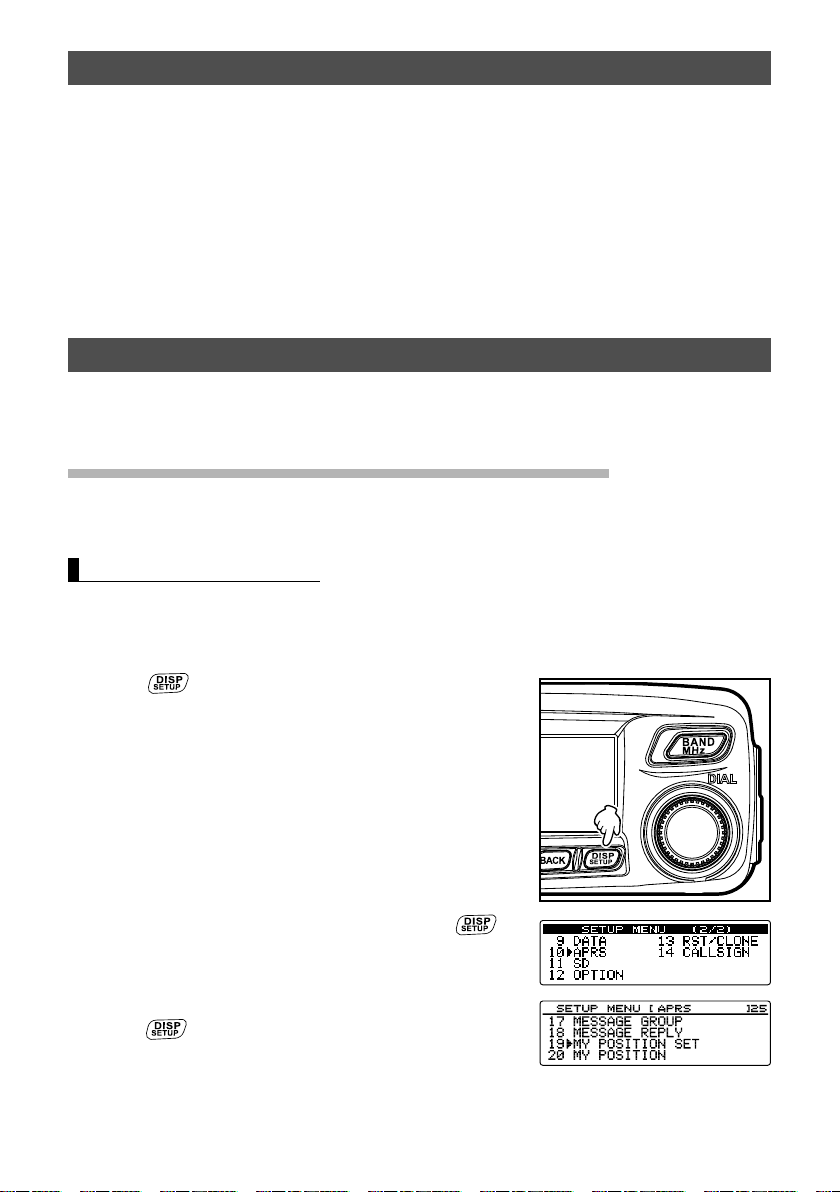
Setting the position information of your own station................................................................................................. 3
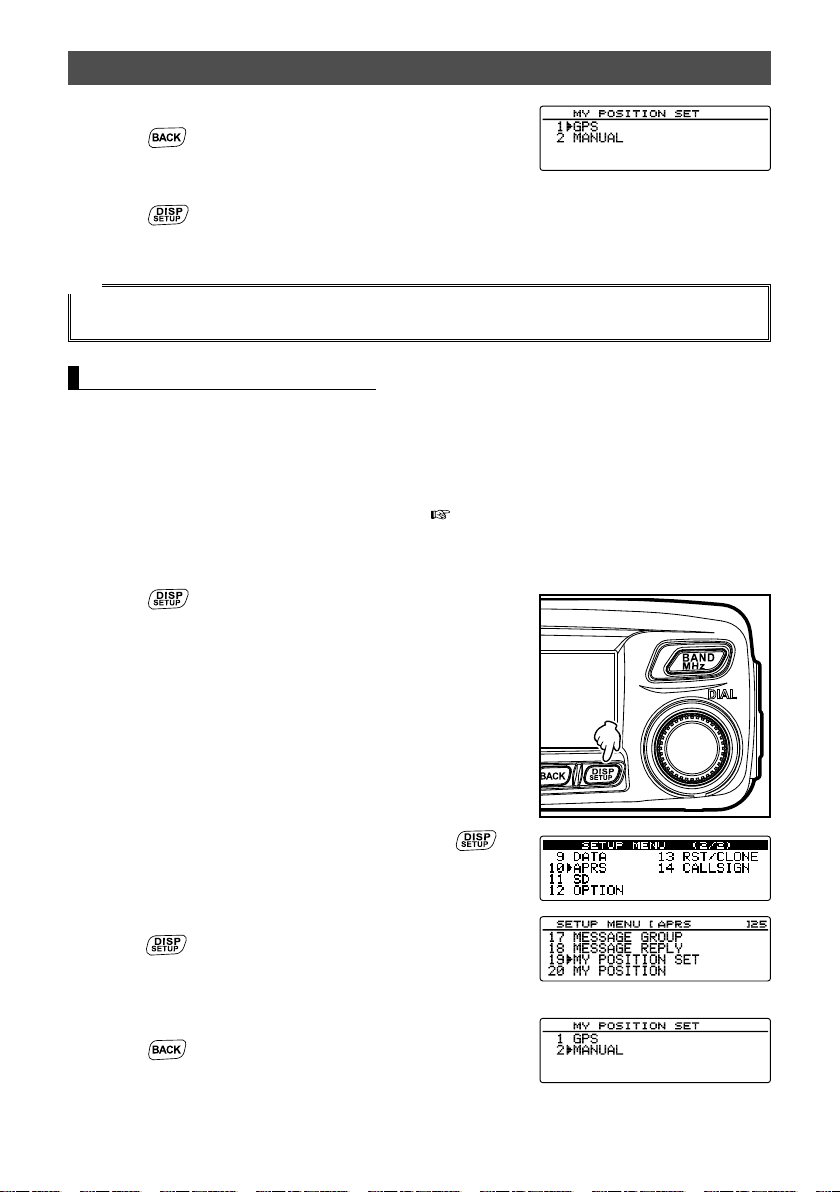
Using the GPS function........................................................................................................................................ 3
Setting the function manually............................................................................................................................... 4
Setting your own station call sign ............................................................................................................................. 6
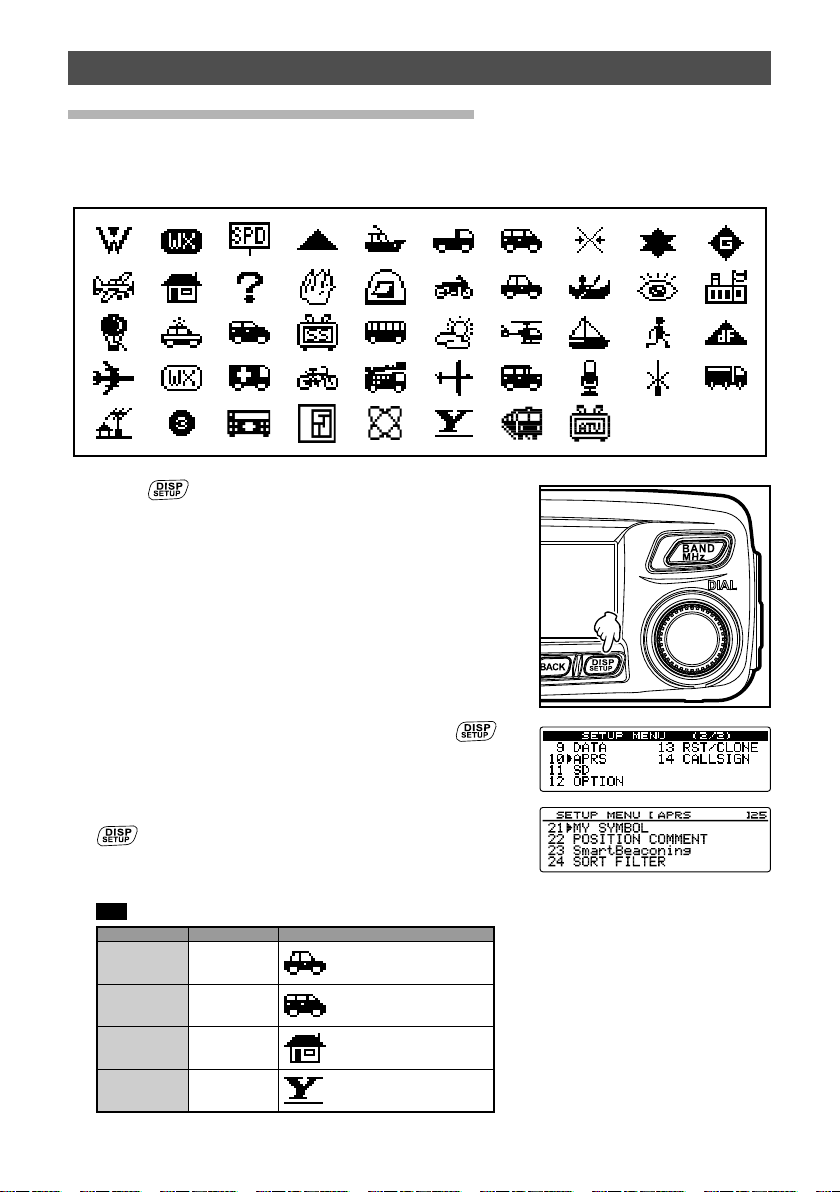
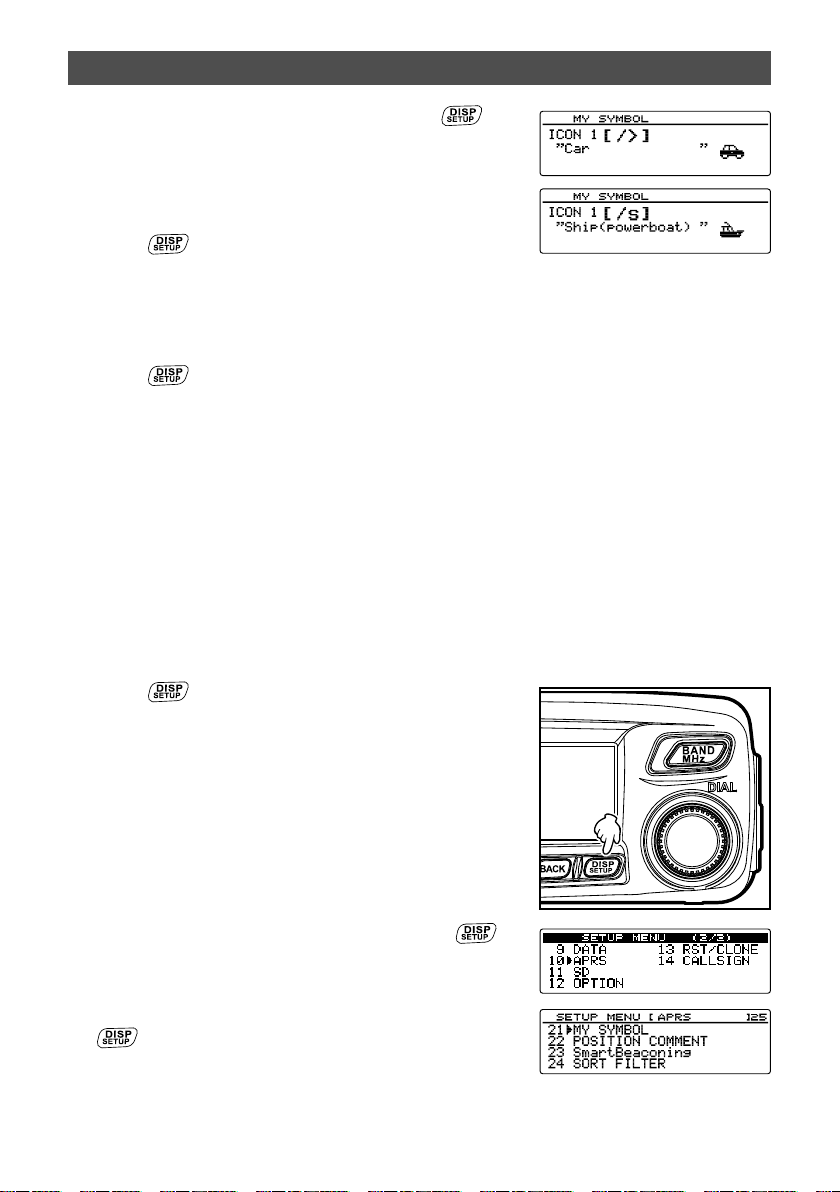
Setting the symbol of your own station..................................................................................................................... 8
Setting the APRS baud rate.................................................................................................................................... 10
Other settings ..........................................................................................................................................................11
Starting APRS Operation ..................................................................................................................................... 12
Matching the frequency .......................................................................................................................................... 12
Receiving APRS Beacons.................................................................................................................................... 13
Explanation of the APRS beacon screen and operation of keys ............................................................................ 14
Viewing the beacon information using packet data (RAW display).................................................................... 27
Convenient functions.............................................................................................................................................. 28
Sorting the station list ............................................................................................................................................. 29
Filtering the list................................................................................................................................................... 30
Deleting information from a list .......................................................................................................................... 32
Transmitting APRS Beacons ............................................................................................................................... 34
Manually transmitting APRS beacons .................................................................................................................... 34
Sending an APRS beacon automatically................................................................................................................ 34
Setting the APRS beacon automatic transmission interval................................................................................ 35
Using SmartBeaconing™ ....................................................................................................................................... 36
Attaching status text to a beacon ........................................................................................................................... 38
Selecting a position comment................................................................................................................................. 40
Setting the digipeater route .................................................................................................................................... 41
Sending and Receiving APRS Messages........................................................................................................... 43
Checking messages........................................................................................................................................... 43
Viewing the message contents .......................................................................................................................... 44
Receiving APRS messages.................................................................................................................................... 45
Convenient functions ......................................................................................................................................... 45
Sending APRS messages ...................................................................................................................................... 46
Creating and sending a new message .............................................................................................................. 46
Using standard text............................................................................................................................................ 48
Replying to a received message........................................................................................................................ 49
Sorting the APRS message list............................................................................................................................... 50
Deleting a message from the list........................................................................................................................ 50
Message receipt acknowledgement (ACK) ............................................................................................................ 52
APRS Set-up Menu List........................................................................................................................................ 53
APRS set-up menu basic operations...................................................................................................................... 55
Resetting the APRS settings .................................................................................................................................. 56
Using the APRS set-up menu.............................................................................................................................. 57
APRS compass setting ...................................................................................................................................... 57
Model code display ............................................................................................................................................ 57
Filter function settings........................................................................................................................................ 58
Inputting standard message text........................................................................................................................ 59
Turning the APRS function ON/OFF.................................................................................................................. 59
APRS operating band mute setting.................................................................................................................... 59
APRS reception pop-up setting.......................................................................................................................... 60
Setting the bell ring when a message or beacon is transmitted/received.......................................................... 61
Call sign setting for CALL RINGER ................................................................................................................... 62

2
Contents
Data transmission delay time setting ................................................................................................................. 63
Setting the display units of the APRS data ........................................................................................................ 64
Transmission beacon information setting .......................................................................................................... 65
Status text input ................................................................................................................................................. 67
Beacon automatic transmission setting ............................................................................................................. 67
Selecting the digipeater route ............................................................................................................................ 70
My call sign setting............................................................................................................................................. 70
Filter setting for messages received .................................................................................................................. 70
Automatic response setting of received messages ........................................................................................... 71
My position setting ............................................................................................................................................. 72
Entering your own station position..................................................................................................................... 72
Setting your own station symbol ........................................................................................................................ 72
Position comment setting................................................................................................................................... 72
Smart beaconing setting .................................................................................................................................... 73
Sort function and filter settings........................................................................................................................... 76
Voice alert function setting................................................................................................................................. 77
List of APRS Bell Rings ....................................................................................................................................... 80

3
What is APRS®?
APRS (Automatic Packet Reporting System) is a packet communication protocol on
amateur radios that is advocated by Bob Bruninga (WB4APR).
The APRS function of this device is a data communication system for messages and
position data using the APRS format.
A partner amateur radio station using a GPS receiver can send an APRS message
including GPS position information of the partner station. The direction, distance speed
etc. of the partner station in relation to your own station will appear on the display of
the FTM-400DR transceiver. The position information can be used in the same way by
connecting the external GPS antenna unit or entering the position data manually.
APRS Initial Settings
This sets the various information of your own station prior to commencing APRS
operation.
Setting the position information of your own station
The position information can be set automatically or manually depending on the situation
and the location where the device is used.
Using the GPS function
Data from the in-built GPS antenna unit or an external GPS device connected to the
device can be downloaded automatically. The GPS function is recommended to be used
when operating mobile.
1Press for one second or longer.
The set-up menu will be displayed.
2Turn the DIAL, select [10 APRS], then press .
The menu list will be displayed.
3Turn the DIAL, select [19 MY POSITION SET], then
press .
The screen for selecting the setting method of the
position information will be displayed.

4
APRS Initial Settings
4Turn the DIAL and select [1 GPS].
5Press .
“1 GPS” will be selected, and the screen will return
to the menu list.
6Press for one second or longer.
The display will return to the previous screen.
Tip
Using the GPS function, the time data received from a GPS satellite will be automatically used to
correct the in-built clock of the main device.
Setting the function manually
The latitude and longitude of your own station can be entered by following the procedure
below, when not using the GPS function. This may be necessary when the GPS
satellites cannot be acquired or the radio is used in a fixed location.
(1) Matching the time
Please refer to “Adjusting the date and time” ( P.46) in the basic operating manual for
the details.
(2) Registering position information
1Press for one second or longer.
The set-up menu will be displayed.
2Turn the DIAL, select [10 APRS], then press .
The menu list will be displayed.
3Turn the DIAL, select [19 MY POSITION SET], then
press .
The screen for selecting the setting method of the
position information will be displayed.
4Turn the DIAL and select [2 MANUAL].
5Press .
“2 MANUAL” will be selected, and the screen will
return to the menu list.

5
APRS Initial Settings
6Turn the DIAL, select [20 MY POSITION], then press
.
The screen for setting your own station’s information
will be displayed.
7Press .
The cursor will shift to the latitude item.
8Turn the DIAL, select north latitude (N) or south
latitude (S), then press [].
The cursor will shift to the “degrees” setting item.
Tip Press [] → The cursor will shift to the left.
Press
[] → The cursor will shift to the right.
The cursor will shift to the right (or left) each time (or ) is pressed.
9Turn the DIAL, input the degrees, then press
[].
The cursor will shift to the “minutes” setting item.
10 Turn the DIAL, input the minutes, then press
[].
The cursor will shift to the “1/100 minutes” setting
item.
11 Turn the DIAL, input the 1/100 minutes value, then
press [ ].
The cursor will shift to the longitude item.
12 Turn the DIAL, select east longitude (E) or west
longitude (W), then press [ ].
The cursor will shift to the “degrees” setting item.
13 In the same way as for steps 9 to 11, input the
degrees, minutes and 1/100 minutes.
14 Press .
The latitude and longitude will be set.
15 Press for one second or longer.
The display will return to the previous screen.
Tips
• Please use the map of WGS-84 (world geodetic reference system) to find out the latitude and
longitude.
• In this device, the position information is displayed using both second and 1/100th minute formats.
Please check and enter the map display method to be used (second÷60×100=1/100 minute).

6
APRS Initial Settings
Setting your own station call sign
Register your own station call sign in order to send and receive messages and to send out
beacons in APRS. Enter the call sign like “JA1ZRL-9”. The “-9” in the call sign refers to the
SSID (Secondary Station Identifier). There are 16 types of SSID signs available including
one without SSID. Generally, the SSIDs shown in the table below are used in APRS.
SSID Explanation SSID Explanation
NIL Fixed stations that can exchange
messages
-8 Marine mobile stations, land mobile
stations
-1 1200 bps narrow-to-middle band
digipeater
-9 Using the FTM-100DR/DE etc. for mobile
applications
-2 9600 bps digipeater -10 I-Gate station, Internet connection station
-3 1200 bps broadband digipeater -11 Balloons, aircraft, spacecraft, etc.
-4 Digipeater, mobile station, meteorological
station, etc.
-12 1-way tracker station (messages cannot
be exchanged)
-5 Operation station using mobile devices
(smartphones etc.)
-13 Meteorological station (weather station)
-6 Operation station for satellite
communications, events, etc.
-14 Tracking mobile stations
-7 Use of FT2DR/DE etc. in handy terminals -15 Digipeater, mobile station, meteorological
station, etc.
Tip
Please refer to http://aprs.org/aprs11/SSIDs.txt for the latest SSID information.
Caution
Use the dedicated call sign in APRS. Please make sure to set the call sign when the device is used
for the first time.
1Press for one second or longer.
The set-up menu will be displayed.
2Turn the DIAL, select [10 APRS], then press .
The menu list will be displayed.

7
APRS Initial Settings
3Turn the DIAL, select [16 MY CALL SIGN (APRS)],
then press .
The currently set call signwill be displayed.
4Press .
The cursor will shift to the left of the call sign.
5Turn the DIAL and select the character.
Tip Press [ ] → This switches between letters
and numbers.
Press [ ] → This deletes all characters to the
right of the cursor.
Press [ ] → This shifts the cursor to the left.
Press [ ] → The cursor will shift to the right.
Press [ ] → This deletes all characters to the left of the cursor.
Please refer to “Input characters” ( P.20) in the basic operating manual for details.
6Press [ ].
The cursor will shift to the right.
7Repeat steps 5 and 6 to enter the call sign.
Up to 6 digits can be input for the call sign.
[If not setting the SSID]
To set the SSID, please proceed to Step 10.
8Press .
The entered call sign will be registered.
9Press for one second or longer.
The display will return to the previous screen.
[If setting the SSID]
10 Press [ ].
The cursor will shift to the SSID item.
11 Turn the DIAL and select the SSID.
12 Press .
The enteredcall signand SSIDwill beregistered.
13 Press for one second or longer.
The display will return to the previous screen.

8
APRS Initial Settings
Setting the symbol of your own station
This sets the symbol of your station when sending data by APRS. One of the 48 types of
symbols below can be selected.
1Press for one second or longer.
The set-up menu will be displayed.
2Turn the DIAL, select [10 APRS], then press .
The menu list will be displayed.
3Turn the DIAL, select [21 MY SYMBOL], then press
.
The screen for selecting the symbol will be
displayed.
Tip When shipped from the factory, the following combinations are set in the 4 patterns.
Pattern Code Symbol and name
ICON 1 /> Car
ICON 2 /R REC. vehicle
ICON 3 /- House QTH (VHF)
USER YY Yaesu Radios

9
APRS Initial Settings
4Turn the DIAL, select [ICON 1], then press .
The code displayed within the parentheses [ ] will
blink.
5Turn the DIAL to display the combination of
preferred symbols and codes.
6Press
The symbol will be confirmed.
7Repeat Steps 4 to 6 when setting [ICON 2] and [ICON 3] as well.
8Turn the DIAL to select the pattern that you want to use immediately from among
[ICON 1] to [ICON 3].
9Press for one second or longer.
The display will return to the previous screen.
●Setting preferred symbols
You can change the code and set your own symbol when the symbol that you want is
not available.
The two characters of the code refer to the following contents.
•First character: Table ID
This indicates the classification of the symbol. It is a code used for classifying the
symbols into basic symbols, substitute symbols and symbols with an overlay.
•Second character: Symbol character
This indicates the symbol pattern. A number and symbol is assigned to each
pattern.
1Press for one second or longer.
The set-up menu will be displayed.
2Turn the DIAL, select [10 APRS], then press .
The menu list will be displayed.
3Turn the DIAL, select [21 MY SYMBOL], then press
.
The screen for selecting the symbol will be
displayed.

10
APRS Initial Settings
4Turn the DIAL, select [USER], then press .
The table ID enclosed within the parentheses [ ] will
blink.
5Turn the DIAL to display the target table ID.
6Press [ ].
The symbol character enclosed within the
parentheses [ ] will blink.
7Turn the DIAL and display the target symbol.
8Press .
The symbol will be confirmed.
9Press for one second or longer.
The display will return to the previous screen.
Tip
Please refer to “http://aprs.org/symbols/symbolsX.txt” and “http://aprs.org/symbols/symbolsnew.txt” for
the latest symbol table.
Setting the APRS baud rate
The APRS baud rate (communication speed) can be selected from the following two
types.
•1200 bps: APRS operations. can be carried out using AFSK 1200 bps packets.
•9600 bps: APRS operations can be carried out using GMSK 9600 bps packets.
1Press for one second or longer.
The set-up menu will be displayed.
2Turn the DIAL, select [9 DATA], then press .
The menu list will be displayed.

11
APRS Initial Settings
3Turn the DIAL, select [2 DATA SPEED], then press
.
The screen for selecting the baud rate will be
displayed.
4Turn the DIAL, select [APRS], then press .
The baud rate enclosed within the parentheses [ ]
will blink.
5Turn the DIAL to select the baud rate.
The baud ratewill switch between “1200 bps” and “9600 bps” when the DIAL is
turned.
Tips • Factory default value: 1,200 bps
• When receiving a message, the baud rate will automatically match the baud rate of the
partner station signal regardless of the value set.
6Press for one second or longer.
The baud rate will be set and the display will return to the previous screen.
Other settings
Besides these, other settings such as the mute setting for the receive audio sound of the
APRS operating band can also be configured. Please refer to “Using the APRS set-up
menu” ( P.57) for the details.

12
Starting APRS Operation
Activating the APRS function
During APRS operation, communications are carried out via the built-in APRS modem in
the radio. When shipped from the factory, the APRS modem is set to OFF. Before starting
APRS operation, set the APRS modem to ON.
1Press for one second or longer.
The set-up menu will be displayed.
2Turn the DIAL, select [10 APRS], then press .
The menu list will be displayed.
3Turn the DIAL, select [5 APRS MODEM], then press
.
4Turn the DIAL and select “1 ON”.
Tip Factory default value: 2 OFF
5Press for one second or longer.
The APRS function will be set to ON and the display
will return to the previous screen.
Tip The icon indicating the APRS beacon’s transmission method will be displayed.
: Automatic beacon transmission
: Automatic beacon transmission (smart beacon)
: Manual beacon transmission
Matching the frequency
The frequency varies between regions and countries.
The frequency can be matched using the following methods.
1Turn to select the operating band’s frequency band.
2Turn the DIAL and set the frequency.
Press for one second or longer and then turn it to change the frequency by 1
MHz units.
The frequency value can also be input directly from the included microphone keyboard.
Please refer to “Tuning in to the frequency” ( P.37) in the basic operating manual for
the details.

13
Receiving APRS Beacons
The signal containing the position of the radio station, meteorological information,
communication range, etc. that is transmitted in APRS format, is known as a “beacon”
while the radio station that transmitted the beacon is called a “station”.
The received beacon will be downloaded into the radio memory. Up to a maximum of 100
beacons can be saved in the memory.
●To display using the “APRS pop-up” screen
A “ping pong” bell will ring and the “APRS pop-up” screen will be displayed for a fixed
period of time when a beacon is received on the frequency display screen.
The contents displayed on the “APRS pop-up” screen and the “STATION LIST” details
screen explained below are basically the same.
●To display using the “STATION LIST” details screen
The “STATION LIST” screen is displayed when is pressed for one second or longer
at the frequency display screen, then press .
Turn the DIAL, select [APRS STATION LIST], then press .
The screen switches between the “STATION LIST” screen and the “MESSAGE LIST”
screen each time [] is pressed.
Tips
• You can switch between “2 HEADING UP” for always displaying the direction in which this station is
heading at the top and “1 NORTH UP” to always display the north at the top by selecting [10 APRS]
→ [1 APRS COMPASS] on the set-up menu.
• The display time of the detailed information can be changed by selecting [10 APRS] → [7 APRS
POP-UP] on the set-up menu. The detailed information can also be set not to appear even when a
beacon is received by setting the display time to “OFF”.
• The beacons to be downloaded into the main device can be filtered by selecting [10 APRS] → [3
APRS FILTER] on the set-up menu.
• The reception audio (beacon, voice, etc.) of the APRS operating band can be muted by selecting [10
APRS] → [6 APRS MUTE] on the set-up menu.
• A notification bell can be rung when an APRS beacon is received by setting “3 RX BEACON” under
[10 APRS] → [8 APRS RINGER] on the set-up menu to “ON”. The bell ring when a beacon is
received can be muted by setting it to “OFF”.

14
Receiving APRS Beacons
Explanation of the APRS beacon screen and operation of keys
●Explanation of the “STATION LIST” screen and operation of keys
Beacons downloaded into the device can be viewed in a list. A beacon can also be
selected from the list to check its contents.
1Press for one second or longer, then press .
The “LOG SELECT” screen will be displayed.
2Turn the DIAL, select [APRS STATION LIST], then press .
The “STATION LIST” screen will be displayed.
The stations will be displayed starting from the oldest beacon received to the latest.
Tips • The list can be displayed in order of time, call sign or distance ( P.76).
• The stations displayed on the list can be filtered by the type of beacon ( P.58).
• Turn the DIAL to scroll the list.
• When [ ] is pressed, the list returns to the beginning.
⑩ ⑪⑥ ⑦ ⑧ ⑨
② ③ ⑤④①
Display explanation
➀Automatic/manual
beacon transmission
icon
: When automatic transmission is selected
: When smart beacon is selected
: When manual transmission is selected
➁Number Displayed in order of most recently received beacon (maximum 100
stations).
➂Character Displays the station list’s character.
Please see the following page for details.
➃Station name Displays the call sign or the object name/item name of the received
beacon.
➄Time or date Displays the time (HH:MM) or date (MM/DD). After midnight, the time
display switches to the date display.
➅[]The expansion key switches when is pressed.
➆[]The display switches to the top of the station list when is pressed.
➇[]When is pressed, the frequency information embedded in the target
station can be set in a band separate from the APRS operating band.
➈[]When is pressed, the “MESSAGE LIST” screen is displayed.
➉[]When is pressed, the message editing screen is displayed.
[ ] When is pressed, the APRS beacon is sent.
3Turn the DIAL, select the station whose details you want to see, then press .
The detailed information screen will be displayed.

15
Receiving APRS Beacons
●Viewing the contents of a beacon
The contents of the beacon will be displayed in the following screen.
⑤
⑧ ⑨⑦⑥
④③②
①
Display explanation
➀Symbol Symbol of transmitting station
For overlay symbols, the characters will be displayed at the top left.
➁Compass Display the direction of the transmitting station as seen from your own
station
N-UP: North is always displayed at the top.
H-UP: The direction in which you are heading is always displayed at the
top.
➂Number Entry number in station list
➃Station name Call sign, object name, or item name of a transmitting station
➄Transmitting station
information
Information and comments of transmitting station
➅[]The expansion key switches when is pressed.
➆[]When is pressed, the display moves to the beginning of the
information.
➇[]When is pressed, the frequency information embedded in the target
station can be set in a band separate from the APRS operating band.
➈[]When is pressed, the message editing screen is displayed.
Tips
• When the power supply of the main device is switched on, the position and distance will not be
displayed if the detailed screen is displayed before the GPS is captured.
• The transmitting station’s information and comments can be scrolled one line at a time by turning
the DIAL.

16
Receiving APRS Beacons
●Explanation of station list characters
The 14 types of station list characters are classified as shown below.
Display Explanation Page
E Mic-E This is displayed when the beacon of a microphone
encoder station is received. 17
P Position This is displayed when the beacon of a fixed station
(FIXED) or moving station (MOVING) is received. 18, 20
p Position
This is displayed when the beacon of a fixed station
(fixed) or moving station (moving) is received
(compressed type).
19, 20
W Weather report This is displayed when the beacon of a weather
station is received. 21
w Weather report This is displayed when the beacon of a weather
station is received (compressed type). 21
O Object This is displayed when the beacon of an object station
is received. 22
o Object This is displayed when the beacon of an object station
is received (compressed type). 22
I Item This is displayed when the beacon of an item station
is received. 22
i Item This is displayed when the beacon of an item station
is received (compressed type). 22
K Killed Object/Item This is displayed when an object station or item
station that has been deleted is received. 22
k Killed Object/Item
This is displayed when an object station or item
station that has been deleted is received (compressed
type).
22
S Status This is displayed when the beacon of a status station
is received. 23
G Raw NMEA This is displayed when the beacon of the raw NMEA
data (GGA/GLL or GPRMC) station is received. 24
? Other This is displayed when a beacon that cannot be
deciphered is received. 25
Emg This is displayed when an emergency signal is received from a Mic-E station. 26
Tip
When the power supply of the main device is switched on, the position and distance will not be
displayed if the detailed screen is displayed before the GPS is captured.

17
Receiving APRS Beacons
●Example of a beacon information display for an E (Mic-E) station
②
③
④
⑤
⑥
⑦
⑧
⑨
⑩
①
Turn the DIAL
Turn the DIAL
➀Distance This displays the distance to the partner station.
➁Date This displays the date (MM/DD) the beacon was received.
➂Time This displays the time (HH:MM) the beacon was received.
➃Speed The movement speed of the partner station will be displayed.
➄Direction The movement direction of the partner station will be displayed.
➅Altitude The altitude of the partner station will be displayed.
➆Position comment The standard message from the partner station will be displayed.
➇Latitude The current position of the partner station will be displayed in N (northern
latitude) or S (southern latitude).
(DD degree MM.MM minute or DD degree MM minute SS second)
➈Longitude The current position of the partner station will be displayed in E (eastern
longitude) or W (western longitude).
(DD degree MM.MM minute or DD degree MM minute SS second)
➉Comments Comments, if any, from a partner station will be displayed.

18
Receiving APRS Beacons
●Example of a beacon information display for a fixed P (Position) station
The following information is displayed when a FIXED station or a fixed station is received,
or when the list on the “STATION LIST” screen is selected and is pressed.
Tip
The Position may include detailed information called a PHG code. The data at this time is displayed
as shown below.
②
③
④
⑤
⑥
⑦
⑧
⑨
⑪
⑩
①
Turn the DIAL
Turn the DIAL
➀Distance This displays the distance to the partner station.
➁Date This displays the date (MM/DD) the beacon was received.
➂Time This displays the time (HH:MM) the beacon was received.
➃Transmission output This displays the partner station’s transmission output.
➄Height of antenna from
ground
This displays the height of the antenna from the ground.
➅Antenna gain This displays the gain of the partner station’s antenna.
➆Antenna orientation This displays the orientation of the partner station’s antenna.
➇Number of transmissions This displays the number of transmissions of the partner station.
➈Latitude The current position of the partner station will be displayed in N
(northern latitude) or S (southern latitude).
(DD degree MM.MM minute or DD degree MM minute SS second)
➉Longitude The current position of the partner station will be displayed in E
(eastern longitude) or W (western longitude).
(DD degree MM.MM minute or DD degree MM minute SS second)
Comments Comments, if any, from a partner station will be displayed.

19
Receiving APRS Beacons
●Example of a beacon information display for a fixed P (Position) station
The following information is displayed when a FIXED station or a fixed station (compressed
type*) is received, or when the list on the “STATION LIST” screen is selected and
is pressed.
②
③
④
⑤
⑥
⑦
①
Turn the DIAL
Turn the DIAL
➀Distance This displays the distance to the partner station.
➁Date This displays the date (MM/DD) the beacon was received.
➂Time This displays the time (HH:MM) the beacon was received.
➃Altitude The altitude of the partner station will be displayed.
➄Latitude The current position of the partner station will be displayed in N (northern
latitude) or S (southern latitude).
(DD degree MM.MM minute or DD degree MM minute SS second)
➅Longitude The current position of the partner station will be displayed in E (eastern
longitude) or W (western longitude).
(DD degree MM.MM minute or DD degree MM minute SS second)
➆Comments Comments, if any, from a partner station will be displayed.
*: A beacon where part of the information is sent in a compressed format.
Other manuals for FTM-100DR
11
This manual suits for next models
1
Table of contents
Other Yaesu Transceiver manuals

Yaesu
Yaesu FT-897 User manual

Yaesu
Yaesu VX-5500L User manual

Yaesu
Yaesu FT-690R User manual

Yaesu
Yaesu FT DX 9000 CONTEST - 2 User manual

Yaesu
Yaesu FT-711RH Manual

Yaesu
Yaesu FT-2700RH User manual

Yaesu
Yaesu FT3DR Manual

Yaesu
Yaesu FT-209R Manual

Yaesu
Yaesu FTM-7250DR Manual

Yaesu
Yaesu FT-270R/RH User manual

Yaesu
Yaesu FT-209R User manual

Yaesu
Yaesu Mark-V FT-1000MP User manual

Yaesu
Yaesu FTM-7250DR User manual

Yaesu
Yaesu FTdx3000 Series Manual

Yaesu
Yaesu FT-4XR User manual

Yaesu
Yaesu FT-107M User manual

Yaesu
Yaesu FT-900 User manual

Yaesu
Yaesu FT-65R/E User manual

Yaesu
Yaesu FTA-750 Spirit User manual

Yaesu
Yaesu FT-817ND User manual