Yaesu FTM-400DR User manual

144/430MHz 50W
DUAL BAND TRANSCEIVER
C4FM FDMA/FM
Instruction Manual
FTM-400DR
(GM Edition)
Thank you for purchasing this Yaeau product.
This instruction manual explains information related to the “GM Function” .
For information on basic operation of the transceiver, please refer to the enclosed
FTM-400DR operating manual.

1
Using the GM function
Contents
Introduction.............................................................................................................................................................2
Operating the character input screen.......................................................................................................................2
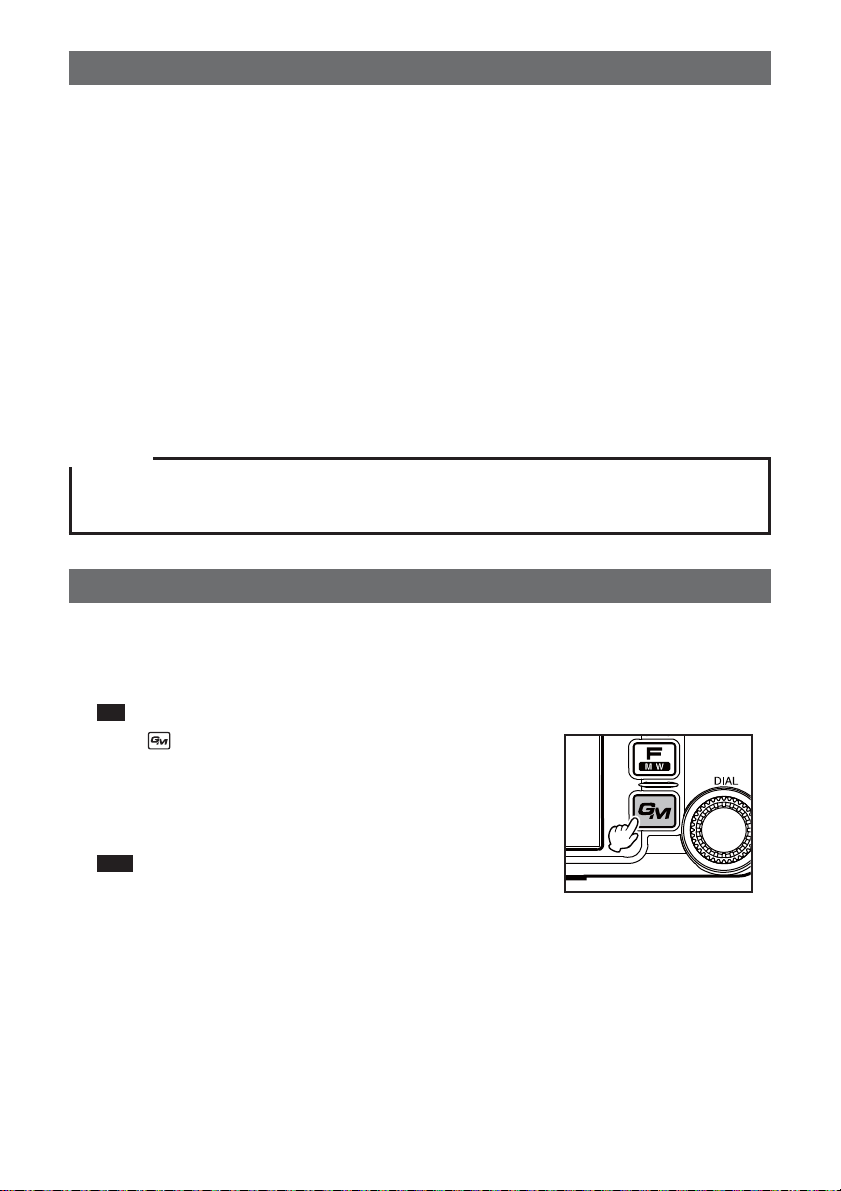
What is the GM Function?.....................................................................................................................................3
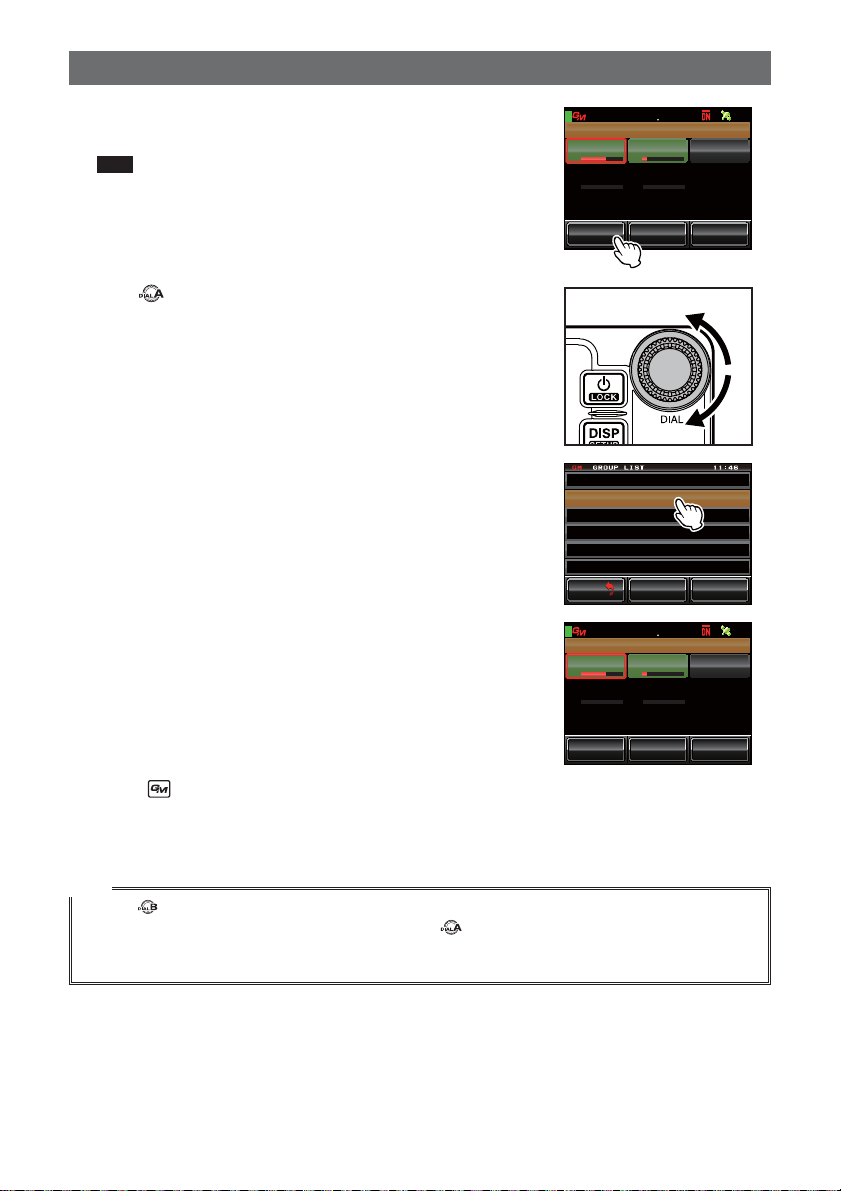
Monitoring the Status of the Communication Sphere ........................................................................................3
Registering Groups and Group Members............................................................................................................5
Creating a new group...............................................................................................................................................5
Registering the group members...............................................................................................................................6
Registering from the group list summary.............................................................................................................6
Manual registration ..............................................................................................................................................7
Changing the group name........................................................................................................................................9
Changing the name (call sign) of a group member ................................................................................................10
Copying group information from the micro-SD card...............................................................................................12
Deleting a group.....................................................................................................................................................13
Deleting a group member.......................................................................................................................................14
Checking Messages and Pictures Received......................................................................................................16
Sending Messages and Pictures.........................................................................................................................18
Creating and sending a new message...................................................................................................................18
Using standard messages.................................................................................................................................20
Registering a standard message.......................................................................................................................21
Replying to a read message or viewed picture.......................................................................................................22
Forwarding messages and pictures........................................................................................................................24
Sending a picture that has been taken...................................................................................................................25
Using Position Information..................................................................................................................................28
Checking the position of a member........................................................................................................................28
Saving the position information of a member in the memory .................................................................................29
Displaying position information saved in the memory........................................................................................30
Updating Group Information in Real-time..........................................................................................................31
Requesting for synchronization from your own station...........................................................................................31
Receiving a synchronization request from another station.....................................................................................32
GM Set-up Menu List............................................................................................................................................33
Using the GM Set-up Menu..................................................................................................................................33
Bell sound setting when checking for stations within sphere of communications..............................................33
Specific ID display by transceiver......................................................................................................................34

2
Introduction
Operating the character input screen
The following screen is displayed when inputting text such as group names in the
radio.
●Alphabet input screen
᳂Ჺ6QWTK IP
%CRU
39'46;7+12
#5&()*,-.
<:%8$0/
#$% 5RCEG
'06
@
ᲹᲺ
[Caps] The input switches between small and large
character input each time this is touched.
[123#%^] The screen changes to the number input
screen when touched.
>ĸ@>ĺ@ The cursor in the input field moves left and
right when these are touched.
[ENT] The entered characters are confirmed and
the display returns to the previous screen
when this is touched.
[BACK] The display returns to the previous screen
when this is touched.
[ ] The character to the left of the cursor will be
deleted when this is touched.
●Numbers and symbols input screen
ᲹᲺ
ᲽᲾᲿ᳀᳁᳂
"
#$% 5RCEG
'06
!
@
ᲹᲺ
᳂ Ჹ 6QWTK Ჺ᳂ Ჹ PI
%CRU
[ABC] The screen changes to the alphabet input
screen when this is touched.
[123#%^] The screen changes to the input screen
for numbers and symbols each time this is
touched.
●Input field
Upon touching a character key when a character is already displayed, the character to
the left of the cursor will be overwritten.

3
What is the GM Function?
The GM (group monitor) function automatically checks the current operating frequency
to find if other stations are operating in the DN mode with the GM function, and are
within within communication range.
When a group of radio stations that you communicate with frequently are registered in
the memory, the GM function is a convenient method of exchanging messages, pictures
and notifications with group members that are within the sphere of communications. The
position information reported from the other stations can also be used for location and
navigation purposes.
A maximum of 16 groups can be created in the GM function of the device.
A maximum of 24 stations excluding your own station can be registered as Members in
each group.
Member lists and group lists are saved in the micro-SD card, and can be exchanged
with other members.
Cautions
zThe GM function works at the Band A frequency (band at the top of the display).
zOnly operate the GM function at the same frequency as the other group members.
zWhen the GM function is activated, Band A will automatically switch to the digital mode.
Monitoring the Status of the Communication Sphere
Check the current frequency to find if other stations are operating in the DN mode with
the GM function, and are within the sphere of communications.
1Tune Band A to the frequency used for the group that you would like to contact.
Tip Refer to “Matching the frequency” in the basic operating manual for the details.
2Press
The call sign and signal strength of stations operating
in the DN mode and those with their GM functions in
operation, that are within communications range, will
be displayed.
Tips • Stations within the sphere of communication are
displayed in green.
• Stations outside the sphere of communication are
displayed in grey.
The “GM” icon and operating frequency will be
displayed at the top of the screen.

4
Monitoring the Status of the Communication Sphere
3Touch [GROUP]
The group list will be displayed.
Tips • The last group in operation will be selected and
displayed at the top of the list.
• The lists will be automatically sorted according to the
latest periods.
)4172
5;0% .1)
#..
Ჸ
ᲹᲽ ᲸᲾ
81(
,*Ჹ;2%ᲹᲺ ,#Ჹ<4.᳂᳂,3 Ჹ ;$(᳂ Ჹ Ჹ
4Turn , or touch the screen to select the group that
you want to operate
5Touch the selected group
A list of the group members will be displayed on
the screen, and the radio will switch to GM group
operation.
$#%-
$#%-
&'. '&+6
Ჹ᳂ )4172 ᳂
᳂ )4172 ᳂
)4172 ᳂
#..
)4172
5;0% .1)
Ჸ
ᲹᲽ ᲸᲾ
81(
)4172 ᳂
,*Ჹ;2%ᲹᲺ ,#Ჹ<4.᳂᳂,3 Ჹ ;$(᳂ Ჹ Ჹ
6Press
The GM function will be turned off and returned to normal operation. The display will
return to the frequency display screen.
Tips
• When is pressed during GM operation, the GM function will be turned off temporarily and the
various operations in Band B will be enabled. Press to return to GM operation in Band A.
• When [GM]ĺ[1 RANGE RINGER] in the set-up menu is set to ON, a bell notification will be
sounded when a group member enters into the sphere of communication.

5
Registering Groups and Group Members
To use the GM function for group operation, the group and group members must be
saved to the memory in advance.
Creating a new group
Up to 16 groups can be created for use by the GM function.
1Press
The call signs and signals strength of stations within communications range,
operating in the DN mode with GM functions, will be displayed.
2Touch [GROUP]
The group list will be displayed.
)4172
5;0% .1)
#..
Ჸ
ᲹᲽ ᲸᲾ
81(
,*Ჹ;2%ᲹᲺ ,#Ჹ<4.᳂᳂,3 Ჹ ;$(᳂ Ჹ Ჹ
3Turn , or touch the screen to select a group with
no group number attached on the left hand side
4Touch the selected group
The character input screen will be displayed.
$#%-
$#%-
&'. '&+6
Ჹ᳂ )4172 ᳂
᳂ )4172 ᳂
)4172 ᳂
#..
5Touch the character keys to enter the group name
The touched characters will be displayed at the top of
the screen.
Tips • Up to 16 characters can be entered.
• English characters, numbers, symbols and katakana
characters can be used.
)4172 ᳂
39'46;7+12
#5&()*,-.
<:%8$0/
#$% 5RCEG
'06
@
ᲹᲺ
%CRU
6Touch [ENT]
The group will be created and a list of the group
members will be displayed on the screen.
;#'57 ᳂᳂Ჹ
39'46;7+12
#5&()*,-.
<:%8$0/
#$% 5RCEG
'06
@
ᲹᲺ
%CRU

6
Registering Group and Group Members
7Touch [BACK]
Return to the group list. The created group will be
displayed at the top of the list.
Tip Before touching [BACK], the members can be registered
manually. Please refer to “Manual registration” ( p.7)
for the procedure.
$#%-
$#%-
&'. '&+6
᳂ Ჹ ;#'57᳂ ᳂ Ჹ
$#%-
$#%-
&'. '&+6
᳂ )4172 ᳂
Ჹ᳂ ;#'57 ᳂᳂
᳂ )4172 ᳂
)4172 ᳂
#..
Registering the group members
Registering from the group list summary
The desired stations can be selected from the group list summary and registered as a
group members.
1Press
The call signs and signals strength of stations within communications range,
operating in the DN mode with GM functions, will be displayed.
Tips • Stations within the sphere of communication are displayed in green.
• Stations outside the sphere of communication are displayed in grey.
2Turn , or touch the screen to select the station
that you would like to register
The selected station will be enclosed in a red box.
3Touch the station enclosed in the red box
The call sign of the touched station will blink.
)4172
5;0% .1)
#..
Ჸ
ᲹᲽ ᲸᲾ
81(
,*Ჹ;2%ᲹᲺ ,#Ჹ<4.᳂᳂,3 Ჹ ;$(᳂ Ჹ Ჹ
4Repeat Steps 2 and 3 to select additional stations
All the selected call signs will blink.
Tip Up to 24 stations can be selected.
)4172
5;0% .1)
#..
Ჸ
ᲹᲽ ᲸᲾ
81(
,*Ჹ;2%ᲹᲺ ,#Ჹ<4.᳂᳂,3 Ჹ ;$(᳂ Ჹ Ჹ

7
Registering Group and Group Members
5Press for one second or longer
The group list will be displayed.
7Turn , or touch the screen to select the group that
you would like to register the member into.
8Touch the selected group
Tip Follow Steps 3 to 6 in “Creating a new group” ( P.5)
to complete the input of the group name when creating
and registering a new group.
$#%-
$#%-
&'. '&+6
Ჹ᳂ )4172 ᳂
᳂ )4172 ᳂
)4172 ᳂
A list of the group members will be displayed with the
selected station added to the list.
)4172 ᳂ Ჹ
)4172
5;0% .1)
Ჸ
ᲹᲽ ᲸᲾ
81(
,* Ჹ ;2% Ჹ Ჺ ,3 Ჹ ;$(᳂ Ჹ
Manual registration
The call signs of other stations can be entered and added as group members.
1Press
The call sign and signal strength of stations within communications range, operating
in the DN mode with GM functions, will be displayed.
2Touch [GROUP]
The group list will be displayed.
)4172
5;0% .1)
#..
Ჸ
ᲹᲽ ᲸᲾ
81(
,*Ჹ;2%ᲹᲺ ,#Ჹ<4.᳂᳂,3 Ჹ ;$(᳂ Ჹ Ჹ
3Turn , or touch the screen to select the group that
you would like to add the member to
4Touch [EDIT]
A list of the group members will be displayed on the
screen.
$#%-
$#%-
&'. '&+6
Ჹ᳂ )4172 ᳂
᳂ )4172 ᳂
)4172 ᳂
#..

8
Registering Group and Group Members
5Touch the station whose call sign is displayed as
“❘ ❘ ❘ ❘ ❘ ❘ ❘ ❘ ❘ ❘”
The touched station will be enclosed in a red box.
Ჹ᳂ )4172 ᳂Ჺ
$#%-
$#%-
&'. '&+6
,*Ჹ;2%ᲹᲺ
6Touch [EDIT]
The character input screen will be displayed.
Ჹ᳂ )4172 ᳂Ჺ
$#%-
$#%-
&'. '&+6
,*Ჹ;2%ᲹᲺ
7Touch the character keys to enter the call sign
The touched characters will be displayed at the top of
the screen.
Tips • Up to 10 characters can be entered.
• English letters and numbers as well as symbols can be
used. Katakana characters cannot be used.
Ჹ.
<
,#4
39'46;7+12
#5&()*,-.
<:%8$0/
#$% 5RCEG
'06
@
ᲹᲺ
%CRU
8Touch [ENT]
The tag of the call sign entered will be added to the
list of group members on the screen.
Repeat Steps 5 to 8 to continue adding other
members.
Tip Up to 24 stations can be registered.
Ჹ
,# . ᳂᳂Ჹ
<4
39'46;7+12
#5&()*,-.
<:%8$0/
#$% 5RCEG
'06
@
ᲹᲺ
%CRU
9Touch [BACK]
The screen will return to the group list.
$#%-
$#%-
&'. '&+6
,# Ჹ <4.᳂᳂ Ჹ
᳂ Ჹ )4172 ᳂Ჺ
,*Ჹ;2%ᲹᲺ

9
Registering Group and Group Members
Changing the group name
The name of a group that has already been created can be changed.
1Press
The call sign and signal strength of stations operating in the DN mode and those
with their GM functions in operation in the vicinity will be displayed.
2Touch [GROUP]
The group list will be displayed.
)4172
5;0% .1)
#..
Ჸ
ᲹᲽ ᲸᲾ
81(
,*Ჹ;2%ᲹᲺ ,#Ჹ<4.᳂᳂,3 Ჹ ;$(᳂ Ჹ Ჹ
3Turn , or touch the screen to select a group
whose name you would like to change
4Touch [EDIT]
A list of the group members will be displayed on the
screen.
Check that the group name at the top of the screen is
enclosed in a red box at this point.
$#%-
$#%- &'. '&+6
᳂ )4172 ᳂
Ჹ᳂ ;#'57 ᳂᳂
᳂ )4172 ᳂
)4172 ᳂
#..
5Touch [EDIT]
The character input screen will be displayed.
$#%-
$#%-
&'. '&+6
᳂ Ჹ ;#'57᳂ ᳂ Ჹ
6Touch the character keys to change the group name
The characters on the right hand side of the cursor
will be overwritten.
Tips • Up to 16 characters can be entered.
• English characters, numbers, symbols and katakana
characters can be used.
᳂Ჹ;#'57᳂᳂Ჹ
39'46;7+12
#5&()*,-.
<:%8$0/
#$% 5RCEG
'06
@
ᲹᲺ
%CRU
7Touch [ENT]
The screen will return to the list of group members
and the group name that has been changed will be
displayed.
%CRU
᳂Ჹ%#/2
39'46;7+12
#5&()*,-.
<:%8$0/
#$% 5RCEG
'06
@
ᲹᲺ

10
Registering Group and Group Members
8Touch [BACK]
Return to the group list. The group name that has
been changed will be displayed in the list.
$#%-
$#%-
&'. '&+6
᳂ Ჹ %#/2
$#%-
$#%-
&'. '&+6
᳂ )4172 ᳂
Ჹ᳂ %#/2
᳂ )4172 ᳂
)4172 ᳂
#..
Changing the name (call sign) of a group member
The call sign of a group member that has already been registered can be changed.
1Press
The call sign and signal strength of stations within communications range, operating
in the DN mode with GM functions, will be displayed.
2Touch [GROUP]
The group list will be displayed.
)4172
5;0% .1)
#..
Ჸ
ᲹᲽ ᲸᲾ
81(
,*Ჹ;2%ᲹᲺ ,#Ჹ<4.᳂᳂,3 Ჹ ;$(᳂ Ჹ Ჹ
3Turn , or touch the screen to select the group
where the member whose call sign you want to
change is registered
4Touch [EDIT]
A list of the group members will be displayed on the
screen.
$#%-
$#%-
&'. '&+6
᳂ )4172 ᳂ Ჹ
᳂ )4172 ᳂
)4172 ᳂
Ჹ᳂ )4172 ᳂
#..

11
Registering Group and Group Members
4Touch the member whose call sign you want to
change
The touched member will be enclosed in a red box.
$#%-
$#%-
&'. '&+6
᳂Ჺ)4172 ᳂ Ჹ
,# Ჹ <4.᳂᳂ Ჹ,*Ჹ;2%ᲹᲺ
5Touch [EDIT]
The character input screen will be displayed.
$#%-
$#%-
&'. '&+6
᳂Ჺ)4172 ᳂ Ჹ
,# Ჹ <4.᳂᳂ Ჹ,*Ჹ;2%ᲹᲺ
6Touch the character keys to change the call sign
The characters on the right hand side of the cursor
will be overwritten.
Tips • Up to 10 characters can be entered.
• English letters, numbers and symbols can be used.
Katakana characters cannot be used.
Ჹ%
;
,*2
39'46;7+12
#5&()*,-.
<:%8$0/
#$% 5RCEG
'06
@
ᲹᲺ
%CRU
7Touch [ENT]
The screen will return to the list of group members,
and the member whose name has been changed will
be displayed.
Ჹ%
ᲿᲿᲿ
;
,*2
39'46;7+12
#5&()*,-.
<:%8$0/
#$% 5RCEG
'06
@
ᲹᲺ
%CRU
8Touch [BACK]
Return to the group list.
$#%-
$#%-
&'. '&+6
᳂ Ჹ )4172 ᳂ Ჹ
,# Ჹ <4.᳂᳂ Ჹ,*Ჹ;2%ᲿᲿᲿ
Caution
Even if the name (call sign) of a group member is changed, when a station with the same ID (a
specific identification number of the radio) is received, the call sign of the signal received will be given
priority and updated automatically.

12
Registering Group and Group Members
Copying group information from the micro-SD card
Group information registered in the micro-SD card can be copied to another transceiver.
Example: When copying from another transceiver to the main device
1Turn both transceivers OFF
2Remove the micro-SD card from the transceiver information is going to be copied
from
3Insert the micro-SD card into the transceiver the information is going to be copied to
4Turn the "copy to" transceiver ON
5Press for one second or longer
The set-up menu will be displayed.
6Touch [SD CARD]
The menu list will be displayed.
$#%-
$#%-
6:4:
5'672/'07
4'5'6
%.10'
%10(+)9Ჰ4'5
5%#0
&+52.#;
5+) 0 # .+0 )
#245 126+10
5&%#4&
/'/14;
#
% # .. 5+) 0
7Turn , or touch the screen to select [2 GROUP ID]
8Touch [2 GROUP ID]
The screen for selecting the copy direction will be
displayed.
$#%-
$#%-
5&%#4&
(14/#6
)4172+&
$#%-72
Ჹ
Ჺ
9Turn , or touch the screen to select [Read from
SD]
10Touch [Read from SD]
The group information saved on the micro-SD card
will be listed on the transceiver screen.
$#%-
$#%-
)4172+&
⌿
5&%#4&
&5QVGVᲲT9
5&QOTHFCG4

13
Registering Group and Group Members
11 Turn , or touch the screen to select the group
name whose information you want to read
12Touch the selected group name
A check mark will be displayed in the box on the right
hand side of the group name.
Tip When reading all the group information, touch [ALL]. All
the group names will be ticked.
$#%-
$#%-
4GCF#..
Ჹ%3
Ჹ (KUJ P
IK
&G
:T
81.706''4 '6/#
Ჺ
Ჹ0;Ჹ
Ჹ)4
Ჹ (+4'0&5 /'6190*1Ჾ
Ჽ
Ჹ)4᳂Ჹ
᳂Ჽ
)4᳂ 0
A7+
6'&
13Touch [READ]
A screen for confirming the reading of the information
will be displayed.
$#%-
$#%-
4GCF#..
Ჹ%3
Ჹ (KUJ P
IK
&G
:T
81.706''4 '6/#
Ჺ
Ჹ0;Ჹ
Ჹ)4
Ჹ (+4'0&5 /'6190*1Ჾ
Ჽ
Ჹ)4᳂Ჹ
᳂Ჽ
)4᳂ 0
A7+
6'&
14Touch [OK?]
Reading the information in the groups that have been
ticked will commence. “Completed” will be displayed
at the end of the reading and the display will return to
the screen for selecting the copy direction.
Tip Touch [Cancel] to cancel the reading.
$#%-
$#%-
4GCF#..
Ჹ%3
Ჹ (KUJ P
IK
&G
:T
81.706''4 '6/#
Ჺ
Ჹ0;Ჹ
Ჹ)4
Ჹ (+4'0&5 /'6190*1Ჾ
Ჽ
Ჹ)4᳂Ჹ
᳂Ჽ
)4᳂ 0
A7+
6'&
%CPEGᲴ1-!
4GCFHTQO5&
Tip
The group information of your own station can be recorded in the micro-SD card by selecting [Write
to SD] in Steps 9 and 10.
Deleting a group
A registered group can be selected and deleted from the list.
1Display the group list
2Turn , or touch the screen to select the group to
be deleted
#..
$#%-
$#%-
&'. '&+6
᳂ )4172 ᳂ Ჹ
᳂ )4172 ᳂
)4172 ᳂
Ჹ᳂ )4172 ::

14
Registering Group and Group Members
3Touch [DEL]
A screen for confirming the deletion will be displayed.
#..
$#%-
$#%-
&'. '&+6
᳂ )4172 ᳂ Ჹ
᳂ )4172 ᳂
Ჹ᳂ )4172 ::
)4172 ᳂
4Touch [OK?]
“Completed” will be displayed when the group is
deleted and the screen will then return to the group
list.
Tip Touch [Cancel] to cancel the deletion.
#..
$#%-
$#%-
&'. '&+6
᳂ )4172 ᳂ Ჹ
᳂ )4172 ᳂
Ჹ᳂ )4172 ::
)4172 ᳂
%CPEGᲴ1-!
&'.'6')4172
Deleting a group member
A group member registered in a group can be selected and deleted from the list.
1Display the group list
2Turn , or touch the screen to select the group
where the member you want to delete is registered
3Touch [EDIT]
A list of the group members will be displayed on the
screen.
#..
$#%-
$#%-
&'. '&+6
Ჹ᳂ )4172 ᳂ Ჹ
᳂ )4172 ᳂
)4172 ᳂
4Touch the member that you want to delete
The touched member will be enclosed in a red box.
$#%-
$#%-
&'. '&+6
,# Ჹ <4.᳂᳂ Ჹ
᳂ Ჹ )4172 ᳂ Ჹ
5Touch [DEL]
A screen for confirming the deletion will be displayed.
$#%-
$#%-
&'. '&+6
,# Ჹ <4.᳂᳂ Ჹ
᳂ Ჹ )4172 ᳂ Ჹ

15
Registering Group and Group Members
6Touch [OK?]
The member will be deleted and the screen will
return to the list of group members.
Tip Touch [Cancel] to cancel the deletion.
$#%-
$#%-
&'. '&+6
,# Ჹ <4.᳂᳂ Ჹ
᳂ Ჹ )4172 ᳂ Ჹ
%CPEGᲴ1-!
&'.'6'/'/$'4

16
Checking Messages and Pictures Received
The messages (text) and pictures received from group members during group operation
can be viewed.
1Display the group list
2Turn , or touch the screen to select the group
3Touch the selected group
A list of the group members will be displayed.
#..
$#%-
$#%-
&'. '&+6
Ჹ᳂ )4172 ᳂
᳂ )4172 ᳂
)4172 ᳂
4Touch [LOG]
A list of the messages received and sent will be
displayed.
Tips • The message list is displayed when shipped from the
factory but subsequently, either the message or picture
list which was last chosen will be displayed.
• The icon on the left side of the list of messages sent
and received refers to the following.
: Messages received during GM operation (read
messages)
: Messages received during GM operation
(unread messages)
: Messages sent during GM operation
: Messages that failed to be sent during GM
operation
Ჸ
ᲹᲽ ᲾᲸ
)4172
5;0% .1)
)4172 ᳂
81(
,*Ჹ;2%ᲹᲺ ,#Ჹ<4.᳂᳂,3 Ჹ ;$(᳂ Ჹ Ჹ
5Turn , or touch the screen to select the message
that you want to read
6Touch the selected message
The main text of the message will be displayed.
Tip Press when the message list is displayed to display
the direction information of the location from where the
message was sent, on the compass screen.
0'9
Ჹ,* ;2% ᲺᲹ
(4/
612
&'.
$#%-
$#%-
᳂
,3 ;$( ᲹᲹ
ᲹᲺ
Ჹ Ჺ
61
7Touch [BACK]
Return to the list of messages.
4'2.;
(149#4&
&'.
$#%-
$#%-
Ჹ
,* ;2% Ჺ
Ჹ
(4/
6JCPM[QW
#..
61

17
Checking Messages and Pictures Received
8Touch [ / ]
A list of the pictures sent and received will be
displayed.
Tip The icon on the left side of the list of pictures sent and
received refers to the following.
: Pictures stored on the micro-SD card
: Pictures received during GM operation (viewed
pictures)
: Pictures received during GM operation (unviewed
pictures)
: Pictures sent during GM operation
: Pictures that failed to be sent during GM
operation
0'9
Ჹ,* ;2% ᲺᲹ
(4/
612
&'.
$#%-
$#%-
,3 ;$(Ჹ
ᲹᲺ
Ჹ Ჺ
61
᳂
Ჹ
9Turn , or touch the screen to select the picture
that you want to view
10Touch the selected picture
The picture will be displayed.
Tip Press when the picture is displayed to display the
direction information of the location from where the
picture was taken on the compass screen.
᳂,3 ;$( Ჹ
Ჹ
,#;
2%Ჺ
Ჹ
Ჹ
(4/
612
&'.
$#%-
$#%-
᳂
,# <4. ᳂ Ჹ
Ჹ
ᲹᲺ
ᲹᲽᲾ
Ჹ Ჺ
61
61
ᲾᲹ
Ჺ᳂Ჾ᳂Ჺ
ᲹᲾ
Ჹ
11 Touch [BACK]
The screen will return to the list of pictures.
᳂
,3;$( Ჹ
Ჹ
(4/
,*;2%Ჹ Ჺ
61
4'2.;
(149#4&
&'.
$#%-
$#%-
12Touch [BACK]
Return to the list of group members.
᳂,3 ;$( Ჹ
Ჹ
,#;
2%Ჺ
Ჹ
Ჹ
(4/
612
&'.
$#%-
$#%-
᳂
,# <4. ᳂ Ჹ
Ჹ
ᲹᲺ
ᲹᲽᲾ
Ჹ Ჺ
61
61
ᲾᲹ
Ჺ᳂Ჾ᳂Ჺ
ᲹᲾ
Ჹ
13Touch [GROUP]
Return to the group list.
Ჸ
ᲹᲽ ᲾᲸ
)4172
5;0% .1)
)4172 ᳂Ჺ
,*Ჹ;2%ᲹᲺ ,#Ჹ<4.᳂᳂,3 Ჹ ;$(᳂ Ჹ Ჹ
81(

18
Sending Messages and Pictures
Messages (text) and pictures can be sent. Messages and pictures can be sent to
specific members only, or to all members all at once.
The following are the four types of transmission methods:
(1) Create and send a new message
(2) Reply to a read message or viewed picture
(3) Forward a read message or viewed picture
(4) Send a picture that has been taken
Creating and sending a new message
1Display the group list
2Turn , or touch the screen to select the group
3Touch the selected group
A list of the group members will be displayed.
#..
$#%-
$#%-
&'. '&+6
Ჹ᳂ )4172 ᳂
᳂ )4172 ᳂
)4172 ᳂
4Touch [LOG]
A list of the messages will be displayed.
Tip Touch [ / ] when the list of pictures is displayed to
change to the list of messages.
Ჸ
ᲹᲽ ᲾᲸ
)4172
5;0% .1)
)4172 ᳂Ჺ
,*Ჹ;2%ᲹᲺ ,#Ჹ<4.᳂᳂,3 Ჹ ;$(᳂ Ჹ Ჹ
81(
5Touch [NEW]
The message details screen will be displayed.
0'9
/'/$'4
612
&'.
$#%-
$#%-
6Touch [ ]
The character input screen will be displayed.
5'0&
6':6
5#8'
$#%-
$#%-
Ჹ
,* ;2% Ჺ
Ჹ
(4/
0'9

19
Sending Messages and Pictures
7Touch the character keys to enter the message
The touched characters will be displayed at the top of
the screen.
Tips • Up to 80 characters can be entered.
• English characters, numbers, symbols and katakana
characters can be used.
39'46;7+12
#5&()*,-.
<:%8$0/
#$% 5RCEG
'06
@
ᲹᲺ
$#%-
%CRU
8Touch [ENT]
The entered text will be confirmed and the display
will return to the message details screen.
39'46;7+12
#5&()*,-.
<:%8$0/
#$% 5RCEG
%CRU
'06
@
ᲹᲺ
ᵥᵦᵧ
;CGUW6QWTKPI
&C[U
9Touch [SEND]
A list of the group members will be displayed.
5'0&
6':6
5#8'
$#%-
$#%-
Ჹ
,* ;2% Ჺ
Ჹ
(4/
;CGUW6QWTKPI
0'9
&C[U
10Select the address
Touch [ALL] if you want all group member stations to
receive the message.
Touch members within the sphere of communication
when specifying specific group members as
addresses to send the message or picture to.
Caution Members outside the sphere of communication
cannot be touched.
Tips • Address refers to the destination displayed in the
message tag where the message is sent to. Even when
a specific station is specified as an address, stations
within the sphere of communication with their GM
functions operating at the same frequency can still see
the message.
• Touch [BACK] to cancel the transmission.
Ჸ
ᲹᲽ ᲾᲸ
ᲷQ #..
$#%-
$#%-
ᲷQ #..
$#%-
$#%-
)4172 ᳂Ჺ
,*Ჹ;2%ᲹᲺ ,#Ჹ<4.᳂᳂,3 Ჹ ;$(᳂ Ჹ Ჹ
81(
The message contents will be displayed, and the message will be sent.
“Completed” will be displayed when the message is sent and the screen will then
return to the list of messages. The tag of the sent message will be added to the top
of the list.
Other manuals for FTM-400DR
7
Table of contents
Other Yaesu Transceiver manuals

Yaesu
Yaesu FT-101E User manual

Yaesu
Yaesu FTM-100DR User manual

Yaesu
Yaesu FT-790R User manual

Yaesu
Yaesu FTM-350 - APRS User manual

Yaesu
Yaesu FT-8900R Manual

Yaesu
Yaesu FT-60R User manual

Yaesu
Yaesu Mark-V FT-1000MP User manual

Yaesu
Yaesu FT-897 User manual

Yaesu
Yaesu FT-23R MKII Manual

Yaesu
Yaesu FT-8100R Manual

Yaesu
Yaesu FT-818ND User manual

Yaesu
Yaesu FT-80C - SERVICE User manual

Yaesu
Yaesu FT-950 Technical manual

Yaesu
Yaesu FTA-550 series Quick start guide

Yaesu
Yaesu FT3DR Manual

Yaesu
Yaesu GX1280S User manual

Yaesu
Yaesu FT-847 User manual

Yaesu
Yaesu FT-7100M User manual

Yaesu
Yaesu FTM-300DE Reference guide

Yaesu
Yaesu FT2DR User manual