UTEPO UTP101PV-HD5 User manual

Please follow installation steps as below:
l
l
l
l
RM Unit pc
SV Unit 1pc
DC Jump Wire 1pc
User Manual 1pc
1
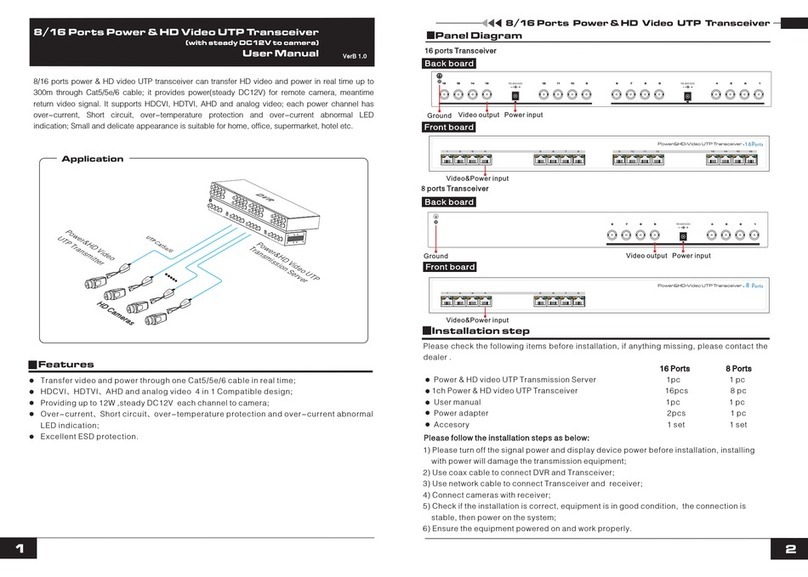
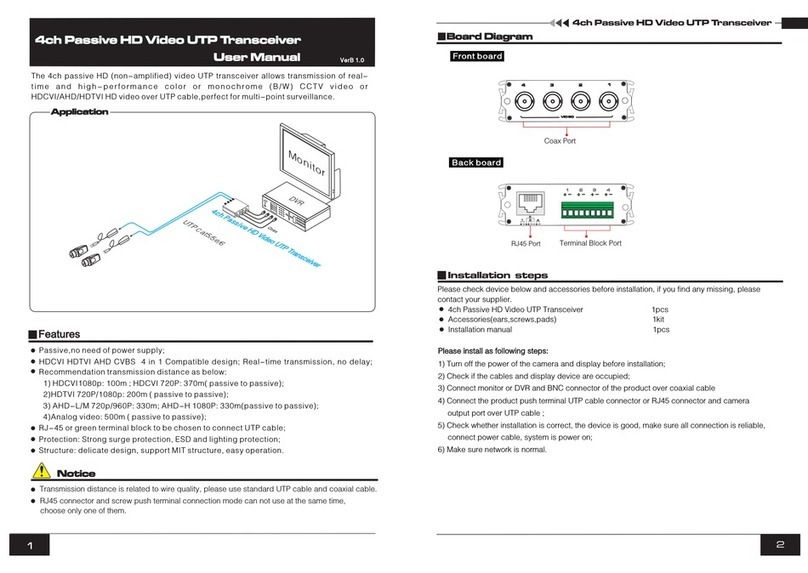
The 1ch HD analog video & power transceiver transfers real-time analog video signal, supplies
stable 12V/0.8A DC power for the remote cameras through Cat5/5e/6 cable, and passes back video
signal up to 500m. It is compatible with analog video signals of CVBS, HDCVI, HDTVI, and AHD.
The transceiver consists of SV unit connecting with DVRs and RM unit with cameras. It features
protection of short-circuit & over-current & over-temperature, over-current LED, and independent
power protection. The transceiver with small volume and joinable design fits easily in many
locations. (e.g., villa, super market, office, hotel)
Feature
l
max. 500m transmission distance;
lHDCVI, HDTVI, AHD, CVBS signals 4in1 full compatible design;
lOutput steadying voltage 12V/0.8A at RM side;
lShort-circuit, over-current, over-temperature protection and over-current abnormity LED
indication;
lSuperior surge immunity, ESD protection;
lCombined connection available, optional MIT rack, which satisfy multi channels centralized
application.
Transfer video and power signal in real-time via single cable, active video transmission solution,
Notice
12
1 Standard Cat5e/6 cable and 75 4 or above coax are strongly suggested for reaching the
maximum transmission distance!
2)
) -
Please use standard UTP cable and coax to ensure the stable transmission.
HD Analog Video &Power UTP Transceiver
Installation Steps
Panel Diagram
Installation Methods
1.Wall-mounting
(Magnet is optional component.
Please purchase it if necessary)
2.Magnetic Attraction
Magnetic attraction
at both bottom sides
VerB 1.0
DC12V Output
RJ45 Port
Right View
Left View Top View
Top View Right View
Left View
RM Unit
SV Unit
DC48-54V
RJ45 Port
Please check the following items before installation if it is missing please contact the dealer , , .
DATA DC 12V
POWER OUT
COAX
Power Video
10X 10X
Power&HD Video Transceive r
With 1 2V Regula torHDCV I/HDTVI /AHD/A nalog Vi deo
Video Output
Switch
Video LED
Power LED
3.Splicing & Rack-mounting(up to 8 pcs)
(Rack is optional component. Please
purchase it if necessary )
1 Turn off the power of all the related devices before the installation; otherwise the device would
be damaged;
2) Check if the any cable has been occupied by other device;
3) Connect power port and BNC port of RM unit to the corresponding ports of other devices (e.g.,
camera);
4) Connect Ethernet ports of RM unit and SV unit by Ethernet cable;
5) Connect the input port of display device and BNC port of SV unit by coaxial cable;
6) Connect power adapter to the SV unit;
7) Double check the installation and connection of equipments are correct and the equipments are
working properly, then power on system;
8) Make sure image displays and other devices are working.
)
HD Analog Video &Power UTP Transceiver
User Manual
Application
HD Cameras
LCD
DVR
10A
250V
LN
CCC
AC IN
Power&HD Video UTP
Receiver
Power&HD Video
UTP Transmitter
Video Input
Switch
Video LED
Power LED

Specification
Product parameters are subject to change without prior notice!
HD Analog Video &Power UTP Transceiver
34
Transmission Distance Table(Recommended)
Signal T ype
HDCVI
720P
HDCVI
1080P
AHD
720P/960P
AHD
1080P
HDTVI
720P
HDTVI
1080P
Transmission
Distance
500m
400m
700m
400m
300m
300m
Adjustment Diagram
HDCVI720P
0-300m
300-400m
400-500m
Switch Setting
RM Unit
SV U nit
RM Unit
SV Unit
RM Unit
SV Unit
The transmission distances of different signals correspond to different switch settings as below:
HDCVI080P
0-150m
150-250m
250-300m
300 400-m
Switch Setting
RM Unit
SV Unit
RM Unit
SV Unit
RM Unit
SV Unit
RM Unit
SV Unit
AHD720P/960P
0-500m
500-700m
Switch Setting
RM Unit
SV Unit
RM Unit
SV Unit
AHD1080P
0-100m
100-400m
400-500m
Switch Setting
RM Unit
SV Unit
RM Unit
SV Unit
RM Unit
SV Unit
HDTVI720P
0-200m
200-300m
300-400m
Switch Setting
RM Unit
SV Unit
RM Unit
SV Unit
RM Unit
SV Unit
HDTVI1080P
0-150m
150-200m
200-250m
250 300-m
Switch Setting
RM Unit
SV Unit
RM Unit
SV Unit
RM Unit
SV Unit
RM Unit
SV Unit
Notice
1) Please follow the steps for troubleshooting if power cuts or image displays abnormally under the
longest transmission distance:
a. Restore switch of SV unit on 5X mark;
b. Reboot;
c. Adjust the switch when DVR works smoothly.
2) There are 2 marks of 10X on RM unit. Right mark features high definition and saturation.
HD Analog Video &Power UTP Transceiver
Item
Parameter
RM Unit
SV Unit
Function
Transfer Signal Number
1x Group(Video+DC Power)
1x Group(Video+DC Power)
Transmission Distance
(Max.)
500m
Power Supply
Voltage Input
DC15-54V
DC48-54V
Voltage Output
12VDC
DC48-54V
Power
Consumption(Max.)
10W
Optional
Video
Performance
& Connector
Video Connector
1×BNC Male)(
Ethernet Port
1×RJ45
Compatible Video Type
HDCVI, HDTVI, A HD, CVBS Signal
Transfer Bandwidth
0-75MHz
RJ45 Indicator
Green Light Solid on: Working Normal;
Off: Not Work or Fault
Yellow Light Solid on: Over-current, Short-circuit;
Off: Working Normal
Anti-interference
>60dB
Protection
Level
Surge Protection of
Power Port
500V Differential-mode P er :IEC61000-4-5
Surge Protection of
Coaxial Port
2KVD ifferential-mode P er:IEC61000-4-5
Surge Protection of
Ethernet Port
Signal L ine-pair : 2KV Differential-mode
Power L ine-pair : 5 00V Differential-mode
P er:IEC61000-4-5
ESD Protection
1a C ontact D ischarge 6 KV
1 b A ir D ischarge 8 KV
Per:IEC61000-4-2
Operation
Environment
Operation Temperature
- ℃- ℃10 55
Storage Temperature
- ℃- ℃45 75
Humidity
0-95%(Non-condensing)
Mechanics
Dimension
113mm×45.5mm×29mm
Material
Refractory A BS P lastics
Color
Black
Weight
65g
Other UTEPO Transceiver manuals
